Getting Started: How to Set Up Your First Connection between n8n and Gravity Forms
The first step to automating with n8n is establishing a secure, authenticated connection between your WordPress site (Gravity Forms) and your n8n instance. This guide walks you through creating a reusable connection profile and the matching JWT credential in n8n.
A connection profile stores the base URL, JWT algorithm, and secret used to sign requests from Gravity Forms to n8n. You can reuse this connection across multiple forms and feeds.
Prerequisites for your n8n Gravity Forms connection
- WordPress admin access with Gravity Forms and the GravityWP – n8n Connector add-on installed and activated.
- Access to your n8n instance (self-hosted or cloud) with permission to create Credentials.
Step 1: Open the n8n Connector settings in WordPress
First, you need to go to the central settings page for the n8n Connector.
- In your WordPress dashboard, go to Forms → Settings.
- Click the n8n Connector tab.
You’ll land on the page where all n8n connections are managed.
Step 2: Add a new n8n Gravity Forms connection
Click Add New to create a connection profile.
Step 3: Configure your n8n Gravity Forms connection details
Now it’s time to fill in the details for your n8n instance. Each field is important for establishing a secure and reliable link.
- n8n Name – A friendly label (e.g., “Production n8n” or “Client X n8n”).
- Slug – A permanent, URL-friendly ID (e.g.,
production-n8n).- Important: The slug can’t be changed later and is used as the JWT
kid(Key ID) in the token header. Pick something stable.
- Important: The slug can’t be changed later and is used as the JWT
- Webhook URL – The base URL of your n8n instance (no webhook path). Example:
https://n8n.example.com - Algorithm – The JWT signing algorithm. HS256 is the recommended default.
- Secret Token – Auto-generated by the GravityWP n8n Connector when you create the connection.
- Click Copy to use this exact value in n8n (next step). Keep it secure.
Click Save to create the connection.
Step 4: Create the matching JWT credential in n8n
Now that you have your Secret Token from the Gravity Forms plugin, you need to create a corresponding credential inside your n8n instance. This tells n8n how to verify that incoming requests from your forms are authentic and secure.
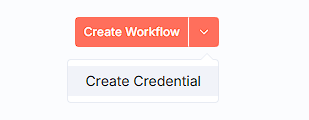
- In n8n, open the button next to Create Workflow and choose Create Credential.
- In the credential type list, search for JWT and select JWT Auth.
- Configure the credential:
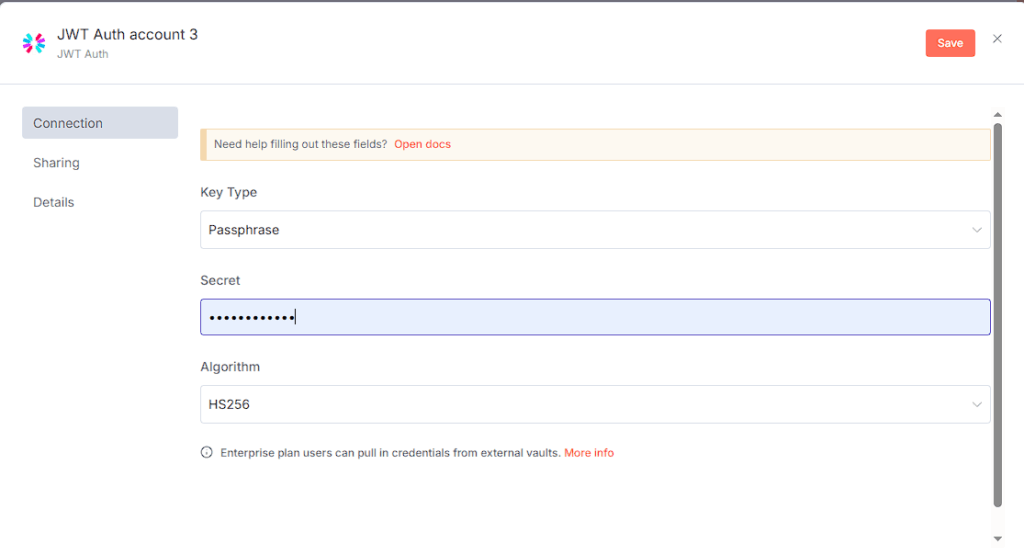
- Key Type – Passphrase.
- Secret – Paste the exact Secret Token from your GravityWP n8n connection.
- Algorithm – HS256 (must match the WordPress connection).
Note: You will not see fields like “Auth Header Name” or “Auth Header Value Prefix” here. That’s expected the JWT Auth credential plus the Webhook node handle the authentication automatically.
What you’ve accomplished with your n8n Gravity Forms connection
- WordPress and n8n now share a verified JWT setup (same secret + algorithm).
- The connection profile is reusable across forms and feeds.
Next steps: Set up the feed to send Gravity Forms submissions to a n8n workflow. This guide shows you how to connect your form to a specific n8n Webhook and (optionally) map the response back into the entry.