API Key Authentication in GravityWP API Connector
API Key authentication is a common way for APIs to verify requests using a secret key value (your “API key”).
Instead of logging in as a user, your API requests include that key, and the API checks whether it’s valid.
In API Connector, API Key authentication works by attaching your key to each request in a header or query string, based on the provider’s rules.
In API Connector, the API Key method lets you:
- Save a key once in an API connection
- Choose where the key is sent (Header or Query String)
- Set the parameter name used by the API provider (example: x-api-key)
- Use the connection inside your feeds so authentication is applied automatically
When to use API Key authentication
Use API Key when the provider tells you something like:
- “Send your API key in a header”
- “Add x-api-key: YOUR_KEY to every request”
- “Include api_key=YOUR_KEY in the query string”
- “Use an API key for server access (no OAuth needed)”
When API Key is not the best fit
If your provider provides a standard Authorization header format, use Bearer Token authentication instead of API Key authentication.
Choose a different method if the provider requires:
- OAuth 2.0 (authorization screen + redirect URL)
- Bearer token inside the Authorization: Bearer … header
- Basic Auth (username + password)
API Key is usually simpler, but it is also less standardized than Bearer tokens and OAuth. Every provider can name the key differently and place it differently.
Key fields explained
API Key
This is the secret value provided by your API platform.
Think of it like a password for your API requests.
API Key Parameter Name
This is the name the API expects for the key.
Examples you may see in provider docs:
- x-api-key
- x-key
- api_key
- apikey
- key
Important: The parameter name must match the provider’s documentation exactly (including dashes and underscores).
API Key Placement
This controls where API Connector sends the key:
1) Header
The key is sent in the request headers under your parameter name.
Example format (conceptually):
- Header name: x-api-key
- Header value: your API key
This is common because keys are not exposed in URLs.
2) Query String
The key is appended to the URL as a query parameter.
Example format (conceptually):
- ?api_key=YOUR_KEY
This is still used by some services, but URLs can get logged in more places, so many providers prefer headers.
Setup overview
Most API Key setups follow the same pattern:
- Get an API key from your provider
- Create a new API connection in API Connector
- Choose API Key as the authentication method
- Enter:
- API Key
- API Key Parameter Name
- API Key Placement (Header or Query String)
- API Key
- Save the connection
- Select this connection inside your API feeds
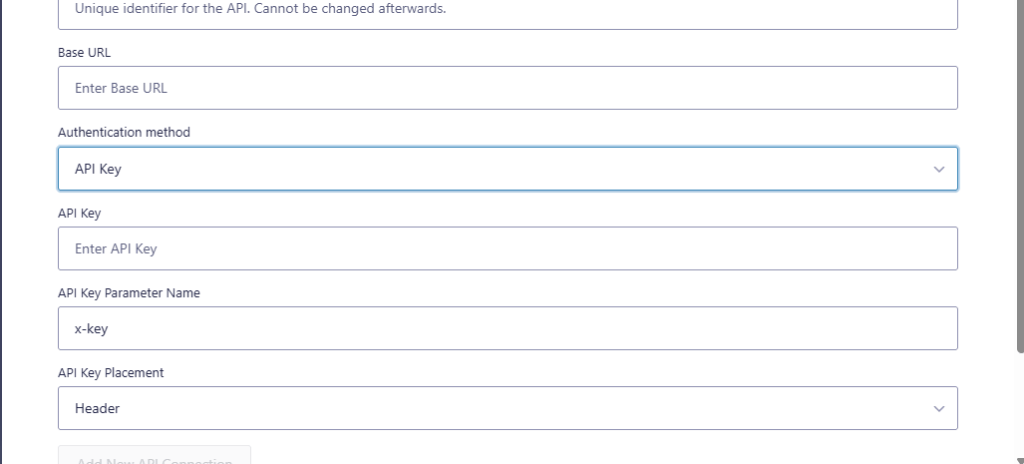
Create an API Key connection in API Connector
Go to the API Connector settings area in WordPress and add a new API connection.
Fill in these fields:
- API Name: a clear label you will recognize later
- Slug: a unique identifier for the connection (cannot be changed later)
- Base URL: the API’s base domain (example format: https://api.example.com)
- Authentication method: API Key
- API Key: paste your key
- API Key Parameter Name: the header or query name required by the API (example shown: x-key)
- API Key Placement: Header (or Query String, depending on provider docs)

Once saved, API Key authentication is applied automatically to any feed that uses this connection.
How API feeds use this connection
Once the API Key connection is saved, you can select it inside an API feed.
That matters because:
- You don’t retype the key in every feed
- The chosen placement (Header or Query String) stays consistent
- You can reuse the same connection across multiple forms and feeds that call the same API
If the API provider changes requirements (new key, new parameter name, new placement), you update the connection and then retest the feeds using it.
Choosing the right parameter name and placement
Your provider documentation will typically spell out one of these patterns:
If docs say “send in header”
Use:
- API Key Placement: Header
- API Key Parameter Name: whatever the docs say (common: x-api-key)
If docs say “send as query parameter”
Use:
- API Key Placement: Query String
- API Key Parameter Name: whatever the docs say (common: api_key)
Common use cases
API Key authentication is commonly used for:
- Data services and lookups (enrichment, validation, search)
- Internal tools with a single shared server key
- Services that provide a long-lived key without OAuth
- APIs that are meant for “system access” rather than user-based access
Security notes (practical, non-technical)
- Treat API keys like passwords. Only admins should have access to them.
- Prefer Header placement when possible (many providers recommend it).
- If you suspect a key was exposed, rotate it in the provider dashboard and update your connection.
Troubleshooting
Most API Key authentication issues come from a wrong parameter name or the wrong placement (Header vs Query String).
401 Unauthorized or 403 Forbidden
Most often caused by one of these:
- Wrong API key value
- Wrong API Key Parameter Name (typo or wrong format)
- Wrong placement (provider expects header but you used query string, or vice versa)
Requests work in Postman but not in API Connector
Compare these details:
- Header name used in Postman
- Whether Postman used query params instead
- The exact base URL and endpoint paths
Key works for some endpoints but not others
Some providers restrict keys by endpoint or permission level.
Check whether the provider requires different keys, scopes, or plan level access for the endpoint you’re calling.
Related documentation
FAQ
An API key is often sent using a custom header name (like x-api-key) or query parameter.
A Bearer token usually uses a standard header format: Authorization: Bearer <token>.
Use what the provider requires.
If both are allowed, header is often preferred because keys are not placed in the URL.
Use the exact name from the provider docs (example: x-api-key).
If the name is wrong, the API will not “see” your key.
Yes. If multiple feeds call the same API and use the same key rules, reusing one connection keeps things consistent.