Do you want to create Zoom meetings from a Gravity Forms booking form without copying meeting details by hand?
In this tutorial, you will build a practical Gravity Forms Zoom integration using GravityWP API Connector. When someone submits a booking form on your WordPress site, Gravity Forms will send the meeting details to Zoom and create a new Zoom meeting.
We tested this workflow with a simple booking form. The final setup created a Zoom meeting, saved the Zoom meeting ID, saved the join URL, saved the start URL, and stored the full Zoom API response in the Gravity Forms entry.
The workflow looks like this:
Gravity Forms booking form
→ GravityWP API Connector gets a Zoom access token
→ GravityWP API Connector creates the Zoom meeting
→ Zoom meeting details are saved back to Gravity Forms
This tutorial uses the Zoom API and a Zoom Server-to-Server OAuth app. It does not use Zapier.
Zoom’s Meeting APIs allow developers to work with Zoom Meetings and Webinars programmatically, and the Zoom Meetings API server is https://api.zoom.us/v2. Zoom API requests also need an access token, which can be created with Server-to-Server OAuth.
What does this Gravity Forms Zoom integration do?
This Gravity Forms Zoom integration creates a real booking workflow.
When a user submits a Gravity Forms form, GravityWP API Connector first requests a Zoom access token. Then it uses that access token to create a scheduled Zoom meeting.
After Zoom creates the meeting, Gravity Forms stores the returned meeting details in the entry.
The setup saves:
- Zoom Meeting ID
- Zoom Join URL
- Zoom Start URL
- Full Zoom Meeting Response
This is useful for discovery calls, onboarding calls, consultation forms, support sessions, internal appointments, and other booking workflows.
This tutorial creates a Zoom meeting. It does not create a Zoom webinar registration, register attendees for a webinar, or build a full webinar registration form. Zoom webinars may need different endpoints, scopes, or Zoom plan access.
What you need to integrate Gravity Forms with Zoom
This tutorial is part of the wider Gravity Forms integrations workflow, where form submissions can send data to other apps through APIs.
Before you start, make sure you have:
- A WordPress site
- Gravity Forms installed
- GravityWP API Connector installed
- A Zoom account
- Access to Zoom App Marketplace
- A Zoom Server-to-Server OAuth app
- Permission to create meetings in Zoom
You will also need these values from your Zoom app:
- Account ID
- Client ID
- Client Secret
Keep these credentials private. Do not add them to screenshots, public documentation, or frontend form fields.
Zoom’s Server-to-Server OAuth flow uses app credentials to request an access token. Then the access token is used to make Zoom API requests.
Step 1: Create a Zoom Server-to-Server OAuth app
First, go to the Zoom App Marketplace.
Then go to:
Develop → Build App
Choose:
Server-to-Server OAuth App
Name the app:
Gravity Forms Zoom Meeting Test
A Server-to-Server OAuth app is a good fit for this tutorial because the WordPress site needs to create Zoom meetings inside your own Zoom account. The person submitting the Gravity Forms booking form does not need to connect their own Zoom account.
After creating the app, open the App Credentials section and copy these values into a private note:
- Account ID
- Client ID
- Client Secret
Do not show the Client Secret in any tutorial screenshot.
Zoom’s documentation explains that Server-to-Server OAuth apps are created in the Zoom App Marketplace and use account credentials for API authentication.
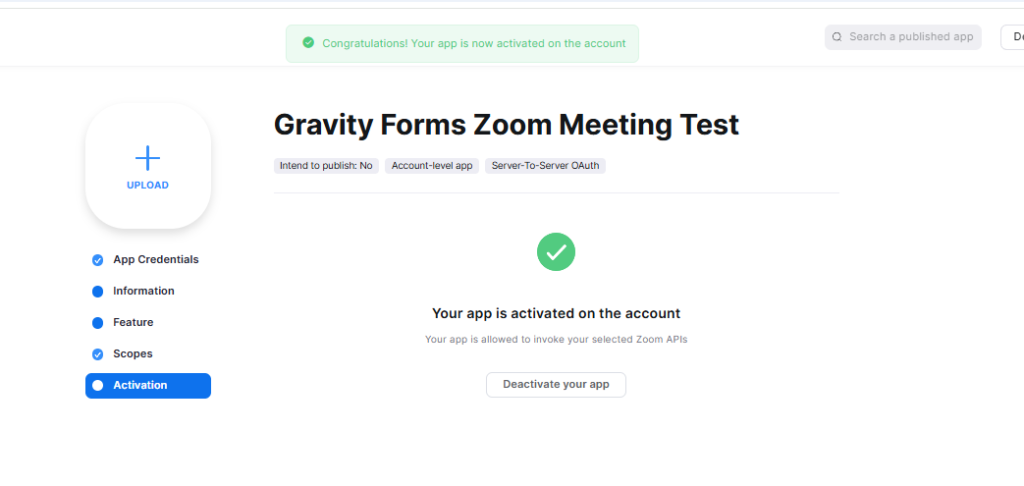
Step 2: Add the Zoom meeting scope and activate the app
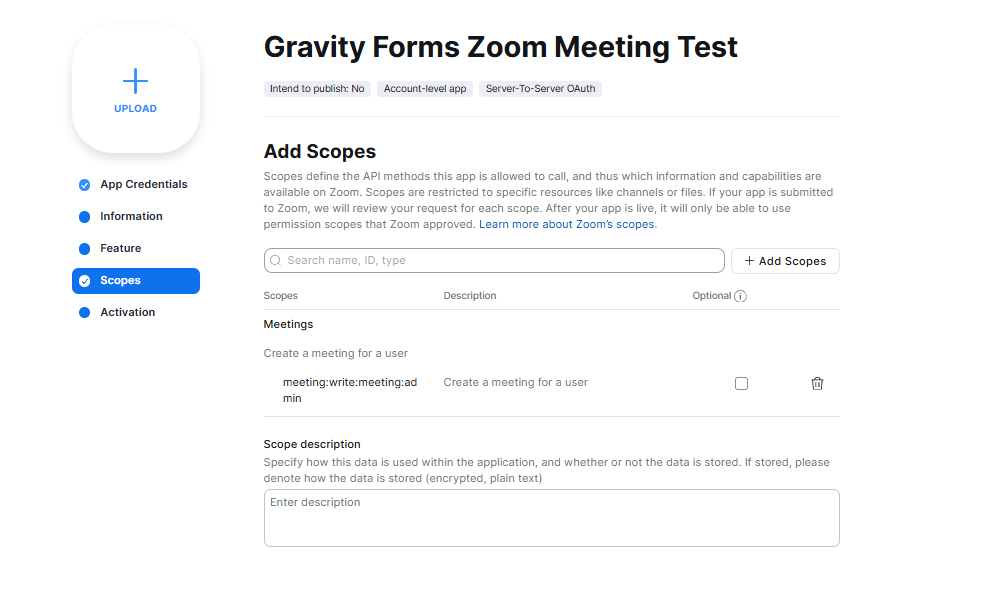
Next, go to the Scopes section in your Zoom app.
Add this meeting scope:
Create a meeting for a user
meeting:write:meeting:admin
This scope allows the app to create a Zoom meeting for a user in your Zoom account.
For this tutorial, you do not need Event Subscriptions. Leave webhook features turned off. Gravity Forms will trigger the workflow when the form is submitted, so we do not need Zoom to send webhook events back to WordPress.
After adding the scope, go to Activation and activate the app.
Step 3: Create the Zoom Booking Form in Gravity Forms
Now create the booking form in WordPress.
Go to:
Forms → New Form
Name the form:
Zoom Booking FormAdd these public fields:
| Field label | Field type |
|---|---|
| Meeting Topic | Single Line Text |
| Booker Name | Name |
| Booker Email | |
| Meeting Date | Single Line Text |
| Meeting Time | Single Line Text |
| Duration | Number |
| Meeting Notes | Paragraph Text |
For the first test, use simple text fields for Meeting Date and Meeting Time. This makes it easier to send the date and time to Zoom in the expected format.
Use values like this:
Meeting Date: 2026-07-30
Meeting Time: 10:00:00
Together, those values create a Zoom start_time like this:
2026-07-30T10:00:00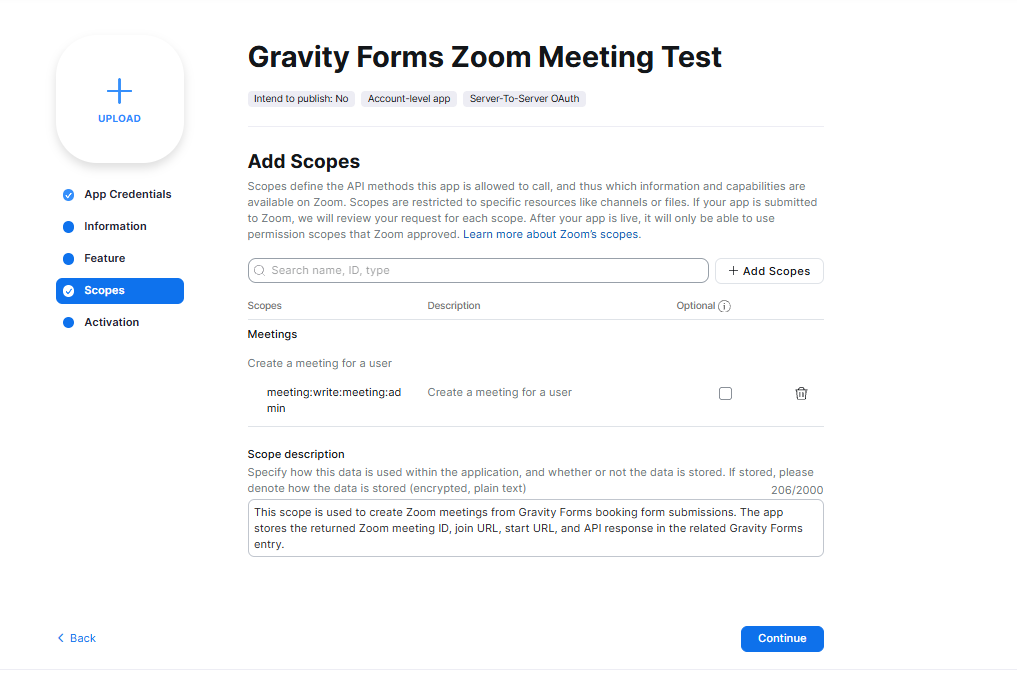
Step 4: Add hidden admin fields for Zoom data
Add these fields to the same Gravity Forms form:
| Field label | Field type | Visibility |
|---|---|---|
| Zoom Access Token | Paragraph Text | Administrative |
| Zoom Token Response | Paragraph Text | Administrative |
| Zoom Meeting ID | Single Line Text | Administrative |
| Zoom Join URL | Single Line Text | Administrative |
| Zoom Start URL | Paragraph Text | Administrative |
| Zoom Meeting Response | Paragraph Text | Administrative |
These fields should be set to Administrative visibility.
They are not for the person filling out the form. They are used to store the Zoom API results in the Gravity Forms entry.
This is important because the Zoom access token and Zoom start URL are sensitive. The start URL is for the meeting host and should not be shown publicly.
Gravity Forms documentation explains that Administrative visibility hides a field from the public form while keeping it available in the admin area.
Step 5: Create the Zoom OAuth Token API connection
Now create the first API connection in GravityWP API Connector.
This API connection gets the temporary Zoom access token.
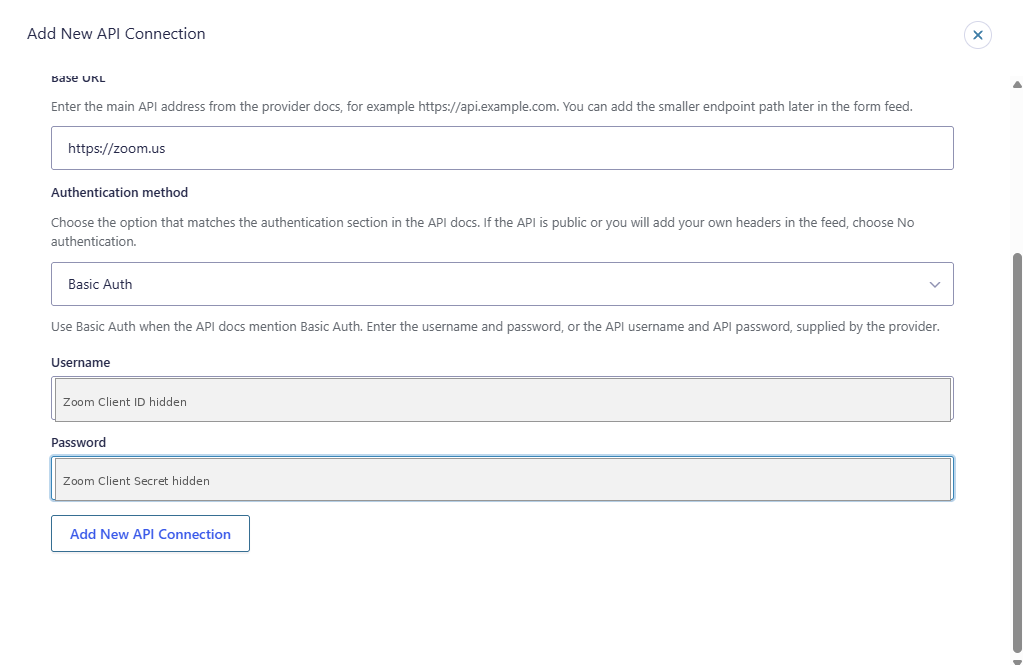
Go to the API Connector settings and add a new API connection.
Use these settings:
| Setting | Value |
|---|---|
| API Name | Zoom OAuth Token |
| Base URL | https://zoom.us |
| Authentication method | Basic Auth |
| Username | Your Zoom Client ID |
| Password | Your Zoom Client Secret |
This may look confusing at first. The app is a Server-to-Server OAuth app, but the token request itself uses Basic Auth with the Client ID and Client Secret.
The token request gets an access token from Zoom. That token is then used in the second API request to create the Zoom meeting.
Zoom says Server-to-Server OAuth tokens are valid for one hour.
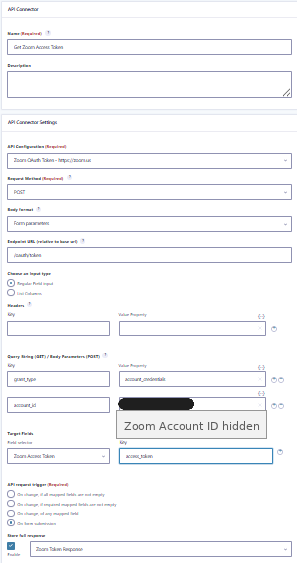
Step 6: Create the “Get Zoom Access Token” API Connector feed
Go to:
Zoom Booking Form → Settings → API Connector
Create a new feed.
Use these settings:
| Setting | Value |
|---|---|
| Feed name | Get Zoom Access Token |
| API Configuration | Zoom OAuth Token |
| Request Method | POST |
| Body format | Form parameters |
| Endpoint URL | /oauth/token |
| API request trigger | On form submission |
In the Query String / Body Parameters section, add:
| Key | Value |
|---|---|
grant_type | account_credentials |
account_id | Your Zoom Account ID |
For the target field mapping, use:
| Field selector | Response key |
|---|---|
| Zoom Access Token | access_token |
Then enable Store full response and select:
Zoom Token ResponseGravityWP API Connector can store the full API response in a text field when the request triggers on form submission. This is useful for testing and troubleshooting.
Step 7: Create the Zoom Meetings API connection
Next, create a second API connection.
This one sends the meeting details to the Zoom API.
Go to the API Connector settings and add another API connection.
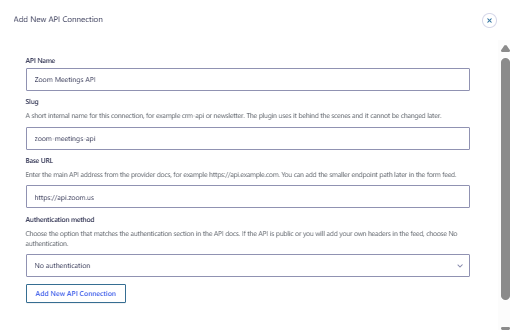
Use these settings:
| Setting | Value |
|---|---|
| API Name | Zoom Meetings API |
| Base URL | https://api.zoom.us |
| Authentication method | No authentication |
Use No authentication here because the Authorization header will be added inside the feed. That header will use the access token saved by the first feed.
Step 8: Create the “Create Zoom Meeting” API Connector feed
Go back to:
Zoom Booking Form → Settings → API Connector
Create another feed.
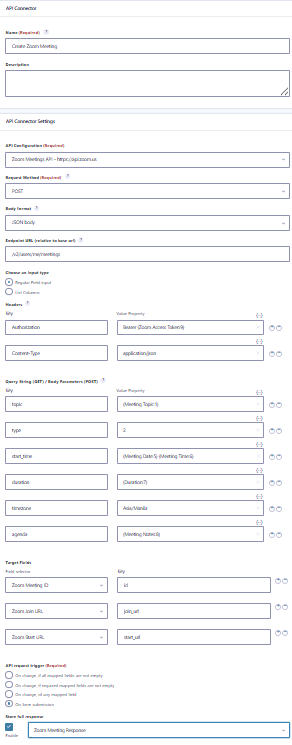
Use these settings:
| Setting | Value |
|---|---|
| Feed name | Create Zoom Meeting |
| API Configuration | Zoom Meetings API |
| Request Method | POST |
| Body format | JSON body |
| Endpoint URL | /v2/users/me/meetings |
| API request trigger | On form submission |
Zoom’s Meeting API uses POST /users/{userId}/meetings to create meetings. The API server is https://api.zoom.us/v2, so using the base URL https://api.zoom.us with the endpoint /v2/users/me/meetings gives the correct request URL.
Step 9: Add the Zoom meeting request headers
In the Headers section of the Create Zoom Meeting feed, add:
| Key | Value |
|---|---|
Authorization | Bearer {Zoom Access Token} |
Content-Type | application/json |
Use the merge tag picker to insert the correct merge tag for the Zoom Access Token field.
It may look something like this:
Bearer {Zoom Access Token:8}Your field ID may be different, so use the merge tag picker instead of copying this example exactly.
Step 10: Add the Zoom meeting body parameters
In the Query String / Body Parameters section, add these values:
| Key | Value |
|---|---|
topic | {Meeting Topic} |
type | 2 |
start_time | {Meeting Date}T{Meeting Time} |
duration | {Duration} |
timezone | Asia/Manila |
agenda | {Meeting Notes} |
Use your actual Gravity Forms merge tags.
For example, your values may look like this:
topic → {Meeting Topic:1}
start_time → {Meeting Date:4}T{Meeting Time:5}
duration → {Duration:6}
agenda → {Meeting Notes:7}
The exact field IDs depend on your form.
Here is what each value does:
| Key | Purpose |
|---|---|
topic | Sets the Zoom meeting title |
type | 2 creates a scheduled meeting |
start_time | Sets the meeting date and time |
duration | Sets the meeting length in minutes |
timezone | Tells Zoom which timezone to use |
agenda | Sends notes or context to Zoom |
In our test, we used:
timezone → Asia/ManilaChange this if your site or meeting host uses a different timezone.
Step 11: Map the Zoom response back to Gravity Forms
In the Target Fields section, map the Zoom response values back into your Gravity Forms entry.
Use:
| Field selector | Response key |
|---|---|
| Zoom Meeting ID | id |
| Zoom Join URL | join_url |
| Zoom Start URL | start_url |
Then enable Store full response and select:
Zoom Meeting ResponseThis lets you confirm the full Zoom response after each test.
Step 12: Test the Gravity Forms to Zoom workflow
Now submit a test entry.
Use this sample:
| Field | Sample value |
|---|---|
| Meeting Topic | Discovery Call Test |
| Booker Name | Jon Alexander Castillo |
| Booker Email | jonalexander@gravitywp.com |
| Meeting Date | 2026-07-30 |
| Meeting Time | 10:00:00 |
| Duration | 30 |
| Meeting Notes | This is a test Zoom meeting created from Gravity Forms. |
After submitting the form, open the Gravity Forms entry.
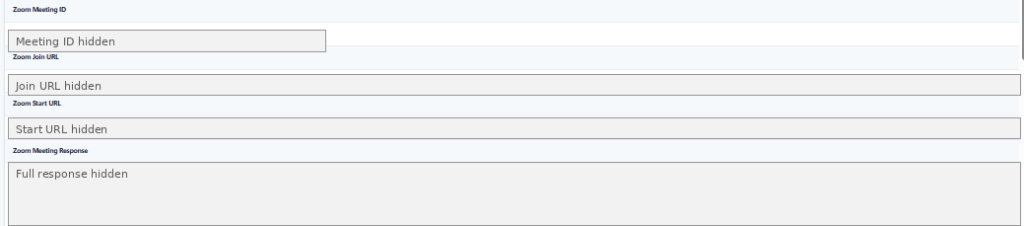
You should see values saved in these fields:
- Zoom Access Token
- Zoom Token Response
- Zoom Meeting ID
- Zoom Join URL
- Zoom Start URL
- Zoom Meeting Response
In our test, Zoom returned a meeting ID and Gravity Forms saved the meeting details back into the entry.
Then check Zoom:
Zoom Web App → Meetings → Upcoming
In our test, the meeting appeared in Zoom as:
Discovery Call Test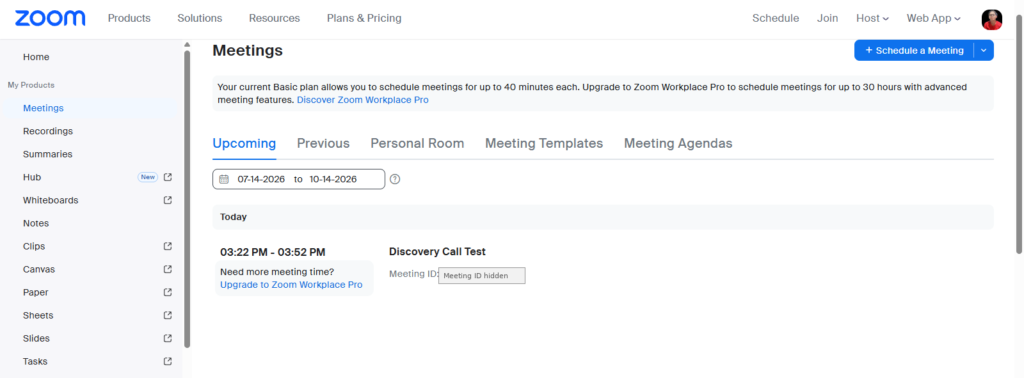
That confirms the full Gravity Forms to Zoom workflow is working.
Why does this setup use two API Connector feeds?
This setup uses two feeds because Zoom requires an access token before the meeting request can run.
The first feed gets the token:
Get Zoom Access TokenThe second feed uses that token:
Create Zoom MeetingThe workflow is:
Form submission
→ Get Zoom access token
→ Use token to create Zoom meeting
→ Save Zoom meeting details
This is why the hidden Zoom Access Token field matters. It stores the token from the first request so the second request can use it in the Authorization header.
What about Zoom webinars and registration forms?
This tutorial creates Zoom meetings, not Zoom webinars.
That matters because Zoom webinar workflows can be different. A Zoom webinar registration form may need different API endpoints, scopes, fields, and Zoom plan access.
For example, a webinar registration workflow may involve:
- Zoom webinar
- Webinar registration
- Webinar ID
- Registrant details
- Zoom registration
- Registration form fields
This tutorial does not register attendees for a Zoom webinar. It creates a scheduled Zoom meeting from a Gravity Forms booking form.
If your goal is webinar registration, test that as a separate workflow.
Troubleshooting Gravity Forms and Zoom API errors
If the integration does not work on the first try, check these common issues.
The Zoom access token is not saved
Check:
- The Client ID is correct
- The Client Secret is correct
- The Account ID is correct
- The Base URL is https://zoom.us
- The endpoint is /oauth/token
- The grant_type value is account_credentials
- The response key is access_token
If any of these values are wrong, Zoom will not return the token.
The Zoom meeting is not created
Check:
- The Zoom Access Token field is filled
- The Authorization header starts with Bearer
- The endpoint is /v2/users/me/meetings
- The request method is POST
- The body format is JSON body
- The Zoom app has the create meeting scope
Also check that your token feed runs before the meeting feed.
The meeting time is wrong
Check:
- Meeting Date format
- Meeting Time format
- Timezone value
In our test, we used:
2026-07-30T10:00:00with:
Asia/ManilaIf your timezone is different, update the timezone value in the feed.
The Zoom Join URL is not saved
Check the response mapping.
Use:
Zoom Join URL → join_urlAlso check the full Zoom Meeting Response field to confirm that the join_url key exists in the response.
The Zoom Start URL is not saved
Check the response mapping.
Use:
Zoom Start URL → start_urlThe start URL is sensitive. Keep it in an Administrative field and do not display it on the public form.
The workflow works once, then fails later
Zoom access tokens expire. In this setup, the token feed runs again on each form submission, then the meeting feed uses the token saved in the entry.
If the meeting feed runs before the token field is filled, the meeting request may fail. In our test, the two-feed setup worked because the token feed ran first and the meeting feed used the saved token.
When should you use n8n instead?
This API Connector setup is useful for a simple no-code workflow:
- Create a Zoom meeting from a Gravity Forms submission
- Save the Zoom meeting ID
- Save the Zoom join link
- Save the Zoom start URL
- Store the full API response
For more advanced automation, you may want to use n8n with Gravity Forms.
n8n may be a better fit when you need:
- Conditional routing
- Different Zoom hosts
- Follow-up emails
- Calendar invites
- CRM updates
- Slack or Telegram notifications
- Multi-step automation
You can also use GravityWP’s n8n Connector if the main goal is to send Gravity Forms submissions into an n8n workflow.
Conclusion
You now have a tested Gravity Forms Zoom integration that creates a Zoom meeting from a booking form submission.
The setup uses GravityWP API Connector, a Zoom Server-to-Server OAuth app, and the Zoom Meetings API. API Connector first gets a Zoom access token, then creates the Zoom meeting, then saves the returned meeting details back to Gravity Forms.
This workflow can reduce manual tasks when your team collects meeting requests in WordPress and needs Zoom meetings created automatically.
FAQ
Yes. In our test, Gravity Forms created a Zoom meeting through GravityWP API Connector and the Zoom API.
No. This setup uses GravityWP API Connector and Zoom’s API. Zapier is not required.
Yes. The tested workflow saved the returned join_url value in a Gravity Forms field.
Yes, but keep it hidden. The Zoom start URL is for the host and should not be shown on the public form.
No. This tutorial creates Zoom meetings. Zoom webinar registration may require different endpoints, scopes, fields, and Zoom plan access.
Yes. After the join URL is saved in Gravity Forms, you can use it in a notification email. Test that as a separate step after confirming the meeting creation works.
Yes. This setup works well for booking forms, discovery calls, support appointments, onboarding sessions, and internal meetings.
Our Premium add-ons for Gravity Forms
Advanced Number Field
Functionality for Number Fields, like rounding or only absolute numbers, fixed point notation, range calculation, custom units like % or m2 & show as slider.

DateTime Field
The GravityWP - DateTime Field add-on adds a dedicated Date/Time field to Gravity Forms so users can enter both a date and a time in a single input.

Entry to Database
Integrates Gravity Forms with internal or external databases, offering flexible mapping of form fields to database columns and real-time synchronization between entries and database rows.

n8n Connector
Connect Gravity Forms to n8n and automate your workflows with secure, flexible, and powerful webhooks. Go beyond simple notifications and build advanced, two-way automations.
Read tutorials about
How to Validate Repeatable Contact Rows in Gravity Forms
Learn how to validate repeatable Gravity Forms List field rows with GravityWP List Text. This tutorial shows how to add email and regex validation, test invalid values, and confirm that valid team roster data is stored correctly.
Gravity Forms Airtable Integration: Create Records From Form Submissions
Learn how to build a Gravity Forms Airtable integration with GravityWP API Connector. Send form submissions to Airtable, create new records automatically, and save the returned Airtable Record ID and response back to Gravity Forms.

Gravity Forms Asana Integration: Create Tasks From Form Submissions
Learn how to connect Gravity Forms to Asana with GravityWP API Connector. This tested workflow creates Asana tasks from form submissions and saves the returned task ID and URL back to Gravity Forms.

Gravity Forms Google Calendar Integration: Create Events From Form Submissions
Connect Gravity Forms to Google Calendar with GravityWP API Connector. Learn how to create calendar events from form submissions, map event details, configure OAuth 2.0, handle time zones, and save the returned Event ID and URL.