You can connect Gravity Forms to Airtable and automatically create a new Airtable record after a form submission using GravityWP API Connector.
In our tested workflow, Gravity Forms sent the request title, requester details, department, priority, request details, and due date to an Airtable table. Airtable then returned the new Record ID and creation time, which GravityWP API Connector saved back into the original Gravity Forms entry.
The completed workflow is:
Gravity Forms submission → GravityWP API Connector → Airtable API → Airtable record → returned data saved to Gravity Forms
This tutorial follows the configuration we successfully tested in August 2026.
What does this Gravity Forms Airtable integration do?
This workflow turns each Gravity Forms submission into a structured Airtable record.
You will:
- Build a Gravity Forms client request form
- Create matching fields in Airtable
- Create an Airtable Personal Access Token
- Connect GravityWP API Connector to the Airtable API
- Find the Airtable Base ID and Table ID
- Send Gravity Forms data with a POST request
- Test record creation with one field first
- Expand the feed to all seven form fields
- Save the Airtable Record ID and Created Time in Gravity Forms
- Verify the final record in both systems
This is a direct API workflow. It does not require Zapier or another automation platform between Gravity Forms and Airtable.
It is also not a continuous two-way sync. This tutorial specifically sends a Gravity Forms submission to Airtable and saves selected values returned by Airtable.
What do you need to connect Gravity Forms to Airtable?
Before you begin, you need:
- WordPress
- Gravity Forms
- GravityWP API Connector
- An Airtable account
- An Airtable base
- An Airtable table
- An Airtable Personal Access Token
Airtable now uses Personal Access Tokens for individual API access rather than the old API keys. PATs let you control both the API scopes and the bases that a token can access.
Step 1: How do you create the Gravity Forms client request form?
Create a new Gravity Form.
We named our test form:
Airtable Client Request Form
Add these fields:
| Field | Gravity Forms field type |
|---|---|
| Request Title | Single Line Text |
| Requester Name | Name |
| Requester Email | |
| Department | Drop Down |
| Priority | Drop Down |
| Request Details | Paragraph Text |
| Due Date | Date |
Our final field IDs were:
| Field | ID |
|---|---|
| Request Title | 1 |
| Requester Name | 3 |
| Requester Email | 4 |
| Department | 5 |
| Priority | 6 |
| Request Details | 7 |
| Due Date | 8 |
Your IDs may be different. Always use the merge tags generated by your own form.
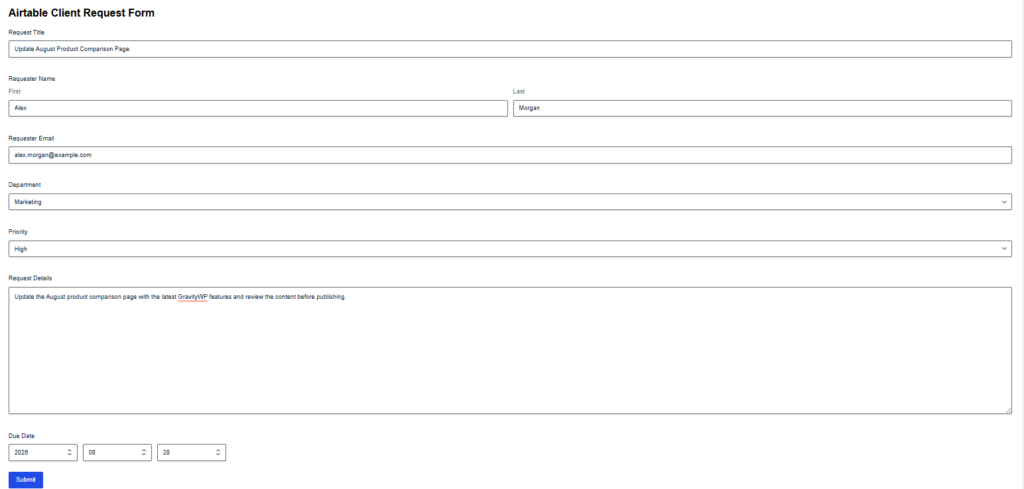
Which Department choices should you use?
For our test, we used:
- Marketing
- Sales
- Support
- Administration
These values were also added as options in the matching Airtable Single Select field.
Which Priority choices should you use?
We used:
- Low
- Normal
- High
- Urgent
Again, these matched the options configured in Airtable.
What date format should you use?
Open the Due Date field settings and set its Date Format to:
yyyy-mm-dd
This produced a value such as:
2026-09-18
which worked in our final Airtable record test.
Step 2: Which Gravity Forms fields should store the Airtable response?
Add three more fields:
| Field | Purpose |
|---|---|
| Airtable Record ID | Stores the ID returned for the new Airtable record |
| Airtable Created Time | Stores the Airtable creation timestamp |
| Airtable API Response | Stores the full JSON response |
These are storage fields. Visitors do not need to enter them.
Use a Paragraph Text field for Airtable API Response because the returned JSON can be much longer than a normal text value.
Saving the response is especially useful during testing because you can see exactly what Airtable returned before deciding which individual response keys you want to store.
Step 3: How do you create the Airtable table?
In Airtable, create a base and table for the form submissions.
We used a base called:
Client Requests
and a table called:
Requests
Our Airtable table contained:
| Airtable field | Field type |
|---|---|
| Request Title | Single line text |
| Requester Name | Single line text |
| Requester Email | |
| Department | Single select |
| Priority | Single select |
| Request Details | Long text |
| Due Date | Date |
Keep the Department and Priority options aligned with Gravity Forms.
For Department:
- Marketing
- Sales
- Support
- Administration
For Priority:
- Low
- Normal
- High
- Urgent
The field names matter because those names will be included in the JSON body we send to Airtable.
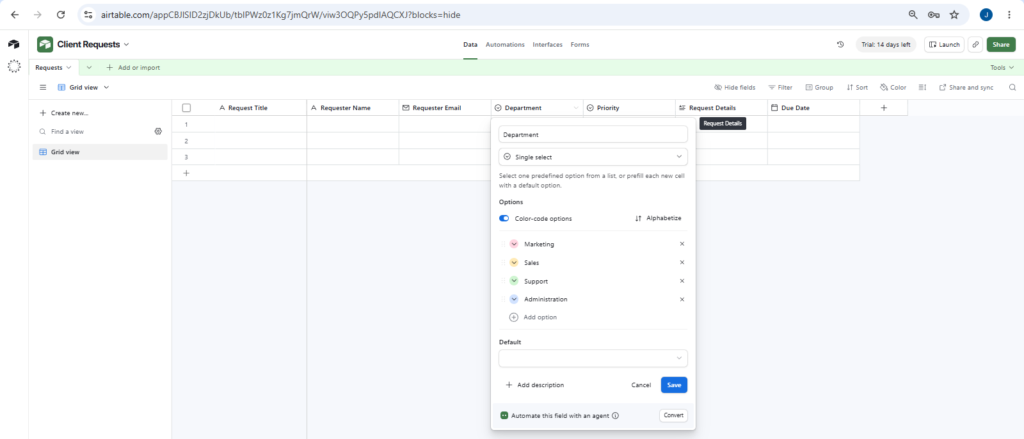
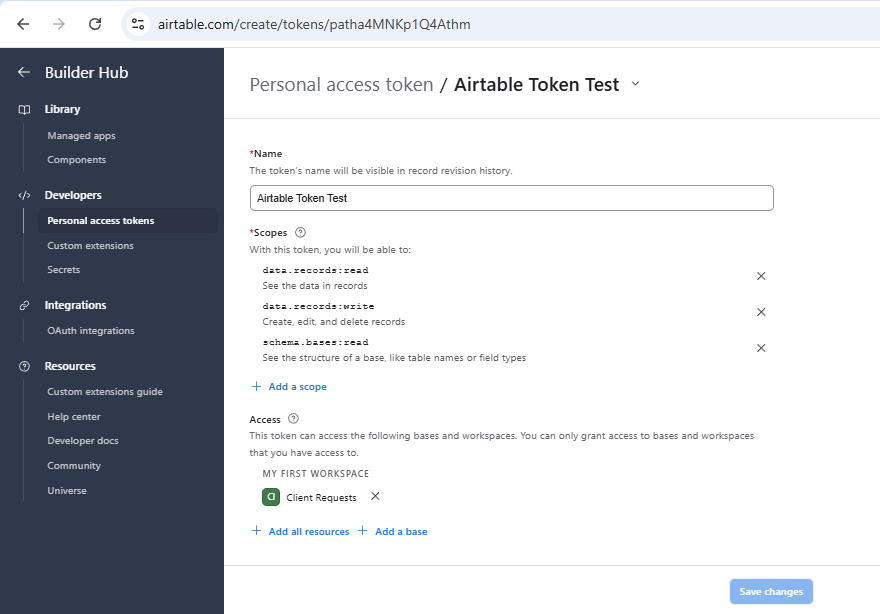
Step 4: How do you create the Airtable Personal Access Token?
Open Airtable’s Developer Hub and go to:
Developers → Personal access tokens
Click Create token.
Give the token a descriptive name. For example:
Gravity Forms Airtable Integration
For the configuration we tested, we enabled:
data.records:read
data.records:write
schema.bases:read
Then under Access, select the Airtable base you want API Connector to use.
Airtable PATs are controlled by both their scopes and their selected resources. They also cannot perform actions that the Airtable user who created the token is not allowed to perform.
For creating records, the important scope in our setup is:
data.records:write
Copy the generated token and store it securely.
Step 5: How do you find the Airtable Base ID and Table ID?
Open the Airtable table in your browser.
An Airtable URL can contain identifiers similar to:
appXXXXXXXXXXXXXX
and:
tblXXXXXXXXXXXXXX
The app... value identifies the base.
The tbl... value identifies the table.
We use these in the Airtable API endpoint:
/v0/YOUR_BASE_ID/YOUR_TABLE_ID
For example:
/v0/appXXXXXXXXXXXXXX/tblXXXXXXXXXXXXXX
Use your own IDs. Do not copy the IDs shown in our screenshots.
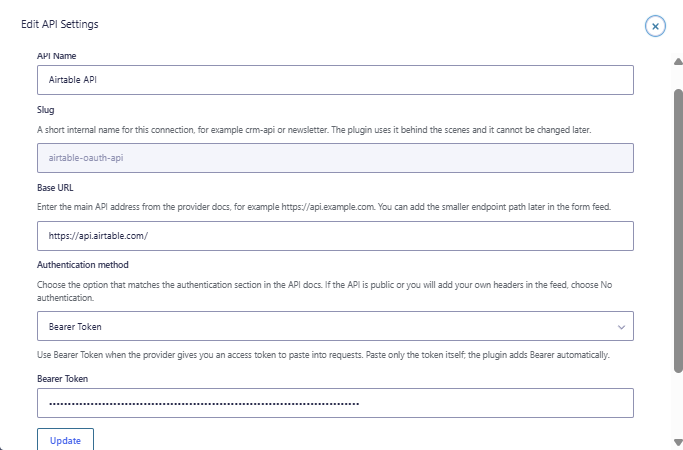
Step 6: How do you connect GravityWP API Connector to Airtable?
In WordPress, go to:
Forms → Settings → API Connector → Add New API Connection
Create a connection with:
| Setting | Value |
|---|---|
| API Name | Airtable API |
| Base URL | https://api.airtable.com/ |
| Authentication method | Bearer Token |
| Bearer Token | Your Airtable PAT |
Paste only the token itself into the Bearer Token field.
Do not add the word Bearer manually.
This follows the same authentication pattern used in GravityWP’s existing Airtable GET tutorial, where API Connector stores the Airtable PAT as a Bearer Token.
Step 7: How do you create the Airtable POST feed?
Open:
Forms → Airtable Client Request Form → Settings → API Connector
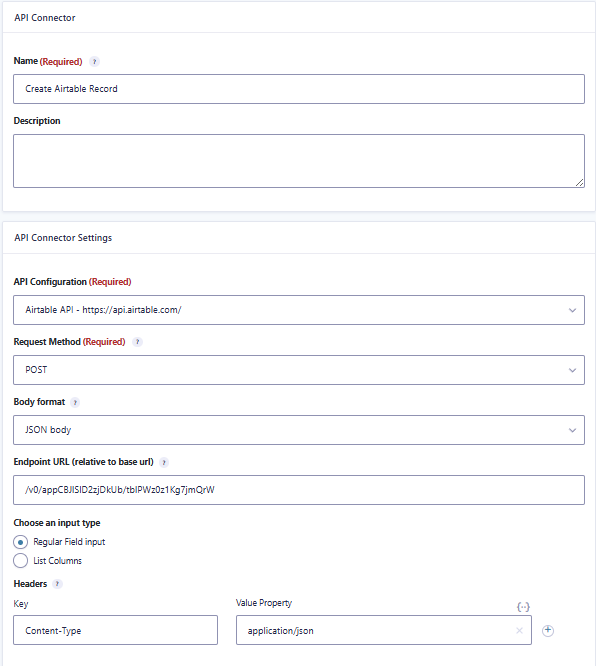
Add a new feed named:
Create Airtable Record
Use:
| Setting | Value |
|---|---|
| API Configuration | Airtable API |
| Request Method | POST |
| Body Format | JSON body |
| Endpoint | /v0/YOUR_BASE_ID/YOUR_TABLE_ID |
| Input Type | Regular Field input |
Add this header:
| Key | Value |
|---|---|
Content-Type | application/json |
Set:
API request trigger → On form submission
For now, don’t map every field.
We first tested record creation using only Request Title. This gave us a much simpler request to validate before building the full workflow.
Step 8: How do you test Airtable record creation with one field?
Under Query String (GET) / Body Parameters (POST), add:
| Key | Gravity Forms value |
|---|---|
fields.Request Title | {Request Title:1} |
Enable:
Store full response → Airtable API Response
For our first successful POST test, we submitted:
Request Title:
Airtable Bearer POST Test
The API request succeeded.
Airtable created a new row containing:
Airtable Bearer POST Test
The full response stored in Gravity Forms contained data similar to:
{
  "id": "recXXXXXXXXXXXXXX",
  "createdTime": "2026-08-22T18:07:36.000Z",
  "fields": {
    "Request Title": "Airtable Bearer POST Test"
  }
}
This was the point where we confirmed that:
Gravity Forms → API Connector → Airtable POST
was working.
Step 9: What did our first Airtable POST test reveal?
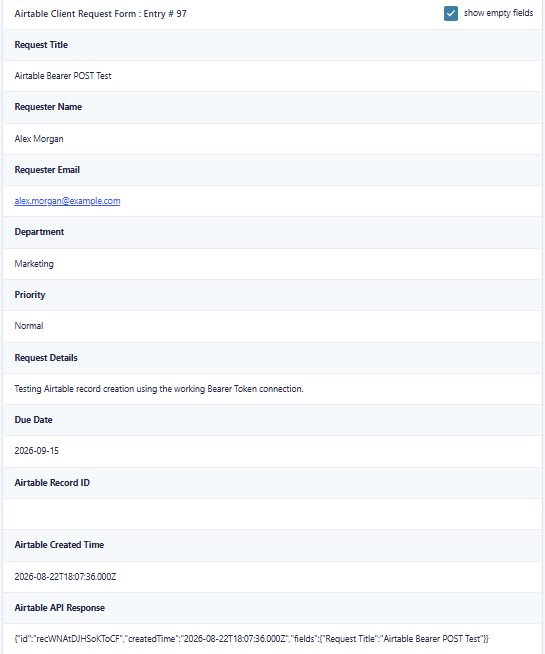
The first POST test created the Airtable record successfully, but it also exposed a small response-mapping mistake.
Our Airtable Created Time field populated correctly.
Our Airtable Record ID field did not.
The reason was simple: the Target Field was initially mapped to the wrong response key.
The Airtable response showed:
"id": "rec..."so the correct Target Field mapping is:
| Gravity Forms field | Response key |
|---|---|
| Airtable Record ID | id |
| Airtable Created Time | createdTime |
After correcting the response key to id, the Record ID populated correctly in the final test.
This is why storing the full response during initial testing is useful. It shows the actual keys returned by the API instead of forcing you to guess them.
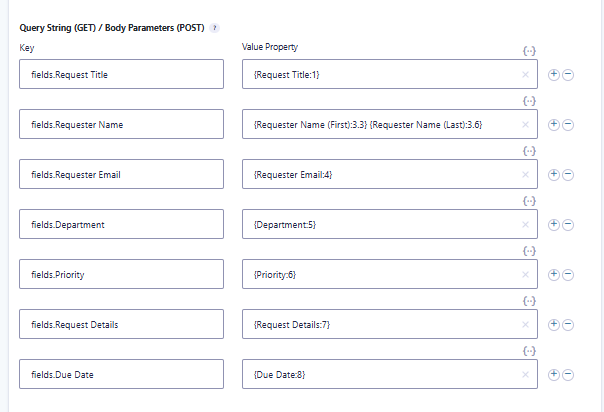
Step 10: How do you map all Gravity Forms fields to Airtable?
Once the one-field POST request worked, we expanded the same feed.
Under Body Parameters (POST), add:
| Airtable JSON path | Gravity Forms value |
|---|---|
fields.Request Title | {Request Title:1} |
fields.Requester Name | {Requester Name (First):3.3} {Requester Name (Last):3.6} |
fields.Requester Email | {Requester Email:4} |
fields.Department | {Department:5} |
fields.Priority | {Priority:6} |
fields.Request Details | {Request Details:7} |
fields.Due Date | {Due Date:8} |
Why do the mappings start with fields.?
Airtable records contain a fields object.
So:
fields.Request Title
places the submitted value inside the Airtable field named Request Title.
Likewise:
fields.Priority
sends the Gravity Forms Priority value to the Airtable Priority field.
Why is there a space between the Requester Name merge tags?
We used:
{Requester Name (First):3.3} {Requester Name (Last):3.6}
Notice the space between the two merge tags.
Our test therefore sent:
Alex Morgan
rather than:
AlexMorgan
That lets one Airtable text column store both parts of the Gravity Forms Name field cleanly.
Step 11: How do you save returned Airtable data in Gravity Forms?
Under Target Fields, configure:
| Gravity Forms field | Airtable response key |
|---|---|
| Airtable Record ID | id |
| Airtable Created Time | createdTime |
Keep:
API request trigger → On form submission
and:
Store full response → Airtable API Response
The two target keys are top-level properties in the record-creation response, so no nested response path is required.
Step 12: How do you run the final Gravity Forms Airtable integration test?
We used a new submission to confirm that the completed workflow worked with all seven mapped fields.
Our final test was:
Request Title:
Prepare September Product Update
Requester Name:
Alex Morgan
Requester Email:
alex.morgan@example.com
Department:
Marketing
Priority:
High
Request Details:
Prepare the September product update with the latest GravityWP changes and send the draft for review.
Due Date:
2026-09-18
Then we submitted the form.
The API Connector feed processed the entry without an API request error.
Step 13: How do you verify the new record in Airtable?
Open your Airtable table after submitting the form.
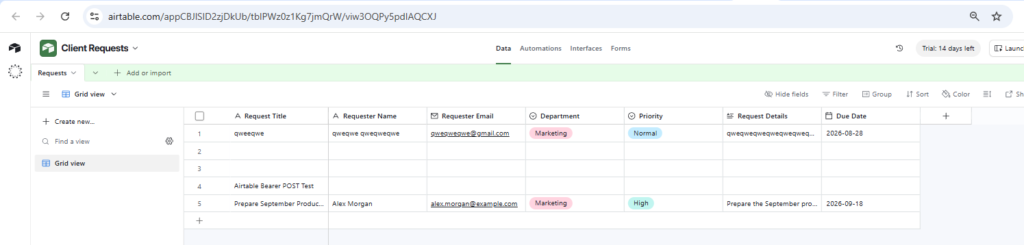
Our final test created a new Airtable row containing:
| Airtable field | Stored value |
|---|---|
| Request Title | Prepare September Product Update |
| Requester Name | Alex Morgan |
| Requester Email | alex.morgan@example.com |
| Department | Marketing |
| Priority | High |
| Request Details | Prepare the September product update with the latest GravityWP changes and send the draft for review. |
| Due Date | 2026-09-18 |
This confirmed that the field mappings were dynamic.
The values were not hardcoded into Airtable. They came from the Gravity Forms submission.
Step 14: How do you verify the Airtable response in Gravity Forms?
Return to:
Forms → Entries
Open the same submission.
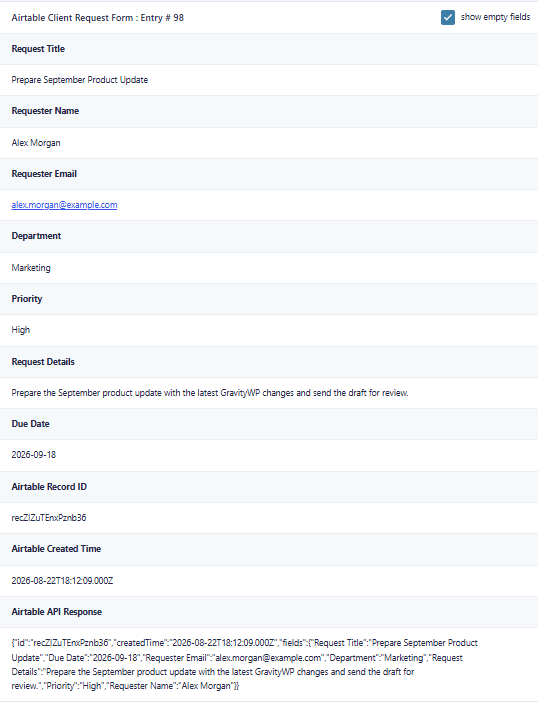
Our final Gravity Forms entry contained:
- Airtable Record ID
The uniquerec...ID returned for the newly created Airtable record. - Airtable Created Time
The timestamp returned when Airtable created the record. - Airtable API Response
The complete JSON response returned by Airtable.
The stored response also contained the submitted field values.
This gave us confirmation on both sides:
Gravity Forms entry → Airtable record
and:
Airtable response → Gravity Forms entry
What did our Gravity Forms Airtable integration actually prove?
Our final test proved that a Gravity Forms submission could create a new Airtable record through GravityWP API Connector using Bearer Token authentication.
All seven mapped values were transferred successfully:
- Request Title
- Requester Name
- Requester Email
- Department
- Priority
- Request Details
- Due Date
Airtable then returned information about the newly created record.
GravityWP API Connector saved:
- Airtable Record ID
- Airtable Created Time
- Full Airtable API Response
back into the original Gravity Forms entry.
The complete tested workflow was:
Gravity Forms → GravityWP API Connector → Airtable API → Airtable record → response saved to Gravity Forms
What should you check if the Gravity Forms Airtable integration does not work?
Why is the Airtable API Response empty?
First confirm that the correct API connection is selected in the feed.
Also check:
- Request Method is POST
- Body Format is JSON body
- Endpoint contains the correct Base ID
- Endpoint contains the correct Table ID
- Trigger is On form submission
- Store Full Response is enabled
If needed, enable Gravity Forms logging and inspect the API Connector log.
Why does Airtable return INVALID_PERMISSIONS_OR_MODEL_NOT_FOUND?
Airtable says this error commonly points to either permissions or an inaccessible/incorrect resource. Check the token scopes, your permission level, field/table permissions, and the referenced Base ID.
For this workflow, confirm that the Personal Access Token has:
data.records:write
and access to the target base.
Why does Airtable reject a Department or Priority value?
Check that the submitted Gravity Forms value matches the option expected by the Airtable Single Select field.
Our setup used matching values such as:
Marketing
and:
High
in both systems.
Why does Airtable reject the Due Date?
Check the value sent by the Gravity Forms Date field.
Our working format was:
yyyy-mm-dd
and our final test sent:
2026-09-18
Why is the Airtable Record ID empty?
Check the Target Fields mapping.
Use:
id
for Airtable Record ID.
Use:
createdTime
for Airtable Created Time.
We found this exact issue during our first successful POST test. The record itself had already been created, but the Gravity Forms Record ID field stayed empty until we changed the Target Field key to id.
Can you connect Gravity Forms to Airtable without Zapier?
Yes.
The workflow tested here uses:
Gravity Forms → GravityWP API Connector → Airtable API
There is no Zapier step between Gravity Forms and Airtable.
That does not mean Zapier or a dedicated Airtable add-on is always the wrong option. Different integrations suit different workflows.
This tutorial focuses on direct API control and storing useful Airtable response data back in Gravity Forms.
What is the difference between this tutorial and the existing Airtable tutorial?
This tutorial sends:
Gravity Forms → Airtable
using a POST request to create a record.
GravityWP’s existing Airtable tutorial works in the opposite direction. It uses a GET request to retrieve Airtable records and auto-fill Gravity Forms fields.
So the two workflows serve different purposes:
| Tutorial | Direction | Main action |
|---|---|---|
| This tutorial | Gravity Forms → Airtable | Create Airtable records |
| Existing tutorial | Airtable → Gravity Forms | Retrieve Airtable data |
That existing tutorial should be one of our strongest internal links.
Can you expand this Gravity Forms to Airtable workflow?
Yes.
You could add more form fields and map them to compatible Airtable fields for workflows such as:
- Lead intake
- Customer requests
- Project requests
- Content planning
- Internal tasks
- Contact forms
- Service requests
However, each additional Airtable field type should be tested with the exact value format you plan to send.
This tutorial documents only what we actually tested: text, email, Single Select values, and a date.
Airtable also supports API operations for existing records, but updating Airtable records is outside the scope of this tested workflow.
How does the finished Gravity Forms to Airtable workflow work?
The completed Gravity Forms Airtable integration automatically turns a WordPress form submission into a structured Airtable record.
The final data flow is:
Gravity Forms → API Connector → Airtable → returned Airtable data → Gravity Forms entry
This gives you a record in Airtable while preserving the returned Airtable identifier and creation time inside WordPress.
Frequently asked questions
Yes. In our tested setup, submitting Gravity Forms triggered GravityWP API Connector, which sent a POST request to Airtable. Airtable created a new record in the selected table.
No. This tutorial uses GravityWP API Connector and Airtable’s API directly.
Our successful workflow uses an Airtable Personal Access Token stored in GravityWP API Connector using Bearer Token authentication.
Airtable lets PATs be limited by both scopes and selected resources.
Yes. Our Department and Priority Drop Downs mapped successfully to Airtable Single Select fields when the submitted values matched the Airtable options.
Yes.
Our final test saved:
Airtable Record ID
Airtable Created Time
We also stored the complete API response.
Yes, provided you map them to compatible Airtable fields and use values that Airtable accepts.
Our Premium add-ons for Gravity Forms

Field to Entries
Create entries based on Checkboxes & Multi Select choices & List Field rows.

All Entries
All your new Gravity Forms entries in one central place. Stop navigating between multiple forms to find new entries. Get immediate oversight and full control with a powerful, unified dashboard.

Advanced Number Field
Functionality for Number Fields, like rounding or only absolute numbers, fixed point notation, range calculation, custom units like % or m2 & show as slider.

List Number Format
With this Gravity Forms Add-on you can change List Field columns into a number field, do calculations within a row or column. Extra merge tags are available with total counts of columns.
Read tutorials about

How to Validate Repeatable Contact Rows in Gravity Forms
Learn how to validate repeatable Gravity Forms List field rows with GravityWP List Text. This tutorial shows how to add email and regex validation, test invalid values, and confirm that valid team roster data is stored correctly.

Gravity Forms Airtable Integration: Create Records From Form Submissions
Learn how to build a Gravity Forms Airtable integration with GravityWP API Connector. Send form submissions to Airtable, create new records automatically, and save the returned Airtable Record ID and response back to Gravity Forms.

Gravity Forms Asana Integration: Create Tasks From Form Submissions
Learn how to connect Gravity Forms to Asana with GravityWP API Connector. This tested workflow creates Asana tasks from form submissions and saves the returned task ID and URL back to Gravity Forms.

Gravity Forms Google Calendar Integration: Create Events From Form Submissions
Connect Gravity Forms to Google Calendar with GravityWP API Connector. Learn how to create calendar events from form submissions, map event details, configure OAuth 2.0, handle time zones, and save the returned Event ID and URL.