With Gravity Forms in combination with some Add-ons, you can create a form to create another form. This can be particularly handy when you have a solid structure for a form, but the only difference is the questions you ask. There is a way to accomplish that without the need to code yourself. We’ll walk you through step by step.
Building a Form with a Form without programming
One way to go is using the Preview Submission Add-on from GravityWiz. This Add-on makes it possible to fill in data from previous steps in your Form as default value of an input field or as content for a HTML-block. That’s what we’re going to need to create our Form based on another Form.
First, we have to determine what the structure is going to be for our final Form. For this example, we’re going to make an Evaluation Form Format with some Radio Buttons with fixed choices and open questions. For that we need the following fields:
- Title Evaluation
- Introduction text
- Number of Radio Button choice questions (1 – 3)
- Label Radio Button 1 – Score – Terrible | Not so great | Neutral | Pretty good | Excellent
- Label Radio Button 2 – Score – Terrible | Not so great | Neutral | Pretty good | Excellent
- Label Radio Button 3 – Score – Terrible | Not so great | Neutral | Pretty good | Excellent
- Number of open questions (1 -2)
- Label open question 1
- Label open question 2
What Add-ons do you need?
You need Gravity Forms, the Preview Submission Perk and the Populate Anything Perk to get this working.
Configuring the Gravity Forms Format Form
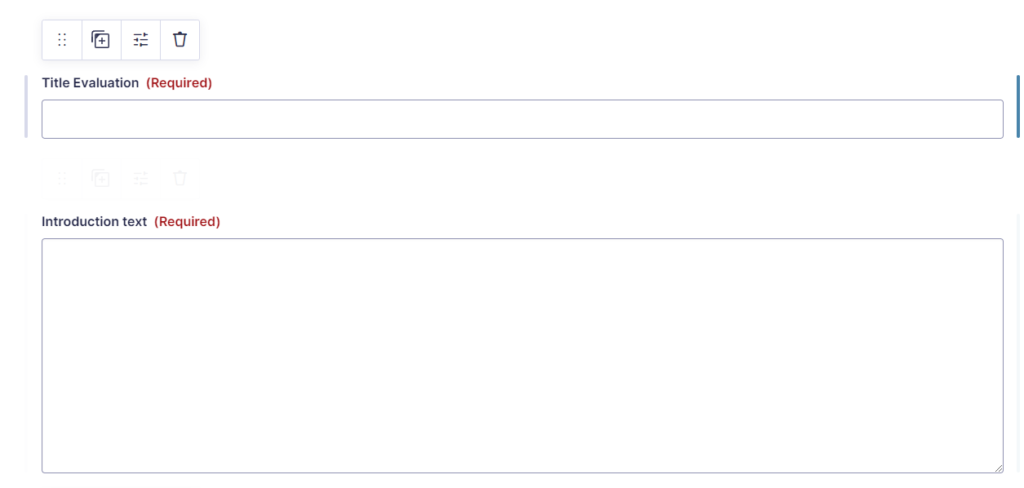
First we add a Single Line Text field and a Paragraph Text to capture the Title of the Evaluation and the introduction text and make them required.
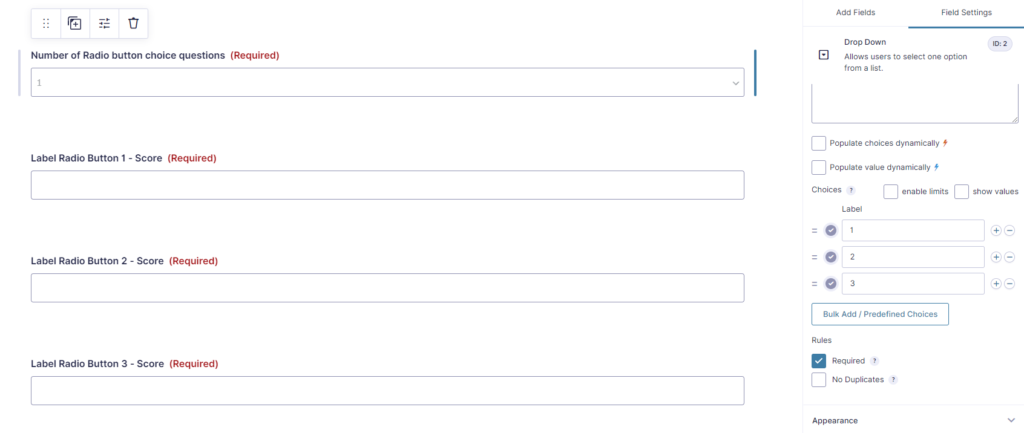
Then we add a Drop Down with choices 1, 2 and 3, so you can select how many Radio Button Score questions you want to show. We add Single Line Text fields for every label we need for the scoring questions.
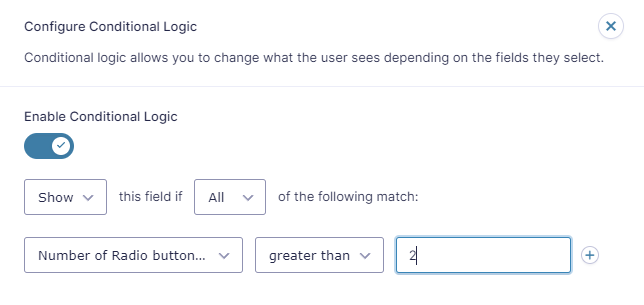
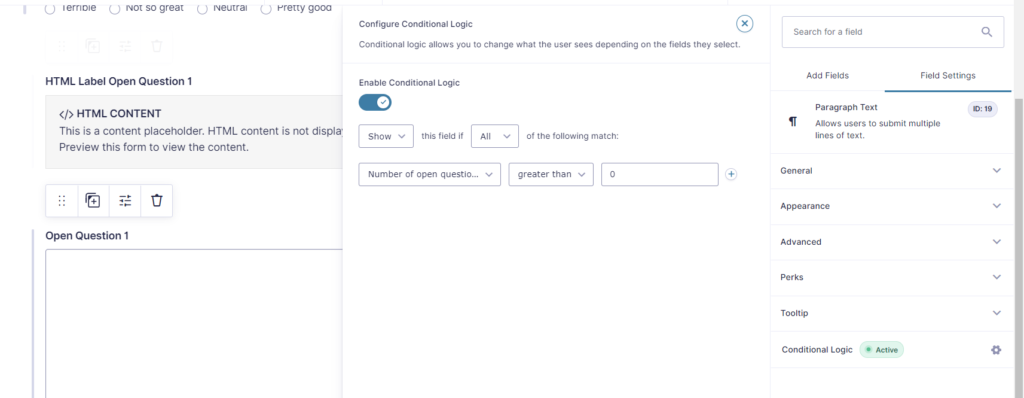
We set conditional logic based on the value of the Number of Radio button choice questions. See here for example the conditional logic applied to Label Radio Button 3 – Score field. We only want to show this Single Line Text field if the choice is higher than 2.
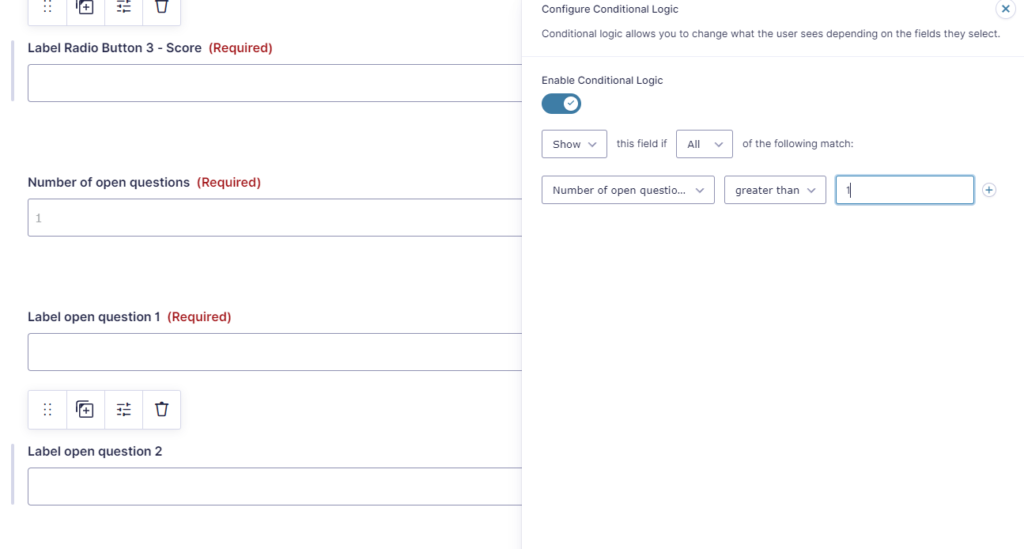
The same we do for the 1 or 2 open question labels, including the same conditional logic, but now on the Number of open questions dropdown value.
Using the Format Form to create another Form
After configuring your Format Form, you can start building the Evaluation Form for your website visitors, based on an Entry from the Format Form.
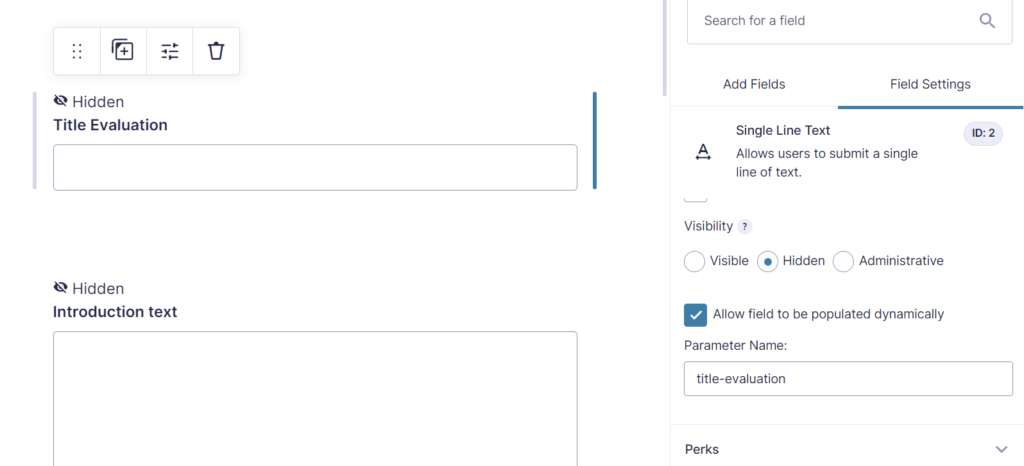
For creating the form, we have to have fields to capture the ‘settings’ from the Entry in the Format Form. We do that by adding fields to our Dynamic Form and make the visibility Hidden. We also need to give them a Parameter Name, since we want to be able to populate these fields from our url.
See here for example a screenshot of the Title Evaluation field, with visibility set to Hidden and as Parameter name ‘title-evaluation’.
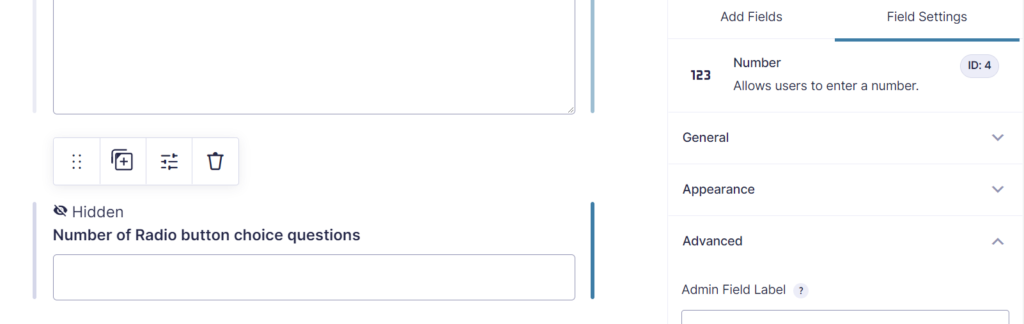
We also need a number field (or you can also use the dropdown, but this is not necessary, because you just want to know a number) for the Number of Radio button choice questions:
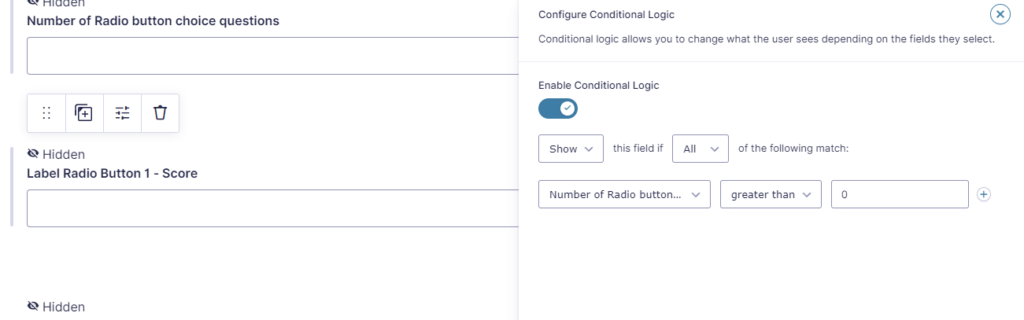
And als the Label for each radio button, with conditional logic configured based on the Number Field:
Showing the Form Questions with HTML-blocks
We now have a lot of invisible fields with data in it (populated by the url, the Save and Continue link, the JWT token or through the Gravity Forms shortcode), but the front-end visitor of the Form doesn’t see anything yet. To get that working, we need to add HTML-blocks with data from populated fields in our Form. You can do that with Preview Submission (you need multiple steps in your form) or with Live Merge Tags (included in the Populate Anything Add-on). We will show in this example the Live Merge Tags. You can use Preview Submission in the same way, but you have to place all the fields you dynamically populate with hidden visibility on the first page of your form and the rest of the HTML Blocks and input fields on the second page. This requires a click on the ‘Next’ button to work.
Live Merge Tags (Populate Anything)
With Populate Anything activated, you can use Live Merge Tags inside your HTML Blocks (and standard values) by adding the @ sign before the Merge Tag. See this example where we show the title of the Evaluation in heading 1 by using the following code:
<h1>@{Title Evaluation:2}</h1>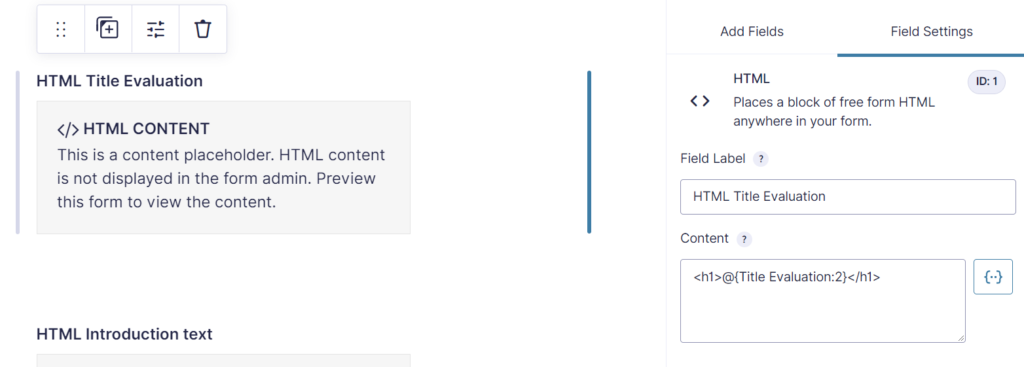
For the questions themselves, we also add a HTML Block for the Question label and a Radio Button to capture the actual input for that question. On both fields we activate Conditional Logic and show it depended on the number of questions we want to show:
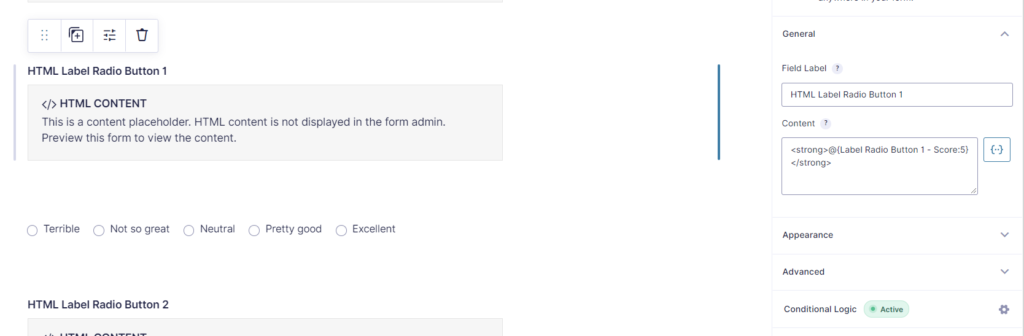
We show the question in the HTML Block as a strong text, again with a Live Merge Tag (adding the @ sign before the Merge Tag):
<strong>@{Label Radio Button 1 - Score:5}</strong>And the Radio Button choice we give a label ‘Radio Button 1’, but we hide the Label itself, because we use the HTML Block above it to show the dynamically loaded question label.

We do the same for the other Radio Buttons and for the Open Questions. Make sure that for the Open Questions you set the conditional logic based on the Number Field where the number of Open Questions is filled in.
For the Open Questions we use a Paragraph Text:
Populating the Form Questions
We now have these fields availble to populate:
| Field Label | Populate | Field Type |
|---|---|---|
| Title Evaluation | title-evaluation | text |
| Introduction text | introduction-text | textarea |
| Number of Radio button choice questions | number-radio-button | number |
| Label Radio Button 1 – Score | label-radio-button-1 | text |
| Label Radio Button 2 – Score | label-radio-button-2 | text |
| Label Radio Button 3 – Score | label-radio-button-3 | text |
| Number of open questions | number-open-questions | number |
| Label open question 1 | label-open-question-1 | text |
| Label open question 2 | label-open-question-1 | text |
We use our GravityWP – Merge Tags Add-on to get a quick overview of fields and dynamic populate slugs and generate a url we can use to create our other Form:
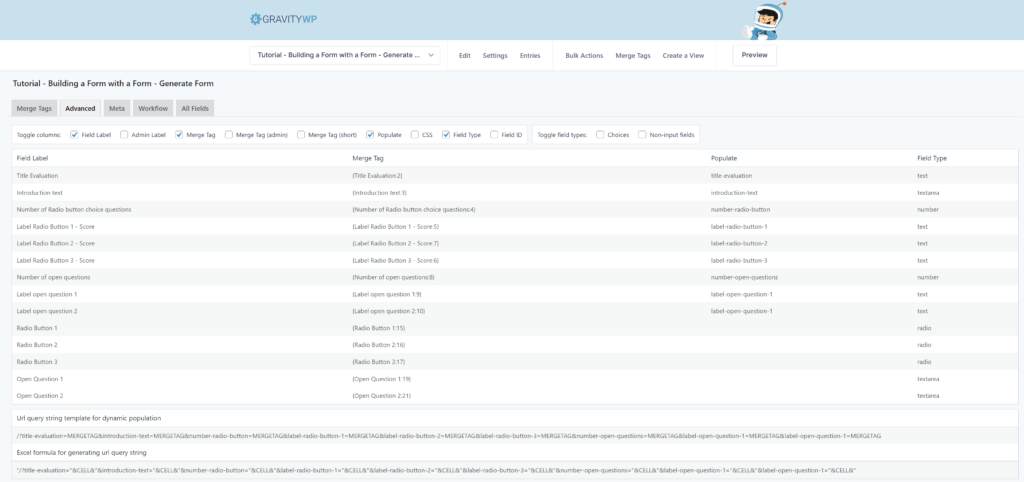
We can easily copy the url on the bottom of the Advanced Tab to use for dynamic population:
/?title-evaluation=MERGETAG&introduction-text=MERGETAG&number-radio-button=MERGETAG&label-radio-button-1=MERGETAG&label-radio-button-2=MERGETAG&label-radio-button-3=MERGETAG&number-open-questions=MERGETAG&label-open-question-1=MERGETAG&label-open-question-2=MERGETAGAnd we create a url filled with Merge Tags from our Format Form:
/?title-evaluation={Title Evaluation:6}&introduction-text={Introduction text:1}&number-radio-button={Number of Radio button choice questions:2}&label-radio-button-1={Label Radio Button 1 - Score:3}&label-radio-button-2={Label Radio Button 2 - Score:4}&label-radio-button-3={Label Radio Button 3 - Score:5}&number-open-questions={Number of open questions:7}&label-open-question-1={Label open question 1:8}&label-open-question-2={Label open question 2:9}We can use this url later on places where we want to communicate a link to our dynamically generated form based on data from the Entry in the Format Form.
Notice that there are quite some texts being included in the url. It can be that if there are certain characters in the url that the link will not work correctly. That’s why it’s always better to urlencode the Merge Tags you use inside a url.
A quick way to do that is by using our Advanced Merge Tags Add-on for Gravity Forms. You can easily use the gwp_urlencode modifier to automatically urlencode the output. The code we use than to generate the url will look like this:
/?title-evaluation={Title Evaluation:6:gwp_urlencode}&introduction-text={Introduction text:1:gwp_urlencode}&number-radio-button={Number of Radio button choice questions:2}&label-radio-button-1={Label Radio Button 1 - Score:3:gwp_urlencode}&label-radio-button-2={Label Radio Button 2 - Score:4:gwp_urlencode}&label-radio-button-3={Label Radio Button 3 - Score:5:gwp_urlencode}&number-open-questions={Number of open questions:7}&label-open-question-1={Label open question 1:8:gwp_urlencode}&label-open-question-2={Label open question 2:9:gwp_urlencode}We can now be assured that the url will work correctly.
Dynamic Form based on an Entry in Format Form
Imagine we have an entry in our Format Form with these values:
| Field | Value |
|---|---|
| Title Evaluation | Evaluation Tutorial Form Inception |
| Introduction text | This is an example Form generated on basis of data from an Entry in the Format Form. |
| Number of Radio button choice questions | 3 |
| Label Radio Button 1 – Score | What did you think about the structure of the Tutorial? |
| Label Radio Button 2 – Score | What do you think about the idea of creating a Form with a Form? |
| Label Radio Button 3 – Score | What do you think about our Gravity Forms Tutorials in general? |
| Number of open questions | 2 |
| Label open question 1 | What didn’t you like about the Tutorial? Do you have any suggestions for improvement? |
| Label open question 2 | What did you like about the Tutorial? Share any positive insights you got from reading it. |
The above values in the Format Form will result in the following url:
/?title-evaluation=Evaluation+Tutorial+Form+Inception&introduction-text=This+is+an+example+Form+generated+on+basis+of+data+from+an+Entry+in+the+Format+Form.&number-radio-button=3&label-radio-button-1=What+did+you+think+about+the+structure+of+the+Tutorial%3F&label-radio-button-2=What+do+you+think+about+the+idea+of+creating+a+Form+with+a+Form%3F&label-radio-button-3=What+do+you+think+about+our+Gravity+Forms+Tutorials+in+general%3F&number-open-questions=2&label-open-question-1=What+didn%26%23039%3Bt+you+like+about+the+Tutorial%3F+Do+you+have+any+suggestions+for+improvement%3F&label-open-question-2=What+did+you+like+about+the+Tutorial%3F+Share+any+positive+insights+you+got+from+reading+it.We have to embed the Dynamic Form on a page to get it working. You can check the above link for this Tutorial by clicking the button below:
Try it yourself
You can also try it yourself. Just fill in some questions and click Next to generate a URL to use.
Embedding with Gravity Forms Shortcode
You can also use the values from the Format Form Entry to create a Gravity Forms Shortcode that you directly embed on a page. This way it’s more difficult for visitors to change the data by simply changing data in the url. The shortcode for our example looks like this:
[gravityform id="1" title="false" description="false" ajax="true" tabindex="1" field_values="title-evaluation=Evaluation+Tutorial+Form+Inception&introduction-text=This+is+an+example+Form+generated+on+basis+of+data+from+an+Entry+in+the+Format+Form.&number-radio-button=3&label-radio-button-1=What+did+you+think+about+the+structure+of+the+Tutorial%3F&label-radio-button-2=What+do+you+think+about+the+idea+of+creating+a+Form+with+a+Form%3F&label-radio-button-3=What+do+you+think+about+our+Gravity+Forms+Tutorials+in+general%3F&number-open-questions=2&label-open-question-1=What+didn%26%23039%3Bt+you+like+about+the+Tutorial%3F+Do+you+have+any+suggestions+for+improvement%3F&label-open-question-2=What+did+you+like+about+the+Tutorial%3F+Share+any+positive+insights+you+got+from+reading+it."]FAQ Building a Form with a Form
Can I create a Gravity Form based on an Entry in another Gravity Form?
Does this Tutorial explain how to create a new Gravity Form with a new Form ID?
Why is it useful to be able to create a Form based on the Entry in another Form?
Our Premium add-ons for Gravity Forms

All Entries
All your new Gravity Forms entries in one central place. Stop navigating between multiple forms to find new entries. Get immediate oversight and full control with a powerful, unified dashboard.

Advanced Merge Tags
This Gravity Forms Add-On adds extra Merge Tag modifiers (and a lot of power). From the most common used functions like capitalize and length to changing date formats.
DateTime Field
The GravityWP - DateTime Field add-on adds a dedicated Date/Time field to Gravity Forms so users can enter both a date and a time in a single input.

Advanced Number Field
Functionality for Number Fields, like rounding or only absolute numbers, fixed point notation, range calculation, custom units like % or m2 & show as slider.
Read tutorials about

Gravity Forms Discount Code Field: Apply Fixed or Percentage Discounts in a Form
Learn how to create a Gravity Forms discount code field that applies fixed or percentage discounts. This tutorial shows how to calculate subtotals, discount amounts, and final totals using tested form logic.

Gravity Forms Zoom Integration: Create Zoom Meetings From Booking Forms
Learn how to connect Gravity Forms to Zoom without Zapier using GravityWP API Connector. This step-by-step tutorial shows how to create Zoom meetings from booking form submissions and save the returned meeting details back to Gravity Forms.

Gravity Forms monday.com Integration: Create New Items From Form Submissions
Learn how to connect Gravity Forms to monday.com without Zapier using GravityWP API Connector. This step-by-step tutorial shows how to create new monday.com items from form submissions and save the returned monday.com item ID back to Gravity Forms.

Gravity Forms Pipedrive Integration: Send Form Contacts to Pipedrive Without Zapier
Learn how to connect Gravity Forms to Pipedrive without Zapier using GravityWP API Connector. This step-by-step tutorial shows how to send form contacts, custom fields, and the returned Pipedrive Person ID directly from WordPress to Pipedrive CRM.

