Do you want to dynamically populate and validate Gravity Forms Fields with data (claims) from a JSON Web Token (JWT)? With the JWT Prefill Add-on you can do that. In this Tutorial we’ll walk you through it step by step.
What is a JSON Web Token?
A JSON Web Token is one of the most popular and effective ways to pass data between two parties with the possibility to validate the data with a private key. On JWT.io you can easily see how that works:
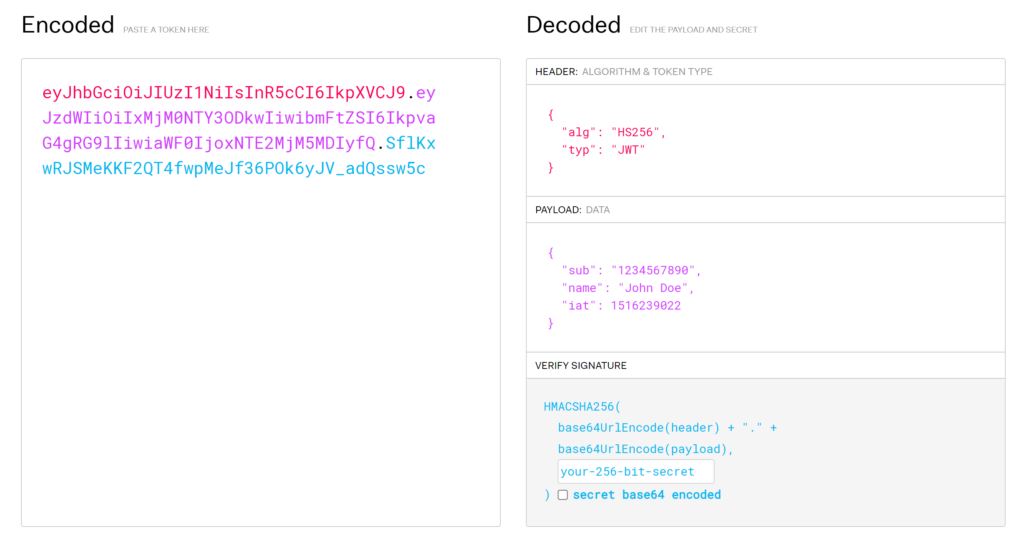
You see an encoded JSON Web Token on the left. When decoded you see that the token consists of 3 different parts with claims:
- Header: this contains information type of algoritm used (alg: Signature or encryption algorithm). In this example HS256. And what type of token (claim typ), in this case JWT.
- Payload: This is where al the data (claims) are being stored. In this example you see sub (subject of the claim, whom the claim refers to), name (custom claim) and iat (issued at, this is a timestamp). You can add more custom claims to the payload and there are also some other default claims (like exp, to set a timestamp for the expiration of the token).
- Verify signature: this contains information to validate the token.
Why using JSON Web Tokens in Gravity Forms?
With JSON Web Tokens you can pass data to a Gravity Form, with the possibility to configure extra validations and options, especially when you use them through the JWT Prefill Add-on:
- Validate if the information that is used to dynamically populate fields is not tampered with
- Have a way to pass data to a Form that is not visible in the url
- Validate if the link is not expired
- Make it possible to only use the JSON Web Token one time
- Check if the JSON Web Token is allowed or forbidden
This can be very handy in situations where you want to know with 100% certainty that the information you pass is valid and the person that visits the Gravity Form can only use a token that is issued with your private key (can be on your WordPress installation or somewhere else).
Setting a Private Key
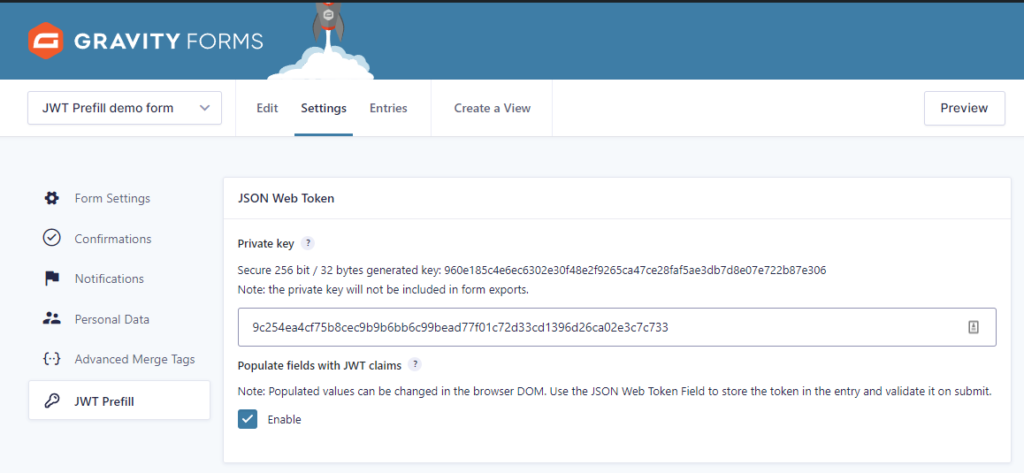
With the JWT Prefill Add-on activated you can quickly get started with creating your own tokens. First you have to decide in which Gravity Form you want to use the JSON Web Tokens and add a Private Key. This private key is needed to generate and validate the tokens and is at the heart of the validation process.
In the Form Settings you’ll see an extra tab in the menu for JWT Prefill. When you load this page, the Add-on automatically generates a secure 256 bit / 32 bytes generated key you can use. Just copy and paste it in the input field and save the settings. From that moment, the private key in the input field is going to be used to generate and validate tokens.
Validating JWT in Gravity Forms
In the Form Settings you can also configure several validations.
- Parameter gwp_token is required: When enabled, the Gravity Form will only be loaded if a gwp_token is passed in the url query.
- Schedule gwp_token requirement: You can configure a Start time and End time for the requirement of the token. This can be handy if you want to schedule a certain moment when you want the form only to be accessible with a gwp_token or when you want to open the form (End time) for everybody after a certain date and time.
- Start time: the moment a gwp_token is required
- End time: the moment a gwp_token is not required anymore

On Form Level there is also an option to check for allowed or forbidden tokens. This can be handy if you want to be 100% sure that the JWT token being used is allowed to be used. You can do that by connecting another Form that holds the allowed or the forbidden tokens in a Single Line Text field.
There is an option to disable the check on submit. This is useful when you create an entry in the form with forbidden tokens directly after submit (for example with the Create Entry step from Gravity Flow), as this can lead to unintentionally blocking the confirmation message after submit.

Using the JSON Web Token Field in Gravity Forms
After the JWT Prefill Add-on is activated and configured in your Gravity Form and someone visits the Form with a valid token, you can use the claims to dynamically populate other fields in the form.
For example, you have a Form with a Single Line Text Field ‘Text’, with ‘Allow field to be populated dynamically’ enabled with Parameter Name: text.
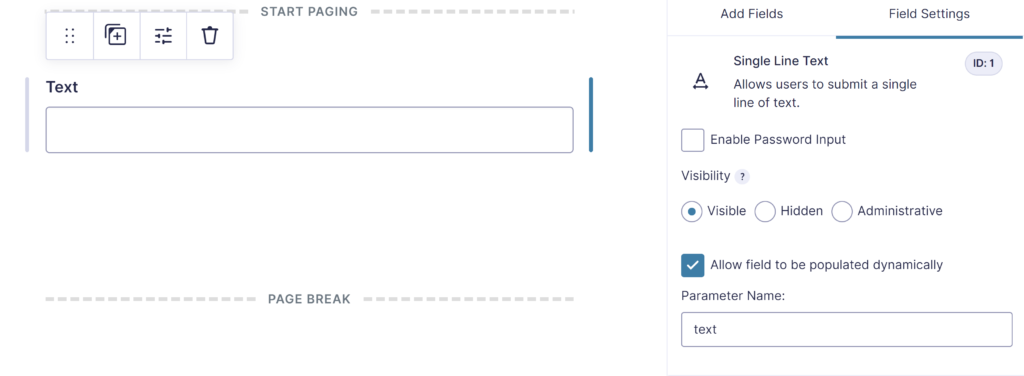
If the valid JSON Web Token contains a claim ‘text’ in the payload, it will dynamically populate the Single Line Text Field (Field ID 1) with the value of the claim.
Creating JSON Web Tokens for Gravity Forms
The JWT Prefill Add-on provides two ways to create JSON Web Tokens to be used to dynamically fill (and validate) data in Gravity Forms.
- Using a shortcode
- Using a Gravity Flow Step
Shortcode to generate JSON Web Tokens
This example shortcode will use the Private key saved in the settings of Form ID 1 (the Form we want to fill with JWT claims), links to the page on your site where the form is embedded and includes the JWT claim ‘text’ filled with a Merge Tag from the form you use this shortcode in.
[gwp_jwt_link form_id='1' form_url='http://yoursite.com/prefill-form/' text='{Text:1}']]The shortcode returns a raw url as text.
You can also generate a (clickable) link by using the shortcode like this:
[[gwp_jwt_link form_id='1' form_url='http://yoursite.com/prefill-form/' text='{Text:1}']Link text[/gwp_jwt_link]This will return a html link.
The available shortcode settings are:
- form_id (required): this is the ID of the Form you want to populate with JWT claims.
- form_url: this is the url of the page where the url should point to.
- form_url_postfix: possibility to add your own extra parameters to the url.
- disable_iat: disables the issued at date, which is included by default.
- exp: setting an expiration date to the link (so for more detailed instructions below).
You can set the ‘exp’ claim to configure a expiration date of the token. For filling the expiration claim you can use any valid PHP datetime string.
[gwp_jwt_link form_id='1' form_url='http://yoursite.com/prefill-form/' text='{Text:1}' exp='08/23/2022']Link text[/gwp_jwt_link]Gravity Flow step to generate JSON Web Tokens
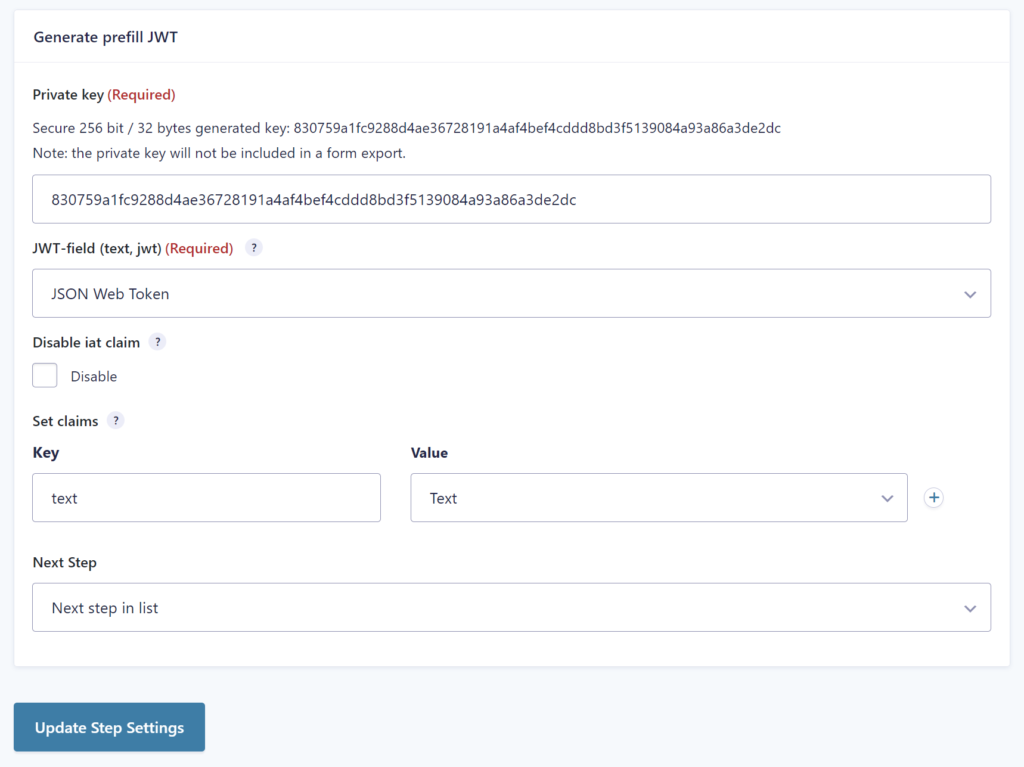
You can also configure a Gravity Flow workflow step to generate a prefill JWT token. Go to Workflow in your Form Settings and create a new step. Click on ‘Generate prefill JWT’.
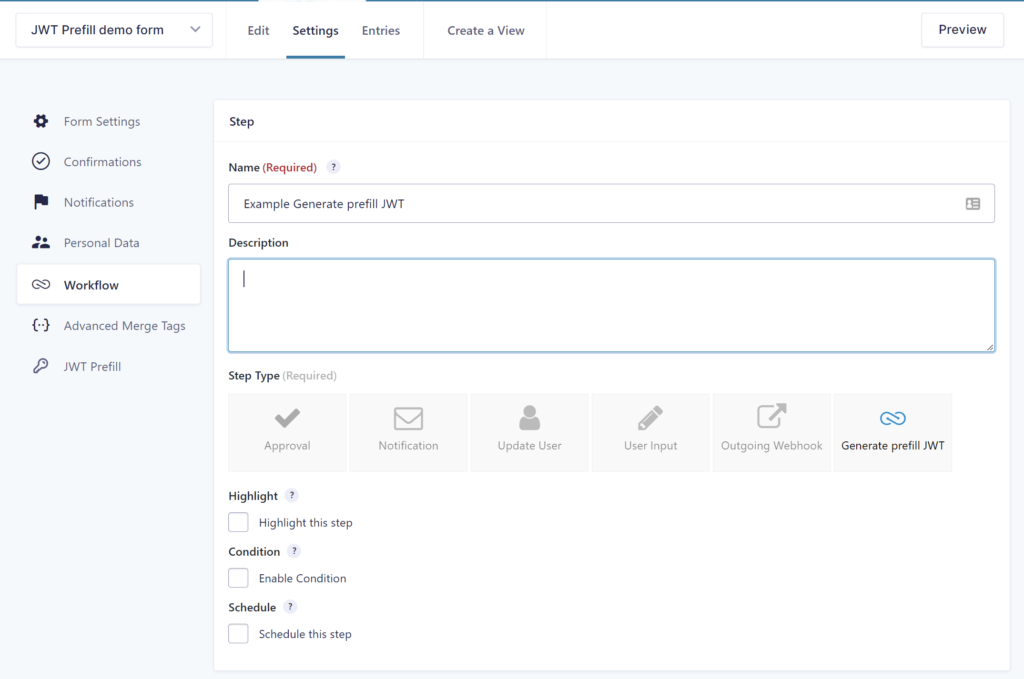
Fill in a Private key (use a Private key from the Form you want to populate with JWT claims) and select the JWT-field (should be a text field or JWT Prefill field) to save the generated token.
After that you can configure Keys and Values to include in the JSON Webtoken.
Try the JWT Prefill demo
Our Premium add-ons for Gravity Forms
List Text
Add features like textarea, placeholder and custom validation to a column or multiple columns in a Gravity Forms List Field.

DateTime Field
The GravityWP - DateTime Field add-on adds a dedicated Date/Time field to Gravity Forms so users can enter both a date and a time in a single input.

API Connector
Connect Gravity Forms to External API's: Query the API using form field values and automatically fill other form fields with the API response.

JWT Prefill
Fill forms with data you can trust. Prefill Gravity Forms fields with a secure token instead of links with editable url parameters, so your data is accurate, tamper-proof, and ready to use.
Read tutorials about

Gravity Forms Discount Code Field: Apply Fixed or Percentage Discounts in a Form
Learn how to create a Gravity Forms discount code field that applies fixed or percentage discounts. This tutorial shows how to calculate subtotals, discount amounts, and final totals using tested form logic.

Gravity Forms Zoom Integration: Create Zoom Meetings From Booking Forms
Learn how to connect Gravity Forms to Zoom without Zapier using GravityWP API Connector. This step-by-step tutorial shows how to create Zoom meetings from booking form submissions and save the returned meeting details back to Gravity Forms.

Gravity Forms monday.com Integration: Create New Items From Form Submissions
Learn how to connect Gravity Forms to monday.com without Zapier using GravityWP API Connector. This step-by-step tutorial shows how to create new monday.com items from form submissions and save the returned monday.com item ID back to Gravity Forms.

Gravity Forms Pipedrive Integration: Send Form Contacts to Pipedrive Without Zapier
Learn how to connect Gravity Forms to Pipedrive without Zapier using GravityWP API Connector. This step-by-step tutorial shows how to send form contacts, custom fields, and the returned Pipedrive Person ID directly from WordPress to Pipedrive CRM.

