You can connect Gravity Forms to ClickUp without Zapier by using GravityWP API Connector and the ClickUp API. In our test, submitting a Gravity Forms task request automatically created a new ClickUp task with the submitted name, requester details, request type, description, and priority.
The workflow also saved data returned by ClickUp back into the original Gravity Forms entry. This included the ClickUp task ID, task URL, task status, and full API response.
In this tutorial, you will build the same Gravity Forms ClickUp integration step by step. You will create the form, generate a ClickUp API token, find your List ID, configure the API request, map Gravity Forms fields to a new ClickUp task, and save the response.
By the end, the workflow will look like this:
Gravity Forms submission → GravityWP API Connector → ClickUp task → returned ClickUp data saved to Gravity Forms
This tutorial follows the exact configuration we tested in August 2026.
What do you need for this Gravity Forms ClickUp integration?
Before you start, you need:
- A WordPress website
- Gravity Forms
- GravityWP API Connector
- A ClickUp account
- A ClickUp List where new tasks will be created
- A ClickUp Personal API Token
- Permission to edit the Gravity Form
GravityWP API Connector can send GET and POST requests, use Gravity Forms values in request parameters and headers, and map values from an API response back to form fields.
For this test, we used a ClickUp Personal API Token. ClickUp recommends personal tokens for individual or testing use. Apps or integrations intended for other users should use ClickUp’s OAuth flow instead.
Step 1: Create the Gravity Forms task request form
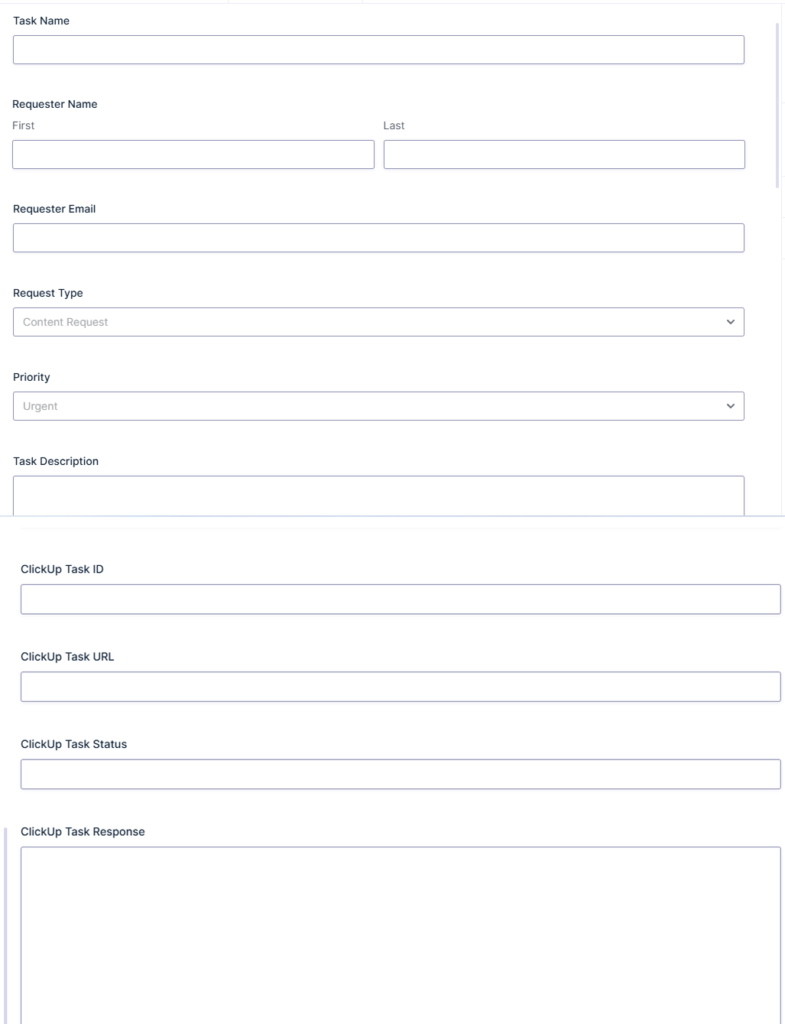
Create a new form in Gravity Forms.
We named ours:
ClickUp Task Request Form
Add these public fields:
| Field | Gravity Forms field type | Purpose |
|---|---|---|
| Task Name | Single Line Text | Becomes the ClickUp task name |
| Requester Name | Name | Identifies who submitted the request |
| Requester Email | Adds contact information | |
| Request Type | Drop Down | Describes the type of request |
| Priority | Drop Down | Sets the ClickUp priority |
| Task Description | Paragraph Text | Contains the request details |
For Request Type, our test form used:
- Content Request
- Technical Issue
- Website Update
- Customer Support
- Other
Next, add these fields for data returned by ClickUp:
| Field | Field type |
|---|---|
| ClickUp Task ID | Single Line Text |
| ClickUp Task URL | Single Line Text |
| ClickUp Task Status | Single Line Text |
| ClickUp Task Response | Paragraph Text |
Set these response fields to Administrative visibility. Visitors do not need to see data that is only used by the integration.
Step 2: Configure the Gravity Forms Priority field
The Priority field needs special values because ClickUp represents its four priorities with integers.
ClickUp uses:
| Label | Value |
|---|---|
| Urgent | 1 |
| High | 2 |
| Normal | 3 |
| Low | 4 |
Open the Priority Drop Down and enable:
Then enter the values above.
Gravity Forms lets a choice have a user-facing label and a separate stored value. Custom choice values are especially useful when sending form data to external systems.
This means a visitor can select:
High
while Gravity Forms can send:
2
to ClickUp.
Later in the API feed, we will use:
{Priority:6:value}The :value modifier outputs the stored value instead of the visible choice label.
Your field IDs may be different, so use the merge tags generated by your own form.
Step 3: Create the ClickUp List for incoming tasks
Next, choose where ClickUp should create the tasks.
In our test, we created a List called:
Gravity Forms Requests
You can use an existing ClickUp List instead.
The ClickUp Create Task API requires the ID of the List that will receive the new task. Its endpoint follows this structure:
POST /api/v2/list/{list_id}/taskClickUp requires list_id in the endpoint and name in the task request body. It also supports properties such as description, priority, status, assignees, dates, tags, and custom fields.
Step 4: Find your ClickUp List ID
Open the List you want to use.
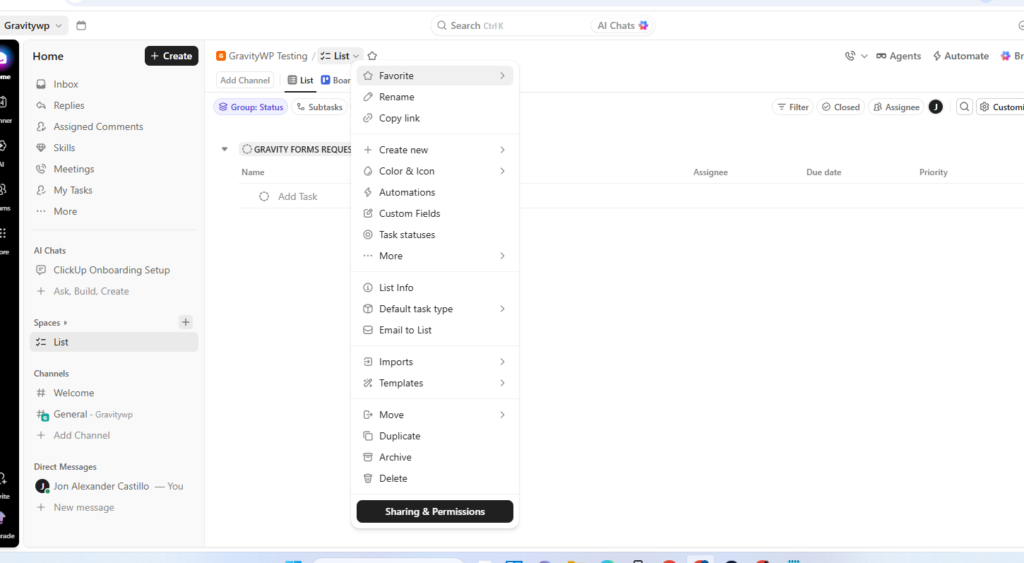
In the ClickUp interface we tested, we could open the List menu and choose:
Copy link
A copied List link looked similar to:
https://app.clickup.com/WORKSPACE_ID/v/li/LIST_IDThe number after /li/ is the List ID you will use in the API Connector feed.
Do not copy our test ID. Use the ID from your own ClickUp List.
Step 5: Generate a ClickUp Personal API Token
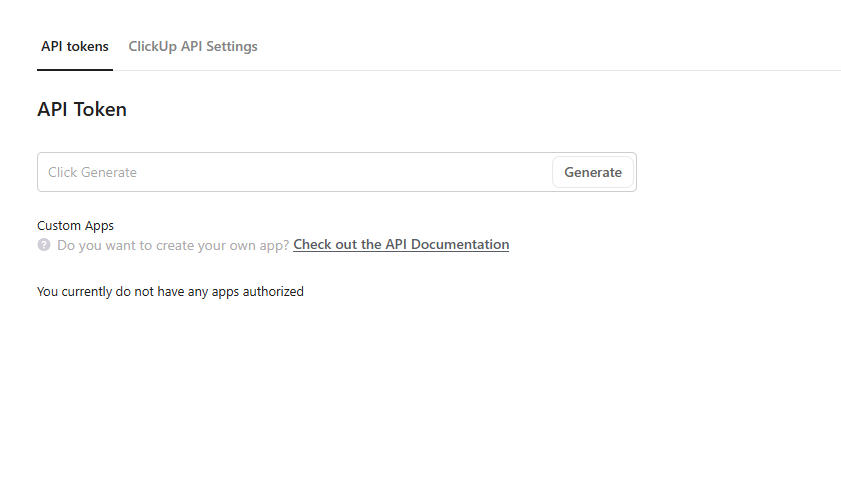
In the ClickUp interface we tested, go to the ClickUp API settings and open the API tokens section.
Click:
Generate
Copy the token and store it somewhere private.
ClickUp personal API tokens start with pk_ and are sent in the Authorization header of API requests.
Step 6: Create the ClickUp API connection in GravityWP
In WordPress, go to:
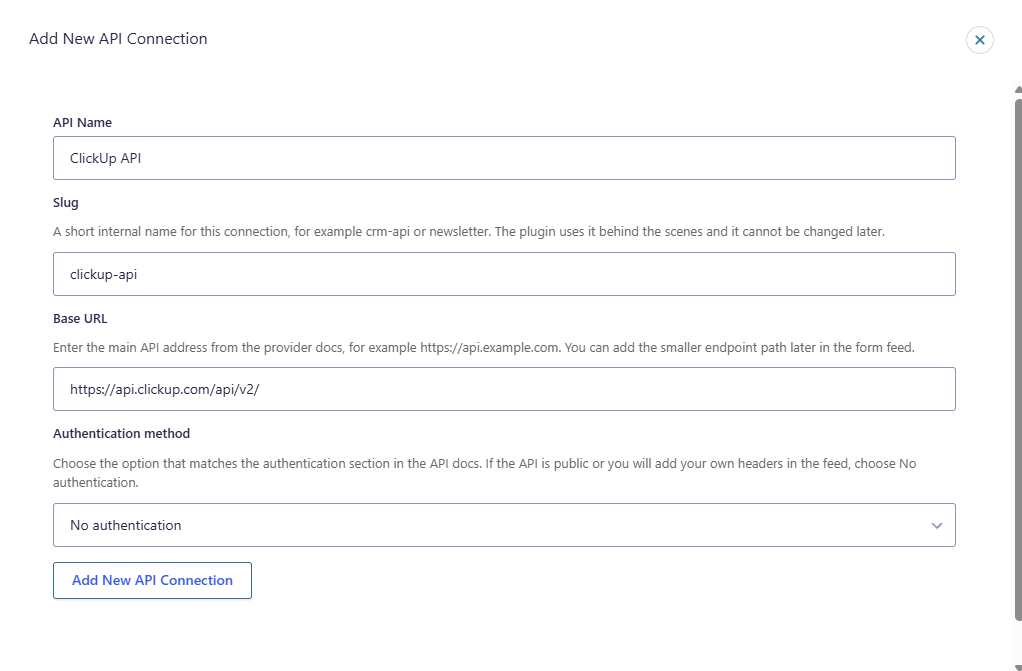
Forms → Settings → API Connector → Add New API Connection
Use:
| Setting | Value |
|---|---|
| API Name | ClickUp API |
| Slug | clickup-api |
| Base URL | https://api.clickup.com/api/v2/ |
| Authentication method | No authentication |
The No authentication option can look confusing here.
ClickUp does require authentication. We selected this option because our Personal API Token is added manually to the request’s Authorization header in the feed instead of using API Connector’s OAuth or Basic Auth settings.
ClickUp documents this personal-token format as:
Authorization: {personal_token}Save the API connection.
Step 7: Create the ClickUp task API feed
Open:
Forms → ClickUp Task Request Form → Settings → API Connector
Create a new feed.
We named ours:
Create ClickUp Task
Use:
| Setting | Value |
|---|---|
| API Configuration | ClickUp API |
| Request Method | POST |
| Body format | JSON body |
| Endpoint URL | list/YOUR_LIST_ID/task |
| Input type | Regular Field input |
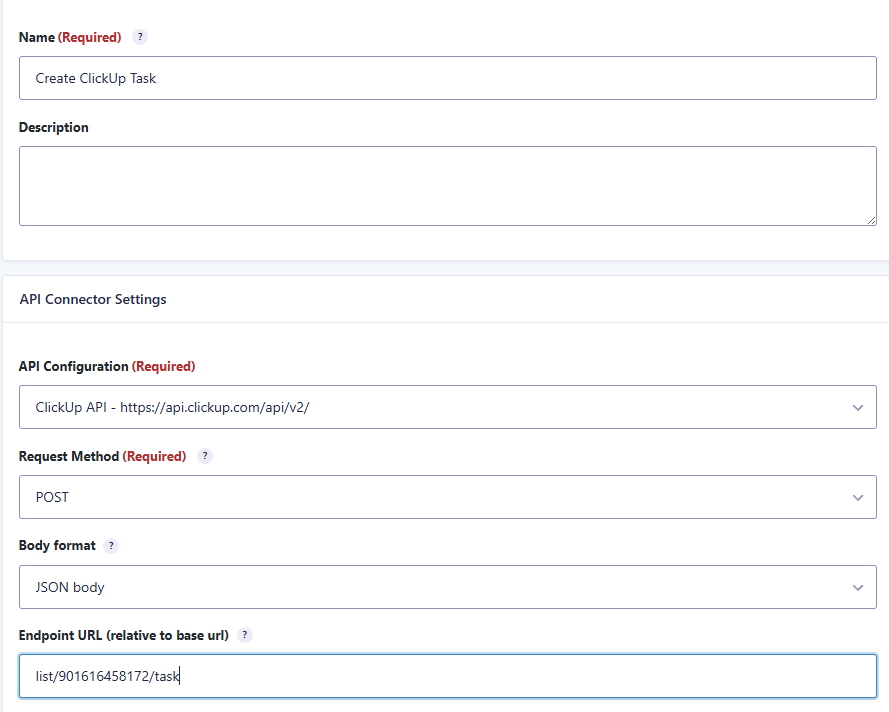
Replace YOUR_LIST_ID with the ClickUp List ID you copied earlier.
ClickUp’s official Create Task endpoint is:
POST https://api.clickup.com/api/v2/list/{list_id}/taskA POST request is used here because we are creating a new task.
GravityWP API Connector supports POST feeds with JSON request bodies, including values built from Gravity Forms fields.
Step 8: Add the ClickUp Authorization header
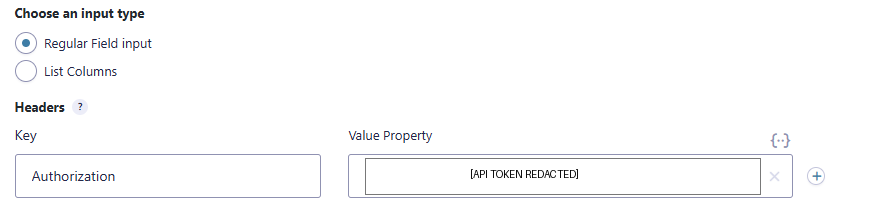
Under Headers, add:
Key:
Authorization
For the value, enter your ClickUp Personal API Token.
Conceptually:
Authorization → pk_YOUR_PRIVATE_TOKEN
ClickUp requires the personal token in the Authorization header for this authentication method.
Step 9: Map Gravity Forms fields to the ClickUp task
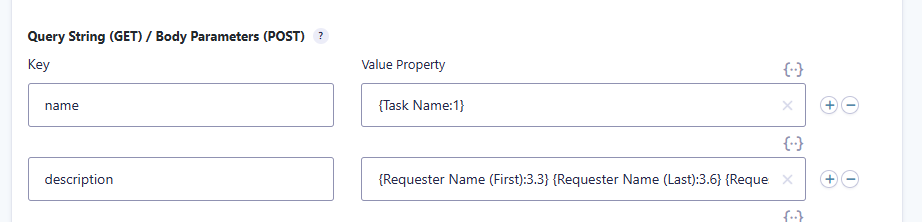
Under Query String (GET) / Body Parameters (POST), add the request body fields.
We used three ClickUp properties:
Task name
name
mapped to:
{Task Name:1}Task description
description
For the description, we combined several Gravity Forms values into one ClickUp field:
Requester: {Requester Name (First):3.3} {Requester Name (Last):3.6} Email: {Requester Email:4} Request Type: {Request Type:5} Description: {Task Description:7}This lets the ClickUp task contain the requester information and actual task details without requiring custom ClickUp fields for this basic workflow.
Priority
priority
mapped to:
{Priority:6:value}The final mapping looks like this:
| ClickUp property | Gravity Forms value |
|---|---|
name | {Task Name:1} |
description | Requester details + request type + task description |
priority | {Priority:6:value} |
ClickUp accepts name, description, and integer priority values when creating a task.
Step 10: Store the full ClickUp response first
Before we mapped individual ClickUp response values, we first captured the complete response.
Set:
API request trigger → On form submission
Then enable:
Store full response
Select:
ClickUp Task Response
This is a useful way to test an unfamiliar API because it lets you see the actual JSON ClickUp returned before deciding which properties you want to save.
GravityWP recommends this same approach for testing: trigger the request on submission, store the full response, inspect it in the Gravity Forms entry, and then determine the response paths you need.
Step 11: Run the first Gravity Forms to ClickUp test
For our first test, we submitted:
Task Name:
Homepage pricing update
Requester:
Alex Morgan
Request Type:
Website Update
Priority:
Normal
Task Description:
Please update the pricing section on the homepage with the latest package information.
The submission created a new ClickUp task successfully.
ClickUp showed:
- Task name: Homepage pricing update
- Priority: Normal
- Requester details in the description
- Request Type: Website Update
- Submitted task description
The full ClickUp response was also stored in the Gravity Forms entry.
That response gave us the exact paths needed for the next step.
Step 12: Map the ClickUp response back to Gravity Forms
Go back to the API Connector feed.
Under Target Fields, add:
| Gravity Forms field | Response path |
|---|---|
| ClickUp Task ID | id |
| ClickUp Task URL | url |
| ClickUp Task Status | status/status |
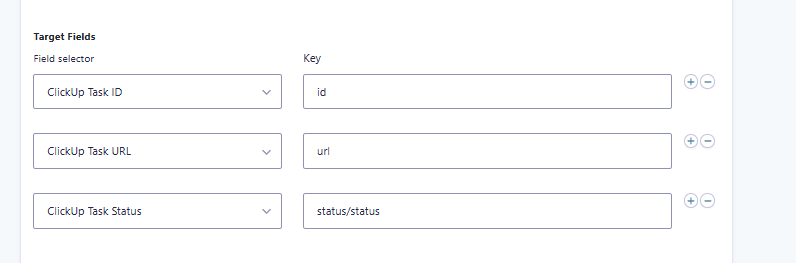
Keep:
API request trigger → On form submission
and:
Store full response → ClickUp Task Response
API Connector maps API response values to Target Fields using response paths. Nested JSON properties use / as the separator, which is why the ClickUp status uses:
status/statusIf you are not sure which response path to use with another API, GravityWP also provides a JSON response path parser. It can display the available paths from a stored JSON response.
Step 13: Run the final ClickUp integration test
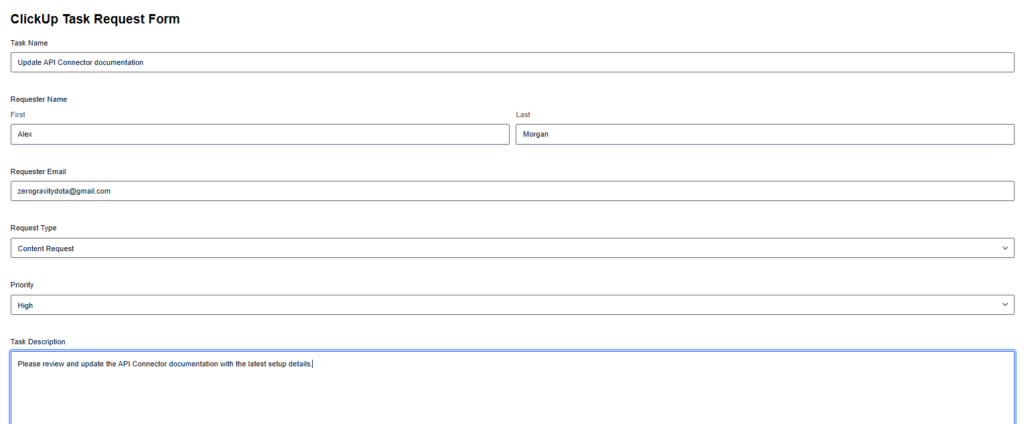
For our final test, we submitted:
Task Name:
Update API Connector documentation
Requester:
Alex Morgan
Request Type:
Content Request
Priority:
High
Task Description:
Please review and update the API Connector documentation with the latest setup details.
The form stored:
Priority: 2
because 2 is the custom Gravity Forms value we assigned to High.
ClickUp correctly displayed:
High
This confirmed that the priority mapping was dynamic rather than hardcoded.
Step 14: Verify the task in ClickUp
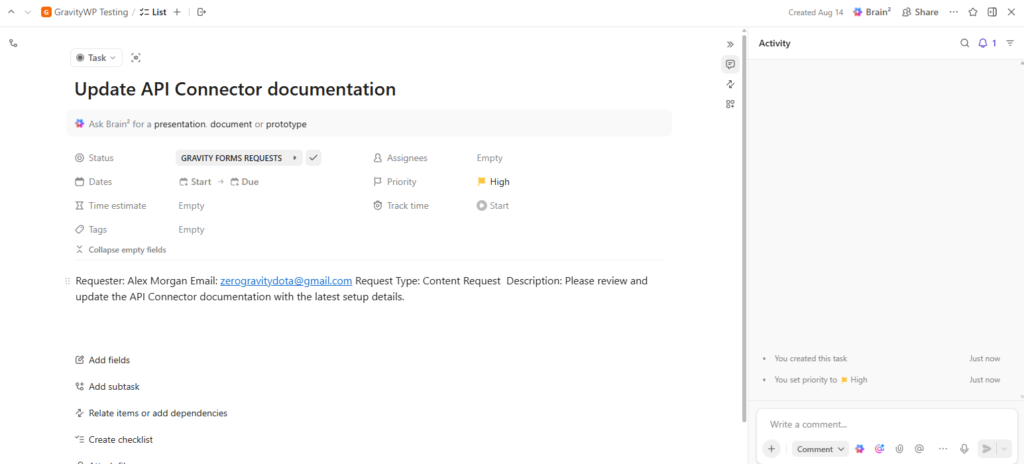
Open the task created from the final submission.
Our ClickUp task showed:
- Update API Connector documentation
- High priority
- Requester: Alex Morgan
- Requester email
- Request Type: Content Request
- The submitted task description
The task was created inside our Gravity Forms Requests List.
This confirms that Gravity Forms successfully transferred the mapped form data to the ClickUp API.
Step 15: Check the returned ClickUp data in Gravity Forms
Return to:
Forms → Entries
Open the same submission.
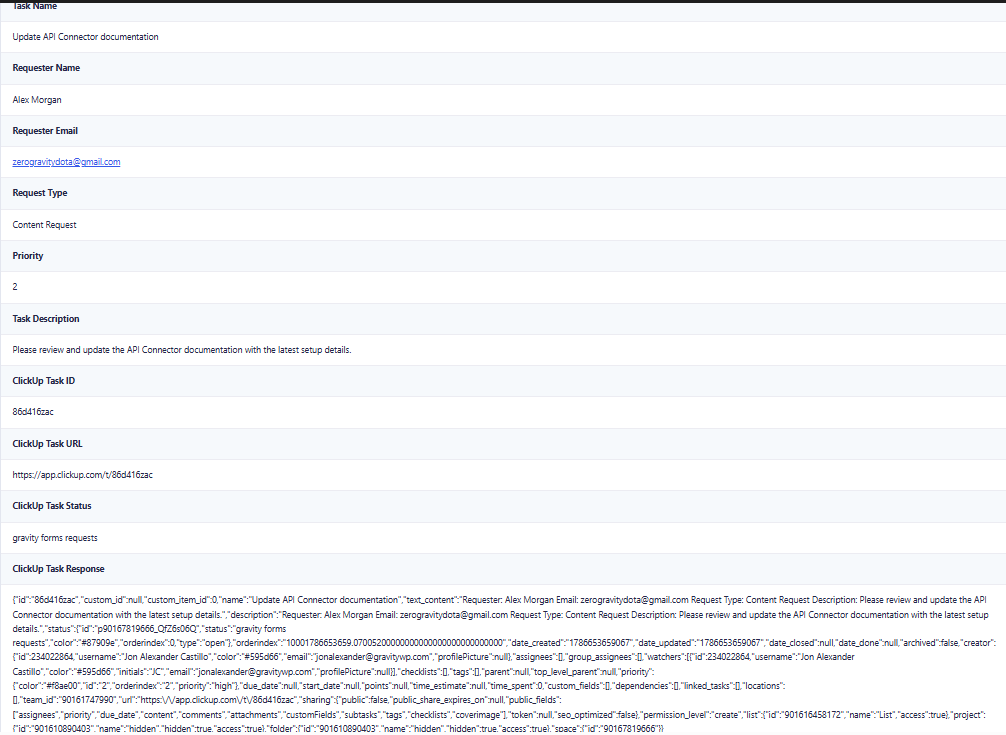
Our final entry contained:
- ClickUp Task ID
- ClickUp Task URL
- ClickUp Task Status
- Full ClickUp Task Response
The returned task URL gives you a direct link from the Gravity Forms entry to the ClickUp task.
The returned status in our test reflected the status configured in our ClickUp List. Your own value may differ because ClickUp workflows can use different status names.
This is also why storing the full response during testing is useful. You can see what your own ClickUp workspace actually returned instead of assuming every account uses the same configuration.
What happened in our final test?
In our final test, submitting the Gravity Forms task request created a ClickUp task named Update API Connector documentation.
ClickUp received the requester information, Content Request type, task description, and High priority.
GravityWP API Connector then saved the returned:
- Task ID
- ClickUp task URL
- Task status
- Complete JSON response
back into the original Gravity Forms entry.
The final workflow was:
Gravity Forms submission → API Connector → ClickUp task → ClickUp response saved to Gravity Forms
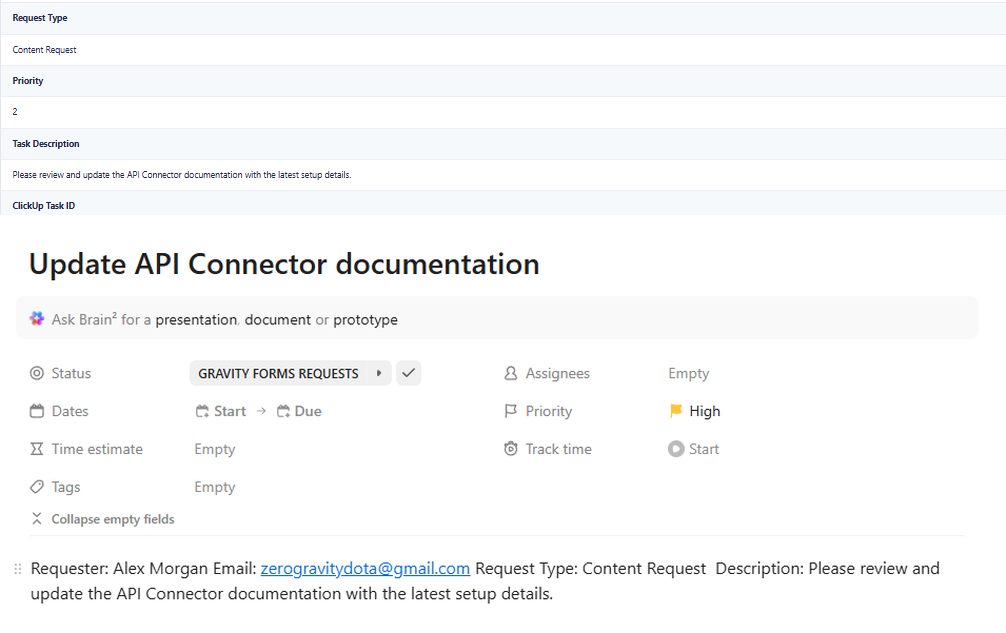
2, which ClickUp correctly interpreted as High priority.What should you check if the Gravity Forms ClickUp integration does not work?
ClickUp does not create a task
Check these settings first:
- Personal API Token
Authorizationheader- ClickUp List ID
- Request method is POST
- Endpoint uses
list/YOUR_LIST_ID/task - Task Name is mapped
ClickUp requires authentication on API requests, and the Create Task endpoint requires both a List ID and a task name.
ClickUp receives the wrong priority
Check the Gravity Forms Priority field.
Make sure Show Values is enabled and use:
Urgent → 1
High → 2
Normal → 3
Low → 4
Then map the field using:
{Priority:FIELD_ID:value}ClickUp uses these four fixed priority values, while Gravity Forms’ :value modifier outputs the stored value instead of the label.
ClickUp response fields stay empty
Temporarily enable:
Store full response
Then submit another test and inspect the complete JSON response inside the Gravity Forms entry.
Compare the returned JSON with your Target Field paths.
API Connector supports nested paths using /, and the GravityWP JSON response path parser can help identify available properties.
The task is created but the status is different from this tutorial
That does not necessarily mean the integration failed.
Our response returned the status configured in our ClickUp List. Your workspace may use different task statuses.
Check the full response and use the status value returned by your own ClickUp configuration.
Can you connect Gravity Forms to ClickUp without Zapier?
Yes.
The workflow in this tutorial connects Gravity Forms directly to the ClickUp API through GravityWP API Connector. There is no Zap in the tested setup.
The request path is:
Gravity Forms → GravityWP API Connector → ClickUp API
This gives you direct control over the endpoint, request headers, mapped form values, and returned API response.
If you want a broader comparison of ways to connect Gravity Forms with external services, see our guide to Gravity Forms integrations. GravityWP explains when API-based integrations can be useful compared with add-ons, webhooks, and other connection methods.
We are not saying this method is always better than Zapier or another automation platform. The best approach depends on the workflow you need.
Can this ClickUp workflow be expanded?
Yes.
ClickUp’s Create Task API supports more task properties than the three we used here, including:
- Assignees
- Status
- Tags
- Start dates
- Due dates
- Time estimates
- Sprint points
- Custom fields
- Parent tasks and dependencies
We kept this tutorial focused on the fields we actually tested:
name, description, and priority.
If you need a more advanced project-management integration, the same API Connector approach can be expanded after you test the additional ClickUp properties your workflow requires.
For another example of creating project-management records from Gravity Forms, see our Gravity Forms monday.com integration tutorial. That workflow also uses API Connector to turn a form submission into a new item in an external work-management platform.
Create ClickUp tasks from Gravity Forms
You now have a working Gravity Forms ClickUp integration that creates a new task when someone submits a form.
Our tested workflow sent the task name, requester information, request type, description, and dynamic priority to ClickUp. It then saved useful response data back into the original Gravity Forms entry.
The final setup is:
Gravity Forms → API Connector → ClickUp → returned task data stored in Gravity Forms
If you want to build more API-driven Gravity Forms workflows, see the GravityWP API Connector documentation or the API Connector product page. API Connector supports configurable requests, custom headers, multiple authentication methods, and response mapping for other APIs as well.
Frequently Asked Questions
Yes. In our tested workflow, submitting the Gravity Forms form triggered API Connector, which sent a POST request to ClickUp’s Create Task endpoint. A new ClickUp task was created in the selected List.
No. The method in this tutorial uses GravityWP API Connector and the ClickUp API directly.
Our test uses a ClickUp Personal API Token in the Authorization request header.
ClickUp recommends personal tokens for individual or testing use. Integrations intended for other users should use OAuth.
Enable Show Values on the Priority Drop Down and assign ClickUp’s numeric values:1 Urgent, 2 High, 3 Normal, and 4 Low.
Then use the Gravity Forms :value merge tag modifier in the API mapping.
Yes. API Connector can map properties returned by the API response into Gravity Forms Target Fields.
In our test, we saved the task ID, task URL, and status. We also stored the complete ClickUp response.
Yes, if they map to properties supported by ClickUp’s API. ClickUp’s Create Task endpoint supports additional fields such as assignees, dates, tags, status, and custom fields.
This tutorial only documents the mappings we tested.
Our Premium add-ons for Gravity Forms

Entry to Database
Integrates Gravity Forms with internal or external databases, offering flexible mapping of form fields to database columns and real-time synchronization between entries and database rows.

DateTime Field
The GravityWP - DateTime Field add-on adds a dedicated Date/Time field to Gravity Forms so users can enter both a date and a time in a single input.
Update Multiple Entries
Trigger the update of multiple entries in a target form by submitting an entry in a trigger form.
Advanced Merge Tags
This Gravity Forms Add-On adds extra Merge Tag modifiers (and a lot of power). From the most common used functions like capitalize and length to changing date formats.
Read tutorials about

How to Validate Repeatable Contact Rows in Gravity Forms
Learn how to validate repeatable Gravity Forms List field rows with GravityWP List Text. This tutorial shows how to add email and regex validation, test invalid values, and confirm that valid team roster data is stored correctly.

Gravity Forms Airtable Integration: Create Records From Form Submissions
Learn how to build a Gravity Forms Airtable integration with GravityWP API Connector. Send form submissions to Airtable, create new records automatically, and save the returned Airtable Record ID and response back to Gravity Forms.

Gravity Forms Asana Integration: Create Tasks From Form Submissions
Learn how to connect Gravity Forms to Asana with GravityWP API Connector. This tested workflow creates Asana tasks from form submissions and saves the returned task ID and URL back to Gravity Forms.

Gravity Forms Google Calendar Integration: Create Events From Form Submissions
Connect Gravity Forms to Google Calendar with GravityWP API Connector. Learn how to create calendar events from form submissions, map event details, configure OAuth 2.0, handle time zones, and save the returned Event ID and URL.