Do you want to send Gravity Forms submissions to monday.com without copying entries by hand?
In this tutorial, you will build a practical Gravity Forms monday.com integration using GravityWP API Connector. The setup connects WordPress, Gravity Forms, and monday.com through the monday.com API.
When someone submits a form on your WordPress site, the form data is sent to monday.com. A new item is then created on a monday.com board.
We tested this workflow with a simple project request form. The final setup created a new monday.com item. It also filled the mapped monday.com board columns, saved the returned monday.com item ID back to Gravity Forms, and stored the full API response in the Gravity Forms entry.
The workflow looks like this:
Gravity Forms submission
→ GravityWP API Connector
→ monday.com API
→ New monday.com item created
→ monday.com item ID saved back to Gravity Forms
monday.com’s platform API is GraphQL-based. API requests are sent as POST requests with a JSON body. The access token is sent in the Authorization header. monday.com also says GraphQL queries and mutations should be sent with the query key in the JSON body. See the monday.com API getting started guide.
What does this Gravity Forms and monday.com integration do?
This tutorial creates a real workflow between Gravity Forms and monday.com.
When a user submits the form, GravityWP API Connector sends the submitted form data to monday.com. monday.com then creates a new item on a board.
In our tested example, the form submission created a new item in a monday.com board called Project Requests.
The submitted values were saved into these monday.com columns:
- Requester Name
- Requester Email
- Department
- Request Type
- Priority
- Due Date
- Request Details
The setup also saved the returned monday.com item ID inside the Gravity Forms entry. This is useful because you can track which form entry created which monday.com item.
This tutorial focuses on creating a new monday.com item. It does not create a monday.com WorkForm, a CRM lead, or a multi-step automation. You can use the same idea for a monday.com CRM board, but this example is built around project requests.
What you need to integrate Gravity Forms with monday.com
Before you begin, make sure you have:
- A WordPress site
- Gravity Forms installed
- GravityWP API Connector installed
- A monday.com account
- A monday.com board
- A monday.com API token
- Access to edit a Gravity Form
You also need to copy IDs from monday.com and use Gravity Forms merge tags. We will explain where each value goes.
monday.com uses token-based authentication for API requests. The token should be passed in the Authorization header. You can learn more in the monday.com authentication documentation.
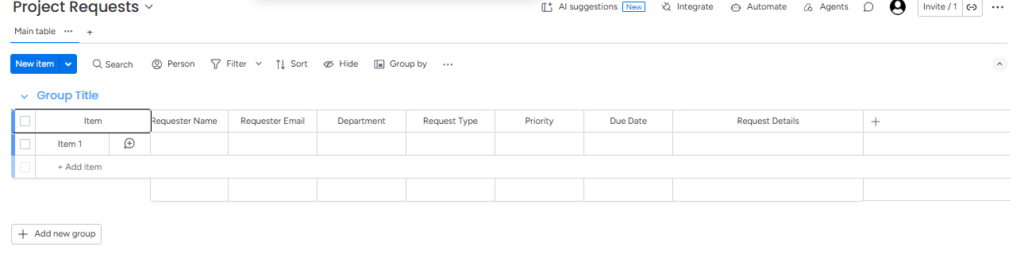
Step 1: Create a monday.com board for Gravity Forms submissions
First, create a board in monday.com.
For this tutorial, we used this board name:
Project RequestsThis monday.com board will receive the Gravity Forms submissions.
Add these columns to the board:
| monday.com column | Suggested column type |
|---|---|
| Item name | Default first column |
| Requester Name | Text |
| Requester Email | Text |
| Department | Text |
| Request Type | Text |
| Priority | Text |
| Due Date | Text |
| Request Details | Long Text |
The first column in a monday.com board is the item name. In this tutorial, we use the Gravity Forms Request Title field as the monday.com item name.
For the first setup, we recommend using mostly Text columns. Text columns are easier to test because they can accept simple text values. The Request Details column uses Long Text, so it needs a slightly different format in the API request.
monday.com’s API uses column_values to set board column values when creating or updating items. The column values are sent as a JSON-formatted string. You can read more in the monday.com items API documentation.
Step 2: Get your monday.com board ID and column IDs
Next, collect the IDs you need for the API request.
Get the monday.com board ID
Open your monday.com board and check the browser URL.
It may look like this:
https://yourcompany.monday.com/boards/5029849336The number after /boards/ is the board ID.
In our test, the board ID was:
5029849336Get the monday.com column IDs
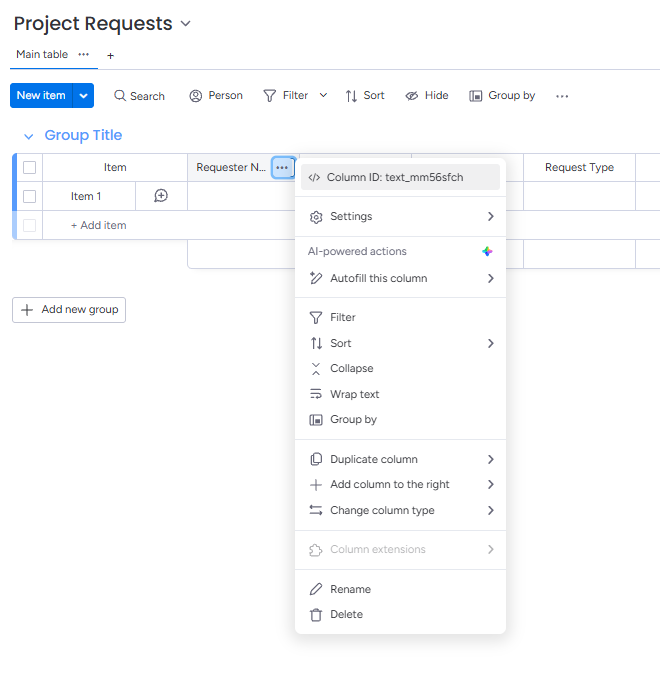
To copy column IDs, enable Developer Mode in monday.com.
Go to:
Profile menu → monday.labs → Developer mode
After Developer Mode is enabled, open the menu for each column and copy the column ID.
In our tested board, we used these monday.com column IDs:
Requester Name: text_mm56sfch
Requester Email: text_mm56tvnp
Department: text_mm56ff2q
Request Type: text_mm563cy5
Priority: text_mm564cww
Due Date: text_mm563e1f
Request Details: long_text_mm56a766
Your IDs will be different. Do not copy these values unless you are working on the same test board.
Step 3: Set up Gravity Forms for the monday.com workflow
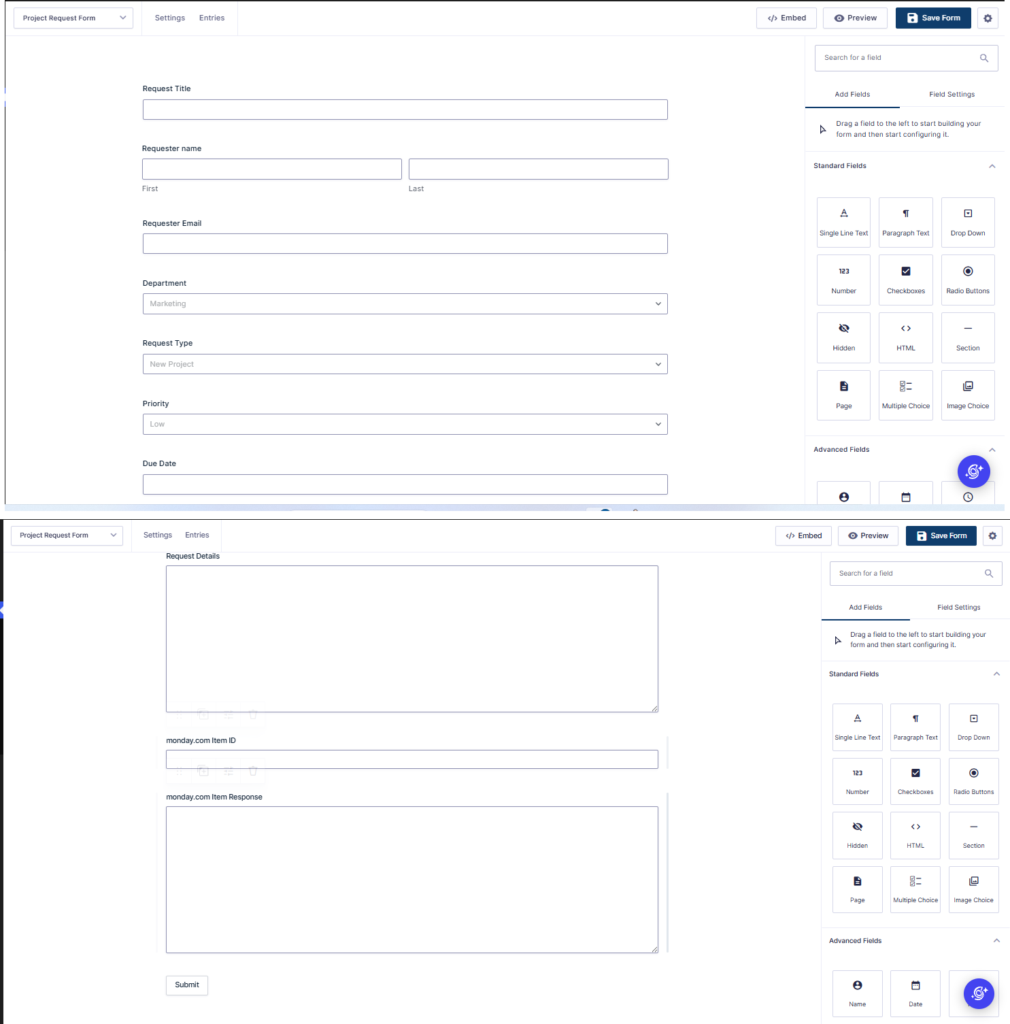
Now create the form in Gravity Forms.
In WordPress, go to:
Forms → New FormName the form:
Project Request FormAdd these fields:
| Field label | Field type |
|---|---|
| Request Title | Single Line Text |
| Requester name | Name |
| Requester Email | |
| Department | Drop Down |
| Request Type | Drop Down |
| Priority | Drop Down |
| Due Date | Single Line Text |
| Request Details | Paragraph Text |
| monday.com Item ID | Single Line Text |
| monday.com Item Response | Paragraph Text |
For the Department dropdown, you can use:
- Marketing
- Sales
- Support
- Operations
- Development
For the Request Type dropdown, you can use:
- New Project
- Support Task
- Client Request
- Internal Task
- Onboarding
In Priority dropdown, you can use:
- Low
- Medium
- High
- Urgent
Set these two fields to Administrative visibility:
monday.com Item ID
monday.com Item Response
These fields are not for the person filling out the form. They store data from the monday.com API response inside the Gravity Forms entry.
Gravity Forms explains that Administrative visibility hides a field from the public form while keeping it available in the admin area. See the Gravity Forms common field settings documentation.
Step 4: Create the monday.com API connection in GravityWP API Connector
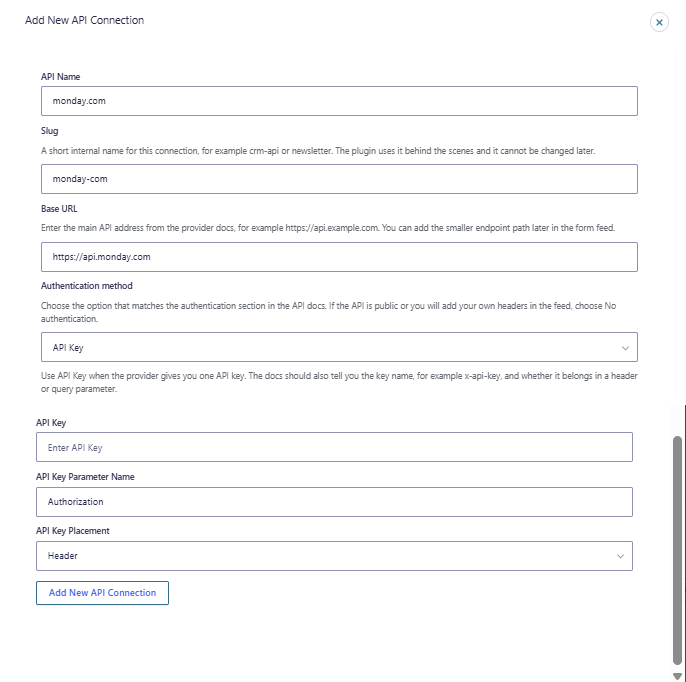
Now create the monday.com API connection in GravityWP API Connector.
Go to your API Connector settings and add a new API connection.
Use these settings:
| Setting | Value |
|---|---|
| API Name | monday.com |
| Base URL | https://api.monday.com |
| Authentication method | API Key |
| API Key Parameter Name | Authorization |
| API Key Placement | Header |
| API Key Value | Your monday.com API token |
Do not share your API token publicly. Paste it only inside your WordPress admin settings.
The endpoint will be added later in the feed as:
/v2Together, the base URL and endpoint create the full monday.com API URL:
https://api.monday.com/v2This keeps the API connection reusable. You can use the same API connection for other monday.com feeds later.
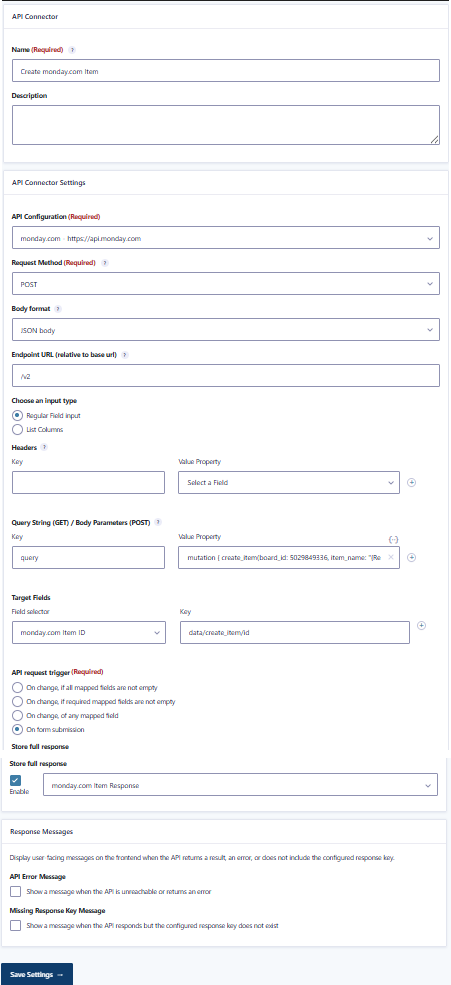
Step 5: Create the Gravity Forms to monday.com API Connector feed
Next, go to your form settings:
Project Request Form → Settings → API ConnectorCreate a new feed.
Use these settings:
| Setting | Value |
|---|---|
| Feed name | Create monday.com Item |
| API Configuration | monday.com |
| Request Method | POST |
| Body format | JSON body |
| Endpoint URL | /v2 |
| Input type | Regular Field Input |
| API request trigger | On form submission |
In the Query String / Body Parameters section, add:
| Key | Value |
|---|---|
query | The monday.com GraphQL mutation |
This is the key part. monday.com expects the GraphQL mutation to be sent inside a query value in the JSON body.
For the response mapping, use:
| Setting | Value |
|---|---|
| Target field | monday.com Item ID |
| Response key | data/create_item/id |
| Store full response | Enabled |
| Full response field | monday.com Item Response |
GravityWP API Connector can map JSON response paths into Gravity Forms fields. It can also store the raw response, which is useful for testing and troubleshooting. See the API Connector feed settings documentation.
Step 6: Add the monday.com create_item mutation
Now add the mutation that creates the monday.com item.
monday.com’s API supports creating items through the create_item mutation. The mutation can return fields such as the new item’s ID, name, and URL. You can learn more in the monday.com GraphQL overview.
Here is the final tested mutation from our setup:
mutation { create_item(board_id: 5029849336, item_name: "{Request Title:1}", column_values: "{\"text_mm56sfch\":\"{Requester name (First):3.3} {Requester name (Last):3.6}\",\"text_mm56tvnp\":\"{Requester Email:4}\",\"text_mm56ff2q\":\"{Department:5}\",\"text_mm563cy5\":\"{Request Type:6}\",\"text_mm564cww\":\"{Priority:7}\",\"text_mm563e1f\":\"{Due Date:8}\",\"long_text_mm56a766\":{\"text\":\"{Request Details:9}\"}}") { id name url } }Paste this into the Value field for the query body parameter.
Then replace these values with your own:
5029849336 → your monday.com board IDtext_mm56sfch → your Requester Name column IDtext_mm56tvnp → your Requester Email column IDtext_mm56ff2q → your Department column IDtext_mm563cy5 → your Request Type column IDtext_mm564cww → your Priority column IDtext_mm563e1f → your Due Date column IDlong_text_mm56a766 → your Request Details column ID
Also check your Gravity Forms merge tags. In our tested form, these were the field IDs:
Request Title: {Request Title:1}
Requester name: {Requester name (First):3.3} {Requester name (Last):3.6}
Requester Email: {Requester Email:4}
Department: {Department:5}
Request Type: {Request Type:6}
Priority: {Priority:7}
Due Date: {Due Date:8}
Request Details: {Request Details:9}
Your field IDs may be different. This can happen if you added, deleted, or recreated fields while building the form.
Step 7: Test the Gravity Forms to monday.com workflow
Now submit a test entry.
Use sample values like this:
| Field | Sample value |
|---|---|
| Request Title | Website landing page update |
| Requester name | Jon Alexander Castillo |
| Requester Email | jonalexander@gravitywp.com |
| Department | Marketing |
| Request Type | Support Task |
| Priority | High |
| Due Date | 2026-07-30 |
| Request Details | Please update the homepage hero section, contact form, and call-to-action button for the new campaign. |
After submitting the form, check your monday.com board.
You should see a new item with the submitted values.
In our test, monday.com created a new item with this item name:
Website landing page updateThe row also included:
Requester Name: Jon Alexander Castillo
Requester Email: jonalexander@gravitywp.com
Department: Marketing
Request Type: Support Task
Priority: High
Due Date: 2026-07-30
Request Details: Please update the homepage hero section, contact form, and call-to-action button for the new campaign.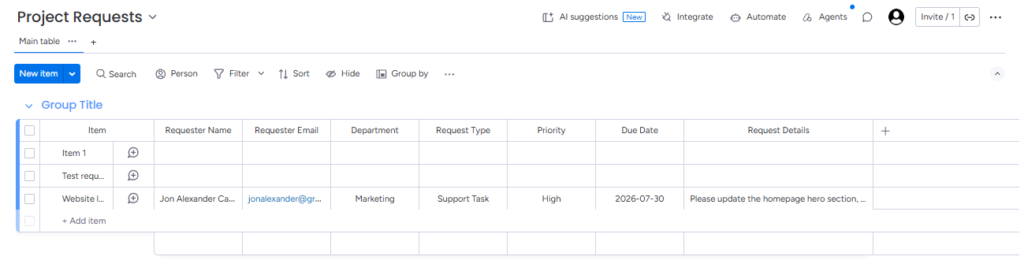
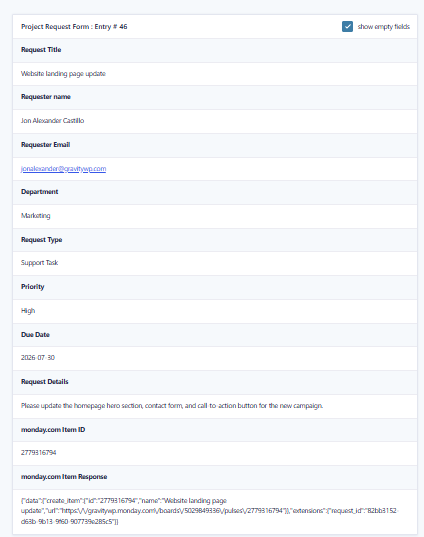
Then check the Gravity Forms entry.
In our test, Gravity Forms saved the returned monday.com item ID:
2779316794It also saved the full monday.com response in the monday.com Item Response field.
That confirms the data transfer is working.
Why use Text columns first in this monday.com integration?
You may wonder why this tutorial uses Text columns for fields like Priority and Due Date.
The reason is simple. Different monday.com column types can need different value formats.
A Text column can use a simple value:
"text_mm56ff2q":"{Department:5}"A Long Text column needs a different structure:
"long_text_mm56a766":{"text":"{Request Details:9}"}This makes Text columns easier for your first Gravity Forms to monday.com setup.
After the basic integration works, you can test more advanced monday.com column types like Status, Date, Email, or People. Check monday.com’s API documentation for the correct value format before changing the mutation.
Troubleshooting Gravity Forms and monday.com API errors
If the integration does not work on the first try, check these common issues.
The monday.com item is not created
Check these settings:
- The monday.com API token is correct
- The API Key Parameter Name is Authorization
- The API Key Placement is Header
- The request method is POST
- The endpoint is /v2
- The body format is JSON body
- The body parameter key is query
If the API token is wrong, monday.com will reject the request.
The item is created, but the columns are empty
This usually means the basic create_item mutation worked, but the column_values part did not.
Check:
- The column IDs are correct
- The column_values string is included
- The monday.com board has those columns
- The Gravity Forms merge tags are correct
If a column ID is wrong, monday.com cannot place the value in that column.
The monday.com Item ID is not saved in Gravity Forms
Check the target field mapping.
Use:
Target field: monday.com Item ID
Response key: data/create_item/id
Also make sure the mutation returns id:
{ id name url }If the response does not include id, API Connector cannot save it into the target field.
The Long Text field does not save correctly
For the Long Text column, use this format:
"long_text_column_id":{"text":"Your text here"}In our test, this worked:
"long_text_mm56a766":{"text":"{Request Details:9}"}The form works once, then fails after editing fields
If you edit your Gravity Forms fields, check your merge tags again.
Gravity Forms field IDs can change if fields are deleted and recreated. That means a merge tag like this:
{Requester Email:4}may not match your current form anymore.
Use the merge tag picker in API Connector to confirm the correct field IDs.
When should you use a more advanced monday.com workflow?
This tutorial is best for a simple no-code workflow:
- Create a new monday.com item from a Gravity Forms submission
- Send basic form data to monday.com
- Save the returned monday.com item ID
- Reduce manual effort
- Keep form entries connected to monday.com items
For more advanced workflows, you may need extra setup.
Examples include:
- Updating existing monday.com items
- Creating subitems
- Assigning people columns
- Using advanced Status or Date formatting
- Adding conditional routing
- Sending files
- Running multi-step workflows
For multi-step automation, you may want to use a tool like n8n with Gravity Forms. This can be useful when one API step depends on the result from a previous API step.
Conclusion
You now have a working Gravity Forms monday.com integration that creates a new monday.com item from a form submission.
The setup uses GravityWP API Connector, a monday.com API token, and the monday.com create_item mutation. It sends submitted form values to a monday.com board and saves the returned item ID back to the Gravity Forms entry.
This is useful when your team collects requests in WordPress but manages the work in monday.com. Instead of copying form entries by hand, each new form submission can become a new action item on your monday.com board.
FAQ about Gravity Forms and monday.com integration
Yes. In this tutorial, Gravity Forms sends submission data to monday.com through GravityWP API Connector. The setup creates a new item on a monday.com board when the form is submitted.
No. This tutorial uses GravityWP API Connector and the monday.com API. Zapier is not required.
Yes. The tested workflow creates a new monday.com item from a Gravity Forms form submission.
Yes. In our test, API Connector saved the returned data/create_item/id value into a Gravity Forms field called monday.com Item ID.
This tutorial focuses on creating new items. monday.com’s API can also update items, but that requires a different mutation and a reliable way to identify the item you want to update.
Yes, but those column types may need a different JSON format. This tutorial starts with Text columns to keep the first setup simple and reliable.
Yes. The same setup can work for support tasks, project requests, onboarding, internal operations, client intake, and other form-to-board workflows.
Our Premium add-ons for Gravity Forms

All Entries
All your new Gravity Forms entries in one central place. Stop navigating between multiple forms to find new entries. Get immediate oversight and full control with a powerful, unified dashboard.
Field to Entries
Create entries based on Checkboxes & Multi Select choices & List Field rows.
List Text
Add features like textarea, placeholder and custom validation to a column or multiple columns in a Gravity Forms List Field.

JWT Prefill
Fill forms with data you can trust. Prefill Gravity Forms fields with a secure token instead of links with editable url parameters, so your data is accurate, tamper-proof, and ready to use.
Read tutorials about
How to Validate Repeatable Contact Rows in Gravity Forms
Learn how to validate repeatable Gravity Forms List field rows with GravityWP List Text. This tutorial shows how to add email and regex validation, test invalid values, and confirm that valid team roster data is stored correctly.

Gravity Forms Airtable Integration: Create Records From Form Submissions
Learn how to build a Gravity Forms Airtable integration with GravityWP API Connector. Send form submissions to Airtable, create new records automatically, and save the returned Airtable Record ID and response back to Gravity Forms.

Gravity Forms Asana Integration: Create Tasks From Form Submissions
Learn how to connect Gravity Forms to Asana with GravityWP API Connector. This tested workflow creates Asana tasks from form submissions and saves the returned task ID and URL back to Gravity Forms.

Gravity Forms Google Calendar Integration: Create Events From Form Submissions
Connect Gravity Forms to Google Calendar with GravityWP API Connector. Learn how to create calendar events from form submissions, map event details, configure OAuth 2.0, handle time zones, and save the returned Event ID and URL.