Do you want to send a Gravity Forms email notification when someone edits an entry from the front end using GravityView?
This is a common need when entries are not final after the first submission. A user may update an application, a staff member may revise an order, or an admin may change a public directory listing. In those cases, the right person should know when the entry changes.
By default, Gravity Forms notifications usually run when a form is submitted. But when an existing entry is edited later, you may need an additional notification event.
The GravityRevisions plugin adds this option. It creates a new notification event called “Entry is updated, revision is saved”. When this event is selected, Gravity Forms can send an email after an entry is updated, including updates made through GravityView front-end editing.
Why edit-entry notifications matter
Entry updates can be easy to miss.
If a user changes information after submitting a form, the update may not be obvious unless someone checks the entry manually. That can cause delays in approval workflows, order revisions, HR processes, member directory updates, or support requests.
An edit-entry notification helps your team respond faster. It can alert an admin, reviewer, manager, or support team whenever an entry changes.
This is useful for workflows such as:
- HR forms where employees update personal details
- Job applications where applicants revise submitted information
- Order forms where customers request changes
- Support portals where users update issue details
- Member directories where users edit profile information
- Approval workflows where admins need to review revised entries
Instead of checking entries manually, the notification tells the right person that something changed.
What you need before you start
Before setting up the notification, make sure you have the correct tools active on your site.
You need:
| Requirement | Why it matters |
|---|---|
| Gravity Forms | Stores the form and entry data |
| GravityView | Lets users or admins edit entries from the front end |
| GravityRevisions | Adds the update-entry notification event |
| A form with existing entries | Gives you something to edit and test |
| A configured View with edit access | Allows front-end entry editing through GravityView |
You do not need to write custom code for this setup. The key is choosing the correct notification event after GravityRevisions is active.
Before you configure the notification
First, confirm that front-end editing works in GravityView.
Open the View connected to your form and test whether the right user role can edit an entry. If editing is not available from the front end, fix that first before creating the notification.
You should also decide who needs to receive the update email. For example, you may want to notify:
- The site administrator
- A department manager
- A reviewer assigned to the form
- A support team email address
- The person who originally submitted the entry
The best recipient depends on the workflow. For internal approval processes, an admin or reviewer may be the right choice. For user profile updates, the user and admin may both need a copy.
Step 1: Install and activate GravityRevisions
Install and activate the GravityRevisions plugin on your WordPress site.
Once GravityRevisions is active, it adds revision tracking for Gravity Forms entries. It also adds the notification event used in this tutorial.
If you do not see the new event later, the first thing to check is whether GravityRevisions is installed and active.
Step 2: Open the form notification settings
Go to your WordPress dashboard and open the form connected to your GravityView View.
Then go to:
Form Settings → Notifications
This is the same area where you manage normal Gravity Forms email notifications.
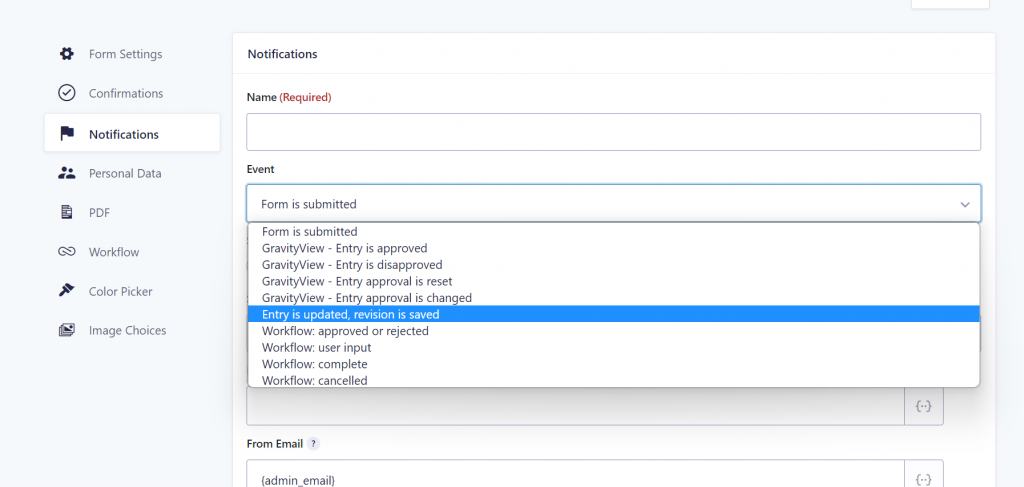
Step 3: Add a new notification
Click Add New to create a separate notification for updated entries.
Give the notification a clear admin-only name. This name is only used inside WordPress, so choose something easy to recognize later.
Good examples include:
- Entry Updated Notification
- GravityView Edit Alert
- Revised Entry Email
- Application Update Notification
- Order Revision Alert
Avoid naming it something too vague, such as “Admin Notification,” because the form may already have other notifications.
Step 4: Select the update-entry event
In the Event dropdown, choose:
Entry is updated, revision is saved
This event is added by GravityRevisions. It tells Gravity Forms to send the notification when an existing entry is changed and a revision is saved.
If you do not see this option, check that GravityRevisions is installed and activated. You may also need to refresh the form settings page after activating the plugin.
Step 5: Choose who receives the email
Next, configure the Send To setting.
You can send the notification to an admin email address, a fixed team address, or a value from the form entry. For example, if your form has a manager email field, you can send the update notification to that field value.
Keep the recipient list focused. If too many people receive every edit notification, the emails can quickly become noise.
For most workflows, send the email only to the person or team responsible for reviewing the change.
Step 6: Write the subject line
Use a subject line that makes the purpose of the email clear.
Examples:
Entry Updated: {form_title}A GravityView entry was editedUpdated application: {Name:1}Order revision submitted for reviewIf the form has a useful identifying field, include it in the subject line. This helps admins understand which entry changed without opening the email first.
Step 7: Add the message content
In the message body, explain that an existing entry has been updated.
You can include normal Gravity Forms merge tags, such as {all_fields}, if you want to show the full entry data. GravityRevisions also provides merge tags for revision details.
A simple message could look like this:
Hello,

An entry has been updated.

Updated fields:
{entry_revision_diff}

Full entry details:
{all_fields}
The {entry_revision_diff} merge tag shows a before-and-after comparison for fields that changed. The {all_fields} merge tag shows the full entry details.
This is helpful because the recipient can quickly see what changed without comparing the entry manually.
Step 8: Save the notification
After configuring the event, recipient, subject line, and message, click Save Notification.
Then return to the Notifications list and confirm that the new notification is active.
If the form has several notifications, check that each one has a clear name and purpose. This makes future troubleshooting easier.
Step 9: Test the notification through GravityView
Do not test this only by editing the entry in the WordPress admin area. Since this tutorial is about GravityView, test it from the front end.
Open the page where your GravityView View appears. Edit an existing entry and change one or two field values. Save the update.
Then check whether the notification email arrives.
Also review the email content. Make sure it shows the changed fields clearly and does not include unnecessary information.
Step 10: Check the saved entry revision
After testing the email, open the entry in the WordPress dashboard.
GravityRevisions saves entry changes as revisions, so you can review what changed after the update. This is useful when you need an audit trail for edited entries.
For approval workflows, revision history can help admins understand what was changed, who made the change, and whether the updated entry still needs review.
Example use cases
HR update forms
An employee may submit a form with personal details, emergency contact information, or internal request data. If the employee later edits the entry through GravityView, HR can receive an email notification and review the update.
Order revision workflows
A customer or staff member may update order details after the original submission. An edit-entry notification can alert the operations team that the order needs another look.
Application review systems
Applicants may need to update missing information after an initial review. When the applicant edits the entry, the reviewer can receive an email instead of checking the dashboard manually.
Member directories
If users can update their public profile or directory listing, admins may want to review changes before trusting the updated information. A notification helps flag edited listings for review.
Support requests
A user may add more details to an existing support request. When the entry changes, the support team can get notified and continue the conversation faster.
Troubleshooting
The update event does not appear
If “Entry is updated, revision is saved” does not appear in the Event dropdown, check that GravityRevisions is installed and active. This event is not part of the default Gravity Forms notification events.
The email does not send after editing through GravityView
First, make sure the entry was actually saved after editing. Then check that the notification is active and uses the correct event.
Also confirm that your WordPress site can send email. If normal Gravity Forms notifications are not sending either, the issue may be related to email delivery rather than GravityView or GravityRevisions.
The email sends, but it does not show what changed
Add the {entry_revision_diff} merge tag to the message body. This merge tag shows the changed fields in the notification email.
If you only use {all_fields}, the email may show the full entry but not clearly highlight the difference between the old and new values.
The wrong person receives the notification
Review the Send To setting. If you are using a form field as the recipient, make sure that field contains a valid email address.
For admin workflows, a fixed team email address may be more reliable.
Too many emails are being sent
If users edit entries often, update notifications can become noisy. Keep the recipient list narrow and use clear subject lines so the emails are easier to manage.
If only certain changes need attention, review whether your workflow needs extra conditions or a more specific review process.
Final thoughts
Triggering an email notification after a GravityView entry edit helps you keep track of changes without checking entries manually.
With GravityRevisions active, you can add a dedicated Gravity Forms notification for updated entries, choose the “Entry is updated, revision is saved” event, and include revision details in the email message.
This setup is especially useful for approval systems, HR forms, order updates, support requests, and member directories where entries may change after the first submission.
For more information about GravityView and related resources, see our GravityView for Gravity Forms page.
Frequently asked questions
Yes, but you need the right event. GravityRevisions adds the “Entry is updated, revision is saved” event, which can trigger a notification after an existing entry is changed.
Yes. This setup is useful when GravityView allows users or admins to edit entries from the front end, and GravityRevisions saves the update as a revision.
Yes. Use the {entry_revision_diff} merge tag in the message body to show a before-and-after comparison of changed fields.
Usually, yes. The normal submission notification is for the first time the form is submitted. The update-entry notification is for later edits to an existing entry.
Yes, if the original entry includes an email field. In the notification settings, you can choose a field value as the recipient. Make sure the field contains a valid email address.
Our Premium add-ons for Gravity Forms

All Entries
All your new Gravity Forms entries in one central place. Stop navigating between multiple forms to find new entries. Get immediate oversight and full control with a powerful, unified dashboard.

List Number Format
With this Gravity Forms Add-on you can change List Field columns into a number field, do calculations within a row or column. Extra merge tags are available with total counts of columns.
Advanced Number Field
Functionality for Number Fields, like rounding or only absolute numbers, fixed point notation, range calculation, custom units like % or m2 & show as slider.
List Dropdown
Add a Dropdown Select with choices to a column or multiple columns in a Gravity Forms List Field.
Read tutorials about
How to Validate Repeatable Contact Rows in Gravity Forms
Learn how to validate repeatable Gravity Forms List field rows with GravityWP List Text. This tutorial shows how to add email and regex validation, test invalid values, and confirm that valid team roster data is stored correctly.
Gravity Forms Airtable Integration: Create Records From Form Submissions
Learn how to build a Gravity Forms Airtable integration with GravityWP API Connector. Send form submissions to Airtable, create new records automatically, and save the returned Airtable Record ID and response back to Gravity Forms.

Gravity Forms Asana Integration: Create Tasks From Form Submissions
Learn how to connect Gravity Forms to Asana with GravityWP API Connector. This tested workflow creates Asana tasks from form submissions and saves the returned task ID and URL back to Gravity Forms.

Gravity Forms Google Calendar Integration: Create Events From Form Submissions
Connect Gravity Forms to Google Calendar with GravityWP API Connector. Learn how to create calendar events from form submissions, map event details, configure OAuth 2.0, handle time zones, and save the returned Event ID and URL.

