Do you want to send Gravity Forms submissions to Pipedrive without using Zapier?
In this tutorial, you will build a working Gravity Forms Pipedrive integration using the GravityWP API Connector. When someone submits your form, the integration sends the contact data directly to Pipedrive CRM and creates a new Person in Pipedrive.
We tested this workflow with a real Gravity Forms form and a Pipedrive trial account. The final setup sends the visitor’s name, email, phone, company, service interest, and message to Pipedrive. It also saves the returned Pipedrive Person ID back into the Gravity Forms entry.
This is useful if you want to collect leads through a WordPress form and store those form contacts in Pipedrive without a third-party automation service.
What will this Gravity Forms Pipedrive integration do?
This tutorial creates a direct connection between Gravity Forms and Pipedrive using API Connector.
Here is the workflow:
- A visitor submits a Gravity Form on your WordPress site.
- API Connector sends the form data to the Pipedrive API.
- Pipedrive creates a new Person/Contact.
- Pipedrive returns the new Person ID.
- API Connector saves the Person ID and full API response inside the Gravity Forms entry.
Pipedrive’s API is REST-based, returns JSON output, and validates API requests against an API token. GravityWP API Connector can send GET or POST requests, pass form values as parameters, and map API responses back into form fields.
In our tested setup, these fields are sent to Pipedrive:
| Gravity Forms field | Pipedrive destination |
|---|---|
| Name | Pipedrive Person name |
| Pipedrive Person email | |
| Phone | Pipedrive Person phone |
| Company | Submitted Company custom field |
| Service Interest | Service Interest custom field |
| Message | Form Message custom field |
And these Pipedrive values are saved back to Gravity Forms:
| Pipedrive response | Gravity Forms field |
|---|---|
| Pipedrive Person ID | Pipedrive Person ID |
| Full API response | Pipedrive Person Response |
Why does this tutorial send contacts instead of creating Pipedrive Leads?
This tutorial creates a Pipedrive Person, also called a contact. It does not create a Pipedrive Lead object.
That is intentional.
During our test, we first tried to create both a Pipedrive Person and a Pipedrive Lead. The Person feed worked. It created the contact and saved the Person ID back into Gravity Forms.
The problem came with the second step. A Pipedrive Lead needs to be connected to an existing Person or Organization. That means the second API request needs the Person ID created by the first request. In our test, a two-feed setup was not reliable because the second feed needed data that only existed after the first feed finished.
For this tutorial, we chose the cleaner and more reliable setup:
Gravity Forms submission → Pipedrive Person/Contact
If your workflow needs to create a Person first and then create a Lead, Deal, Note, or Activity, that is a better fit for a multi-step automation tool like GravityWP n8n Connector or a custom workflow.
What do you need before you connect Gravity Forms to Pipedrive?
Before starting, make sure you have:
- A WordPress site
- Gravity Forms installed
- GravityWP API Connector installed
- A Pipedrive account
- A Pipedrive API token
- Access to create Pipedrive Person custom fields
For this tutorial, we used API Key authentication. Pipedrive’s current authentication docs say API token integrations should send the token in the x-api-token header. GravityWP API Connector also supports API Key authentication and lets you store the key once, choose the placement, and reuse the saved connection across API feeds.
How do you create the Gravity Forms contact form?
First, create the form that will collect the data you want to send to Pipedrive.
In WordPress, go to:
Forms → New Form
Name the form:
Pipedrive Lead Form
You can use a different name, but this tutorial will use that name for the steps.
Add the visible form fields
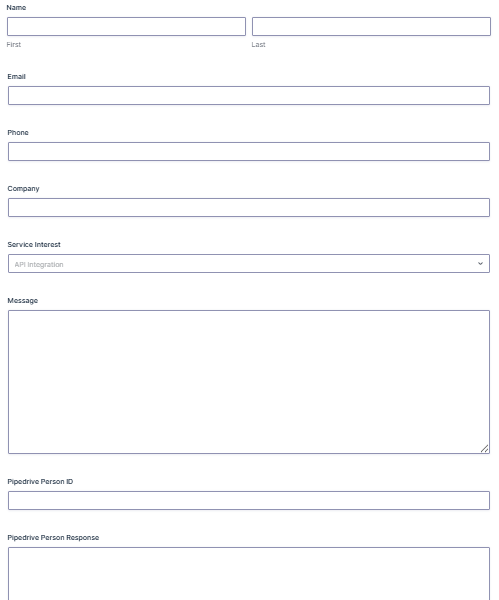
Add these fields to your Gravity Form:
| Field label | Gravity Forms field type |
|---|---|
| Name | Name |
| Phone | Phone |
| Company | Single Line Text |
| Service Interest | Drop Down |
| Message | Paragraph Text |
For the Service Interest dropdown, you can use these choices:
- API Integration
- CRM Automation
- Gravity Forms Support
- Custom Workflow
These choices are only examples. You can change them based on your own sales process.
Add the admin-only response fields
Next, add two extra fields to store the Pipedrive response.
| Field label | Gravity Forms field type | Visibility |
|---|---|---|
| Pipedrive Person ID | Single Line Text | Administrative |
| Pipedrive Person Response | Paragraph Text | Administrative |
Set both fields to Administrative visibility so visitors will not see them on the front end.
These fields are important for testing and verification. The Pipedrive Person ID field proves that Pipedrive created the contact. The Pipedrive Person Response field stores the full API response, which is useful when checking response keys or troubleshooting.
How do you create custom fields in Pipedrive?
Pipedrive already has default fields for name, email, and phone. But our form also collects company, service interest, and message.
To send those extra form fields to Pipedrive in one API request, we created custom Person fields in Pipedrive.
In Pipedrive, go to:
Settings → Data fields → Person → + Custom field
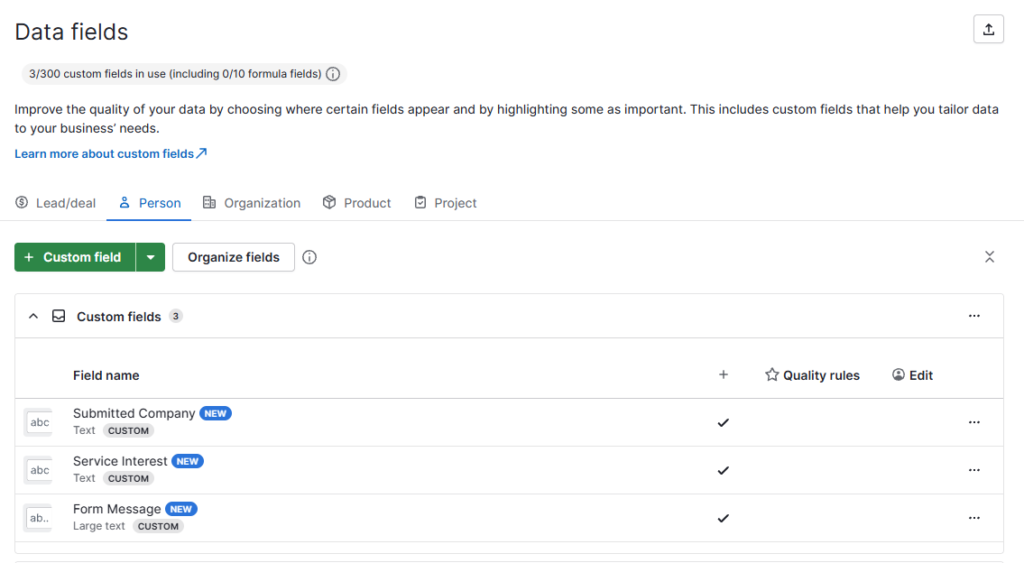
Create these custom Person fields:
| Pipedrive custom field | Field type |
|---|---|
| Submitted Company | Text |
| Service Interest | Text |
| Form Message | Large text |
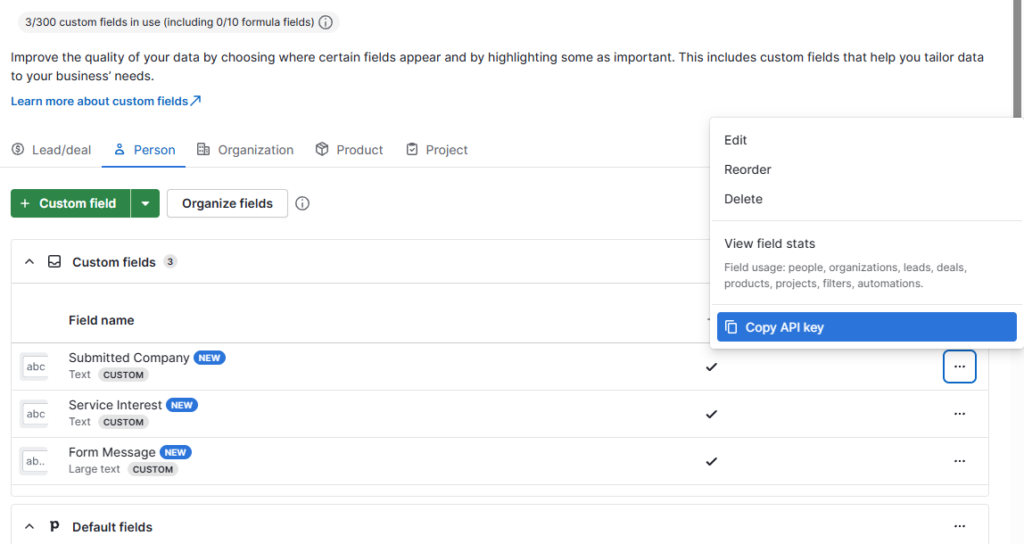
Pipedrive’s custom field docs explain that you can find a custom field API key from the Data fields area by choosing the entity, opening the three-dot menu beside the field, and selecting Copy API key. The Persons API also notes that custom fields are referenced by generated hash keys.
This means you should not use the visible field name as the API key.
For example, do not use this as the API Connector key:
Submitted CompanyInstead, use the copied API key from Pipedrive. It will look like a long generated string.
Create the three custom fields, copy each API key, and save the keys in a temporary note. You will use them when you map your form fields in API Connector.
How do you create the Pipedrive API connection in GravityWP API Connector?
Now create the reusable API connection.
In WordPress, go to:
Forms → Settings → API Connector → Add New API Connection
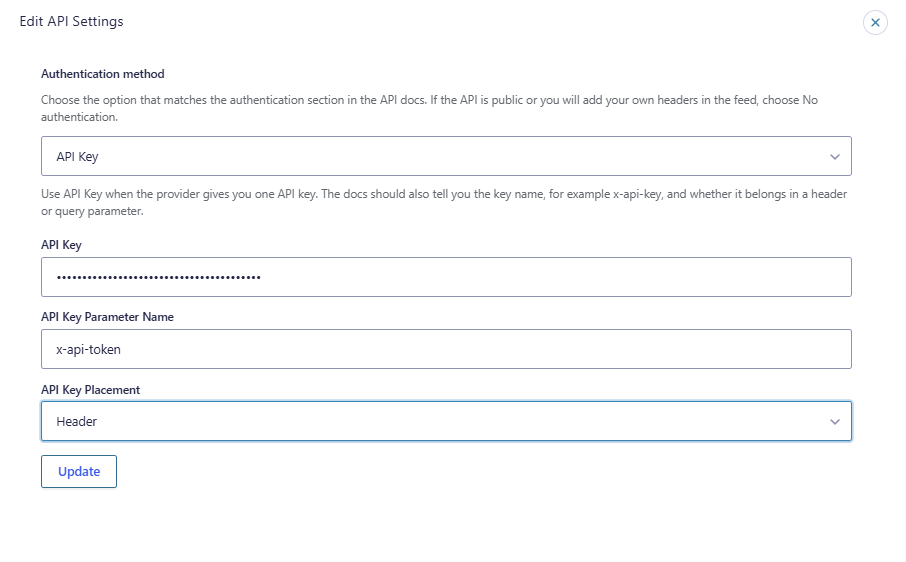
Use these settings:
| Setting | Value |
|---|---|
| API Name | Pipedrive |
| Slug | pipedrive |
| Base URL | https://yourcompanydomain.pipedrive.com |
| Authentication method | API Key |
| API Key | Your Pipedrive API token |
| API Key Parameter Name | x-api-token |
| API Key Placement | Header |
Your Pipedrive base URL comes from your browser address bar. For example, if your Pipedrive account URL is:
https://examplecompany.pipedrive.com/settings/apiThen your base URL is:
https://examplecompany.pipedrive.comDo not include the page path after .com.
Also, never show your real Pipedrive API token in screenshots. In our test, the API token was visible once, so we regenerated the token before continuing. That is a good security habit because an API token can access account data.
How do you map your form fields to Pipedrive?
Now create the API feed that sends the Gravity Forms data to Pipedrive.
Open your form, then go to:
Settings → API Connector → Add New
Name the feed:
Create Pipedrive Person
Use these settings:
| Setting | Value |
|---|---|
| API Configuration | Pipedrive |
| Request Method | POST |
| Body format | Form parameters |
| Endpoint URL | /api/v1/persons |
| Input type | Regular Field input |
| API request trigger | On form submission |
The full API request will use your Pipedrive base URL plus the endpoint. For example:
https://yourcompanydomain.pipedrive.com/api/v1/personsThis endpoint creates a Person/contact record in Pipedrive.
Add the body parameters
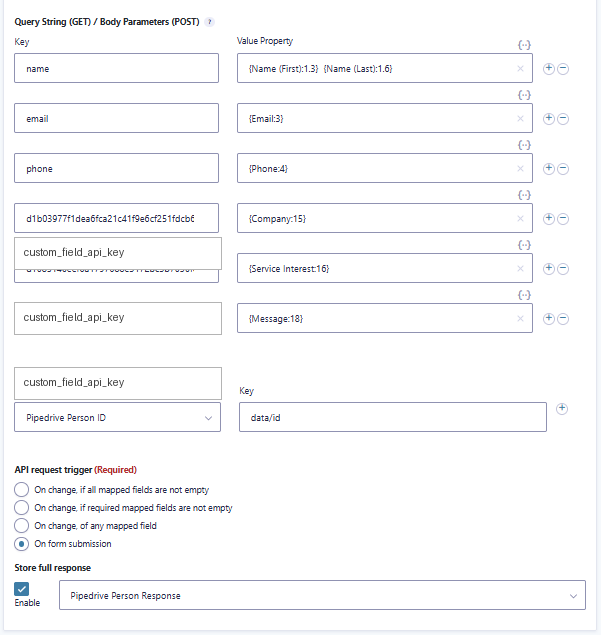
In the Query String (GET) / Body Parameters (POST) section, add the field mappings.
Use this structure:
| Key | Value Property |
|---|---|
name | First name + Last name |
email | |
phone | Phone |
| Submitted Company API key | Company |
| Service Interest API key | Service Interest |
| Form Message API key | Message |
The first three keys are normal Pipedrive Person fields:
name
email
phone
The last three keys must be the copied Pipedrive custom field API keys.
Your values will use Gravity Forms merge tags. For example:
name = {Name (First):1.3} {Name (Last):1.6}
email = {Email:3}
phone = {Phone:4}
Your field IDs may be different, so use the merge tag picker in API Connector instead of copying these exact field IDs.
For the custom fields, the setup should look like this:
custom_field_api_key_for_company = {Company:15}
custom_field_api_key_for_service_interest = {Service Interest:16}
custom_field_api_key_for_message = {Message:18}
Again, your field IDs and custom field API keys will be different.
How do you save the Pipedrive Person ID back to Gravity Forms?
After Pipedrive creates the contact, it returns a response. In our test, the new Person ID was available at this response path:
data/idIn the Target Fields section, add this mapping:
| Field selector | Key |
|---|---|
| Pipedrive Person ID | data/id |
Then enable:
| Setting | Value |
|---|---|
| Store full response | Enabled |
| Full response field | Pipedrive Person Response |
In our test, data/id worked. data.id did not. API Connector uses slash-style paths for nested response values, so use data/id.
If you are not sure which response key to use, store the full response first and check the returned JSON. GravityWP also provides documentation for API feed settings and a JSON response path helper for finding possible paths.

How do you test the Gravity Forms to Pipedrive connection?
Now submit a test entry.
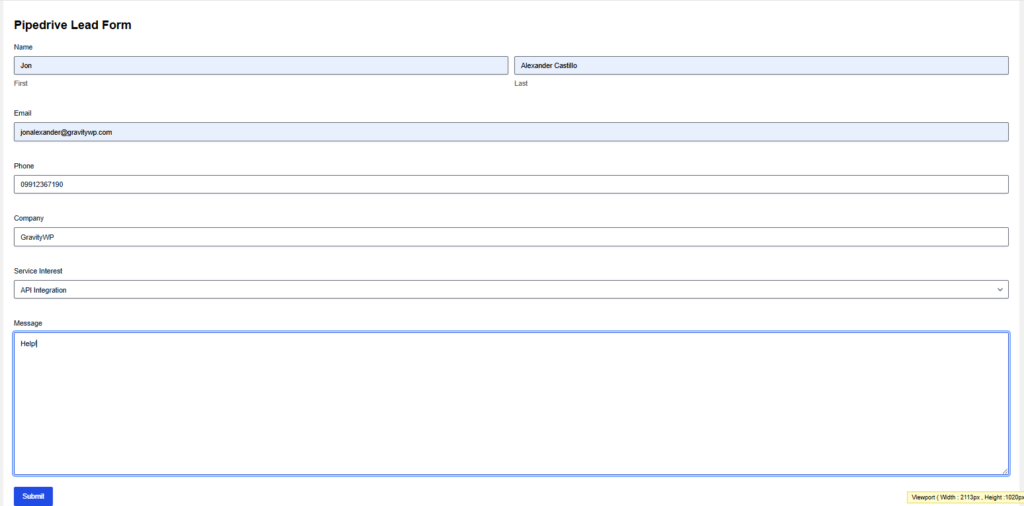
Open the form preview and enter test data like this:
| Field | Example value |
|---|---|
| Name | Jon Alexander Castillo |
| jonalexander@gravitywp.com | |
| Phone | 09912367190 |
| Company | GravityWP |
| Service Interest | API Integration |
| Message | Help! |
Submit the form.
Then go to:
Forms → Entries → Pipedrive Lead Form
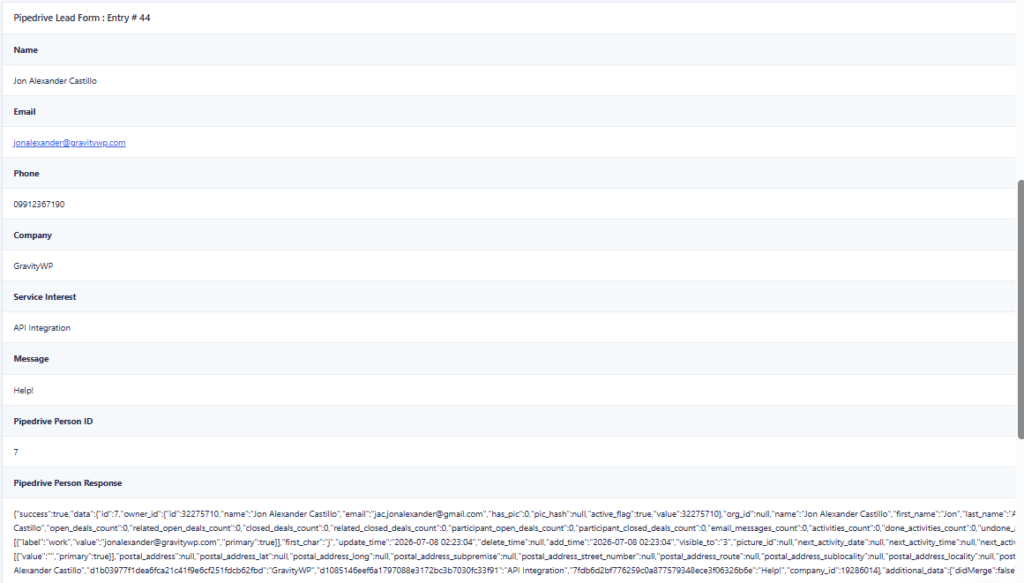
Open the new entry and check these fields:
- Pipedrive Person ID
- Pipedrive Person Response
In our final test, the Pipedrive Person ID was saved successfully. The full response also showed the values sent to Pipedrive.
Next, open Pipedrive and go to:
Contacts → People
Open the new person record.
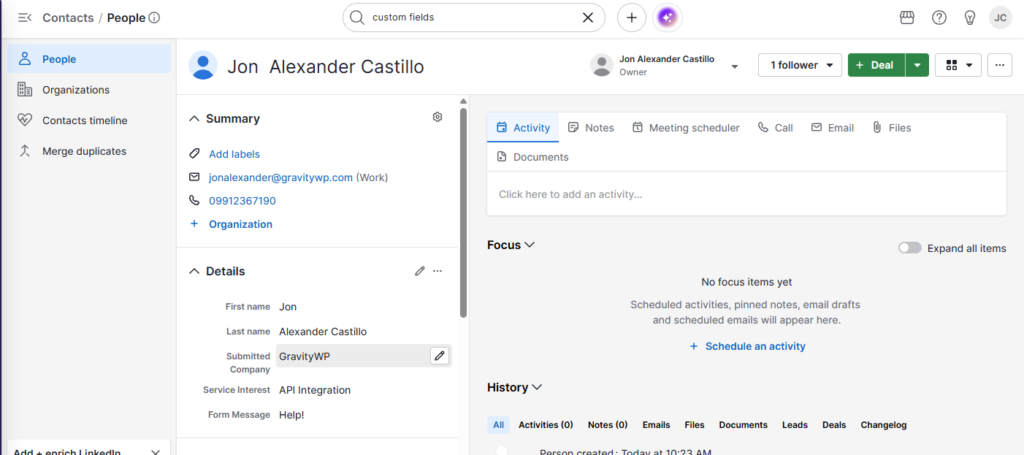
You should see:
| Pipedrive field | Expected value |
|---|---|
| Name | Submitted name |
| Submitted email | |
| Phone | Submitted phone |
| Submitted Company | Submitted company |
| Service Interest | Selected dropdown value |
| Form Message | Submitted message |
In our test, the Pipedrive contact showed the name, email, phone, Submitted Company, Service Interest, and Form Message. That confirmed the Gravity Forms Pipedrive integration was working.
What did we learn from testing multiple feeds?
We also tested a second API Connector feed that tried to create a Pipedrive Lead after creating the Person.
That setup looked like this:
- Feed 1 creates the Pipedrive Person.
- Pipedrive returns the Person ID.
- Feed 2 uses the Person ID to create a Pipedrive Lead.
The issue was timing. The second feed needed the Person ID from the first feed, but that ID only existed after the first feed finished. In our test, the chained two-feed setup was not reliable enough for a beginner-friendly tutorial.
So we used a better one-feed setup:
Create the Pipedrive Person and store all submitted form data in default and custom Person fields.
This keeps the tutorial practical and stable.
For advanced workflows that need to create a Person, then create a Lead, Deal, Note, or Activity, use a multi-step automation tool like GravityWP n8n Connector. GravityWP’s n8n Connector is designed for workflows where the form submission starts a larger process, while API Connector is useful when Gravity Forms needs to call an external API and use the response in the form or entry.
How do you troubleshoot the Pipedrive integration?
If the integration does not work on the first try, check these common issues.
The contact was not created in Pipedrive
Check these settings:
- Is the API connection active?
- Is the correct Pipedrive base URL used?
- Is the API token correct?
- Is the API key parameter name set to
x-api-token? - Is the API key placement set to Header?
- Is the endpoint set to
/api/v1/persons? - Is the feed active?
- Is the trigger set to On form submission?
The Pipedrive Person ID is not saved in Gravity Forms
Check the target field mapping.
Use:
data/idDo not use:
data.idIn our test, data/id was the working response key.
Also enable Store full response so you can inspect the JSON response in the Gravity Forms entry.
Custom fields are not showing in Pipedrive
Check these items:
- Did you create the custom fields under Person, not Lead/deal?
- Did you copy the API key from the custom field menu?
- Did you use the copied API key as the key in API Connector?
- Did you open the contact record directly in Pipedrive?
Custom fields may not always show in the main People table. Open the contact profile and check the Details section.
The form creates contacts but not Pipedrive Leads
That is expected for this tutorial.
This setup creates Pipedrive People/Contacts. It does not create Pipedrive Lead objects.
Creating a Lead after creating a Person requires a second API request that depends on the Person ID. For that kind of workflow, use n8n or another multi-step automation setup.
Final thoughts
This Gravity Forms Pipedrive integration gives you a practical way to send form contacts from WordPress to Pipedrive without Zapier.
The final tested setup sends:
- Name
- Phone
- Company
- Service Interest
- Message
It also saves the returned Pipedrive Person ID and full API response back into the Gravity Forms entry.
For a simple contact workflow, API Connector is enough. For a larger automation that needs multiple steps, such as creating a contact and then creating a Pipedrive Lead or Deal, use a multi-step workflow tool like n8n.
FAQ about Gravity Forms and Pipedrive
Yes. This tutorial uses GravityWP API Connector to send Gravity Forms data directly to Pipedrive through the Pipedrive API. You do not need Zapier for this contact workflow.
This tested setup creates a Pipedrive Person/Contact. It does not create a Pipedrive Lead object.
Yes. Create custom Person fields in Pipedrive, copy each custom field API key, and map your Gravity Forms fields to those keys in API Connector.
Yes. The API Connector feed can run on form submission. When a user submits the form, the mapped form data is sent to Pipedrive automatically.
Not in this one-feed setup. Creating a Deal would need another API endpoint and may require related IDs. For a multi-step workflow, use n8n or another automation tool.
If you need to resend entries, check your API Connector feed behavior and any available entry or feed processing tools in your setup. For a live site, always test with a safe entry before resending real customer data.
Our Premium add-ons for Gravity Forms

List Number Format
With this Gravity Forms Add-on you can change List Field columns into a number field, do calculations within a row or column. Extra merge tags are available with total counts of columns.

Field to Entries
Create entries based on Checkboxes & Multi Select choices & List Field rows.

API Connector
Connect Gravity Forms to External API's: Query the API using form field values and automatically fill other form fields with the API response.

Entry to Database
Integrates Gravity Forms with internal or external databases, offering flexible mapping of form fields to database columns and real-time synchronization between entries and database rows.
Read tutorials about

How to Validate Repeatable Contact Rows in Gravity Forms
Learn how to validate repeatable Gravity Forms List field rows with GravityWP List Text. This tutorial shows how to add email and regex validation, test invalid values, and confirm that valid team roster data is stored correctly.

Gravity Forms Airtable Integration: Create Records From Form Submissions
Learn how to build a Gravity Forms Airtable integration with GravityWP API Connector. Send form submissions to Airtable, create new records automatically, and save the returned Airtable Record ID and response back to Gravity Forms.

Gravity Forms Asana Integration: Create Tasks From Form Submissions
Learn how to connect Gravity Forms to Asana with GravityWP API Connector. This tested workflow creates Asana tasks from form submissions and saves the returned task ID and URL back to Gravity Forms.

Gravity Forms Google Calendar Integration: Create Events From Form Submissions
Connect Gravity Forms to Google Calendar with GravityWP API Connector. Learn how to create calendar events from form submissions, map event details, configure OAuth 2.0, handle time zones, and save the returned Event ID and URL.