You can connect Gravity Forms to Google Calendar and automatically create a calendar event after a form submission using GravityWP API Connector and the Google Calendar API.
In our tested workflow, Gravity Forms sent the event title, date, start and end times, location, organizer details, and event notes to Google Calendar.
Google Calendar then created the event and returned its Event ID and direct Event URL. GravityWP API Connector saved both values, plus the full API response, back into the original Gravity Forms entry.
The completed workflow is:
Gravity Forms submission → GravityWP API Connector → Google Calendar API → Google Calendar event → returned event data saved to Gravity Forms
This tutorial follows the exact setup we tested in August 2026.
What Does This Gravity Forms Google Calendar Integration Do?
This Gravity Forms integration turns a form submission into a new Google Calendar event.
The user enters the event details in WordPress. When the form is submitted, GravityWP API Connector sends a POST request directly to the Google Calendar API.
Our workflow maps the data like this:
| Gravity Forms data | Google Calendar destination |
|---|---|
| Event Title | Event summary |
| Organizer Name | Event description |
| Organizer Email | Event description |
| Event Notes | Event description |
| Event Date + Start Time | Event start |
| Event Date + End Time | Event end |
| Location | Event location |
| Google Event ID | Saved back to Gravity Forms |
| Google Event URL | Saved back to Gravity Forms |
| Full Google response | Saved back to Gravity Forms |
This is an automated one-way event creation workflow.
It is not a continuous two-way sync. If someone later edits the event inside Google Calendar, this setup does not automatically update the original Gravity Forms entry.
GravityWP API Connector can send GET and POST requests using form values and map values from API responses back into Gravity Forms fields.
For more information about the add-on, see the GravityWP API Connector product page.
What Do You Need to Connect Gravity Forms to Google Calendar?
Before you start, you need:
- A WordPress website
- Gravity Forms
- GravityWP API Connector
- A Google account
- Access to Google Calendar
- Access to Google Cloud Console
- A calendar where you want the events to be created
You do not need Zapier or custom PHP for the workflow we tested.
We use Google Cloud because Google Calendar API requests need a Google Cloud project, an enabled Calendar API, and OAuth credentials. Google lists creating a Cloud project, enabling the required API, configuring OAuth consent, and creating credentials as part of its standard Workspace API setup.
If you want to compare API-based integrations with native add-ons and webhooks, see our .
Step 1: How Do You Create the Gravity Forms Event Request Form?
Create a new Gravity Form.
We named our test form:
Google Calendar Event Request Form
Add these user-facing fields:
| Field | Gravity Forms field type |
|---|---|
| Event Title | Single Line Text |
| Organizer Name | Name |
| Organizer Email | |
| Event Date | Date |
| Start Time | Time |
| End Time | Time |
| Location | Single Line Text |
| Event Notes | Paragraph Text |
Which fields should store the Google Calendar response?
Add three more fields:
| Field | Purpose |
|---|---|
| Google Calendar Event ID | Stores Google’s returned event ID |
| Google Calendar Event URL | Stores the direct link to the created event |
| Google Calendar API Response | Stores the full JSON response |
These are storage fields. Visitors do not need to enter them.
Set them to Administrative visibility if you do not want them displayed on the public form.
Use a Paragraph Text field for Google Calendar API Response because the JSON response can be long.
Which date and time formats should you use?
For our tested setup, Event Date used:
yyyy-mm-dd
The Time fields used the 24-hour format.
Gravity Forms supports both 12-hour and 24-hour formats for Time fields.
Our test submission later used:
Date: 2026-09-18
Start Time: 14:00
End Time: 15:00
That makes it easy to construct the date-time values required by Google Calendar.
Step 2: How Do You Create a Google Calendar for the Form Events?
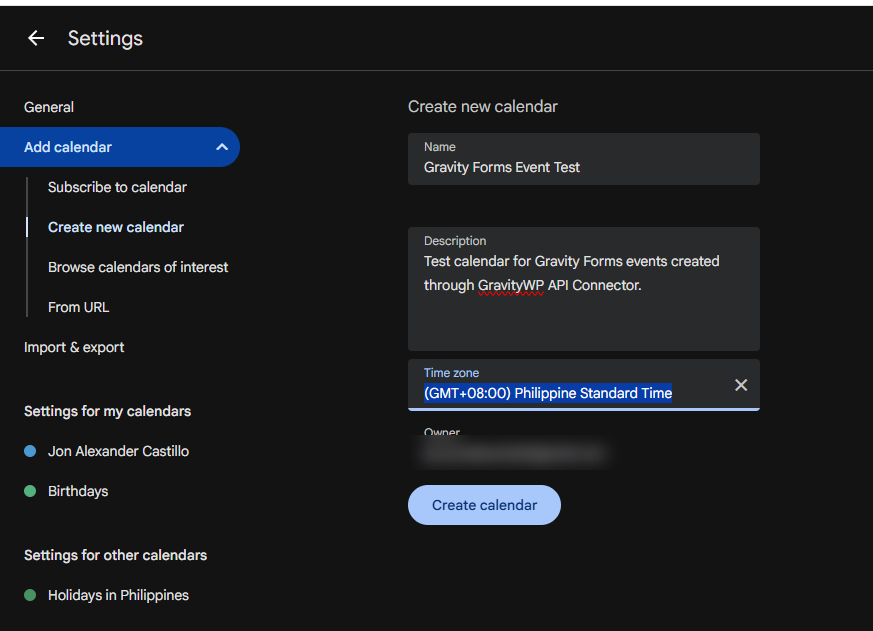
You can use an existing calendar, but we created a separate calendar for testing.
In Google Calendar, go to:
Settings → Add calendar → Create new calendar
We named ours:
Gravity Forms Event Test
A separate calendar is useful during testing because the events created by Gravity Forms stay separate from your normal calendar.
We also selected:
(GMT+08:00) Philippine Standard Time
because our test workflow used the Google Calendar timezone:
Asia/Manila
You do not have to use Asia/Manila. Use the timezone that matches the events you are creating.
We will add the timezone directly to the API request later.
Step 3: How Do You Create the Google Cloud Project?
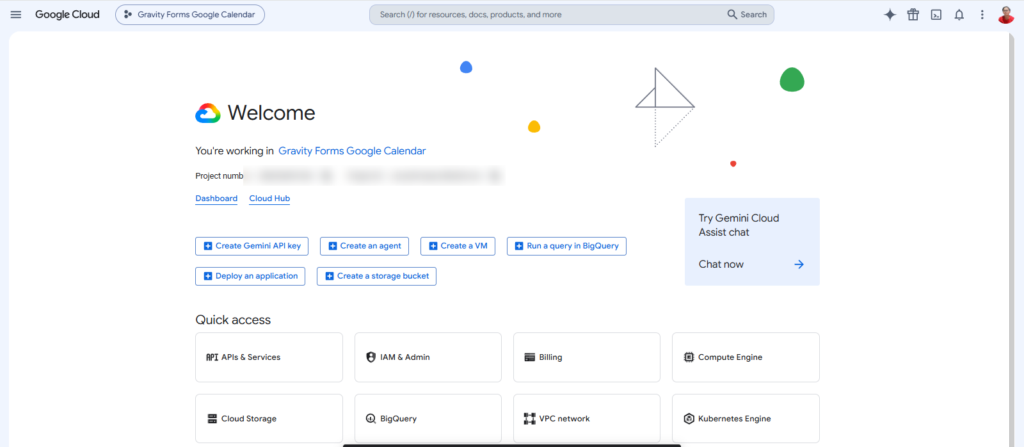
Open Google Cloud Console and create a new project.
We used:
Gravity Forms Google Calendar
The generated Project ID will be different for every Google Cloud project, so you do not need to copy ours.
Once the project is created, make sure it is selected at the top of Google Cloud Console.
Step 4: How Do You Enable the Google Calendar API?
With your project selected, open:
APIs & Services → Library
Search for:
Google Calendar API
Open it and click:
Enable
Google requires the relevant product API to be enabled before its OAuth scopes and API methods can be used by the project.
The API is now available to the project, but we still need authorization.
Step 5: How Do You Configure Google OAuth for the Integration?
Open the Google Auth Platform for your project.
We need to configure the consent screen, audience, scope, and OAuth client.
How do you configure the OAuth branding?
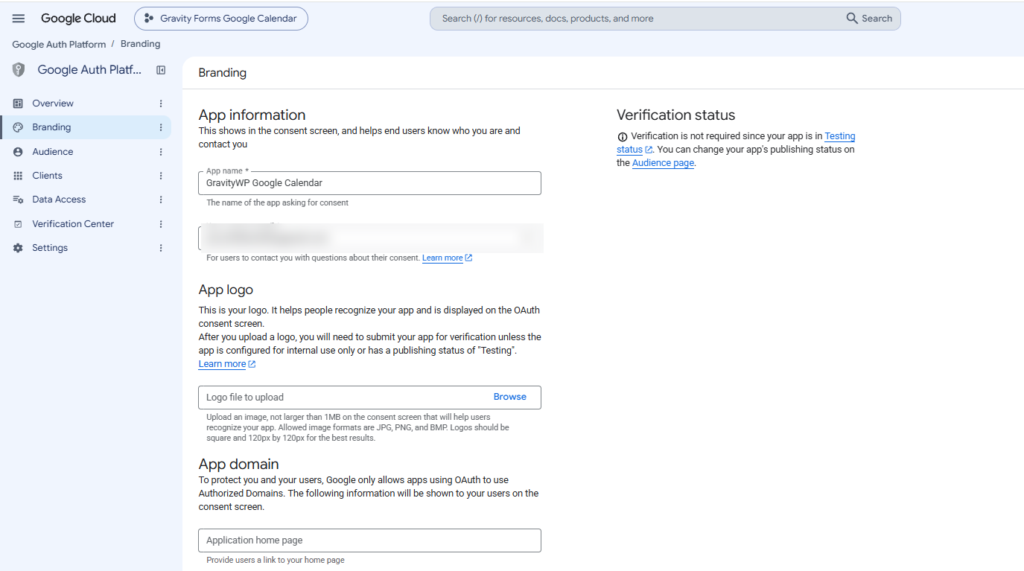
Open:
Google Auth Platform → Branding
For our test, we used:
App name:GravityWP Google Calendar
User support email:
The Google account used for the integration.
For the authorized domain, enter your own WordPress site’s root domain.
For example:
example.com
Do not enter the full callback URL into the Authorized domains field.
Google’s current OAuth configuration uses the Branding, Audience, Data Access, and Clients areas to configure the app and permissions.
Which OAuth audience should you use?
For our development test, we used:
User type: External
Publishing status: Testing
Then we added the Google account we planned to authorize under:
Audience → Test users
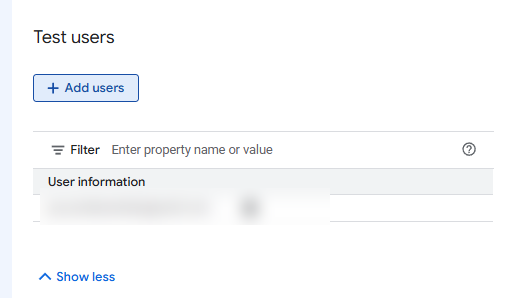
Google states that External apps in Testing are available to the users added to the test-user list.
There is an important limitation.
For an External app in Testing, Google says authorizations that use scopes beyond basic identity permissions can expire after seven days. An offline refresh token issued to a test user can also expire.
That is fine for this development tutorial.
For a long-term production integration, review Google’s current publishing and verification requirements before relying on Testing mode.
Which Google Calendar OAuth scope do you need?
Open:
Data Access → Add or remove scopes
We added:
https://www.googleapis.com/auth/calendar.events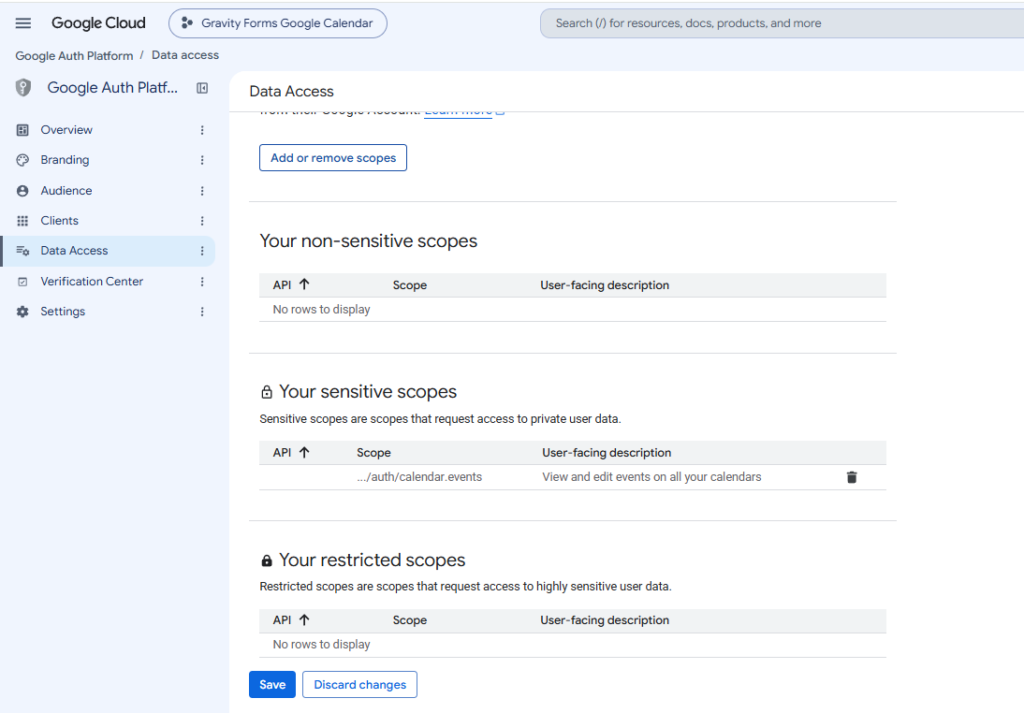
Google’s events.insert endpoint accepts calendar.events as one of its authorization scopes.
In our Google Cloud interface, this appeared under Sensitive scopes.
This gives the integration the Calendar event access needed for the workflow without requesting broader permissions than we need.
Step 6: How Do You Create the Google OAuth Client?
Open:
Google Auth Platform → Clients → Create client
Select:
Application type: Web application
We named the client:
GravityWP Google Calendar
Leave Authorized JavaScript origins blank for this server-side OAuth setup.
Under Authorized redirect URIs, add the Redirect URL shown by GravityWP API Connector.
It follows this structure:
https://yourdomain.com/wp-json/gwpapiconnector/v1/oauth/callback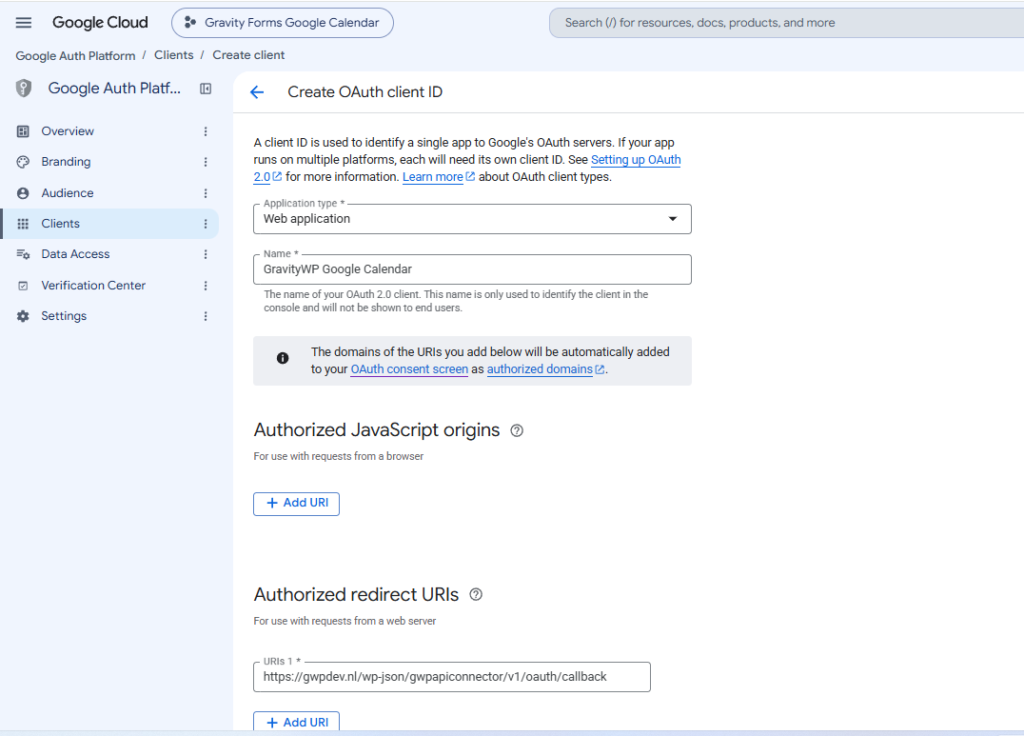
Use the exact URL displayed by your own API Connector installation.
Google requires the redirect URI supplied during authorization to exactly match one of the authorized redirect URIs configured for the OAuth client. A mismatch causes a redirect_uri_mismatch error.
Create the client.
Google will provide:
- Client ID
- Client Secret
Keep the Client Secret private.
Do not include it in screenshots, public documentation, Git repositories, or form fields.
Step 7: How Do You Connect Google Calendar to GravityWP API Connector?
In WordPress, go to:
Forms → Settings → API Connector
Click:
Add New API Connection
Use this configuration:
| Setting | Value |
|---|---|
| API Name | Google Calendar API |
| Slug | google-calendar-api |
| Base URL | https://www.googleapis.com |
| Authentication method | OAuth 2.0 (Authorization Code) |
| Client ID | Your Google OAuth Client ID |
| Client Secret | Your Google OAuth Client Secret |
| Authorization URL | https://accounts.google.com/o/oauth2/v2/auth |
| Token URL | https://oauth2.googleapis.com/token |
| Scope | https://www.googleapis.com/auth/calendar.events |
| Enable PKCE | Off |
GravityWP API Connector supports OAuth 2.0 Authorization Code connections using a Client ID, Client Secret, Authorization URL, Token URL, scope, and redirect URL.
You can read the full setup guide in the GravityWP OAuth 2.0 Authorization Code documentation.
Which extra Google OAuth parameters should you add?
Under Extra Authorization Parameters, we used:
access_type=offline
prompt=consent
Google recommends access_type=offline for web-server applications that need to refresh an access token when the user is not present. Google also supports prompt=consent to explicitly request consent during authorization.
Save the API connection.
Step 8: How Do You Authorize the Google Calendar Connection?
After saving the API configuration, click:
Authorize
Sign in using the Google account that you added as a Test user.
Review the access request and approve it.
Our callback page returned:
Authorization Successful!
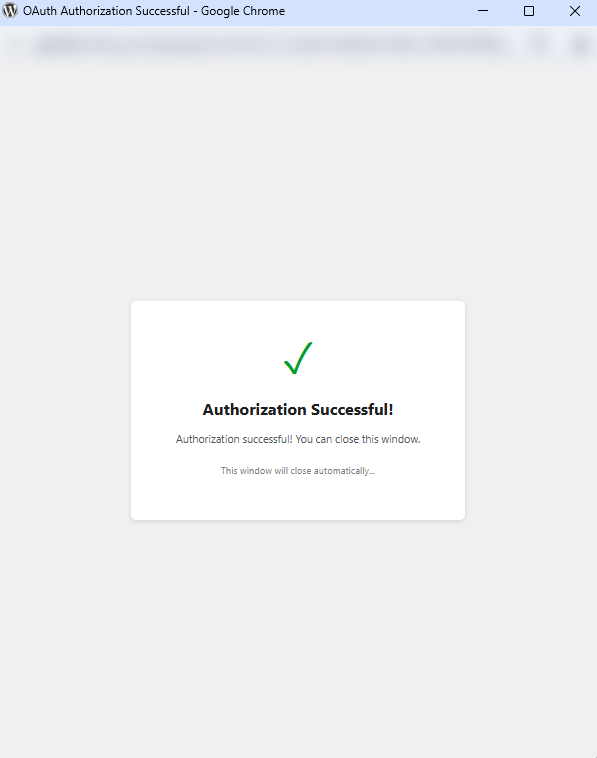
Back in API Connector, the Google Calendar connection showed:
Authorized
At this point, OAuth is working.
The next step is identifying which calendar should receive the events.
Step 9: How Do You Find the Google Calendar ID?
Open Google Calendar.
Go to:
Settings → Settings for my calendars → select your calendar → Integrate calendar
Find:
Calendar ID
A secondary calendar ID may look like:
xxxxxxxxxxxxxxxxxxxxxxxx@group.calendar.google.comCopy your own Calendar ID.
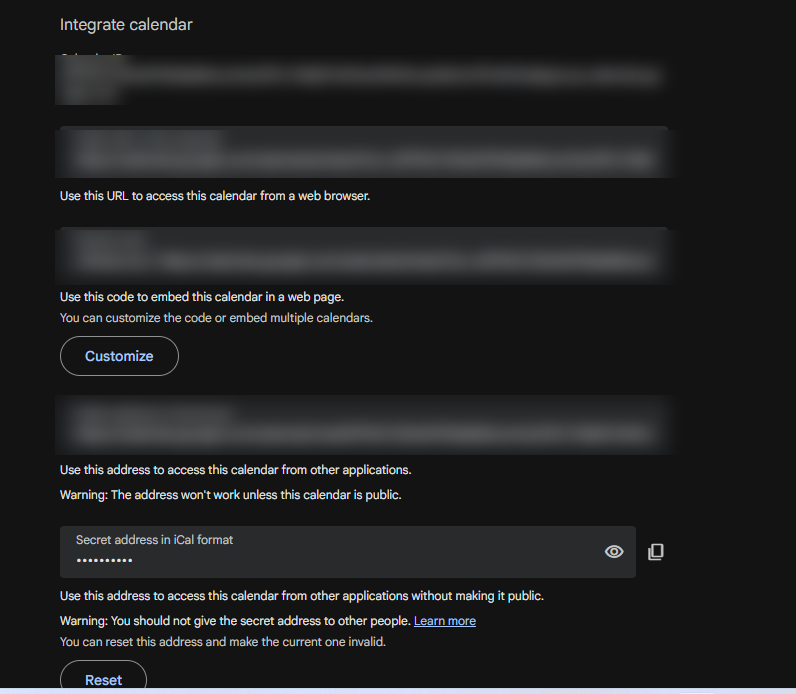
Google uses calendarId to identify the calendar where an event should be created. Its API also supports the special value primary when you want to target the signed-in user’s primary calendar.
For this tutorial, we used the specific ID for our Gravity Forms Event Test calendar.
Step 10: How Do You Create the Google Calendar POST Feed?
Now return to WordPress.
Open:
Forms → Google Calendar Event Request Form → Settings → API Connector
Add a new feed.
We named ours:
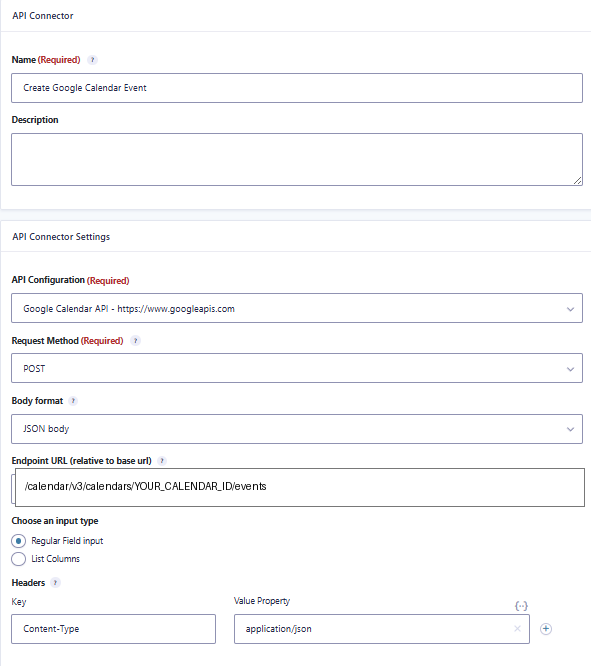
Create Google Calendar Event
Use:
| Setting | Value |
|---|---|
| API Configuration | Google Calendar API |
| Request Method | POST |
| Body format | JSON body |
| Endpoint URL | /calendar/v3/calendars/YOUR_CALENDAR_ID/events |
| Input type | Regular Field input |
Replace YOUR_CALENDAR_ID with the ID copied from Google Calendar.
The request resolves to:
POST https://www.googleapis.com/calendar/v3/calendars/YOUR_CALENDAR_ID/eventsGoogle documents this as the events.insert endpoint for creating an event.
Google requires start and end in the event resource. Other fields such as the summary, description, and location are optional.
Which request header should you add?
Under Headers, add:
Content-Type
application/json
Do not add the OAuth Authorization header manually.
API Connector handles authorization through the Google Calendar API connection we already authorized.
Step 11: How Do You Map Gravity Forms Fields to the Google Calendar Event?
Under:
Query String (GET) / Body Parameters (POST)
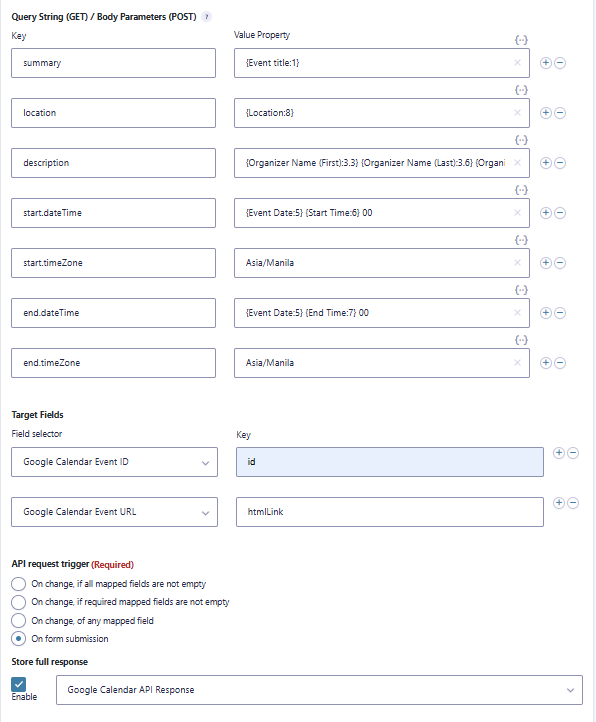
add the following mappings.
| Key | Value Property |
|---|---|
summary | {Event title:1} |
location | {Location:8} |
description | Organizer Name + Organizer Email + Event Notes |
start.dateTime | {Event Date:5}T{Start Time:6}:00 |
start.timeZone | Asia/Manila |
end.dateTime | {Event Date:5}T{End Time:7}:00 |
end.timeZone | Asia/Manila |
Our exact tested description mapping was:
{Organizer Name (First):3.3} {Organizer Name (Last):3.6} {Organizer Email:4} {Event Notes:9}Gravity Forms merge tags insert submitted field values dynamically. Field merge tags use the field label and field ID inside curly brackets.
Why is there a T between the event date and time?
The date and time need to form a valid timed-event value.
For example:
2026-09-18plus:
14:00becomes:
2026-09-18T14:00:00Google’s Calendar documentation uses start.dateTime and end.dateTime for timed events. It also supports a separate timeZone property for the event’s start and end.
Our request therefore used:
start.dateTime
2026-09-18T14:00:00
start.timeZone
Asia/Manila
and:
end.dateTime
2026-09-18T15:00:00
end.timeZone
Asia/Manila
Why don’t we map Organizer Email to Google’s organizer field?
Our Gravity Forms field is named Organizer Email, but it represents the person submitting the event request.
We deliberately placed that information in the event description.
The Google Calendar event itself is created on the calendar authorized through Google OAuth. In our successful response, Google’s organizer information represented the Google Calendar that owned the event.
We did not try to replace that organizer with the submitted email address.
We also did not add the submitted email as an attendee in this test.
This tutorial documents only the workflow we actually tested.
Step 12: How Do You Save the Google Calendar Event ID and URL in Gravity Forms?
Under Target Fields, add:
| Gravity Forms field | Response key |
|---|---|
| Google Calendar Event ID | id |
| Google Calendar Event URL | htmlLink |
Google returns an Event resource after a successful events.insert request.
Then set:
API request trigger → On form submission
Enable:
Store full response
and select:
Google Calendar API Response
GravityWP API Connector can map values from an API response into Target Fields. Its Store Full Response option can also save the complete response when the request runs on form submission.
This setup gives us three useful pieces of data:
- Google Calendar Event ID
Identifies the event returned by Google. - Google Calendar Event URL
Provides a direct link to the created event. - Google Calendar API Response
Stores the full response for testing and troubleshooting.
Save the feed.
Step 13: How Do You Run the Gravity Forms Google Calendar Integration Test?
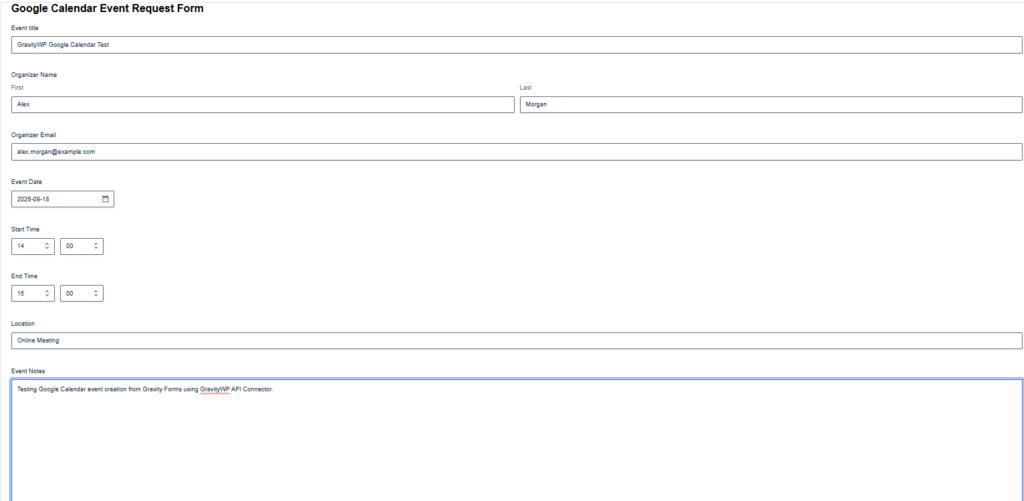
We submitted the following real test data:
Event Title:
GravityWP Google Calendar Test
Organizer Name:
Alex Morgan
Organizer Email:
alex.morgan@example.com
Event Date:
September 18, 2026
Start Time:
14:00
End Time:
15:00
Location:
Online Meeting
Event Notes:
Testing Google Calendar event creation from Gravity Forms using GravityWP API Connector.
Submit the form.
Step 14: How Do You Verify the Returned Google Calendar Data in Gravity Forms?
Open:
Forms → Entries
Then open the test submission.
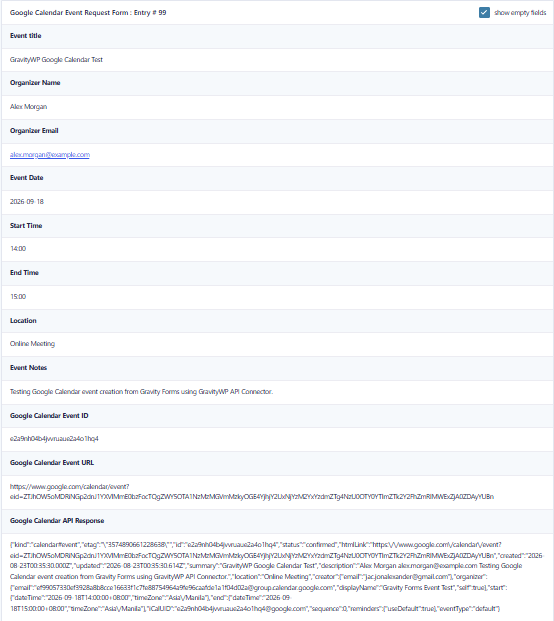
Our test entry contained:
- Google Calendar Event ID
Google returned a unique ID for the event. - Google Calendar Event URL
Google returned a directhtmlLinkto the calendar event. - Google Calendar API Response
The stored response included the new event data, including:- Event ID
- Event URL
- Event title
- Description
- Location
- Start date and time
- End date and time
- Timezone
- Calendar organizer information
This confirms that the API request was not only sent. Google actually created an event and returned an Event resource.
Step 15: How Do You Verify the Event in Google Calendar?
Open the same Google Calendar that you used in the endpoint.
Our event appeared on:
Friday, September 18, 2026
with:
Time: 2:00 PM–3:00 PM
Title: GravityWP Google Calendar Test
Location: Online Meeting
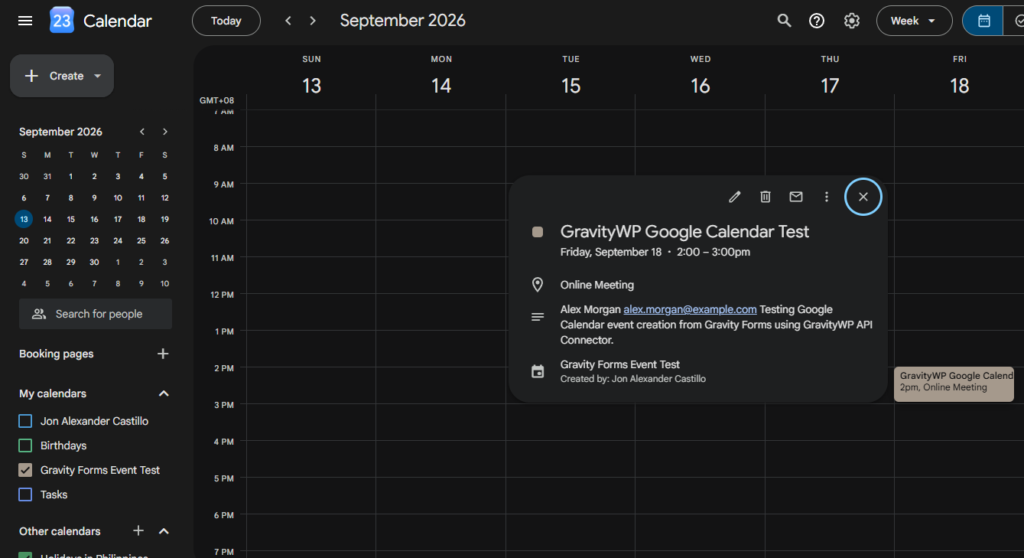
Opening the event also displayed the information submitted through the description field.
This confirmed the full workflow:
Gravity Forms → API Connector → Google Calendar API → new event → response saved to Gravity Forms
What Did Our Gravity Forms Google Calendar Integration Actually Prove?
Our test successfully created a real Google Calendar event from a Gravity Forms submission.
The submitted event data was dynamic. The event was not manually created in Google Calendar.
The workflow successfully sent:
- Event title
- Organizer contact details
- Event notes
- Event date
- Start time
- End time
- Location
- Timezone
Google Calendar then returned the event information.
GravityWP API Connector saved the returned Event ID, Event URL, and complete response inside the original Gravity Forms entry.
This gives administrators a direct connection between the WordPress submission and the related calendar event.
Why Did Google Calendar Initially Show the Event at the Wrong Time?
During our first test, the Gravity Forms submission used:
14:00with:
Asia/ManilaHowever, the Google Calendar interface initially displayed the event at:
6:00 AM
The API request was not wrong.
Google Calendar itself was displaying the calendar using:
GMT+00
Manila is UTC+8, so:
14:00 in Manila
=
06:00 UTC
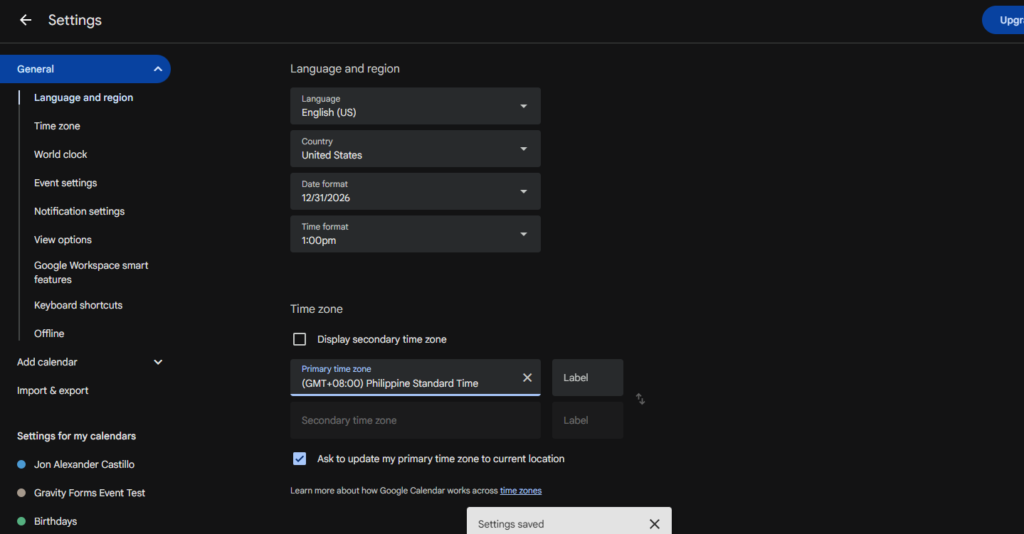
We opened:
Google Calendar → Settings → General → Time zone
and changed the primary timezone to:
(GMT+08:00) Philippine Standard Time
After that change, the same event displayed correctly as:
2:00 PM–3:00 PM
We did not need to change the API feed.
The tested API mapping remained:
start.timeZone → Asia/Manila
end.timeZone → Asia/Manila
This distinction is important. The event’s timezone and the timezone used by the Google Calendar interface can affect how the same moment appears on screen.
What Should You Check If the Google Calendar Event Is Not Created?
Is the Google Calendar API enabled?
Open Google Cloud and confirm the Google Calendar API shows as Enabled.
If it is not enabled, the project cannot use the Calendar API.
Is the OAuth connection authorized?
Go to:
Forms → Settings → API Connector
Check your Google Calendar connection.
It should show:
Authorized
If authorization has expired or been revoked, authorize it again.
Remember that Google says External OAuth apps kept in Testing can have test-user authorizations expire after seven days.
Does the OAuth redirect URI match exactly?
The callback URL in Google Cloud must match the Redirect URL displayed by GravityWP API Connector.
Even a different path or trailing character can cause OAuth authorization to fail.
Google explicitly requires an exact redirect URI match.
Did you use the correct Calendar ID?
Open:
Google Calendar → Settings → your calendar → Integrate calendar
Copy the Calendar ID from there.
Do not confuse the calendar’s public URL with its Calendar ID.
Does the endpoint end with /events?
The event creation endpoint must use:
/calendar/v3/calendars/YOUR_CALENDAR_ID/eventsnot:
/eventGoogle’s Calendar API reference defines the event creation route as POST /calendar/v3/calendars/calendarId/events.
Are the event date and time values formatted correctly?
Our working request produced values such as:
2026-09-18T14:00:00Make sure the date, literal T, hour, minute, and seconds are present.
Also make sure Start Time uses the Start Time field and End Time uses the End Time field.
Does the OAuth scope include calendar event access?
Our tested scope was:
https://www.googleapis.com/auth/calendar.eventsGoogle lists that scope as valid for the events.insert request.
Is Google Calendar using a different display timezone?
If the event was successfully created but appears several hours early or late, check:
Google Calendar → Settings → Time zone
The event may be correct while the Calendar interface is displaying it in another timezone.
Does This Integration Sync Google Calendar Back to Gravity Forms?
No.
Our tested workflow sends a new form submission to Google Calendar.
It then saves information returned by the event-creation request back into the Gravity Forms entry.
The workflow does not continuously monitor existing Google Calendar events.
For example, if someone manually changes the event from 2:00 PM to 4:00 PM inside Google Calendar later, this setup does not automatically change the original Start Time field in Gravity Forms.
Calling the workflow a two-way sync would therefore be inaccurate.
It is better described as:
Gravity Forms submission → automatically create Google Calendar event
Can You Connect Gravity Forms to Google Calendar Without Zapier?
Yes.
The workflow in this tutorial connects Gravity Forms directly to the Google Calendar API through GravityWP API Connector.
The data flow is:
Gravity Forms → GravityWP API Connector → Google Calendar API
There is no Zap between the form submission and Google Calendar.
API Connector handles the OAuth connection, POST request, JSON field mapping, and returned response values.
This does not mean an API-based integration is always the best choice.
Gravity Connect, Zapier, dedicated plugins, and other automation platforms can also fit different workflows.
The advantage of the setup in this tutorial is direct control over the Google Calendar API request and the ability to save selected response values back into the original Gravity Forms entry.
Can You Expand This Google Calendar and Gravity Forms Workflow?
Yes.
The Google Calendar Events resource supports many properties beyond the ones used in this tutorial.
For example, Google’s API can support attendees, recurrence, reminders, conference data, and other event metadata depending on the request and permissions.
However, those features were not part of our tested workflow.
Our tested setup only covered:
- Event title
- Description
- Location
- Start date and time
- End date and time
- Timezone
- Returned Event ID
- Returned Event URL
- Full API response
If you extend the workflow, test each new field against the current Google Calendar API requirements.
For another tested API workflow, see our Gravity Forms Zoom integration tutorial.
How Does the Finished Gravity Forms to Google Calendar Workflow Work?
The finished Gravity Forms Google Calendar integration automatically creates an event after a new form submission.
The form collects the event information.
GravityWP API Connector turns those submitted values into a Google Calendar API request.
Google Calendar creates the event and returns its event data.
GravityWP then stores selected values from the response back inside the same Gravity Forms entry.
The final workflow is:
Gravity Forms → API Connector → Google Calendar → returned Event ID and URL → Gravity Forms entry
To build other direct API workflows, see the GravityWP API Connector documentation.
Frequently Asked Questions
Yes. In our tested setup, submitting Gravity Forms triggered GravityWP API Connector. It sent a POST request to Google’s events.insert endpoint and created a new event on the selected Google Calendar.
No.
You can target a calendar that the authorized Google account can write to. We created a separate Gravity Forms Event Test calendar because it kept our API testing separate from personal calendar events.
Our tested integration used:https://www.googleapis.com/auth/calendar.events
Google lists this as one of the scopes accepted by the events.insert endpoint.
Yes.
The Calendar ID is part of the API endpoint:/calendar/v3/calendars/YOUR_CALENDAR_ID/events
Using a different calendar ID lets the request target another calendar that the authenticated Google account has permission to write to.
Check both the timezone sent with the event and the timezone configured in the Google Calendar interface.
Our event used Asia/Manila, but Google Calendar initially displayed it using GMT+00. After setting the Calendar interface to Philippine Standard Time, the event displayed at the expected 2:00 PM–3:00 PM.
Yes.
GravityWP API Connector can map properties returned by an API to Target Fields.
In our test, we saved:
Event ID → id
and:
Event URL → htmlLink
We also saved the full Google Calendar API response.
Our Premium add-ons for Gravity Forms
Field to Entries
Create entries based on Checkboxes & Multi Select choices & List Field rows.
List Text
Add features like textarea, placeholder and custom validation to a column or multiple columns in a Gravity Forms List Field.
Update Multiple Entries
Trigger the update of multiple entries in a target form by submitting an entry in a trigger form.

Entry to Database
Integrates Gravity Forms with internal or external databases, offering flexible mapping of form fields to database columns and real-time synchronization between entries and database rows.
Read tutorials about
How to Validate Repeatable Contact Rows in Gravity Forms
Learn how to validate repeatable Gravity Forms List field rows with GravityWP List Text. This tutorial shows how to add email and regex validation, test invalid values, and confirm that valid team roster data is stored correctly.

Gravity Forms Airtable Integration: Create Records From Form Submissions
Learn how to build a Gravity Forms Airtable integration with GravityWP API Connector. Send form submissions to Airtable, create new records automatically, and save the returned Airtable Record ID and response back to Gravity Forms.

Gravity Forms Asana Integration: Create Tasks From Form Submissions
Learn how to connect Gravity Forms to Asana with GravityWP API Connector. This tested workflow creates Asana tasks from form submissions and saves the returned task ID and URL back to Gravity Forms.

Gravity Forms Google Calendar Integration: Create Events From Form Submissions
Connect Gravity Forms to Google Calendar with GravityWP API Connector. Learn how to create calendar events from form submissions, map event details, configure OAuth 2.0, handle time zones, and save the returned Event ID and URL.