You can connect Gravity Forms to Zendesk without Zapier by using GravityWP API Connector and the Zendesk API. In our test, a Gravity Forms submission created a new Zendesk support ticket and saved the returned ticket ID, status, requester ID, and API URL back into the original Gravity Forms entry.
In this tutorial, you will build that same Gravity Forms Zendesk integration step by step. You will create a customer support form, connect your Zendesk account with OAuth 2.0, map Gravity Forms fields to Zendesk ticket fields, create a ticket automatically after form submission, and store selected response data from Zendesk.
By the end, your workflow will look like this:
Gravity Forms submission → GravityWP API Connector → Zendesk ticket → Zendesk ticket data saved back to Gravity Forms
We will also cover an issue we found during testing. Our first tickets were created successfully, but the Zendesk Type field remained empty. We fixed this by using separate choice values in Gravity Forms and the :value merge tag modifier.
This tutorial uses the exact configuration we tested rather than an example that exists only on paper.
What do you need for this Gravity Forms and Zendesk integration?
You need:
- A WordPress website
- Gravity Forms
- GravityWP API Connector
- A Zendesk Support account
- Access to create a Zendesk OAuth client
- HTTPS enabled on your WordPress site
API Connector can send Gravity Forms data to external APIs and map values from an API response back into form fields. It also supports OAuth 2.0 Authorization Code connections, which is the authentication method we use here.
You do not need to create a Zap or write custom PHP for the workflow in this tutorial.
Step 1: Create the Gravity Forms support request form
Start by creating a new Gravity Forms form.
We named ours:
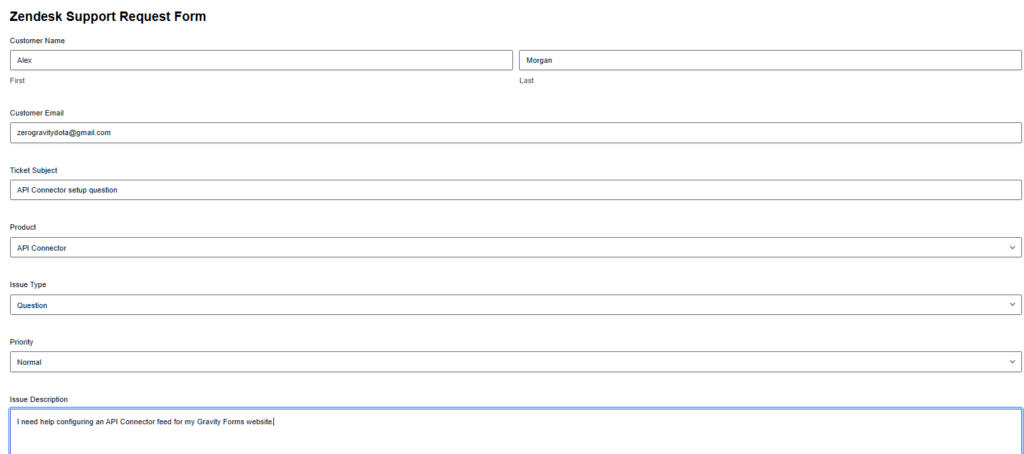
Zendesk Support Request Form
Add these customer-facing fields:
| Field | Gravity Forms field type | Purpose |
|---|---|---|
| Customer Name | Name | Zendesk requester name |
| Customer Email | Zendesk requester email | |
| Ticket Subject | Single Line Text | Ticket subject |
| Product | Drop Down | Records the GravityWP product |
| Issue Type | Drop Down | Sets the Zendesk ticket type |
| Priority | Drop Down | Sets ticket priority |
| Issue Description | Paragraph Text | Creates the ticket comment |
We also created these fields for information returned by Zendesk:
| Field | Field type |
|---|---|
| Zendesk Ticket ID | Single Line Text |
| Zendesk Ticket Status | Single Line Text |
| Zendesk Requester ID | Single Line Text |
| Zendesk Ticket API URL | Single Line Text |
| Zendesk Ticket Response | Paragraph Text |
Set these five response fields to Administrative visibility. Visitors do not need to see them on the public support form.
The Product field is stored in the Gravity Forms entry in our tested workflow, but we did not map it to a Zendesk ticket field. This keeps the tutorial limited to the fields we actually tested.
How should you configure Issue Type?
Open the Issue Type Drop Down and enable Show Values.
Use:
| Label shown to visitor | Value |
|---|---|
| Question | question |
| Incident | incident |
| Problem | problem |
| Task | task |
Gravity Forms lets a choice have a user-facing label and a separate stored value. This is useful when an external integration needs a specific value while the visitor should see a friendlier label.
Zendesk accepts question, incident, problem, and task as ticket type values.
How should you configure Priority?
Enable Show Values for Priority as well:
| Label | Value |
|---|---|
| Low | low |
| Normal | normal |
| High | high |
| Urgent | urgent |
We used Normal as the default choice.
Zendesk’s ticket API uses these values for ticket priority.
You can leave Show Values disabled for Product because we are not sending that field to Zendesk in this workflow.
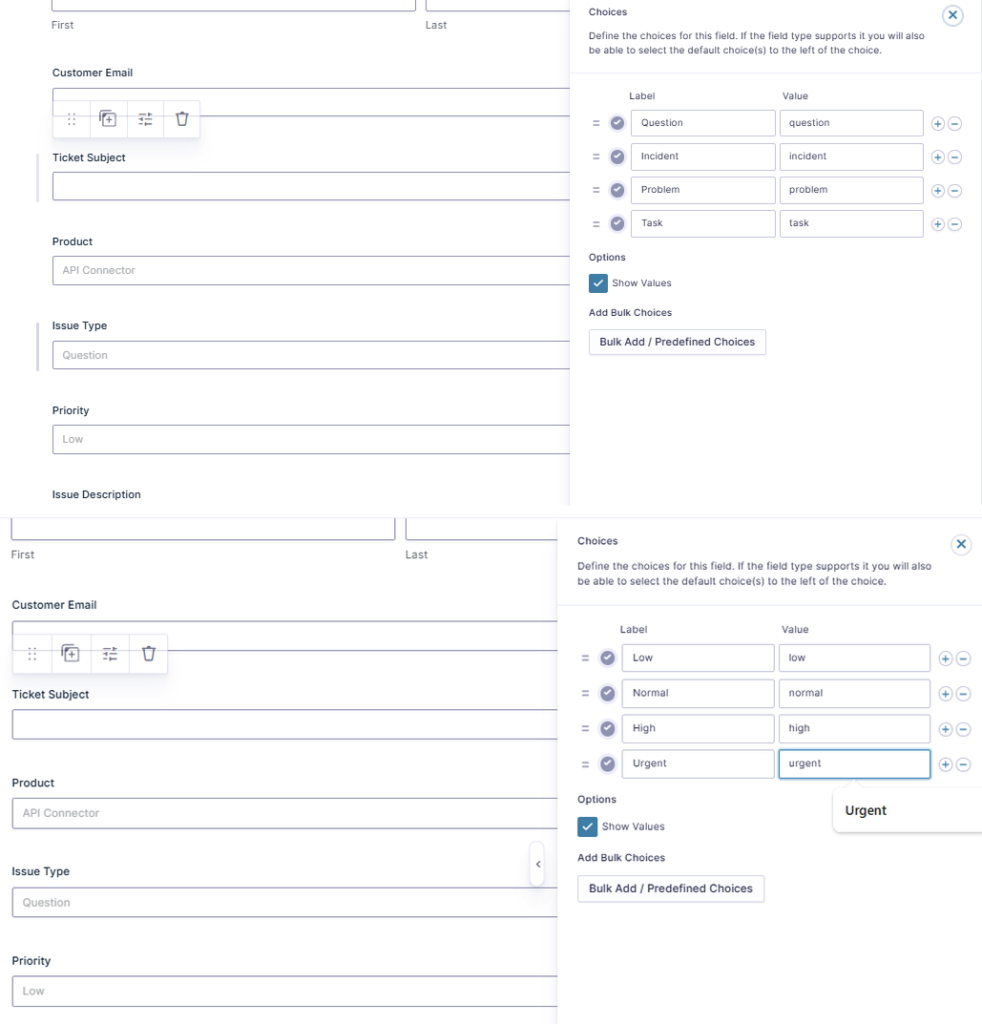
question, normal, and urgent.Step 2: Create a Zendesk OAuth client
Next, we need to let API Connector authenticate with Zendesk.
In the Zendesk interface we tested, we opened:
Support dropdown → Admin Center → Apps and integrations → APIs → OAuth clients
Then select Add OAuth client.
Zendesk uses OAuth clients to grant applications controlled access to an account. Redirect URLs must be absolute and normally use HTTPS.
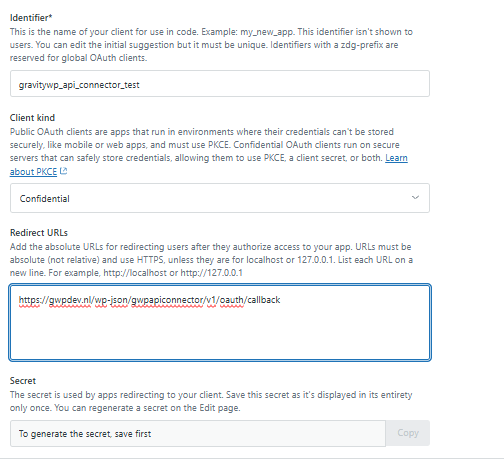
We used settings similar to these:
| Zendesk setting | Value |
|---|---|
| Name | GravityWP API Connector Test |
| Description | Creates Zendesk support tickets from Gravity Forms submissions using GravityWP API Connector |
| Company | GravityWP |
| Identifier | gravitywp_api_connector_test |
| Client kind | Confidential |
| Redirect URL | Copy from API Connector |
Use Confidential for this server-side connection because API Connector can securely use the OAuth client secret. Zendesk supports confidential OAuth clients for integrations where credentials can be kept securely.
Where do you get the Redirect URL?
Do not guess it.
In WordPress, go to:
Forms → Settings → API Connector → Add New API Connection
Choose:
OAuth 2.0 (Authorization Code)
API Connector displays the Redirect URL for your WordPress installation. Copy that exact URL into Zendesk.
GravityWP requires the callback registered with the provider to match the API Connector Redirect URL.
It follows this pattern:
https://YOUR-DOMAIN.com/wp-json/gwpapiconnector/v1/oauth/callbackSave the OAuth client in Zendesk and copy the generated client secret somewhere secure.
Step 3: Connect Zendesk to GravityWP API Connector
Return to:
WordPress → Forms → Settings → API Connector
Select Add New API Connection.
We used:
| Setting | Value |
|---|---|
| API Name | Zendesk Support API |
| Slug | zendesk-support-api |
| Base URL | https://YOUR-SUBDOMAIN.zendesk.com/ |
| Authentication method | OAuth 2.0 (Authorization Code) |
| Client ID | Your Zendesk OAuth Identifier |
| Client Secret | Your Zendesk OAuth Secret |
| Authorization URL | https://YOUR-SUBDOMAIN.zendesk.com/oauth/authorizations/new |
| Token URL | https://YOUR-SUBDOMAIN.zendesk.com/oauth/tokens |
| Scope | tickets:write |
| PKCE | Disabled in our test |
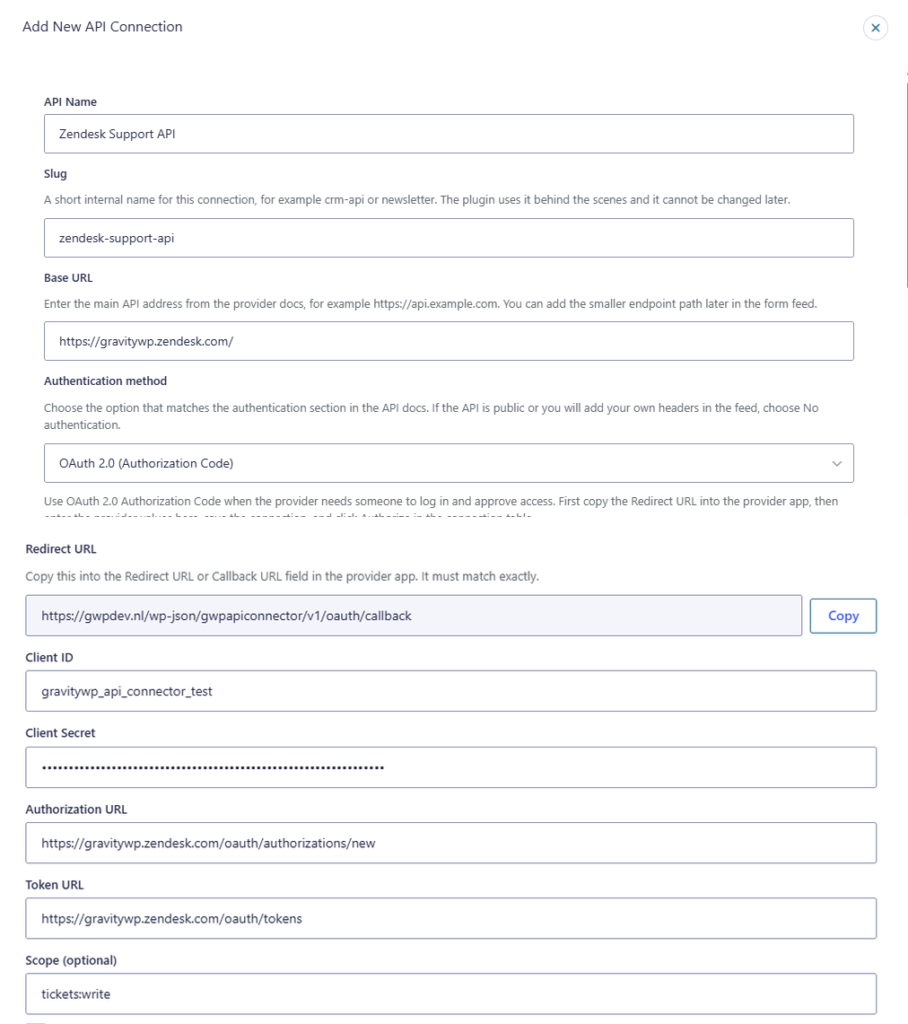
Zendesk documents the authorization and token endpoints used by its OAuth authorization-code flow.
We used:
tickets:writeThe Zendesk OAuth scope system allows access to be restricted by resource and action. A write scope permits operations such as POST requests, which we need to create a new ticket.
Save the API connection.
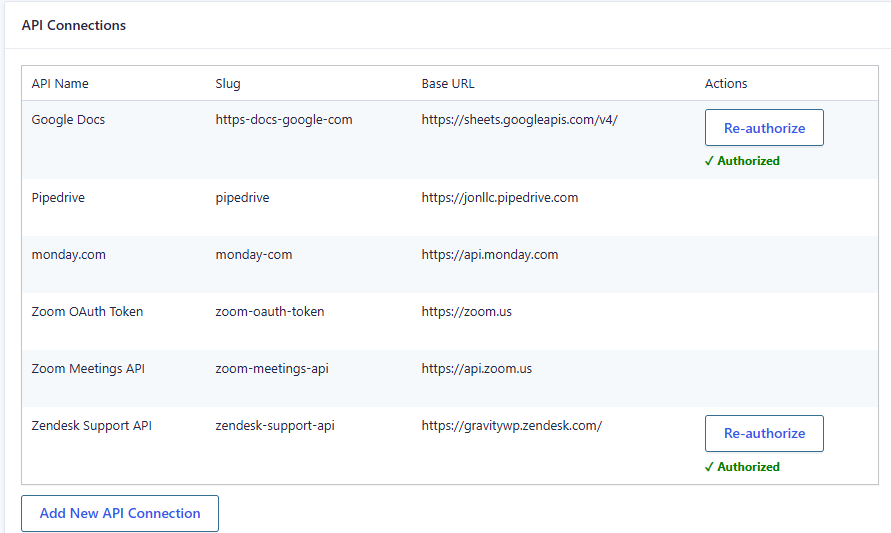
You should now see Zendesk Support API in your API Connections list with an Authorize button.
Click Authorize.
Zendesk opens a consent screen that shows what the application wants to access. In our test, it showed permission to:
Write all ticket data
Click Allow.
After Zendesk redirects you to WordPress, API Connector should show:
✓ Authorized
Your Gravity Forms site can now make authenticated Zendesk API requests.
Step 4: Create the Zendesk ticket feed
Open:
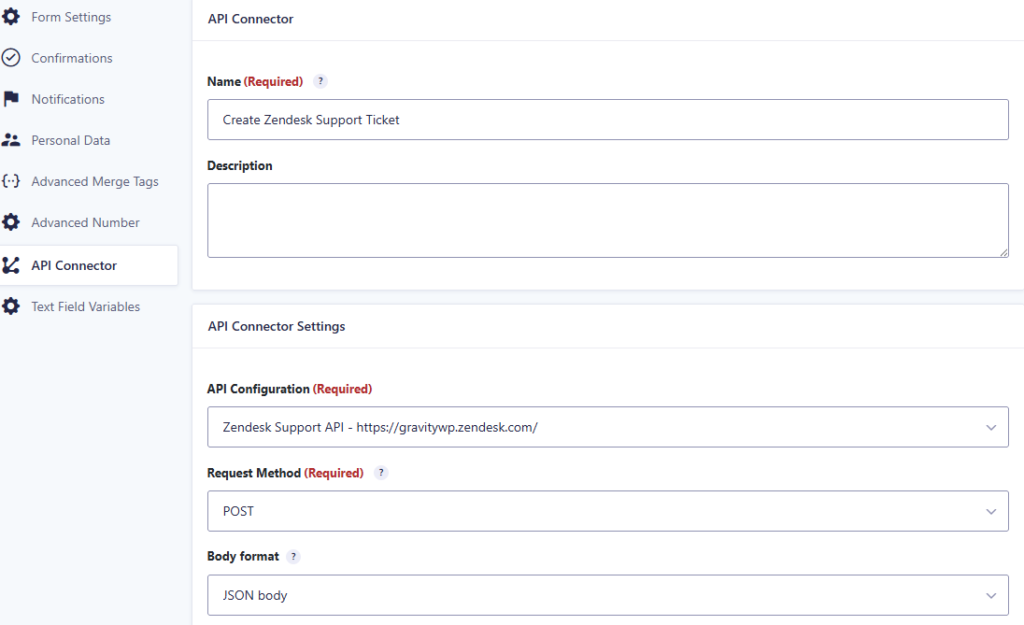
Forms → Zendesk Support Request Form → Settings → API Connector
Create a new feed named:
Create Zendesk Support Ticket
Configure:
| Setting | Value |
|---|---|
| API Configuration | Zendesk Support API |
| Request Method | POST |
| Body format | JSON body |
| Endpoint URL | api/v2/tickets.json |
| Input type | Regular Field input |
Zendesk provides a Tickets API for agents and administrators to create and manage tickets.
A POST request sends data to an API to create a new resource. In this case, the resource is a Zendesk ticket.
API Connector’s JSON body option lets you create nested JSON structures from field mappings rather than writing the complete request manually.
Leave the Headers section empty for this setup. The saved OAuth connection handles authentication.
Step 5: Map Gravity Forms data to Zendesk fields
Under Query String (GET) / Body Parameters (POST), add these mappings:
| Key | Gravity Forms value |
|---|---|
ticket.subject | {Ticket Subject:4} |
ticket.comment.body | {Issue Description:8} |
ticket.requester.name | {Customer Name (First):1.3} {Customer Name (Last):1.6} |
ticket.requester.email | {Customer Email:3} |
ticket.type | {Issue Type:6:value} |
ticket.priority | {Priority:7:value} |
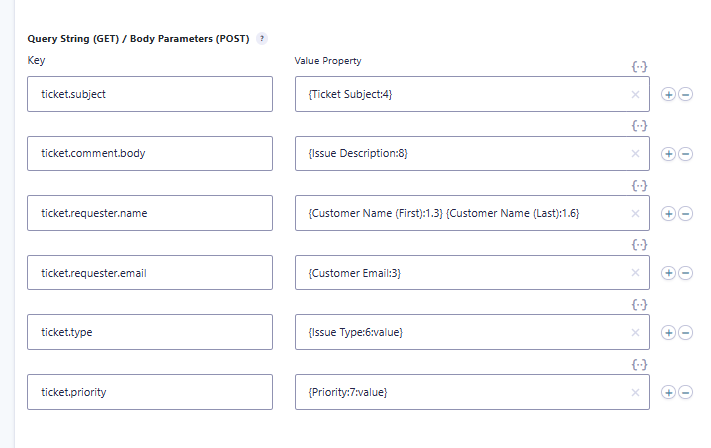
Your field IDs may be different. Use the merge tags generated by your own Gravity Forms form.
These mappings produce a request with a structure similar to:
{
  "ticket": {
    "subject": "API Connector setup question",
    "comment": {
      "body": "I need help configuring an API Connector feed for my Gravity Forms website."
    },
    "requester": {
      "name": "Alex Morgan",
      "email": "customer@example.com"
    },
    "type": "question",
    "priority": "normal"
  }
}
The actual values change with every form submission.
Why do Issue Type and Priority use :value?
This detail came directly from our testing.
Our first Gravity Forms submissions created Zendesk tickets, but the Type field was empty.
The Zendesk API response showed:
"type": nullWe first confirmed that the JSON path itself worked by sending the static value:
questionZendesk then displayed Type: Question.
For the final dynamic setup, we changed the merge tag to:
{Issue Type:6:value}We also used:
{Priority:7:value}Our next test returned:
"type":"question"and:
"priority":"normal"Zendesk then showed both Question and Normal correctly in the ticket.
Gravity Forms documents the :value modifier for Drop Down fields specifically as a way to output the stored choice value instead of its label.
This is why we recommend using the value modifier for these Zendesk mappings.
Step 6: Save Zendesk response data in Gravity Forms
Creating the ticket is only part of this workflow.
API Connector can also map information returned by Zendesk into the original Gravity Forms entry.
Under Target Fields, use:
| Gravity Forms target field | Response key |
|---|---|
| Zendesk Ticket ID | ticket/id |
| Zendesk Ticket Status | ticket/status |
| Zendesk Requester ID | ticket/requester_id |
| Zendesk Ticket API URL | ticket/url |
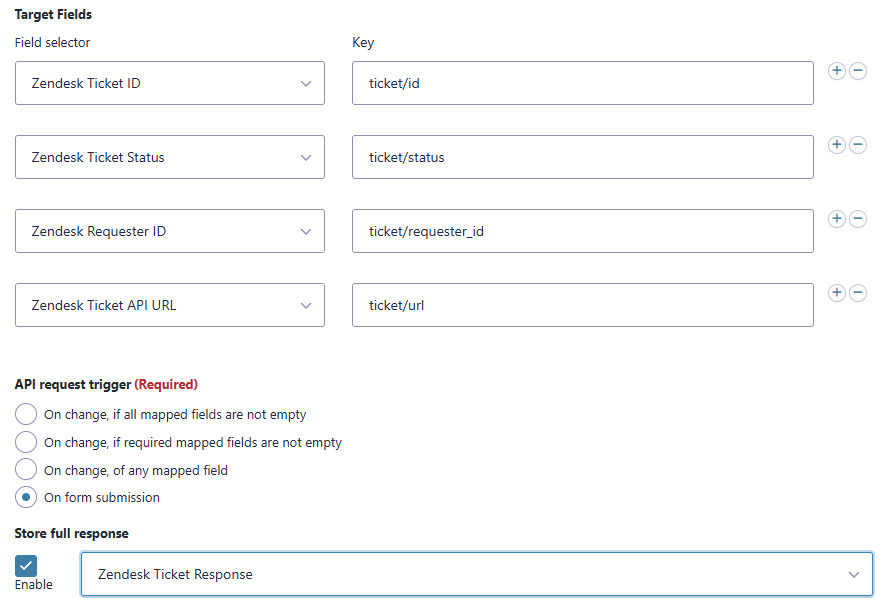
Set the API request trigger to:
On form submission
Then enable:
Store full response
Map it to:
Zendesk Ticket Response
GravityWP’s API Connector documentation confirms that Store Full Response can save the complete API response into a text field when the request runs on form submission. This is useful during testing and troubleshooting because you can inspect the actual JSON returned by the external API.
Save the feed.
Step 7: Submit a test support request
Now test the Gravity Forms Zendesk integration from the front end.
Our final test used:
| Field | Value |
|---|---|
| Customer Name | Alex Morgan |
| Ticket Subject | API Connector setup question |
| Product | API Connector |
| Issue Type | Question |
| Priority | Normal |
| Issue Description | I need help configuring an API Connector feed for my Gravity Forms website. |
We used a test email address that we controlled.
Submit the form.
There is no separate Zap or manual ticket creation step. The API Connector feed runs after the Gravity Forms submission.
Step 8: Check the new Zendesk ticket
Open Zendesk and go to your ticket list.
Our final test created a new support ticket successfully.
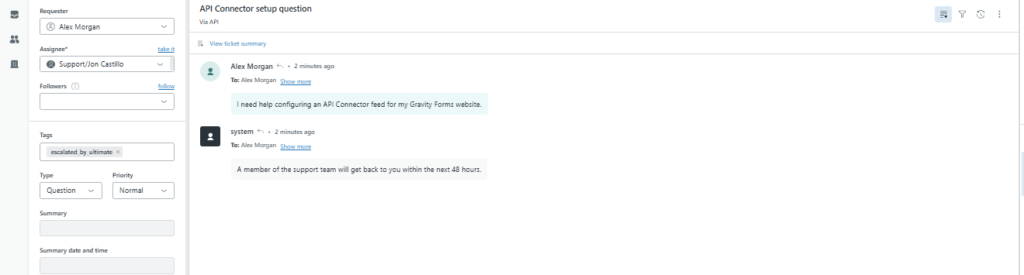
The Zendesk ticket showed:
- Requester: Alex Morgan
- Subject: API Connector setup question
- Type: Question
- Priority: Normal
- Comment: I need help configuring an API Connector feed for my Gravity Forms website.
Zendesk also showed that the ticket arrived Via API.
This confirms that the submitted Gravity Forms data reached Zendesk through the authenticated API connection.
Step 9: Check the Gravity Forms entry
Return to:
Forms → Entries
Open the submission you just created.
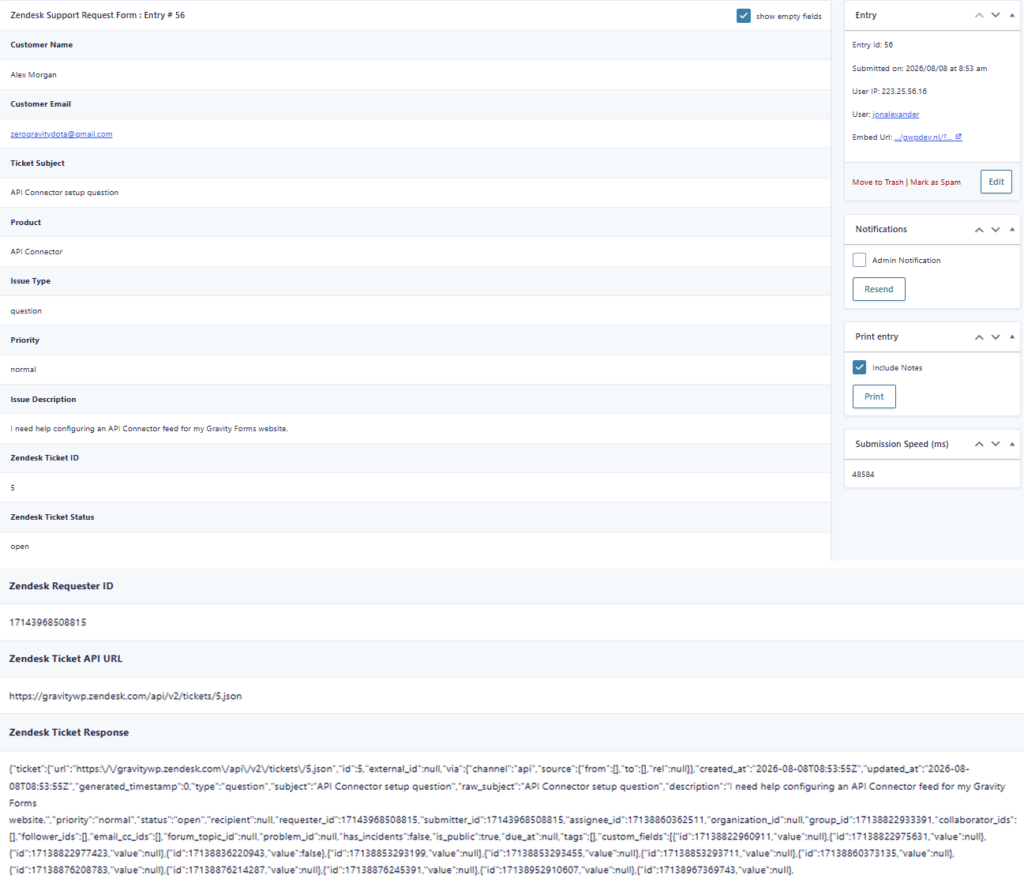
In our final test, API Connector stored:
- Zendesk Ticket ID
- Zendesk Ticket Status
- Zendesk Requester ID
- Zendesk Ticket API URL
- Full Zendesk Ticket Response
Our test ticket returned:
Status: open
Type: question
Priority: normal
The full response also contained the new Zendesk ticket URL and requester information.
This is not continuous two-way synchronization between Gravity Forms and Zendesk. The tested workflow sends data to Zendesk and then stores selected values from that API response back in the Gravity Forms entry.
If someone later changes the ticket inside Zendesk, this tutorial does not automatically sync that later change back to Gravity Forms.
What happened in our final test?
Here is the full tested workflow:
1. A customer submitted the Gravity Forms support request.
2. GravityWP API Connector sent an authenticated JSON POST request to Zendesk.
3. Zendesk created a new support ticket for the requester.
4. Zendesk received the ticket subject, description, requester details, Question type, and Normal priority.
5. Zendesk returned information about the new ticket.
6. API Connector saved the ticket ID, status, requester ID, API URL, and full JSON response in the original Gravity Forms entry.
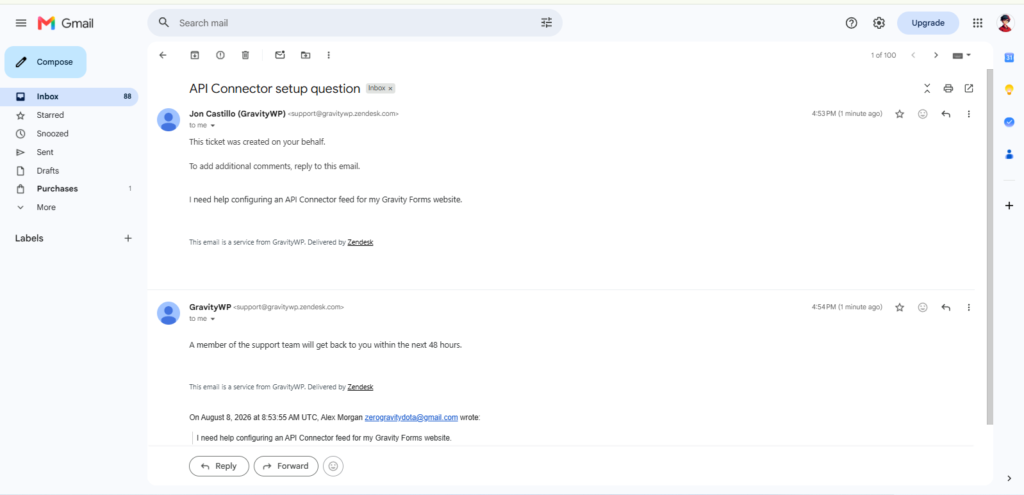
Our Zendesk test account also sent email notifications to the requester after ticket creation. Those emails came from the triggers and notification behavior configured in our Zendesk account, so your own email behavior may differ.
How do you troubleshoot a Gravity Forms Zendesk integration?
The Zendesk ticket is created, but Type is empty
This happened during our own testing.
Make sure Show Values is enabled for the Gravity Forms Issue Type field and use values Zendesk accepts:
question
incident
problem
task
Then map the field using:
{Issue Type:FIELD_ID:value}In our test, using :value made Zendesk correctly receive question.
Gravity Forms documents that the :value modifier outputs the choice value rather than the visible choice label.
API Connector says the Zendesk connection is not authorized
Check:
- Zendesk subdomain
- Client ID
- Client Secret
- Authorization URL
- Token URL
- Redirect URL
- OAuth scope
The Redirect URL registered in Zendesk should match the URL displayed by API Connector.
Zendesk does not create a ticket
Check that your feed uses:
POSTand:
api/v2/tickets.jsonAlso check that the Zendesk OAuth connection still shows Authorized.
How can you see what Zendesk returned?
Enable Store full response and map it to a Paragraph Text or other suitable text field.
After submitting the form, open the Gravity Forms entry and inspect the stored JSON response.
GravityWP also provides a JSON response path parser that can help identify paths you can use for Target Field mappings.
The OAuth redirect fails
Copy the Redirect URL directly from your API Connector connection settings.
Do not manually change:
- HTTP to HTTPS
- The hostname
- The callback path
OAuth providers require the registered callback to match the expected redirect URL.
Can you connect Gravity Forms to Zendesk without Zapier?
Yes.
The method in this tutorial connects Gravity Forms to Zendesk directly through the Zendesk API using GravityWP API Connector.
You do not need to build a Zap for this workflow.
API Connector is useful when you need more control over the request itself or when you want to map selected API response data back into Gravity Forms. If you are deciding between native add-ons, Webhooks, and API-based integrations, see our guide to Gravity Forms integration methods.
The best integration method still depends on the workflow you need. This tutorial focuses only on the API Connector setup we tested.
Our Premium add-ons for Gravity Forms

List Dropdown
Add a Dropdown Select with choices to a column or multiple columns in a Gravity Forms List Field.

Advanced Number Field
Functionality for Number Fields, like rounding or only absolute numbers, fixed point notation, range calculation, custom units like % or m2 & show as slider.
List Text
Add features like textarea, placeholder and custom validation to a column or multiple columns in a Gravity Forms List Field.

Entry to Database
Integrates Gravity Forms with internal or external databases, offering flexible mapping of form fields to database columns and real-time synchronization between entries and database rows.
Read tutorials about

How to Validate Repeatable Contact Rows in Gravity Forms
Learn how to validate repeatable Gravity Forms List field rows with GravityWP List Text. This tutorial shows how to add email and regex validation, test invalid values, and confirm that valid team roster data is stored correctly.

Gravity Forms Airtable Integration: Create Records From Form Submissions
Learn how to build a Gravity Forms Airtable integration with GravityWP API Connector. Send form submissions to Airtable, create new records automatically, and save the returned Airtable Record ID and response back to Gravity Forms.

Gravity Forms Asana Integration: Create Tasks From Form Submissions
Learn how to connect Gravity Forms to Asana with GravityWP API Connector. This tested workflow creates Asana tasks from form submissions and saves the returned task ID and URL back to Gravity Forms.

Gravity Forms Google Calendar Integration: Create Events From Form Submissions
Connect Gravity Forms to Google Calendar with GravityWP API Connector. Learn how to create calendar events from form submissions, map event details, configure OAuth 2.0, handle time zones, and save the returned Event ID and URL.