Sometimes a new form submission needs more context.
For example, a returning customer submits another request using the same email address. Instead of checking the Gravity Forms Entries screen manually, you may want the confirmation message to show how many previous submissions used that email and the total value connected to those matching entries.
In this tutorial, we’ll build that workflow using GravityWP Advanced Merge Tags.
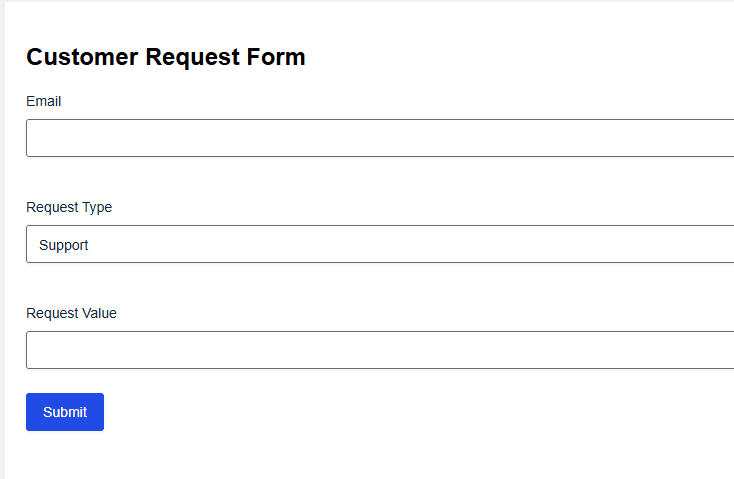
The demo uses a simple Customer Request Form. A visitor enters their email address, chooses a request type, and adds a request value. After submission, the confirmation message shows:
- the number of previous submissions found for that email address
- the total submitted value from matching entries
This tutorial is based on a tested Gravity Forms setup. We confirmed that gwp_count_matched_entries counted previous submissions by matching the email field, and gwp_sum_matched_entries_values calculated the total value from matching entries.
What You’ll Build in This Tutorial
You’ll create a Gravity Forms previous submissions summary based on an email lookup.
Here is the basic flow:
- A visitor submits the form using an email address.
- Advanced Merge Tags checks previous entries with the same email.
- The confirmation message shows how many previous submissions were found.
- The confirmation message also shows the total submitted value from matching entries.
In our demo, the form was called Customer Request Form.
| Field label | Field type | Field ID in our demo | Purpose |
|---|---|---|---|
| 1 | Used to match previous submissions | ||
| Request Type | Drop Down | 3 | Sample request category |
| Request Value | Number | 4 | Numeric value used for the total |
| Previous Submission Count | Single Line Text / Administrative | 5 | Optional field for storing the count |
| Total Submitted Value | Single Line Text / Administrative | 8 | Optional field for storing the total |
The key field is Email. Advanced Merge Tags uses the submitted email address as the matching value, then checks form entries that use the same email.
In this demo, the Form ID is 5. Your own Form ID will be different, so update the merge tags before using them on your site.
Before You Start
You’ll need:
- Gravity Forms installed and active
- GravityWP Advanced Merge Tags installed and active
- access to edit the form settings
- a form with an Email field
- a Number field if you want to calculate totals
- a few test entries using the same email address
This tutorial uses the confirmation message because it is the simplest place to test the result. Once it works, you can also place the same merge tags in an admin notification or store the output in administrative fields.
Step 1: Create the Customer Request Form
Create a new form in Gravity Forms.
For this demo, we used a form called Customer Request Form with these visible fields:
| Field label | Field type | Example choices or value |
returning@example.com | ||
| Request Type | Drop Down | Support, Billing, Feature Request, General Inquiry |
| Request Value | Number | 100, 200, 300, etc. |
The Email field is used for matching. If the same email address appears in earlier entries, Advanced Merge Tags can count those matching entries.
The Request Value field is used for the total. Since it is a number field, Advanced Merge Tags can add the values from matching entries.
In our demo:
- Email = Field ID 1
- Request Type = Field ID 3
- Request Value = Field ID 4
- Form ID = 5
You can find your form ID in the Forms list or in the browser URL while editing the form.

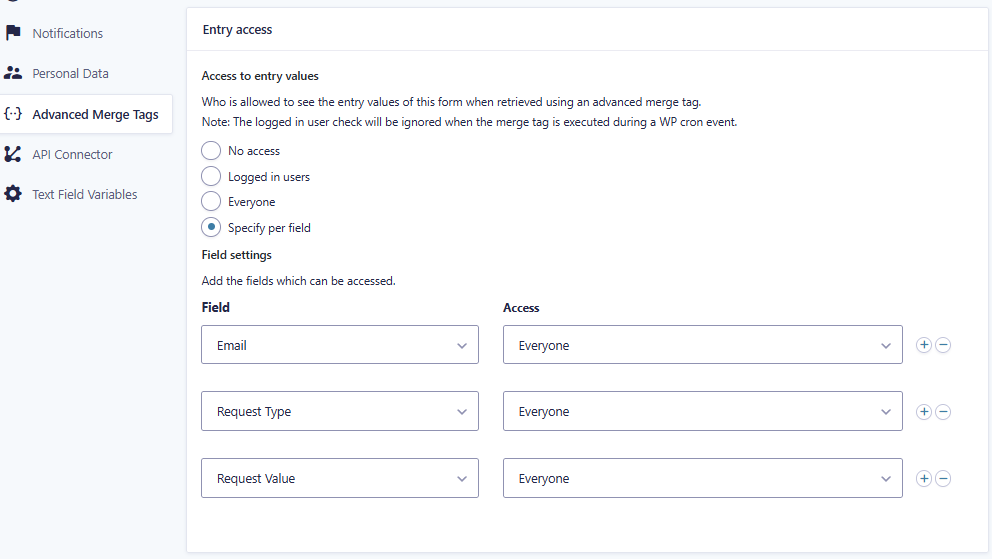
Step 2: Set Field Access in Advanced Merge Tags
Next, allow Advanced Merge Tags to access only the fields needed for this lookup.
Go to:
Form Settings → Advanced Merge Tags
Set Entry access to:
Specify per field
In our demo, we allowed access to these fields:
| Field | Access level used in demo | Why access is needed |
| Everyone | Used as the matching value | |
| Request Type | Everyone | Safe sample field in the demo |
| Request Value | Everyone | Used for calculating the total |
We used Everyone because the form is submitted on the front end, and the visitor may not be logged in.
Only allow access to fields that are needed for the lookup or calculation. Do not expose private notes, payment details, personal data, or internal admin-only fields unless your workflow truly requires it.
Step 3: Add the Previous Submission Count Merge Tag
Now we’ll create the merge tag that counts previous submissions.
Use this merge tag:
{Email:1:gwp_count_matched_entries form_id="5" match_id="1"}Here is what each part means:
| Merge tag part | Meaning |
{Email:1} | Uses the submitted value from the Email field. In our demo, Email is Field ID 1. |
gwp_count_matched_entries | Counts entries that match the submitted value. |
form_id="5" | Searches entries from Form ID 5. In our demo, that is the Customer Request Form. |
match_id="1" | Looks for matching values in Field ID 1 of the target form, which is also the Email field. |
In plain English, the merge tag says:
Take the email address submitted in this entry. Search Form 5 for entries where Field 1 has the same email address. Return the number of previous matching entries.
In our test, we submitted several entries using:
returning@example.comThe count increased like this:
| Same-email submission | Previous Submission Count result |
| 1st submission | 0 |
| 2nd submission | 1 |
| 3rd submission | 2 |
| 4th submission | 3 |
| 5th submission | 4 |
This confirmed that the count worked for a returning-user workflow.
Step 4: Add the Total Submitted Value Merge Tag
Next, add a merge tag that calculates the total submitted value from matching entries.
Use this merge tag:
{Email:1:gwp_sum_matched_entries_values form_id="5" match_id="1" return_id="4" raw="true"}Here is what each part means:
| Merge tag part | Meaning |
{Email:1} | Uses the submitted email address as the match value. |
gwp_sum_matched_entries_values | Adds up values from matching entries. |
form_id="5" | Searches entries from Form ID 5, the Customer Request Form in our demo. |
match_id="1" | Matches entries where Field ID 1 has the same email address. |
return_id="4" | Adds the value from Field ID 4, which is Request Value in our demo. |
raw="true" | Outputs the number without extra formatting. |
In plain English, the merge tag says:
Take the submitted email address. Find matching entries in Form 5. For those matching entries, add the values from Field 4.
In our demo, the confirmation message showed a total matching submitted value of 2700 after multiple submissions used the same email address.
Your result will depend on the values submitted in your own form.
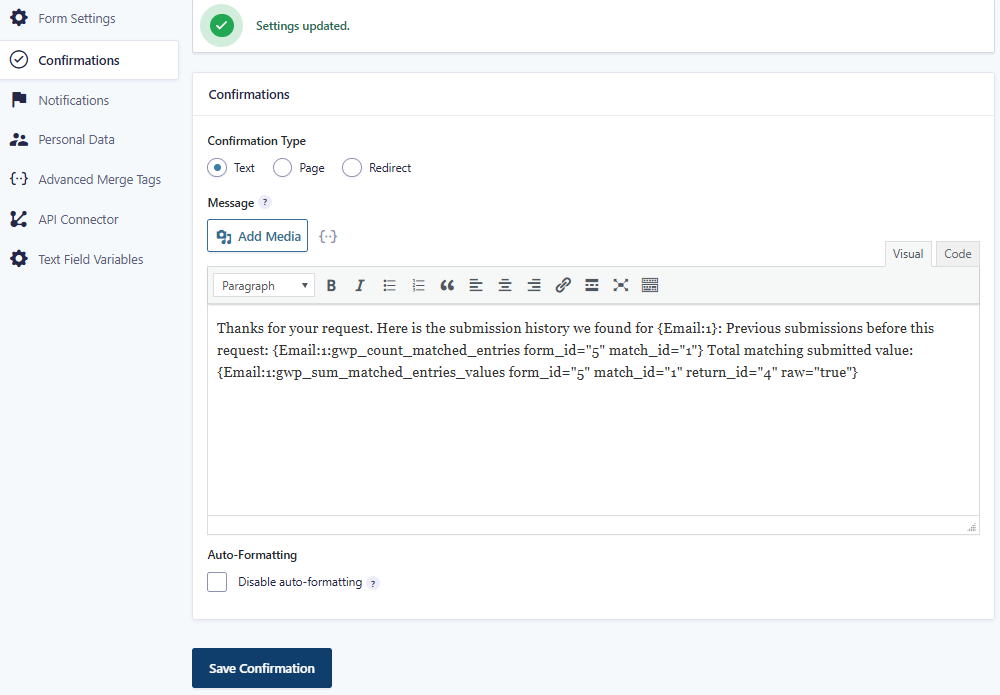
Step 5: Add the Merge Tags to the Confirmation Message
Now add the merge tags to your confirmation message.
Go to:
Form Settings → Confirmations → Default Confirmation
Set the confirmation type to Text.
Then paste this message:
Thanks for your request.
Here is the submission history we found for {Email:1}:
Previous submissions before this request:
{Email:1:gwp_count_matched_entries form_id="5" match_id="1"}
Total matching submitted value:
{Email:1:gwp_sum_matched_entries_values form_id="5" match_id="1" return_id="4" raw="true"}
Update the IDs to match your own form.
In our demo:
| ID | What it refers to |
| Form ID 5 | Customer Request Form |
| Field ID 1 | |
| Field ID 4 | Request Value |
After submitting the form, the confirmation displays:
- the email address used in the submission
- the number of previous matching submissions
- the total matching submitted value
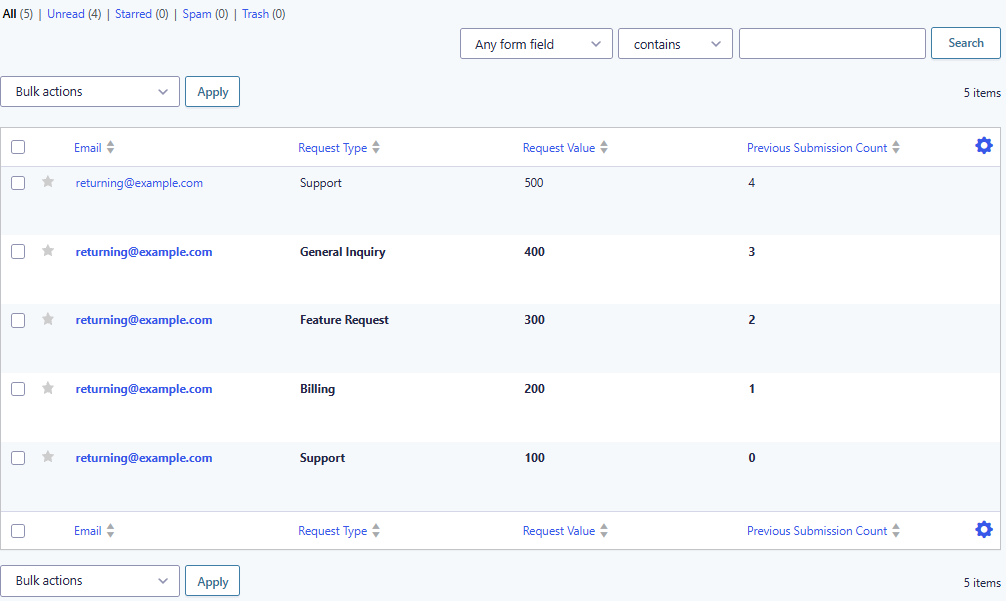
Step 6: Test the Form with the Same Email Address
To test the setup, submit the form several times using the same email address.
For example:
| Submission | Request Type | Request Value | |
| 1 | returning@example.com | Support | 100 |
| 2 | returning@example.com | Billing | 200 |
| 3 | returning@example.com | Feature Request | 300 |
| 4 | returning@example.com | General Inquiry | 400 |
| 5 | returning@example.com | Support | 500 |
Use the same email each time. The lookup depends on matching the submitted email value against entries that already use that same email.
If the setup is working, the count should increase as the same email is submitted again.
| Submission | Expected count |
| First submission | 0 |
| Second submission | 1 |
| Third submission | 2 |
| Fourth submission | 3 |
| Fifth submission | 4 |
If you test with different emails, the count will not increase because the entries do not match.
These are different values:
test1@example.com
test2@example.com
test3@example.com
Use one repeated email instead:
returning@example.comStep 7: Check the Confirmation Result
After submitting the form, review the confirmation message.
In our demo, the confirmation showed:
- previous submissions found for the submitted email
- total matching submitted value
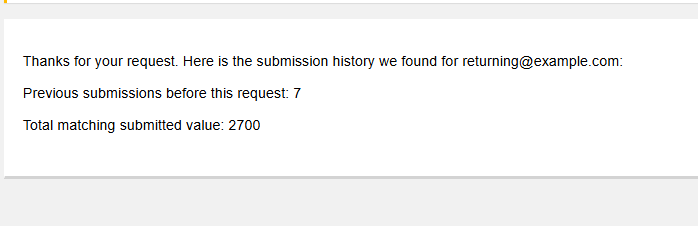
One tested confirmation result showed:
Previous submissions before this request:
7
Total matching submitted value:
2700
That means Advanced Merge Tags found earlier entries with the same email address and calculated the matching value total from the Request Value field.
Optional: Store the Results in Administrative Fields
The confirmation method is the easiest way to show the result.
But you can also store the resolved count or total inside the entry using administrative fields.
This is useful when site admins want to see the previous submission summary in the Entries screen.
For this optional method, create Administrative Single Line Text fields such as:
| Field label | Purpose |
| Previous Submission Count | Stores the resolved count |
| Total Submitted Value | Stores the resolved total |
Then place the same merge tags in the fields’ default value settings.
You also need to enable this global Advanced Merge Tags setting:
Forms → Settings → Advanced Merge Tags → Replace field merge tags in Administrative Text fields
In our demo, the previous submission count worked in an administrative text field after this setting was enabled.
If you only need to show the result after submission, you can skip this optional section and use the confirmation method only.
Troubleshooting: What If the Output Does Not Work?
If the confirmation shows a blank result or the raw merge tag text, check these common issues.
Check the Form ID
The form_id must match the form you want to search.
In our demo, the Customer Request Form had Form ID 5:
form_id="5"Your form may use a different ID.
Check the Email Field ID
The field ID inside {Email:1} and match_id="1" must match the Email field used for lookup.
In our demo, Email was Field ID 1.
If your Email field has a different ID, update both parts.
Check the Request Value Field ID
For the total submitted value, return_id must point to the numeric field you want to sum.
In our demo, Request Value was Field ID 4:
return_id="4"Check the Advanced Merge Tags Access Settings
Go to:
Form Settings → Advanced Merge Tags
Use Specify per field, then allow access only to the fields needed for the lookup and calculation.
In our demo, those fields were:
- Request Type
- Request Value
Test in the Confirmation First
For the easiest test, place the merge tags inside the confirmation message first.
Once the confirmation output works, you can move the same logic into an admin notification or administrative text field if needed.
Use a Repeated Email for Testing
The match only works when the same value is used again.
Use this:
returning@example.comDo not use different test emails for each submission.
Privacy Notes Before Showing Previous Submission Data
Be careful when showing previous submission data to a front-end user.
In this demo, we only showed a count and a total value based on the submitted email address. We did not show private notes, full entry details, payment information, or personal data from other fields.
Before using this on a live site, ask:
- Is this data safe to show to the person submitting the form?
- Could someone type another person’s email and see information they should not see?
- Should this summary be shown only to admins?
- Should the result be stored in an admin-only field instead of shown in the confirmation?
For sensitive workflows, use the admin notification or administrative field approach instead of showing previous submission data in a public confirmation message.
Final Confirmation Message Used in This Demo
Here is the final confirmation message from the working demo:
Thanks for your request.
Here is the submission history we found for {Email:1}:
Previous submissions before this request:
{Email:1:gwp_count_matched_entries form_id="5" match_id="1"}
Total matching submitted value:
{Email:1:gwp_sum_matched_entries_values form_id="5" match_id="1" return_id="4" raw="true"}
Replace the IDs with your own form and field IDs.
Use this as the starting point, then test it with repeated submissions using the same email address.
Final Recommendation
Advanced Merge Tags can help you show useful Gravity Forms submission history without manually checking previous entries.
In this tutorial, we used a returning email address to:
- count previous Gravity Forms submissions
- calculate the total submitted value from matching entries
- show the result in a confirmation message
- optionally store the result in an administrative text field
For most use cases, start with the confirmation method. It is easier to test, easier to explain, and gives immediate context after the form is submitted.
For more advanced entry lookup workflows, review the official Advanced Merge Tags documentation and test each modifier in the exact context where you plan to use it.
Frequently Asked Questions
Gravity Forms can show submitted values through merge tags. With GravityWP Advanced Merge Tags, you can extend that behavior by counting or calculating values from matching entries.
Use gwp_count_matched_entries with the submitted Email field as the match value. In this tutorial, the Email field was Field ID 1, and the merge tag counted entries from Form ID 5 where the Email field matched the submitted email.
Yes. Use gwp_sum_matched_entries_values to sum a numeric field from matching entries. In this demo, we summed the Request Value field from entries that matched the submitted email address.
Yes. The working demo showed the previous submission count and total matching submitted value inside a Gravity Forms confirmation message.
Yes. You can store resolved merge tag output in Administrative Text fields if the Advanced Merge Tags setting for replacing merge tags in Administrative Text fields is enabled. In this demo, the previous submission count worked in an administrative field.
No custom PHP was used in this demo. The setup used Gravity Forms fields, confirmation text, and GravityWP Advanced Merge Tags.
Only show data that is safe for the submitter to see. For sensitive workflows, send the summary to an admin notification or store it in an administrative field instead of showing it in a public confirmation message.
Our Premium add-ons for Gravity Forms

Entry to Database
Integrates Gravity Forms with internal or external databases, offering flexible mapping of form fields to database columns and real-time synchronization between entries and database rows.

Advanced Merge Tags
This Gravity Forms Add-On adds extra Merge Tag modifiers (and a lot of power). From the most common used functions like capitalize and length to changing date formats.

List Datepicker
Add a Datepicker with calendar select to a column or multiple columns in a Gravity Forms List Field.

n8n Connector
Connect Gravity Forms to n8n and automate your workflows with secure, flexible, and powerful webhooks. Go beyond simple notifications and build advanced, two-way automations.
Read tutorials about

Gravity Forms monday.com Integration: Create New Items From Form Submissions
Learn how to connect Gravity Forms to monday.com without Zapier using GravityWP API Connector. This step-by-step tutorial shows how to create new monday.com items from form submissions and save the returned monday.com item ID back to Gravity Forms.

Gravity Forms Pipedrive Integration: Send Form Contacts to Pipedrive Without Zapier
Learn how to connect Gravity Forms to Pipedrive without Zapier using GravityWP API Connector. This step-by-step tutorial shows how to send form contacts, custom fields, and the returned Pipedrive Person ID directly from WordPress to Pipedrive CRM.

Show Previous Gravity Forms Submissions Using Advanced Merge Tags
This step-by-step tutorial shows how to use GravityWP Advanced Merge Tags to count previous Gravity Forms submissions and calculate total submitted value based on a matching email address.

Gravity Forms LeadConnector Integration with OAuth 2.0
This documentation-based tutorial explains how to connect Gravity Forms to LeadConnector/HighLevel with OAuth 2.0, search contacts by email, and map returned CRM values back into form fields using GravityWP API Connector.
