If you’ve been running Gravity Forms through Zapier for a while, you probably know the pattern by heart: form submits, Zap fires, data lands in Sheets/CRM/Slack, and tasks quietly tick up in the background. At some point you start wondering whether it’s time to replace Zapier with n8n for your Gravity Forms workflows so you get more control over costs and where your data lives.
This tutorial walks through how to replace Zapier with n8n using the GravityWP n8n Connector as the bridge between Gravity Forms and your n8n instance, so you keep the same business outcome but run everything on your own automation engine.
What you need before you start
To follow this tutorial you’ll need three things:
- Gravity Forms installed on your WordPress site.
- A running n8n instance (self-hosted or n8n Cloud).
- The GravityWP n8n Connector add-on, installed and activated. This is what connects Gravity Forms to your n8n workflows.
If you’re not using the n8n Connector yet, you can get it from GravityWP and then come back to this guide to wire everything together. If you want to move away from Zapier and prefer it done for you, Aiwos, our sister company that specializes in WordPress / Gravity Forms services, can help. They set up, optimize, and maintain your Gravity Forms automations with n8n so everything runs reliably from day one.
- Form submits
- Zap fires
- Data lands in Sheets/CRM/Slack
- Tasks quietly tick up in the background
At some point, a few questions start nagging you:
- “Why are we burning so many Zapier tasks for simple form submissions?”
- “Do we really want all of this data and authentication to live in someone else’s cloud?”
- “This workflow is getting complex. Is Zapier still the right home for it?”
That’s usually when teams start looking at n8n as a more flexible, more controllable engine and asking how to move real Gravity Forms workflows off Zapier without rebuilding everything from scratch.This tutorial shows you how to replace a Zapier workflow with n8n, using the GravityWP n8n Connector as the bridge between Gravity Forms and your n8n instance. The goal: keep the same business outcome, but move the automation into something you control.
Why teams start looking beyond Zapier
Zapier does a lot of things right:
- It connects thousands of apps via reusable app connections that you can share across workflows.
- Non-technical users can chain together triggers and actions without touching code.
But over time, certain pain points show up:
- Task-based billing: every multi-step Zap consumes multiple tasks. You can see how this works in the official Zapier pricing page.
- Everything runs through a third-party SaaS: Zapier needs access to your connected apps, which means credentials and data are always flowing through Zapier’s environment.
- Complex workflows become opaque: As you stack filters, paths, and lookups, a multi-step Zap can be harder to reason about or debug than a visual workflow builder like n8n.
n8n flips that model:
- You can self-host it or use n8n Cloud, so you decide where data lives.
- It uses a visual workflow canvas with nodes for each app or logic step.
- Credentials are stored in n8n (encrypted, and even optionally in external secret stores on higher plans).
And for Gravity Forms users, GravityWP’s n8n Connector sits right in the middle: it sends entries to an n8n webhook and, if you want, maps the JSON response back into the original Gravity Forms entry. All of this is why, once automations grow beyond a few simple Zaps, many Gravity Forms sites eventually decide to replace Zapier with n8n for their core workflows.
Zapier “app connections” vs n8n “credentials” (and the n8n Connector bridge)
Before you migrate anything, it helps to update your mental model.
How Zapier app connections work
In Zapier:
- You connect an app (like Google Sheets or Slack) once.
- Zapier creates an app connection that links to a specific user account.
- That connection is reusable across multiple Zaps, and on team accounts it can be shared with other users.
So if you have 5 Zaps that all write to the same Google Sheet, they’re probably using the same Google Sheets connection behind the scenes.
The n8n equivalent: credentials
In n8n:
- You create Credentials for each service (Google, Slack, HTTP APIs, OpenAI, etc.)
- These credentials are stored encrypted, can be reused across workflows, and can be shared or restricted depending on your setup.
- Nodes in your workflow reference these credentials when they call external services.
Functionally, one “Zapier app connection” one “n8n credential” used by multiple nodes.
Where GravityWP’s n8n Connector fits
On the Gravity Forms side, the n8n Connector lets you:
- Define one or more connection profiles in Forms → Settings → n8n Connector. Each profile has your n8n base URL, algorithm (e.g. HS256), and a secret token.
- Reuse those connections in per-form feeds that decide:
- Which n8n workflow/webhook to hit
- Which fields to send
- Which fields to update from the JSON response
- Which Response Mode to use: Trigger Only, Immediate Update, or Delayed Update
- Which n8n workflow/webhook to hit
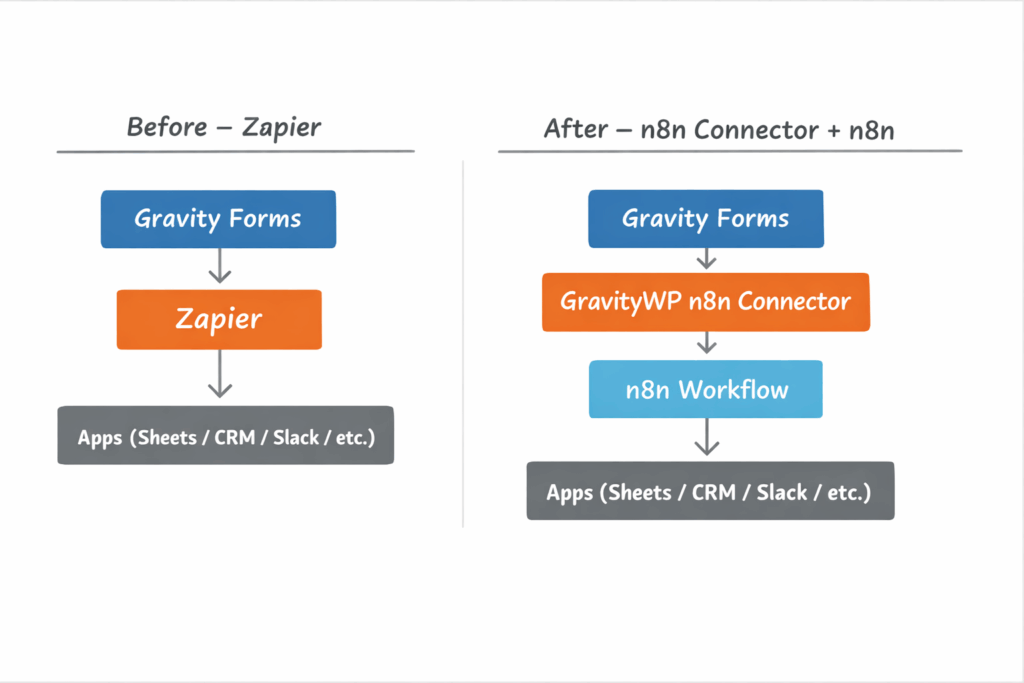
That means your “Gravity Forms → Zapier” link becomes “Gravity Forms → n8n Connector → n8n Webhook,” and everything else (Sheets, Slack, CRM, AI, etc.) happens inside n8n.
The example pattern we’ll migrate
To keep things tangible, we’ll use a simple pattern you’ve probably built in Zapier:
When a Gravity Form is submitted:
- Create or append a row in a spreadsheet (Google Sheets, Excel, Airtable, etc.)
- Send a notification to a chat app (Slack, Teams, email, etc.)
In Zapier, that’s usually:
- Trigger: New Gravity Forms submission
- Action 1: Create Spreadsheet Row
- Action 2: Send Channel Message
We’ll rebuild that general structure in n8n, but in a way that works no matter which spreadsheet or messaging tools you prefer; Sheets and Slack are just easy examples to imagine.
Step 1 – Audit the Zap you’re replacing
Before touching n8n or GravityWP settings, grab a notebook (or a doc) and answer a few questions about the Zap you’re replacing:
- What’s the trigger?
- Most likely “New submission in Gravity Forms.”
- Most likely “New submission in Gravity Forms.”
- Which apps does it call?
- Spreadsheet (Google Sheets, Excel, Airtable).
- Chat/notification tool (Slack, Teams, email).
- Anything else? A CRM? A helpdesk?
- Spreadsheet (Google Sheets, Excel, Airtable).
- What data is passed where?
- Which Gravity Forms fields end up in which columns, fields, or message templates?
- Which Gravity Forms fields end up in which columns, fields, or message templates?
- Is there logic involved?
- Filters (“only run if field X has value Y”).
- Paths or branches based on conditions.
- Delays (e.g. wait an hour, then send a follow-up).
- Filters (“only run if field X has value Y”).
- How expensive is it?
- Roughly how many tasks per month does this Zap consume?
- Roughly how many tasks per month does this Zap consume?
Zapier’s own docs on app connections and Zap management can help you see which Zaps rely on which connections and how they’re shared across the team.You don’t need to be exact. The point is to understand inputs, outputs, and logic before you recreate anything in n8n.
Step 2 – Pick and prepare your n8n instance
Before you can replace Zapier with n8n, you need a reliable place to run your n8n instance.
Common options:
- n8n Cloud – fastest way to test; n8n hosts and manages the infrastructure for you.
- Self-hosted n8n on a VPS (Docker) – the pattern GravityWP documents most often: VPS + Docker + Postgres + reverse proxy.
- Local n8n with Cloudflare Tunnel (dev only) – useful when you want a local instance reachable over HTTPS for short-term testing.
For this tutorial, we’ll assume:
- You already have some n8n instance reachable over HTTPS.
You can log into n8n and create Credentials (e.g. Google, Slack, HTTP request).
If you don’t have this in place yet, GravityWP’s existing tutorials on “How to Set Up an n8n Instance” and “Self-Host n8n with Docker on a VPS” are your starting points.
Step 3 – Create your first n8n connection in Gravity Forms
With the GravityWP n8n Connector add-on installed and active, you can now set up the secure bridge between Gravity Forms and n8n. The connector adds its own settings page inside Gravity Forms where you define one or more reusable n8n connections.
In WordPress:
- Go to Forms → Settings → n8n Connector.
- Click Add New Connection.
You’ll see fields like:
- Name – e.g. “Production n8n”
- Webhook URL/Base URL – your public n8n URL (cloud or self-hosted)
- Algorithm – typically
HS256 - Secret Token – a long random string (shared with n8n’s JWT credential)
Save the connection. GravityWP’s docs describe this as a reusable connection profile: you’ll be able to select it later in any form’s n8n Connector feed.
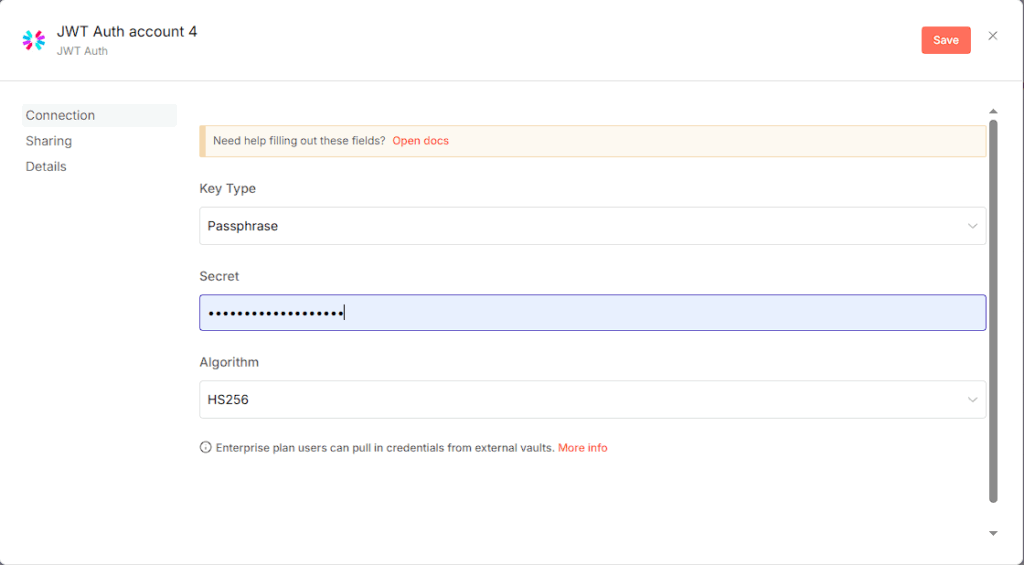
In n8n, you then create a matching JWT Auth credential that uses:
- Key type: Passphrase
- Secret: the same secret token from WordPress
- Algorithm: HS256
At this point, Gravity Forms and n8n share a secret and can verify each other via JWT.

Step 4 – Rebuild your Zap in n8n (Webhook → Connected Apps → Optional Response)
With the connection set up, it’s time to move the logic from Zapier into n8n.
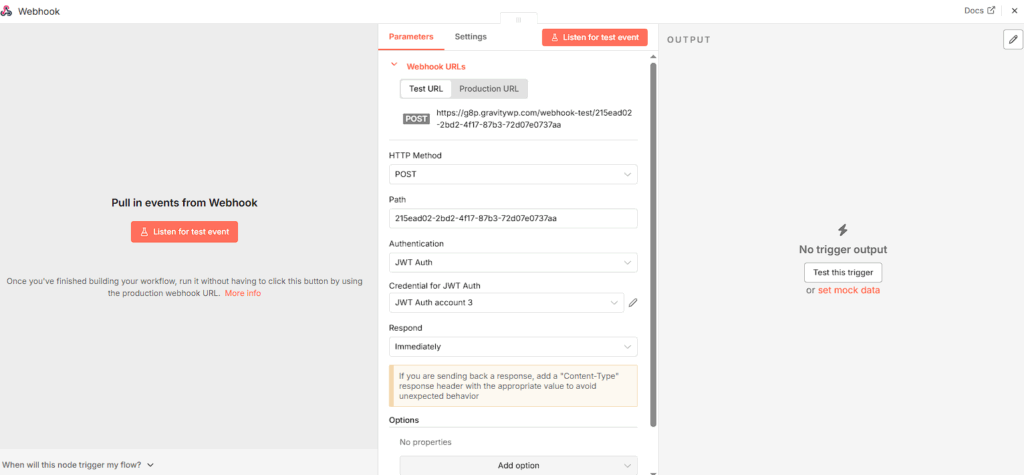
4.1 Start with a Webhook trigger
In n8n:
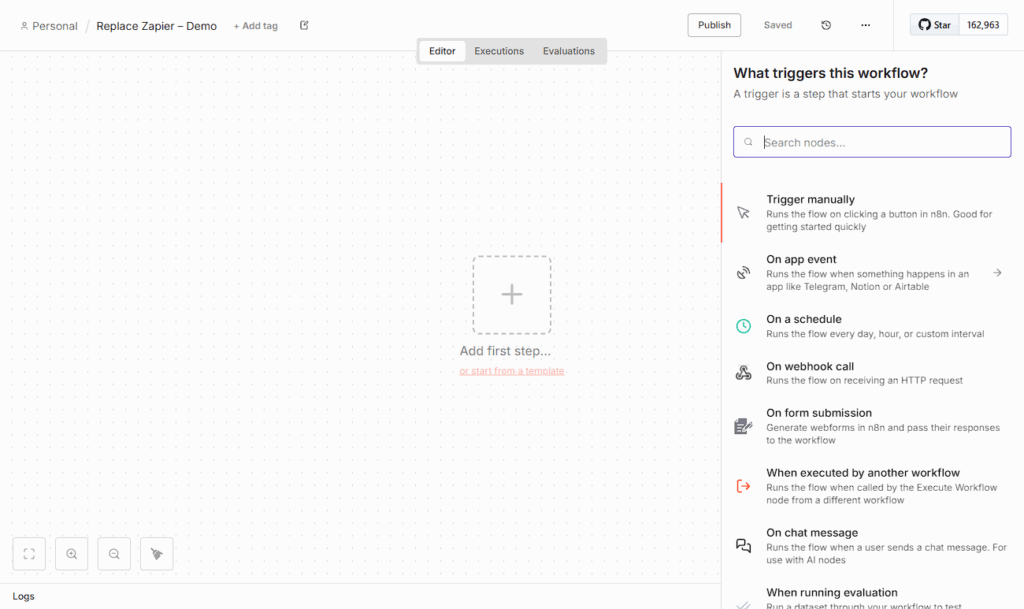
- Create a new workflow.
- Add a Webhook node as the first node.
- Configure it to use the JWT credential you created.
This Webhook becomes the “entry point” for Gravity Forms submissions the n8n equivalent of “New Gravity Forms submission” in Zapier.
4.2 Add nodes for the apps your Zap used
Next, recreate the downstream steps:
- If Zapier wrote to a spreadsheet, add an appropriate node:
- Google Sheets, Excel, Airtable, or a generic HTTP node that calls your own API.
- Google Sheets, Excel, Airtable, or a generic HTTP node that calls your own API.
- If Zapier sent a notification, add nodes for Slack, Teams, email, or any chat tool available in n8n.
- If Zapier updated a CRM or helpdesk, add those nodes too, or use HTTP Request if there’s no built-in node.
Each of these nodes will reference their own Credentials (Google, Slack, custom API key, etc.), just like Zapier app connections.
You don’t have to copy the Zap step-by-step UI; the important thing is:
- Take the JSON coming from the Webhook node
- Map the relevant fields into each node’s input (e.g. “Name” into your spreadsheet; “Email” into your notification text)

4.3 Recreate filters, branches, and delays
Zapier features like Filters and Paths also have direct equivalents in n8n’s visual logic:
- Filters → IF node or conditions inside a node
- Paths / routing → IF or Switch nodes with multiple branches
- Delays → Wait node or scheduled/queued workflows
Because n8n shows everything on a canvas, it’s often easier to see where data flows and where errors might occur compared to multi-tab Zap editors.
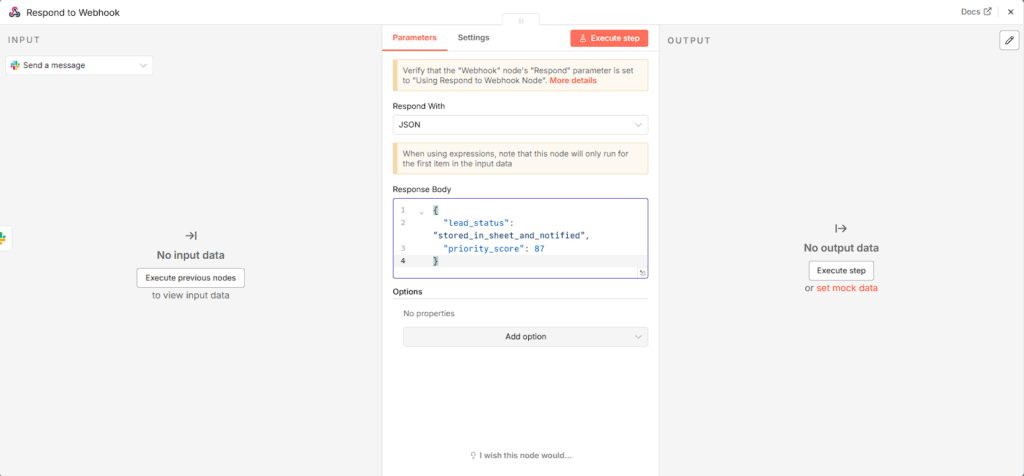
4.4 (Optional) Add a “Respond to Webhook” node
If you want n8n to send something back to Gravity Forms (e.g. a status, score, or AI-generated message), add a Respond to Webhook node at the end of your flow.
Configure it to return a JSON object like:
{
  "lead_status":
"stored_in_crm_and_sheet",
  "priority_score": 87
}
You’ll map those keys into Gravity Forms fields in the next step, using the n8n Connector’s response mapping.
Step 5 – Wire Gravity Forms to your n8n workflow (and stop sending to Zapier)
This is the point where you actually replace Zapier with n8n for this form by wiring Gravity Forms directly to your n8n workflow and turning off the old Zap feed.
5.1 Create an n8n Connector feed for the form
- In WordPress, go to Forms → [your form] → Settings → n8n Connector.
- Click Add New Feed.
- Choose the Connection you created earlier.
You’ll see options for:
- Webhook path / URL segment
- Response Mode
- Request mapping (what you send)
- Response mapping (what you receive)
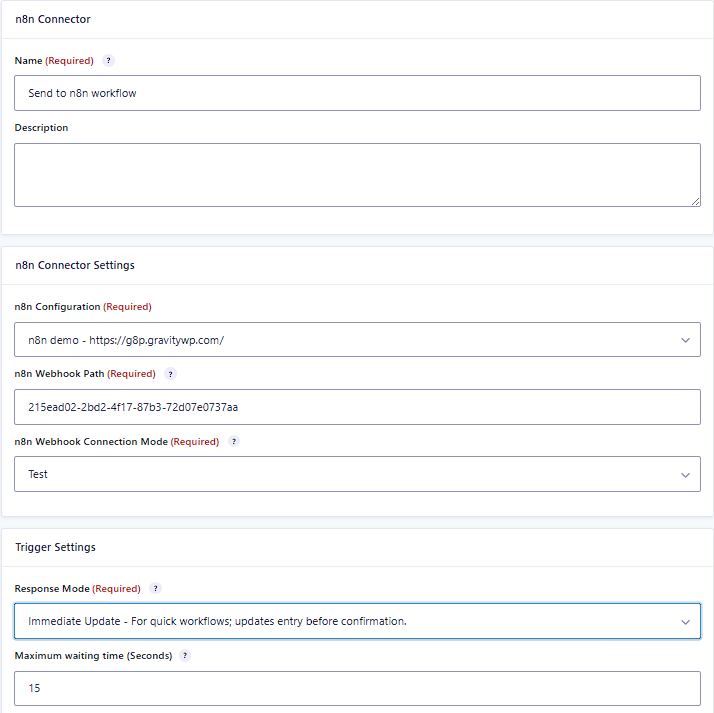
5.2 Pick the right Response Mode
The n8n Connector supports three modes:
- Trigger Only – send to n8n and immediately show the confirmation; use this when you don’t need anything back (e.g. “log to spreadsheet and notify Slack”).
- Immediate Update – wait briefly for n8n to reply, then update the entry before the confirmation page loads (great for showing a result or status immediately).
- Delayed Update – send to n8n, return the confirmation right away, and let n8n update the entry later (good for long-running flows like approvals or heavy AI pipelines).
For “form → spreadsheet + notification” flows, Trigger Only is often enough. If you want to show something like lead_status in the confirmation, use Immediate Update.
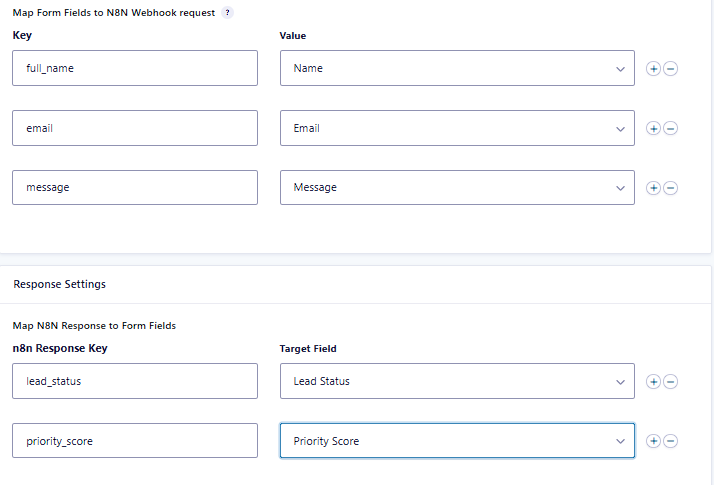
5.3 Map fields to JSON (request + response)
In the request section:
- Define JSON keys like full_name, email, message, form_id.
- Map them to Gravity Forms fields via the merge tag picker (e.g. full_name = {Name:1}).
This is exactly how you tell n8n what shape of data to expect ($json.body.full_name, etc.).
In the response section (if using Immediate or Delayed Update):
- Map response keys from n8n (e.g. lead_status, priority_score) into text fields in your form.
- You can then display those values in confirmations or notifications with normal Gravity Forms merge tags.
5.4 Turn off the old Zapier feed
If the form previously used the Gravity Forms Zapier add-on:
- Open Forms → [your form] → Settings → Zapier.
- Disable or delete the old Zap feed for this workflow so entries don’t go to both Zapier and n8n at once.
At this point:
- Gravity Forms sends to n8n via the n8n Connector.
- n8n does the spreadsheet + notification work you previously ran in Zapier.
- Optionally, n8n sends a JSON response back to enrich the entry.
Step 6 – Test, compare, and monitor
Now you want to make sure your new setup is rock-solid.
- Run a test submission from the Gravity Forms preview screen.
- In n8n, use the Webhook node’s test/listen mode (for dev) or simply check executions in the workflow’s history.
- Confirm:
- The spreadsheet row is created or updated.
- The notification arrives in the right channel or inbox.
- Any response fields (lead_status, etc.) are written into the entry.
- The spreadsheet row is created or updated.
Once everything behaves as expected, you can:
- Keep Zapier disabled for this form.
- Optionally move more Zaps over, one workflow at a time.
How n8n + GravityWP n8n Connector change your Zapier math
When you replace Zapier with n8n for a workflow, a few big things change.
1. Cost model
In Zapier, each step is a task, and tasks are tied directly to your monthly plan limits. Multi-step Zaps with spreadsheets + notifications can burn through tasks quickly at scale.
In n8n:
- If you self-host, your costs are almost entirely infrastructure (VPS, storage, backups).
- If you use n8n Cloud, pricing is still based on executions and resources, but you’re not bound to Zapier’s task-based billing.
For teams with growing volumes, “host your own workflow engine” often becomes cheaper than “pay per task forever.”
2. Ownership of connections and credentials
Zapier app connections are created in Zapier, stored by Zapier, and optionally shared with your team.
In n8n:
- Credentials live in your n8n instance, encrypted and optionally backed by an external secrets store on enterprise plans.
- Gravity Forms doesn’t talk to third-party SaaS directly; it talks to your n8n instance via JWT.
That’s a big win if you care about data residency, compliance, or just not spreading credentials across multiple platforms.
3. Flexibility and extensibility
Zapier has a huge app directory, but you’re limited to what each app’s Zapier integration exposes.
In n8n:
- You get a steadily growing library of built-in nodes.
- You can always drop down to a generic HTTP Request node when there’s no official integration, or use community nodes like the Gravity Forms REST API node.
And because Gravity Forms is connected via a general-purpose webhook + JSON mapping pattern, you’re not locked into “Zapier-style” thinking. You can plug in AI, internal APIs, or multi-step approval flows in the same pipeline.
Next steps: your first real migration
You don’t have to rebuild your entire Zapier account in one weekend. A practical path looks like this:
- Pick one Zap that matters ideally the one we outlined, “Gravity Forms → spreadsheet + notification” and replace Zapier with n8n just for that workflow.
- Follow this pattern:
- Set up the Gravity Forms ↔ n8n connection with JWT.
- Rebuild the Zap’s logic in n8n.
- Create an n8n Connector feed for the form.
- Disable the old Zapier feed.
- Set up the Gravity Forms ↔ n8n connection with JWT.
- Once it’s stable, repeat for the next workflow.
If you want to go deeper:
- Use GravityWP’s n8n vs Zapier article to fine-tune when n8n is the better fit.
- Use the “Self-Host n8n with Docker on a VPS” and “Cloudflare Tunnel + n8n” tutorials if you’re still choosing your hosting strategy.
- Keep Gravity Forms at the center of your stack, but let n8n (and the n8n Connector) handle the heavy automation work.
If you’re ready to move a real workflow today, install the GravityWP n8n Connector, connect it to your n8n instance, and replace one Zap that really matters.
You end up with the same Gravity Forms on the front end but behind the scenes, your workflows are running on your automation engine, on your infrastructure, under your rules.
Frequently Asked Questions when switching from Zapier to n8n Connector
For many teams: yes, as long as someone is comfortable with basic API concepts and a visual workflow builder. n8n is widely used as a primary automation engine, especially when self-hosting and complex workflows are important.
Some teams choose a hybrid approach for a while: n8n for heavy or sensitive workflows; Zapier for small, low-impact automations.
No. Start with one high-impact Zap often the one that:
-consumes the most tasks, or
-is most important to your business, or
-needs better control over data residency.
Migrate it, stabilize it, and only then move the next one.
Zapier supports thousands of apps; it’s famous for that. n8n focuses on a core set of nodes plus generic HTTP requests, which cover most modern SaaS tools and any API you can call.
If you depend on a very niche Zapier-only integration with no API, that might be one of the few reasons to keep a small Zapier footprint.
Ideal owners are:
-A technical marketer
-An operations engineer
-A developer comfortable with JSON and APIs
Zapier is friendlier to non-technical users. n8n rewards you for having one slightly technical person who can build robust workflows others rely on.
n8n is used in production by many teams, and its docs treat it as a serious workflow platform, not just a toy. Reliability comes down to how you host it (VPS quality, backups, monitoring) and how well you design your workflows (error handling, retries).
GravityWP’s n8n Connector adds JWT-based authentication on top, so your Gravity Forms site only talks to a verified n8n endpoint
Our Premium add-ons for Gravity Forms

JWT Prefill
Fill forms with data you can trust. Prefill Gravity Forms fields with a secure token instead of links with editable url parameters, so your data is accurate, tamper-proof, and ready to use.
Advanced Merge Tags
This Gravity Forms Add-On adds extra Merge Tag modifiers (and a lot of power). From the most common used functions like capitalize and length to changing date formats.
List Text
Add features like textarea, placeholder and custom validation to a column or multiple columns in a Gravity Forms List Field.

n8n Connector
Connect Gravity Forms to n8n and automate your workflows with secure, flexible, and powerful webhooks. Go beyond simple notifications and build advanced, two-way automations.
Read tutorials about

How to Create a Public Submission Business Directory in WordPress (Gravity Forms + GravityView)
Build a moderated business directory where users submit listings through a form, admins approve entries, and approved businesses appear in a searchable GravityView directory.

How to Create an Event Workshop Registration + Waitlist System in WordPress
This guide shows how to set up a workshop registration + waitlist system in WordPress: register attendees until capacity is reached, waitlist the rest, approve entries, and auto-promote people when a seat opens using Gravity Forms, Gravity Flow, and GravityView.

Gravity Flow Form Submission Step Tutorial
The Gravity Flow Form Submission step pauses a workflow until another form is submitted, then continues once the handoff is complete. This guide shows how to connect two forms, prefill fields with mapping, send the correct secure link, and troubleshoot the most common “workflow didn’t move” issues.

Gravity Flow Delete an Entry Step Tutorial
The Gravity Flow Delete Entry step lets you trash or permanently remove Gravity Forms entries as part of a workflow. This guide covers the key settings, scheduling options (delay or date-based), and safe testing tips so you can follow retention and privacy rules with confidence.