If you’ve decided to use n8n for automation, the next big question is how to set up an n8n instance that actually fits your budget and skills. n8n gives you a lot of freedom: you can use their fully hosted cloud, run it on your own VPS with Docker, or let a one-click provider spin everything up for you. That flexibility is great, but it can also be confusing especially if you’re not a developer.
At GravityWP we build add-ons that connect Gravity Forms to n8n, so we hear this hosting question a lot from users who want reliable automation without becoming full-time server admins. This article exists to give you that bigger-picture overview before you dive into any specific setup tutorial.
This guide walks you through the most common ways to set up an n8n instance, explains the trade-offs, and gives you enough detail to feel confident choosing the option that fits your budget, skills, and risk level.
How to set up an n8n instance: four main options
We’ll look at:
- Option 1 – n8n Cloud
- Option 2 – Self-host on a VPS
- Option 2a – One-click VPS providers
- Option 2b – Install on your own VPS with Docker
We’ll compare these options fairly, with a bit more focus on self-hosting.
A quick refresher: what this automation setup actually is
n8n is a workflow automation tool. You string together nodes (triggers and actions) to connect services like Gravity Forms, CRMs, databases, and AI models.
An n8n instance is simply the environment where those workflows live and run. It includes:
- The n8n application (the UI and workflow engine)
- A place to store your workflows and credentials
- A URL where webhooks and integrations can reach it
Whether you’re on n8n Cloud or running it on a VPS, you’re still using the same engine. The difference is who owns the server and who is responsible for keeping it online, secure, and updated.
Option 1 – n8n Cloud: the easiest hosted route
What it is
n8n Cloud is the official hosted service run by the n8n team. You get your own workspace at a URL like:
https://your-account-name.app.n8n.cloud
They host the infrastructure for you: servers, database, TLS certificates, scaling, and updates. You just log in and build workflows in the browser.
How the setup feels in real life
For many teams, this is the easiest way to set up an n8n instance without touching any servers at all.
If you’ve used any SaaS tool, this will feel familiar.
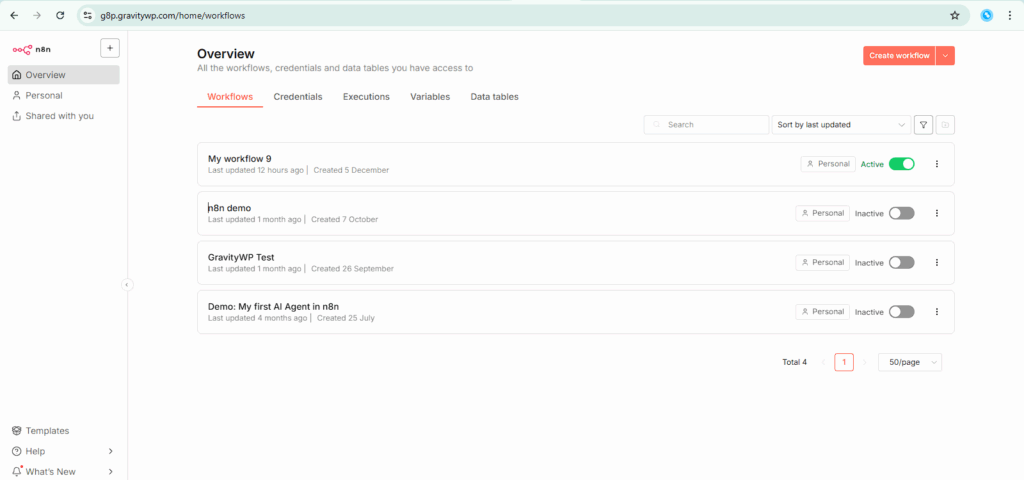
You create an account on n8n Cloud and confirm your email. After logging in, you land in your workspace dashboard where you can see workflows, credentials, and executions. From there, you click Create workflow, choose a trigger like Webhook, and start building.
When you use a Webhook trigger, n8n Cloud gives you a secure HTTPS URL for that webhook which you can paste into GravityWP’s n8n Connector, Zapier alternatives, or any app that can send HTTP requests.

No terminals, no Docker, no servers. The only “infrastructure” you deal with is copying URLs and API keys.
Pros
- Easiest possible setup; no server administration.
- Official support from the n8n team.
- Automatic updates, security patches, backups, and TLS certificates handled for you.
- Public HTTPS endpoint ready out of the box (no extra reverse proxy).
Cons
- Monthly pricing is higher than a cheap VPS, especially as workflow executions grow.
- You are limited by the plan’s execution and resource quotas.
Less control over the underlying environment (for example, custom networking or self-managed backups).
Who this is for
Pick n8n Cloud if you don’t want to touch servers or Docker, you value official support and managed security more than shaving costs, and you’re happy with predictable SaaS-style pricing and limits.
Option 2 – Self-host on a VPS (the flexible default)
Most serious n8n users eventually consider self-hosting. The usual route is a Virtual Private Server (VPS) from a provider like Hetzner, DigitalOcean, Linode, Hostinger, or similar basically a small Linux machine in the cloud that you rent monthly.
On that VPS, you install Docker and run n8n in a container. This is what the official docs recommend for production-grade self-hosting.
What “self-hosted on a VPS” actually means
From a non-developer perspective, self-hosting comes down to four ideas:
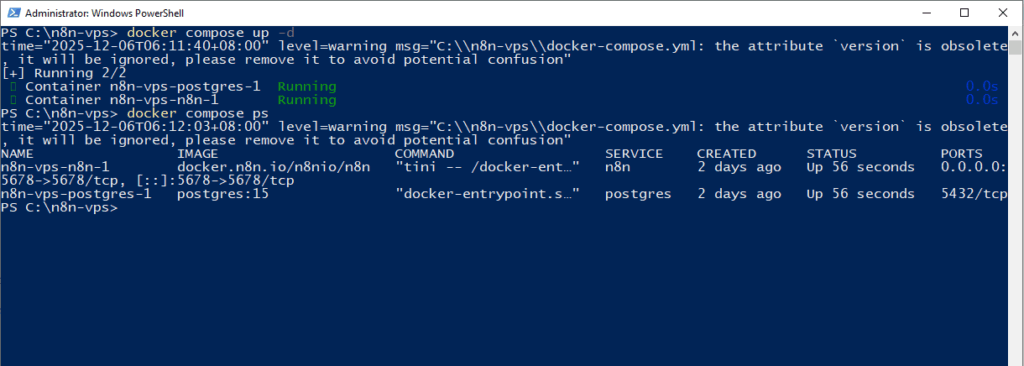
Start n8n with a command like docker compose up -d, and your instance becomes available on a port (commonly 5678) or behind a reverse proxy such as Nginx or Traefik.
Rent a small server in a data center (your VPS).
Install Docker, which lets you run applications in isolated containers.
Define how n8n should run in a docker-compose.yml file (ports, folders to store data, environment variables like timezone and basic auth).
The VPS is always on, so your webhooks can fire 24/7, and you can scale the server up later if you need more memory or CPU.
Why people like this option
Self-hosting on a VPS is the classic way to set up an n8n instance when you care about control and long-term cost. You pay a fixed amount for the VPS (often lower than SaaS at scale). You control security, backups, and network rules, and you can run other services on the same VPS, like databases or monitoring tools.
Pros
- Lower long-term cost than n8n Cloud for many use cases.
- Full control over the environment and security policies.
- Easy to move to a bigger VPS or a different provider later.
- Official Docker images and documentation make the setup reproducible.
Cons
- You are responsible for server security (firewalls, updates, backups).
- Requires comfort with SSH, Linux, and Docker.
- Misconfigurations (open ports, wrong permissions) can expose your instance.
Who this is for
This is ideal if you are comfortable following server tutorials or already manage other VPSs, you want predictable low costs and don’t mind some maintenance, and you need more control over where data lives for compliance or internal policies.
Option 2a – One-click VPS providers (managed shortcuts to self-hosting)
Some cloud providers now offer pre-built n8n templates or “one-click” deployments. You still get a VPS (or container), but much of the Docker and configuration boilerplate is handled for you.
Examples include platforms that ship an n8n image or template you can launch directly, such as:
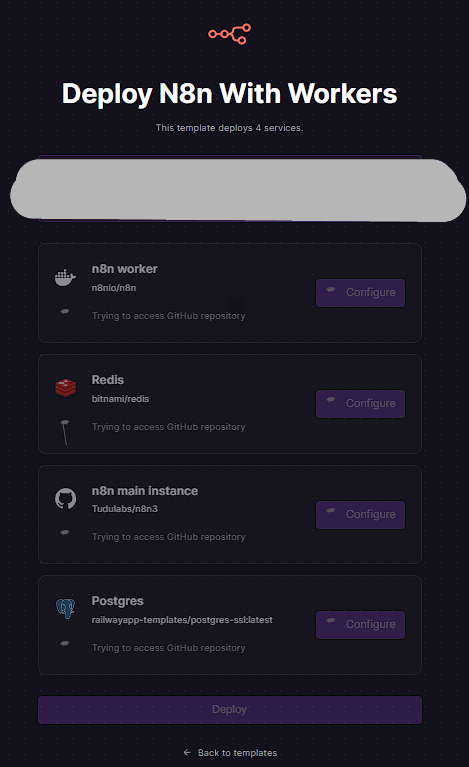
- Railway – one-click n8n template with Postgres and Redis, designed to be production-ready.
- Elestio – managed n8n service that handles updates, monitoring, and backups on top of your chosen cloud provider.
- xCloud – “One Click Apps” dashboard where n8n is a pre-configured app you can deploy and connect to a domain in a few steps.
Coolify on a VPS – not a dedicated n8n host, but gives you an app platform where n8n becomes a one-click install after you’ve set up Coolify on a provider like Hetzner.
How it works in practice
A one-click VPS provider is a convenient way to set up an n8n instance on your own infrastructure without writing Docker files yourself.
In most one-click setups, you follow a simple flow:
First, pick “n8n” from the provider’s marketplace or template list.
Next, choose a plan (CPU, RAM, region); the provider spins up a VPS or container and installs n8n for you.
Finally, log into n8n using a URL they provide, often already configured with HTTPS and a database.
Internally, most of these templates still run n8n in Docker or on a container platform. The difference is that the host has already written the deployment configuration.
Comparison table: popular 1-click n8n hosting options
Note: Pricing and limits change frequently. Treat this as a directional comparison and always check the provider’s current pricing page.
Pros
- Faster to get started than a raw VPS; much less manual setup.
- Usually includes helpful defaults for storage, SSL, and monitoring.
- You still own a self-hosted instance and can export/import data.
Cons
- You’re tied to the way that provider structures the environment.
- Pricing may be higher than a bare VPS because you’re paying for convenience.
- Advanced customizations sometimes require dropping down to manual configuration anyway.
Who this is for
Use a one-click provider if you want self-hosting power but don’t want to write Docker configs from scratch, you’re okay paying a bit extra for speed and convenience, and you prefer a more opinionated setup that “just works” with minimal tweaking.
Option 2b – Docker on your own VPS (full control)
This is the most hands-on way to set up an n8n instance, but it also teaches you exactly how every part of the stack fits together.
This is the “do-it-yourself” version of Option 2: no marketplace images, no templates just you, a VPS, and Docker.
It’s similar to what you might do when running n8n locally with Docker, but this time you’re connecting over SSH to a real server and putting it behind HTTPS.
At a high level, you:
- Create a VPS (for example, Ubuntu 22.04 with 1–2 vCPUs and 2 GB RAM).
- Install Docker and the Docker Compose plugin.
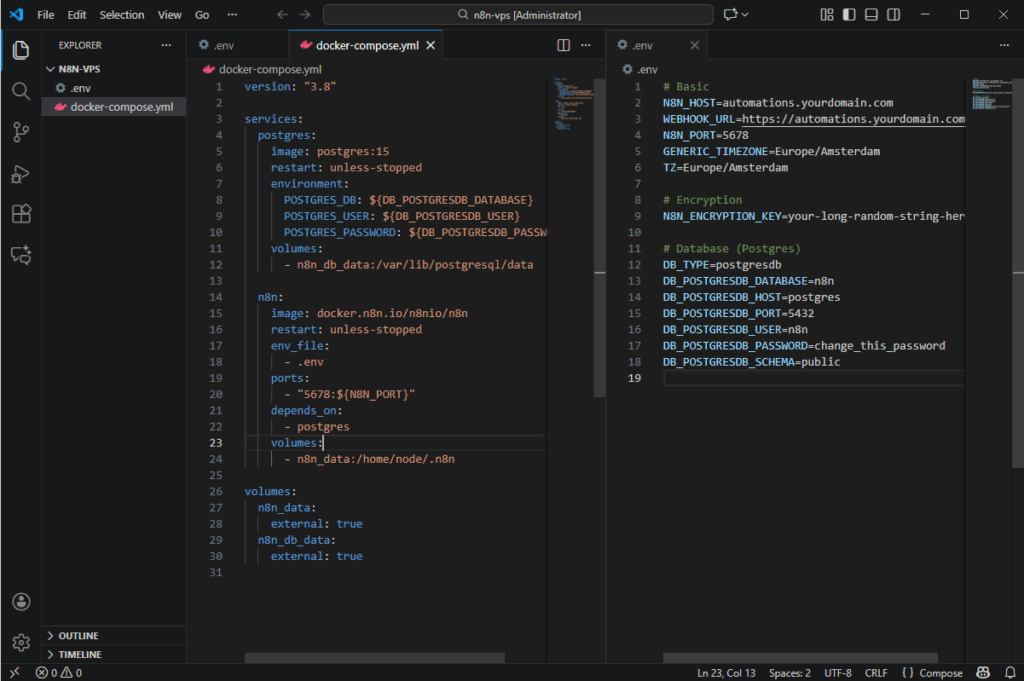
- Create a project folder with a
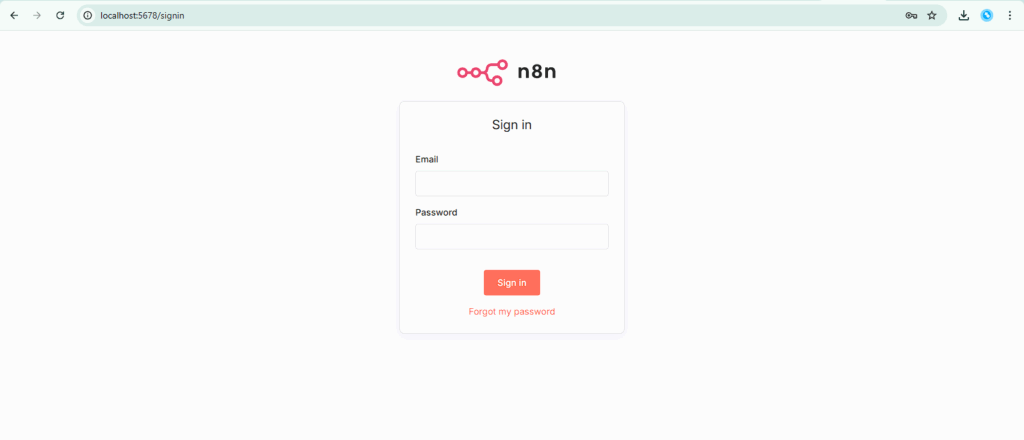
docker-compose.yml(and optionally a.envfile) that defines the n8n service, port mapping, volumes, and environment variables for things like timezone and database. - Run
docker compose up -dand access n8n atlocalhost:5678or behind a reverse proxy onhttps://automations.yourdomain.com.
Once you’ve set up the stack this way, updating usually comes down to:
docker compose pull
docker compose up -d
and your data persists in Docker volumes on the VPS.
Pros
- Maximum control over every part of the stack.
- You understand exactly how n8n is wired, because you set it up.
- Easy to move between hosts or environments – just copy your compose file and data.
- You can scale from “simple single-node” to more advanced topologies (Postgres, workers, Redis, queue mode) without changing providers.
Cons
- Most demanding on your time and technical comfort.
- You must handle OS updates, Docker updates, reverse proxy configuration, and backups.
- Mistakes in firewall or proxy configuration can expose your instance or break webhooks.
Who this is for
Choose this if you already feel comfortable with Docker and Linux, you want a setup that matches exactly how you prefer to manage other services, and you plan to document and reuse the same configuration for multiple projects or clients.
How to choose the right hosting option
Here’s a simple way to decide, based on what matters most to you.
If you just want it to work with minimal setup, start with n8n Cloud. You can always migrate to self-hosting later once you understand your workflow volume and needs.
If you want low cost and are willing to manage a server, go for a VPS with Docker (Option 2 or 2b). That gives you full control and a predictable monthly bill from your VPS provider.
If you want something between “pure DIY VPS” and “fully managed cloud,” try Option 2a with a one-click provider. It gets you into self-hosted territory without as much manual configuration and lets you lean on the provider’s templates and monitoring.
In separate tutorials you can go deep on:
- A full, step-by-step Docker setup on a VPS (Option 2b), and
- A walkthrough of one-click VPS providers with real screenshots and configuration tips (Option 2a).
For step-by-step help connecting Gravity Forms to your new instance, follow our getting started guide for the GravityWP n8n Connector.
This article’s job is to give you the big picture so you can pick the right path before you invest time into a specific setup.
Whatever you choose, the goal is to set up an n8n instance that matches your workflows today and can grow with you later.
Our Premium add-ons for Gravity Forms
List Datepicker
Add a Datepicker with calendar select to a column or multiple columns in a Gravity Forms List Field.

Update Multiple Entries
Trigger the update of multiple entries in a target form by submitting an entry in a trigger form.

JWT Prefill
Fill forms with data you can trust. Prefill Gravity Forms fields with a secure token instead of links with editable url parameters, so your data is accurate, tamper-proof, and ready to use.
Advanced Merge Tags
This Gravity Forms Add-On adds extra Merge Tag modifiers (and a lot of power). From the most common used functions like capitalize and length to changing date formats.
Read tutorials about

How to Create a Public Submission Business Directory in WordPress (Gravity Forms + GravityView)
Build a moderated business directory where users submit listings through a form, admins approve entries, and approved businesses appear in a searchable GravityView directory.

How to Create an Event Workshop Registration + Waitlist System in WordPress
This guide shows how to set up a workshop registration + waitlist system in WordPress: register attendees until capacity is reached, waitlist the rest, approve entries, and auto-promote people when a seat opens using Gravity Forms, Gravity Flow, and GravityView.

Gravity Flow Form Submission Step Tutorial
The Gravity Flow Form Submission step pauses a workflow until another form is submitted, then continues once the handoff is complete. This guide shows how to connect two forms, prefill fields with mapping, send the correct secure link, and troubleshoot the most common “workflow didn’t move” issues.

Gravity Flow Delete an Entry Step Tutorial
The Gravity Flow Delete Entry step lets you trash or permanently remove Gravity Forms entries as part of a workflow. This guide covers the key settings, scheduling options (delay or date-based), and safe testing tips so you can follow retention and privacy rules with confidence.