If your site already collects email addresses, chances are those contacts already live in Zoho CRM complete with a name, phone number, and other details you already entered. A Gravity Forms Zoho CRM integration can do more than push form entries into your CRM. You can also do the reverse: look up an existing contact by email and use that response to fill form fields automatically, without asking users to retype information you already have.
That is what this tutorial will show you.
In this guide, you will use API Connector for Gravity Forms to search the Zoho CRM Contacts module by email address and return the matching first name, last name, phone number, and email into your Gravity Form. This WordPress CRM integration setup is especially useful when you want to reduce duplicate data entry, speed up form completion, and build a smarter contact lookup workflow inside Gravity Forms.
What this Gravity Forms Zoho CRM integration helps you build
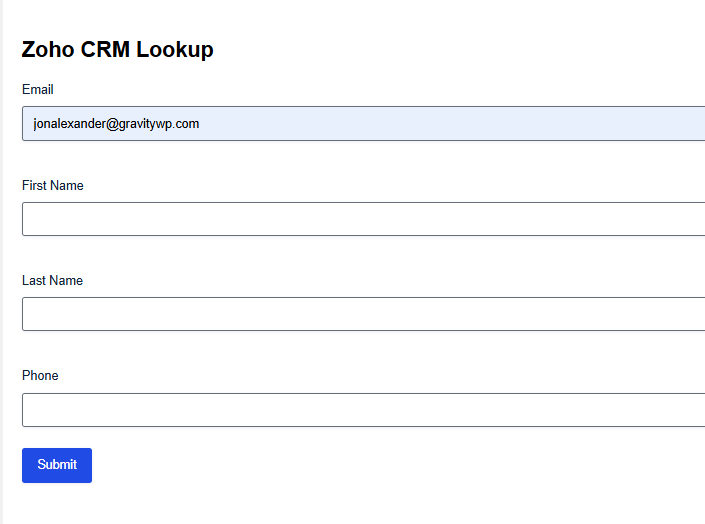
By the end of this tutorial, your form will work like this:
- A user enters an email address into your Gravity Form.
- The form sends that email to Zoho CRM when the form is submitted.
- Zoho CRM searches the Contacts module for a matching contact.
- If a match is found, GravityWP maps the returned data back into your form fields.
In this example, the returned values are:
- First Name
- Last Name
- Phone
This tutorial uses Zoho Self Client with OAuth 2.0 Client Credentials and runs the lookup on form submission.
Why use API Connector for a Gravity Forms Zoho CRM integration
Gravity Forms already supports Gravity Forms dynamic population, but that feature is mainly built for passing values through query strings, shortcode parameters, or custom code. It is helpful, but it is not a ready-made solution for calling an external CRM API, authenticating with OAuth 2.0, and mapping the returned JSON response back into form fields.
API Connector for Gravity Forms gives you that control. It is designed for situations where you need to:
- connect Gravity Forms to an external API
- pass form field values into the request
- use authentication such as API keys, bearer tokens, or OAuth 2.0
- map the API response back into one or more form fields
This is also where it differs from the official Zoho CRM Add-On for Gravity Forms. The official add-on is the better fit when your goal is to send submitted form data into Zoho CRM after submission. This tutorial solves a different problem: it helps you pull data from an existing Zoho CRM contact back into the form.
Advantages and disadvantages of this Gravity Forms Zoho CRM integration
Advantages
- It lets you look up existing Zoho CRM contacts and return their data into a form.
- It gives you full control over the exact endpoint, query parameters, and field mapping.
- It works well for form auto-fill and lookup workflows, not just post-submission syncing.
- It keeps your API credentials server-side and out of the browser.
Disadvantages
- It requires some familiarity with concepts like endpoints, scopes, and JSON response paths more so than a plug-and-play CRM add-on. If these are new to you, the Key terms explained in plain English section below walks through each one before you start.
- Zoho’s Client Credentials flow works well for testing and specific setups. For production use, it is worth reviewing Zoho’s OAuth 2.0 documentation to confirm this flow suits your deployment.
What you need before starting this Gravity Forms Zoho CRM integration
Before you begin, make sure you have the following:
- Gravity Forms installed on your WordPress site
- API Connector for Gravity Forms
- a Zoho CRM account
- access to the Zoho API Console
- at least one existing contact in Zoho CRM for testing
- a Gravity Form with these fields:
- First Name
- Last Name
- Phone
- optional Paragraph field for JSON debugging
For testing, it is also recommended to add an admin-only Paragraph field called JSON. This makes it easier to inspect the raw API response and confirm the correct JSON paths before finalizing your field mappings.
Gravity Forms Zoho CRM integration terms explained in plain English
Before jumping into the setup, here is what each technical term means in the context of this Gravity Forms Zoho CRM integration.
Base URL
The Base URL is the root API domain. It is the fixed part of the request before the endpoint path is added.
In this tutorial, the Base URL is:
This is the Zoho API domain for the US data center. If your Zoho account uses a different region, your Base URL will be different:
- EU: https://www.zohoapis.eu
- AU: https://www.zohoapis.com.au
- IN: https://www.zohoapis.in
You can confirm your region inside your Zoho CRM account settings.
Endpoint URL
The endpoint is the specific API path you are calling. In this tutorial, the endpoint is:
/crm/v8/Contacts/searchThis path tells Zoho to use the CRM API, version 8, and search inside the Contacts module.
Token URL
The Token URL is where your site requests an access token before making the API call. For this setup:
https://accounts.zoho.com/oauth/v2/token?soid=ZohoCRM.YOUR_ORG_ID
The soid parameter tells Zoho which CRM organization the token request belongs to. For non-US regions, adjust the domain:
- EU: https://accounts.zoho.eu/oauth/v2/token
- AU: https://accounts.zoho.com.au/oauth/v2/token
Scope
A scope defines what your token is allowed to access. In this tutorial, the scope is:
ZohoCRM.modules.contacts.READ,ZohoSearch.securesearch.READThat means:
- ZohoCRM.modules.contacts.READ – allows read access to the Contacts module
- ZohoSearch.securesearch.READ – allows the search request needed for this contact lookup
Query string
A query string is the part of a URL request that comes after a question mark. Example:
?email=someone@example.comIn this tutorial, the Gravity Form passes the submitted email value into the Zoho CRM request using the email query string parameter supported by the Zoho CRM v8 Contacts search endpoint.
JSON path
A JSON path tells GravityWP where to find a specific value inside the API response. For example:
data/0/First_Name
This means: data is the main response array returned by Zoho, 0 is the index of the first matching contact, and First_Name is the field value you want from that contact.
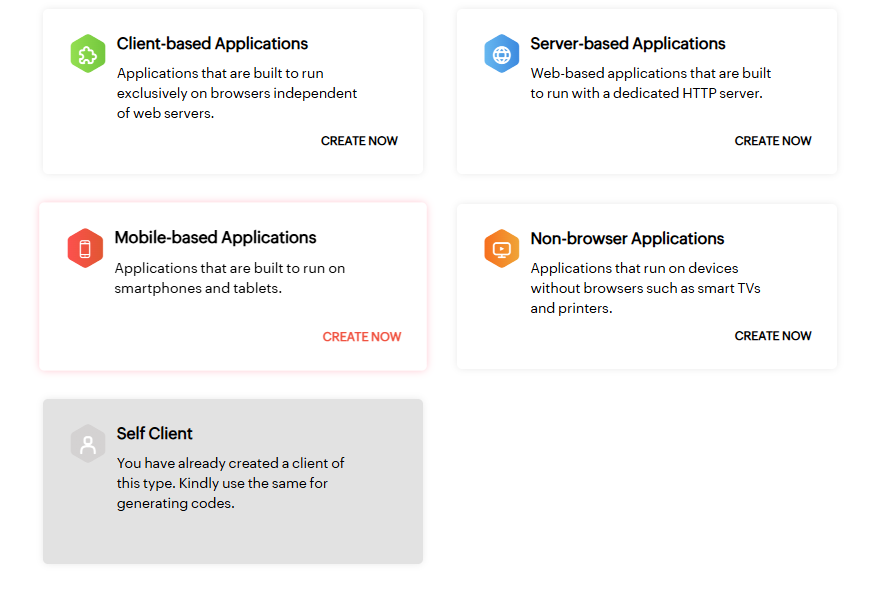
Step 1: Create a Zoho Self Client
To use this Gravity Forms Zoho CRM integration, you first need a Client ID and Client Secret. Go to the Zoho API Console at https://api-console.zoho.com/ and create a Self Client.
Self Client is used in this tutorial because it provides the Client ID and Client Secret needed for the OAuth 2.0 Client Credentials connection in GravityWP API Connector.
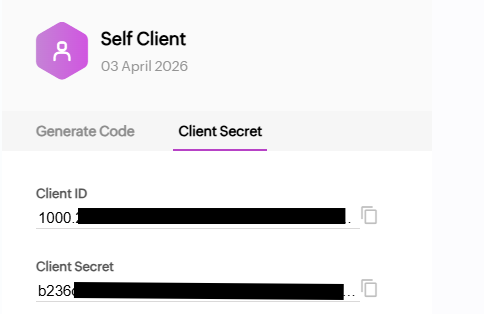
After creating the Self Client, open the Client Secret tab and copy:
- Client ID
- Client Secret
Keep these values ready. You will paste them into the GravityWP connection settings in Step 3.
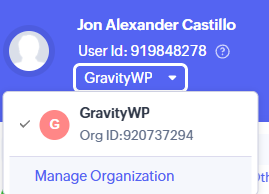
Step 2: Find your Zoho Org ID
Next, you need your Zoho CRM Org ID.
You can find it inside Zoho CRM under Setup → Developer Space → APIs → CRM API. It may also appear in your organization’s profile or account switcher area.
You will use this Org ID to build the soid value in this format:
ZohoCRM.YOUR_ORG_ID
Example (do not use this use your own):
ZohoCRM.919661833
This value is required because the token request in this client credentials setup must be tied to a specific CRM organization. Without the correct soid, Zoho will not know which organization the request belongs to.
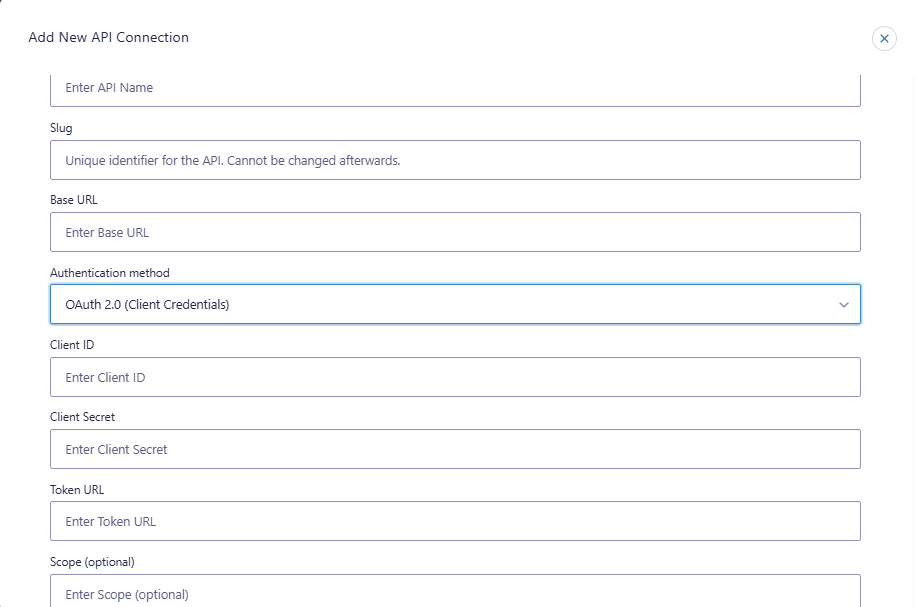
Step 3: Create the API connection for your Gravity Forms Zoho CRM integration
In your WordPress admin, go to:
Forms → Settings → API Connector
Create a new connection. If you need a general walkthrough of this screen, see the adding API connections section in the GravityWP documentation.
Use the following settings:
API Name
Any internal label works. For example:
Zoho CRM API
Base URL
https://www.zohoapis.comUse the Zoho API domain that matches your account’s region (see Key terms above for regional variants).
Authentication Method
OAuth 2.0 (Client Credentials)
This authentication method is covered in detail in the OAuth 2.0 Client Credentials section of the GravityWP documentation.
Client ID
Paste the Client ID from your Zoho Self Client (copied in Step 1).
Client Secret
Paste the Client Secret from your Zoho Self Client (copied in Step 1).
Token URL
https://accounts.zoho.com/oauth/v2/token?soid=ZohoCRM.YOUR_ORG_IDReplace YOUR_ORG_ID with your real Zoho Org ID from Step 2.
Scope
ZohoCRM.modules.contacts.READ,ZohoSearch.securesearch.READ
This scope is intentionally narrow. It covers read access to the Contacts module and the search permission needed for this lookup. Do not add extra scopes unless your use case requires them.
Once everything is filled in, save the connection.
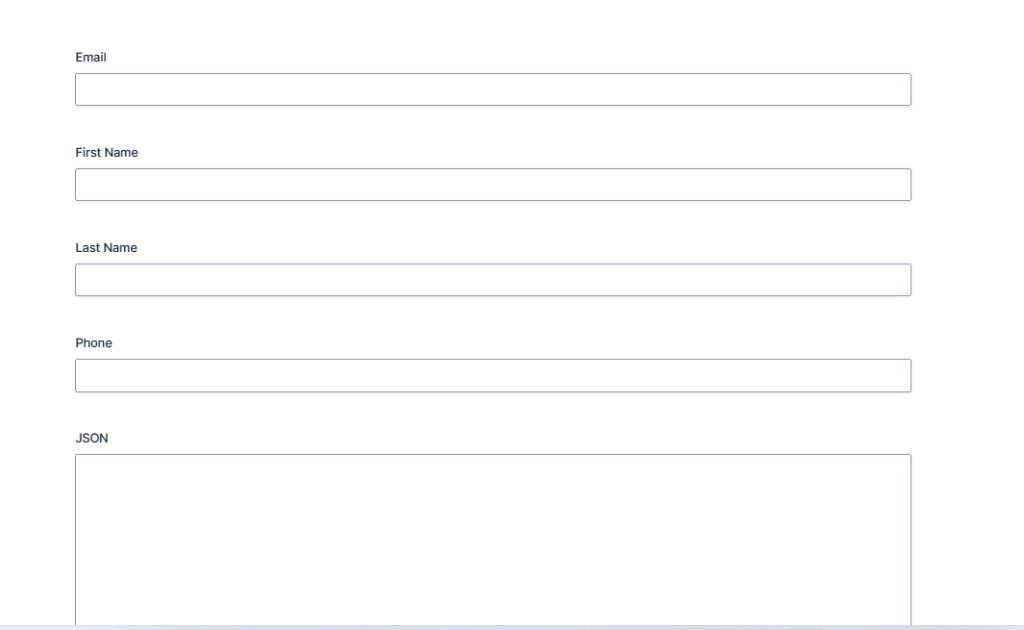
Step 4: Create your Gravity Form
Build the form you want to use for the contact lookup. For this tutorial, use these fields:
- First Name
- Last Name
- Phone
- JSON (optional admin-only Paragraph field)
The Email field is the lookup field the value the user enters is what gets sent to Zoho CRM. The remaining fields are the targets that will receive the data returned from the Zoho CRM contact.
The optional JSON field is useful during testing. It lets you inspect the raw API response and confirm the correct response paths before committing your field mappings. If you want a faster way to identify paths, use the parse the possible paths from a JSON API response tool in GravityWP.
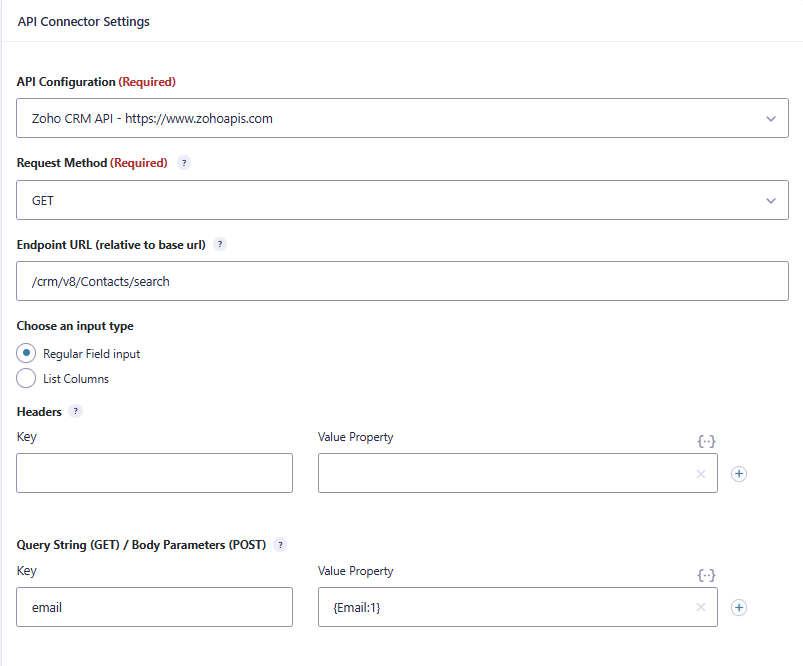
Step 5: Create the API feed for your Gravity Forms Zoho CRM integration
Open your form and go to the API feed settings. Create a new feed and select your Zoho CRM API connection from Step 3.
Use the settings below.
Request Method
GETYou are retrieving data from Zoho CRM, not creating or updating records, so GET is the correct method here.
Endpoint URL
/crm/v8/Contacts/searchThis is the standard Zoho CRM v8 search endpoint for the Contacts module:
- /crm – points to the Zoho CRM API
- /v8 – specifies API version 8
- /Contacts – the module being searched
- /search – the search action
Query String
Add a query string parameter with this key:
Then map it to your Gravity Forms Email field using the field merge tag:
email = {Email:FIELD_ID}Replace FIELD_ID with the actual field ID from your form. You can find field IDs by hovering over a field in the Gravity Forms editor. The Zoho CRM v8 Contacts search endpoint supports filtering by email through this query parameter.
Feed trigger
Configure the feed to run on form submission, which is the setup this tutorial is built around and has been tested against.
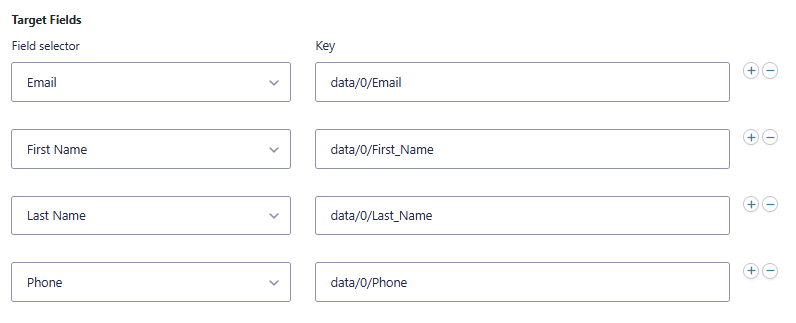
Step 6: Map Zoho CRM data back into Gravity Forms
Now configure the target field mappings using the JSON paths returned by the Zoho CRM API.
Use these mappings:
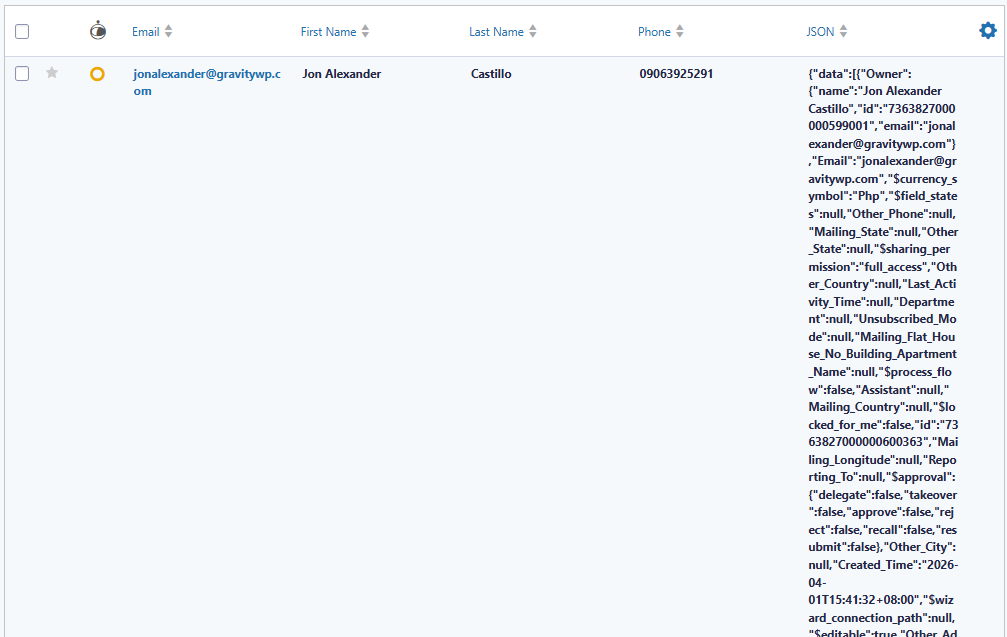
First Name → data/0/First_Name
Last Name → data/0/Last_Name
Phone → data/0/Phone
Email → data/0/Email
This works because Zoho CRM returns matching records inside the data array, and the first result is at index 0. The field names (First_Name, Last_Name, Phone, Email) match the standard field names in the Zoho CRM Contacts module.
If you added the optional JSON field, temporarily map the raw response there as well to confirm the response structure during testing. If the paths ever look different from what is shown above, use the parse the possible paths from a JSON API response tool in GravityWP to identify the correct ones.
Step 7: Test your Gravity Forms Zoho CRM integration
Test the full workflow using a real Zoho CRM contact.
- Enter an email address that already exists in the Zoho CRM Contacts module.
- Submit the form.
- Check whether the First Name, Last Name, Phone, and Email fields are filled with the returned values.
- If you added the JSON debug field, inspect the response to confirm the data structure.
Then test again using an email address that does not exist in Zoho CRM. This confirms how the form behaves when no matching contact is found.
Troubleshooting
If the form does not populate as expected, work through these common issues.
The email does not exist in Zoho Contacts
Make sure the test email exists specifically in the Contacts module, not just in another module such as Leads. The /crm/v8/Contacts/search endpoint only searches the Contacts module.
The wrong region is used
If your Zoho account is not in the US data center, you need a different Base URL and Token URL domain. Check your region’s specific API domain in Zoho’s developer documentation. Using the wrong domain will result in authentication errors.
The scope is incorrect
Confirm your scope is exactly:
ZohoCRM.modules.contacts.READ,ZohoSearch.securesearch.READA typo including a missing comma or extra space will cause the request to fail.
The Org ID is wrong
Confirm the soid value in your Token URL uses your actual Zoho Org ID in this format:
ZohoCRM.YOUR_ORG_IDThe Email field ID is wrong
Verify that the merge tag in your query string uses the correct field ID. In the Gravity Forms editor, hover over the Email field to see its ID.
The response path is wrong
If the API request succeeds but fields remain empty, inspect the raw JSON response and confirm the field paths. The parse the possible paths from a JSON API response tool in GravityWP is the fastest way to identify the correct paths from a live response.
When API Connector is the better choice for a Gravity Forms Zoho CRM integration
This Gravity Forms Zoho CRM integration approach is the right fit when you need to:
- search an existing system before or during form processing
- use a form field value as part of an API request
- map the returned response data back into the form
- build a contact lookup or form auto-fill workflow rather than a simple one-way sync
If your goal is only to create or update Zoho CRM records after someone submits a form, the official Zoho CRM Add-On for Gravity Forms is the simpler choice for that direction.
If your goal is to look up an existing Zoho CRM contact and return their data into the form, API Connector for Gravity Forms is the more direct solution for that workflow.
When a Gravity Forms Zoho CRM integration saves you the most time
This Gravity Forms Zoho CRM integration is most valuable in workflows where data already exists in your CRM and you want to surface it inside a WordPress form without asking users to re-enter it.
Using GravityWP API Connector, you can search your Zoho CRM Contacts module by email and return the matching values directly into your form. That reduces duplicate data entry, speeds up form completion, and makes your WordPress forms feel connected to the rest of your workflow.
If you already use Gravity Forms for data collection and want more flexible, API-driven integrations, this is one of the clearest examples of what API Connector for Gravity Forms makes possible. You can also explore related setups through Best Gravity Forms integrations if you want to expand beyond Zoho CRM.
Gravity Forms Zoho CRM integration – FAQ
Yes. With API Connector for Gravity Forms, you can send a request to the Zoho CRM Contacts search endpoint, search by email, and map the returned values back into your form fields automatically.
Because this tutorial is built around finding an existing Zoho CRM contact by email. The /crm/v8/Contacts/search endpoint is the Zoho CRM v8 route that supports that specific email-based lookup.
Because this setup uses the Zoho CRM search endpoint. The ZohoSearch.securesearch.READ permission is required alongside the module read permission for the search request to function correctly.
In this OAuth 2.0 Client Credentials setup, Zoho requires the organization-specific soid parameter so the token request is correctly associated with your CRM organization. Without it, the token request does not know which organization it belongs to.
That is a different workflow. This tutorial focuses on finding existing contacts and returning their data into the form. Creating or updating records after form submission requires a different endpoint and a different integration method.
Yes, but you will need to adjust the Base URL and Token URL to match your region. Zoho provides separate API domains for EU, AU, IN, JP, and CA data centers. The correct domains for each region are listed in Zoho’s API domain documentation.
Our Premium add-ons for Gravity Forms

Field to Entries
Create entries based on Checkboxes & Multi Select choices & List Field rows.

JWT Prefill
Fill forms with data you can trust. Prefill Gravity Forms fields with a secure token instead of links with editable url parameters, so your data is accurate, tamper-proof, and ready to use.

All Entries
All your new Gravity Forms entries in one central place. Stop navigating between multiple forms to find new entries. Get immediate oversight and full control with a powerful, unified dashboard.

Advanced Number Field
Functionality for Number Fields, like rounding or only absolute numbers, fixed point notation, range calculation, custom units like % or m2 & show as slider.
Read tutorials about

Gravity Forms Discount Code Field: Apply Fixed or Percentage Discounts in a Form
Learn how to create a Gravity Forms discount code field that applies fixed or percentage discounts. This tutorial shows how to calculate subtotals, discount amounts, and final totals using tested form logic.

Gravity Forms Zoom Integration: Create Zoom Meetings From Booking Forms
Learn how to connect Gravity Forms to Zoom without Zapier using GravityWP API Connector. This step-by-step tutorial shows how to create Zoom meetings from booking form submissions and save the returned meeting details back to Gravity Forms.

Gravity Forms monday.com Integration: Create New Items From Form Submissions
Learn how to connect Gravity Forms to monday.com without Zapier using GravityWP API Connector. This step-by-step tutorial shows how to create new monday.com items from form submissions and save the returned monday.com item ID back to Gravity Forms.

Gravity Forms Pipedrive Integration: Send Form Contacts to Pipedrive Without Zapier
Learn how to connect Gravity Forms to Pipedrive without Zapier using GravityWP API Connector. This step-by-step tutorial shows how to send form contacts, custom fields, and the returned Pipedrive Person ID directly from WordPress to Pipedrive CRM.