You can connect Gravity Forms to Notion without Zapier by sending form data to the Notion API with GravityWP API Connector.
In our tested workflow, submitting Gravity Forms automatically created a new page inside a Notion database. The submitted title, requester information, request type, priority, and request details were added to matching Notion database properties.
Notion then returned information about the new page. GravityWP API Connector saved the page ID, direct Notion URL, creation time, and full API response back into the original Gravity Forms entry.
The completed workflow is:
Gravity Forms submission → GravityWP API Connector → Notion API → Notion database page → returned data saved to Gravity Forms
This tutorial follows the configuration we tested in August 2026.
What does this Gravity Forms Notion integration do?
This workflow turns each form submission into a new page in a Notion database.
You will:
- Create a Gravity Forms request form
- Build matching properties in Notion
- Create a private Notion API connection
- Give that connection access to the database
- Find the Notion Database ID
- Retrieve the current Data Source ID
- Send Gravity Forms data to the Notion Create Page API
- Store the returned Notion Page ID, URL, creation time, and full response
This is a direct API workflow. It does not require a Zap or another automation platform between Gravity Forms and Notion.
It is also important to understand what this tutorial does not do. This is not continuous two-way synchronization. It sends a Gravity Forms submission to Notion and stores selected values returned by that API request.
What do you need to connect Gravity Forms to Notion?
Before you start, you need:
- A WordPress website
- Gravity Forms
- GravityWP API Connector
- A Notion workspace
- Access to create a Notion internal connection
- A Notion database for the submitted form data
GravityWP API Connector can send GET and POST requests, use Gravity Forms values in API requests, send JSON bodies, and map values returned by an API back into form fields.
Step 1: How do you create the Gravity Forms request form?
Create a new Gravity Form.
We named our test form:
Notion Request Form
Add these fields:
| Field | Gravity Forms field type |
|---|---|
| Request Title | Single Line Text |
| Requester Name | Name |
| Requester Email | |
| Request Type | Drop Down |
| Priority | Drop Down |
| Request Details | Paragraph Text |
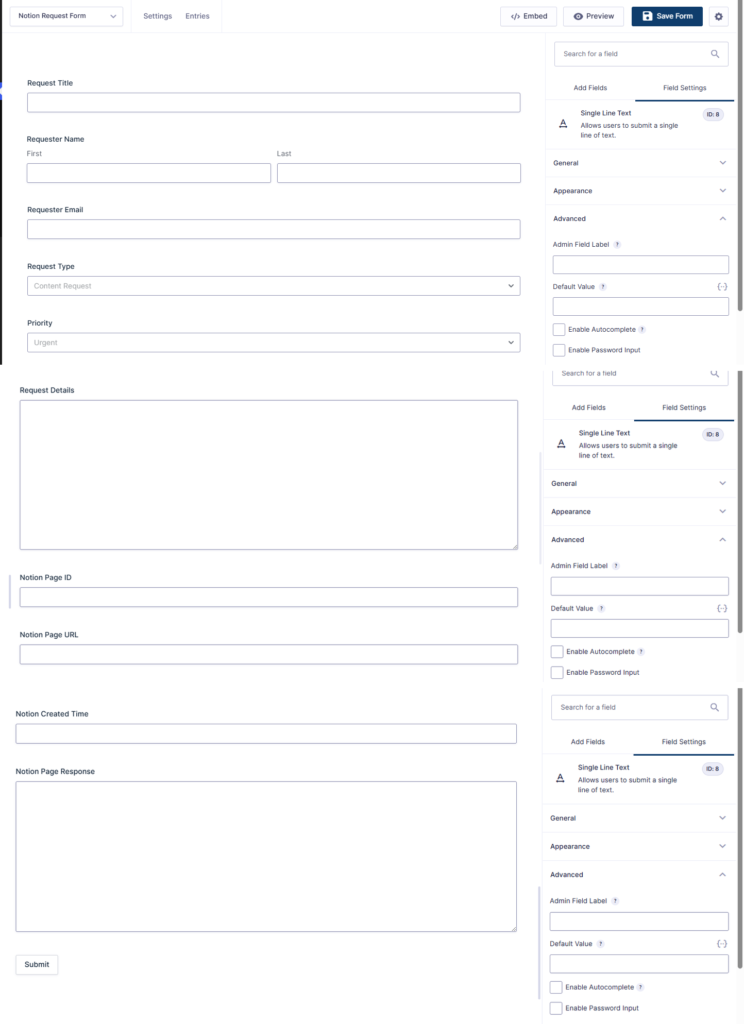
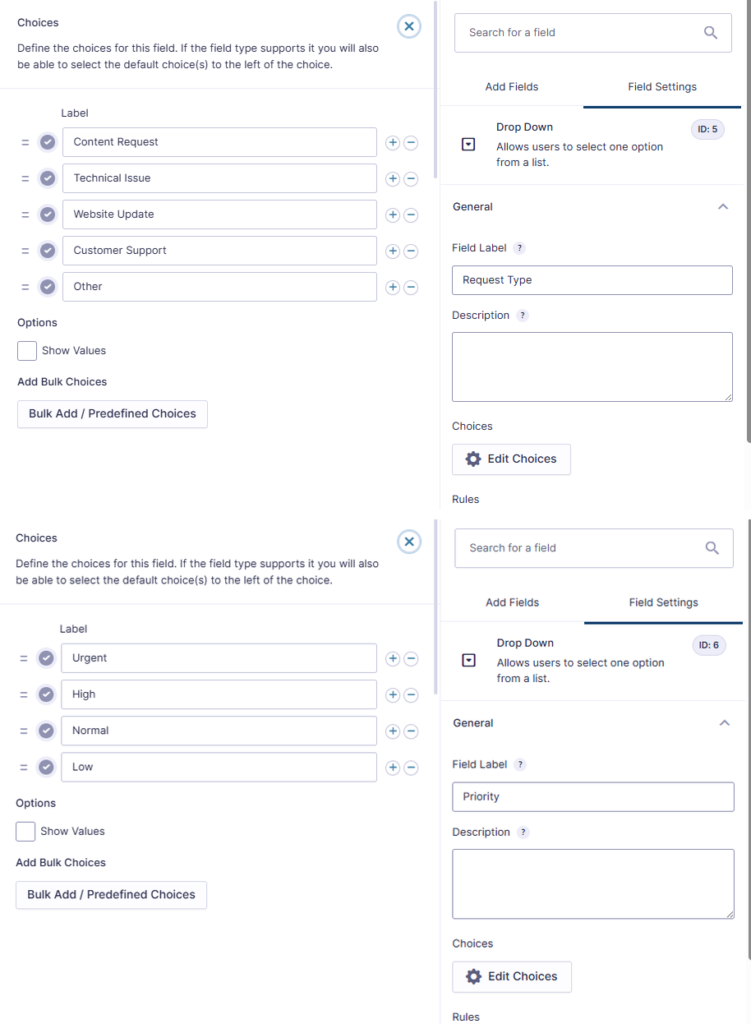
For Request Type, we used:
- Content Request
- Technical Issue
- Website Update
- Customer Support
- Other
For Priority, we used:
- Urgent
- High
- Normal
- Low
Should Show Values be enabled?
No.
For this workflow, keep Show Values disabled for Request Type and Priority.
Unlike the ClickUp API workflow, we did not need separate numeric values. The labels submitted by Gravity Forms matched the names of our Notion Select options directly.
For example:
High
was sent to the Notion Select property as:
High
Which Gravity Forms fields should store the Notion response?
Add four more fields:
| Field | Purpose |
|---|---|
| Notion Page ID | Stores the returned page ID |
| Notion Page URL | Stores the direct Notion page URL |
| Notion Created Time | Stores when Notion created the page |
| Notion Page Response | Stores the full JSON response |
Set these fields to Administrative visibility because visitors do not need to see them.
For Notion Page Response, use a Paragraph Text field because the returned JSON can be long.
Step 2: How do you create the Notion database?
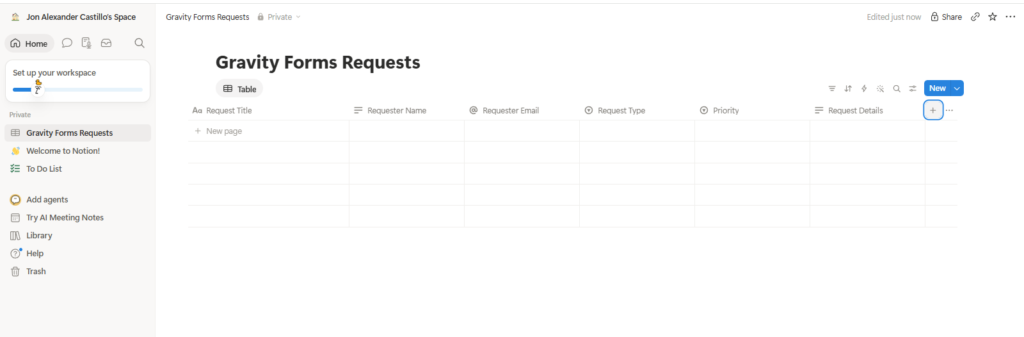
In Notion, create a new database named:
Gravity Forms Requests
We used these six properties:
| Notion property | Property type |
|---|---|
| Request Title | Title |
| Requester Name | Text |
| Requester Email | |
| Request Type | Select |
| Priority | Select |
| Request Details | Text |
For the Request Type Select property, add the same options used in Gravity Forms:
- Content Request
- Technical Issue
- Website Update
- Customer Support
- Other
For Priority, add:
- Urgent
- High
- Normal
- Low
The property names and types matter because the properties object sent when creating a Notion page must match the schema of its parent data source. Notion supports property types including Title, rich text, Email, and Select, each with its own API value structure.
Leave the database empty for now.
Step 3: How do you create the Notion API connection?
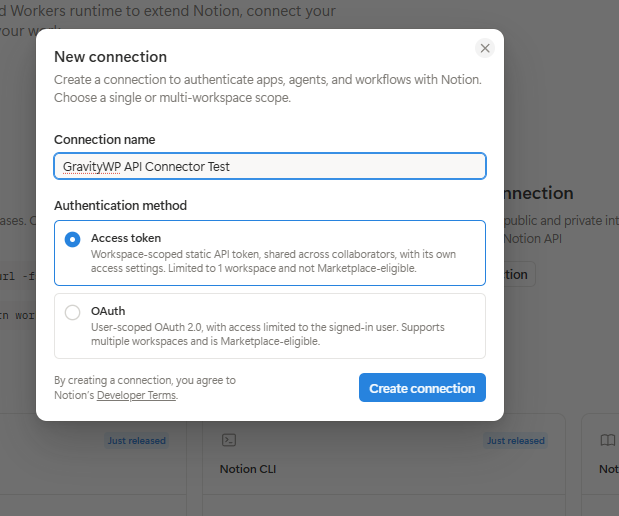
In the current Notion interface we tested, we went to:
Settings → Connections → Manage → Go to developer portal
Then create a new connection.
We named ours:
GravityWP API Connector Test
For the authentication method, choose:
Access token
We used an internal connection because this is a private automation for one Notion workspace. Notion documents internal connections as single-workspace integrations that use a static API token instead of an OAuth authorization flow.
Which Notion capabilities do you need?
For the workflow we tested, enable:
Read content
Insert content
You do not need user information for this integration.
Read content allows the connection to retrieve the database. Insert content allows it to create new pages. Notion separates these permissions through connection capabilities.
You do not need comment permissions.
How should you protect the Notion access token?
Treat the access token like a password.
Do not:
- Publish it
- Add it to screenshots
- Paste it into public documentation
- Commit it to public source code
Anyone who obtains a token may be able to perform actions allowed by that token’s capabilities and content access. If a token is exposed, rotate it.
Step 4: How do you give the connection access to your Notion database?
Creating the connection is not enough. It also needs access to the content it will use.
In the Developer portal, open:
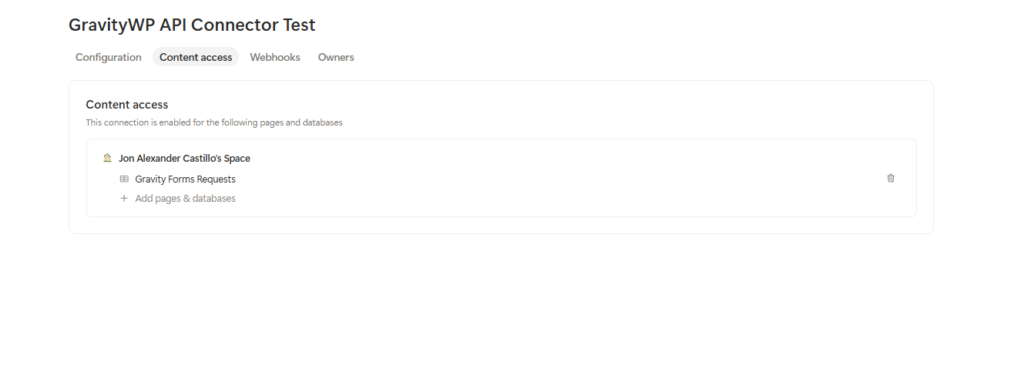
GravityWP API Connector Test → Content access
Click:
Add pages & databases
Then select:
Gravity Forms Requests
Our final Content access screen showed the Gravity Forms Requests database under the connection.
Notion connections can access content that has been shared with the connection, subject to the connection’s capabilities.
Step 5: Why does the current Notion API use a Data Source ID?
This is an important part of the current Notion API.
A Notion database is now a container that can contain one or more data sources. The actual table that holds the properties and pages is represented by a data source.
So the structure is roughly:
Database → Data Source → Pages/Rows
Notion introduced the separate Data Source concept for database APIs, and the Retrieve Database response now includes a data_sources array.
For our Create Page request, we therefore need the Data Source ID, not only the Database ID.
Step 6: How do you find the Notion Database ID?
Open your Gravity Forms Requests database and copy its link.
A Notion database URL contains a long 32-character ID.
For example:
https://app.notion.com/.../DATABASE_ID?v=VIEW_IDThe ID before the query parameters is the Database ID.
Notion’s Retrieve Database documentation confirms that the database ID can be taken from the database URL.
Use your own ID in the next step.

Step 7: How do you connect GravityWP API Connector to the Notion API?
In WordPress, go to:
Forms → Settings → API Connector → Add New API Connection
Use:
| Setting | Value |
|---|---|
| API Name | Notion API |
| Slug | notion-api |
| Base URL | https://api.notion.com/v1/ |
| Authentication method | Bearer Token |
| Bearer Token | Your private Notion access token |
GravityWP API Connector’s Bearer Token authentication stores the token in the reusable API connection and applies it automatically to feeds that use that connection.
You should enter only the token in the Bearer Token field. Do not manually add Bearer to the token value.
Step 8: How do you retrieve the Notion Data Source ID?
We first created a temporary GET feed.
Open:
Forms → Notion Request Form → Settings → API Connector
Add a new feed named:
Get Notion Data Source
Use:
| Setting | Value |
|---|---|
| API Configuration | Notion API |
| Request Method | GET |
| Endpoint | databases/YOUR_DATABASE_ID |
| Input Type | Regular Field input |
Add this header:
Key: Notion-Version
Value Property: 2026-03-11
The current Retrieve Database endpoint requires a Notion-Version header, and Notion currently lists 2026-03-11 as its latest API version.
Leave Query String and Target Fields empty.
Set:
API request trigger → On form submission
Then enable:
Store full response → Notion Page Response
GravityWP’s Store Full Response option is available for feeds triggered on form submission and lets you inspect the JSON returned by the API.
Where do you find the Data Source ID?
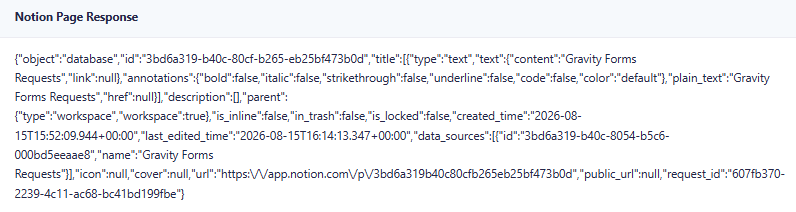
data_sources array with the Data Source ID required to create new Notion pages.Submit the form once and open the Gravity Forms entry.
The database response contains a structure similar to:
{
"data_sources": [
{
"id": "YOUR_DATA_SOURCE_ID",
"name": "Gravity Forms Requests"
}
]
}
The id inside data_sources is the value you need.
Notion specifically documents the data_sources array in the Retrieve Database response as containing each data source’s id and name.
Once you have the Data Source ID, disable or delete this temporary GET feed. It does not need to run on every future form submission.
Step 9: How do you create the real Gravity Forms to Notion API feed?
Create another API Connector feed named:
Create Notion Page
Use:
| Setting | Value |
|---|---|
| API Configuration | Notion API |
| Request Method | POST |
| Body Format | JSON body |
| Endpoint | pages |
| Input Type | Regular Field input |
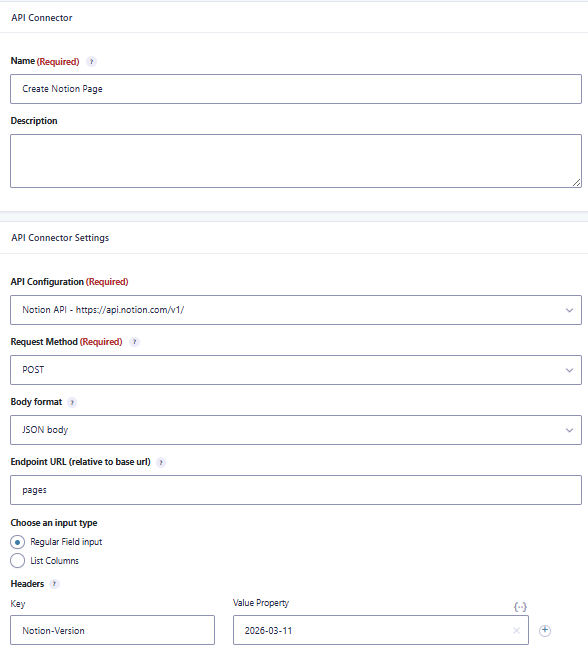
pages endpoint with a JSON body and the current Notion API version header.Add:
Notion-Version → 2026-03-11
The full API request resolves to:
POST https://api.notion.com/v1/pagesNotion’s Create Page endpoint creates a page under a parent page or data source. The current API supports a data_source_id parent for database pages.
GravityWP API Connector’s JSON body mode supports nested objects and arrays using paths such as customer.name and items[0].sku, which lets us construct the nested structure expected by Notion.
Step 10: How do you map Gravity Forms fields to Notion database properties?
Under Query String (GET) / Body Parameters (POST), add these mappings:
| JSON path | Gravity Forms value |
|---|---|
parent.data_source_id | Your Data Source ID |
properties.Request Title.title[0].text.content | {Request Title:1} |
properties.Requester Name.rich_text[0].text.content | {Requester Name (First):3.3} {Requester Name (Last):3.6} |
properties.Requester Email.email | {Requester Email:4} |
properties.Request Type.select.name | {Request Type:5} |
properties.Priority.select.name | {Priority:6} |
properties.Request Details.rich_text[0].text.content | {Request Details:7} |
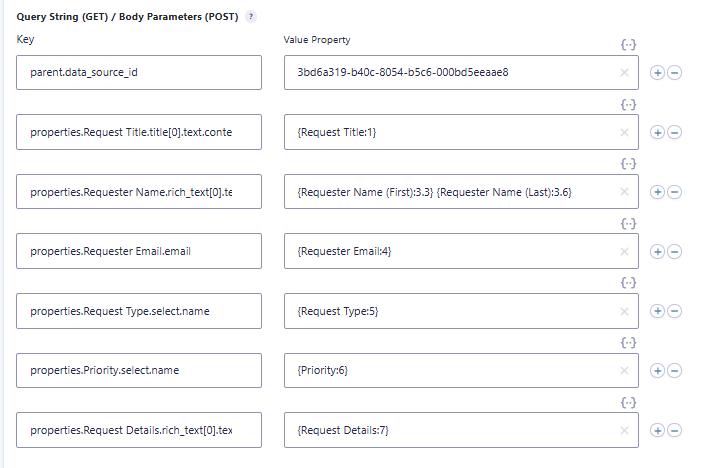
Your field IDs may differ. Use the merge tags generated by your own Gravity Form.
Why does Request Title use title[0].text.content?
The Request Title column in our Notion database is the required Title property.
Notion represents a Title property’s value as an array of rich text objects. The text itself is stored in the object’s text.content value.
Why do Requester Name and Request Details use rich_text?
Those properties were created as regular Text properties in Notion.
Their API values therefore use Notion’s rich_text structure.
Our name mapping combines the two Gravity Forms Name components:
{Requester Name (First):3.3} {Requester Name (Last):3.6}This produced:
Alex Morgan
in our test.
Why does Requester Email use .email?
Requester Email was created as an Email property in Notion.
Its value can therefore be sent directly to:
properties.Requester Email.email
Notion includes Email as a dedicated page property type.
Why do Request Type and Priority use .select.name?
Both are Select properties.
For example:
properties.Priority.select.namereceives:
High
Notion’s Select page-property structure supports sending a Select option by its name.
Because the Gravity Forms choices match the Notion Select option names, we do not need special API values or :value modifiers in this workflow.
Step 11: How do you store the full Notion response?
For the first Create Page test, leave Target Fields empty.
Set:
API request trigger → On form submission
Enable:
Store full response → Notion Page Response
This lets you inspect the actual Page object returned by Notion before deciding which individual values to save.
GravityWP also provides a JSON response path parser that can turn a stored JSON response into paths that can be used in Target Fields.
Step 12: What happened in our first Gravity Forms to Notion test?
For our first page-creation test, we submitted:
Request Title:
Update pricing page content
Requester:
Alex Morgan
Request Type:
Website Update
Priority:
High
Request Details:
Please update the pricing page with the latest package information and review the existing content.
The submission successfully created a new row inside our Gravity Forms Requests database.
Notion showed:
- Update pricing page content
- Alex Morgan
- Submitted requester email
- Website Update
- High
- Submitted request details
The complete Notion Page object was also stored in the Gravity Forms entry.
This confirmed that the JSON property mapping was working.
Step 13: How do you save returned Notion page data in Gravity Forms?
After inspecting the actual response, go back to the Create Notion Page feed.
Under Target Fields, add:
| Gravity Forms field | Response key |
|---|---|
| Notion Page ID | id |
| Notion Page URL | url |
| Notion Created Time | created_time |
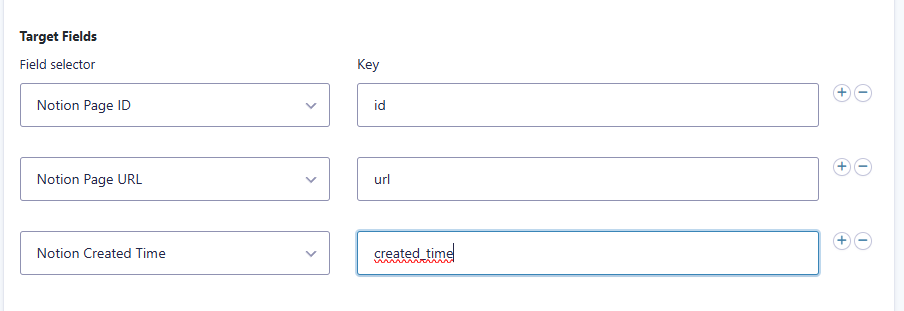
Keep:
API request trigger → On form submission
and:
Store full response → Notion Page Response
GravityWP Target Fields map API response properties back into Gravity Forms fields. Nested response paths can also be accessed with / when needed.
For this response, all three properties are at the top level, so no nested path is required.
Step 14: How do you run the final Gravity Forms Notion integration test?
We used a second submission to confirm that the workflow was dynamic and not hardcoded to the first example.
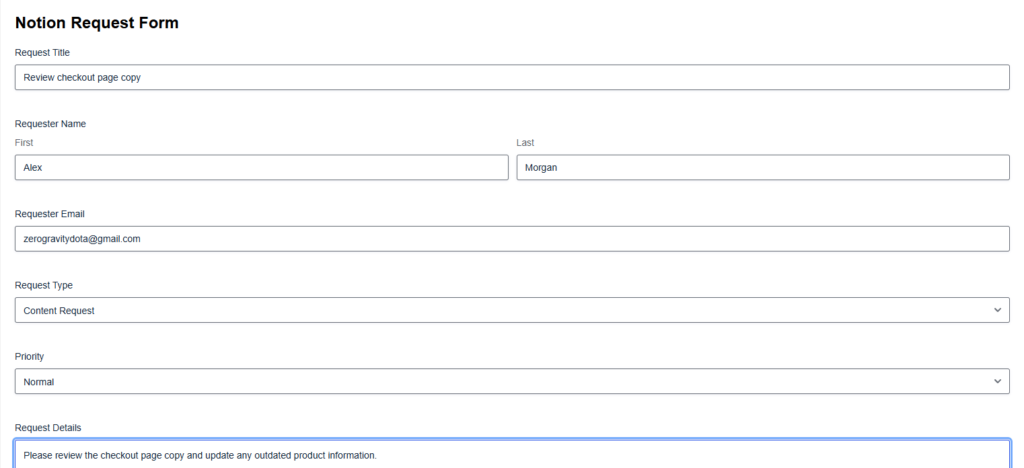
Our final test used:
Request Title:
Review checkout page copy
Requester:
Alex Morgan
Request Type:
Content Request
Priority:
Normal
Request Details:
Please review the checkout page copy and update any outdated product information.
Submit the form.
Step 15: How do you verify the new page in Notion?
Open:
Gravity Forms Requests
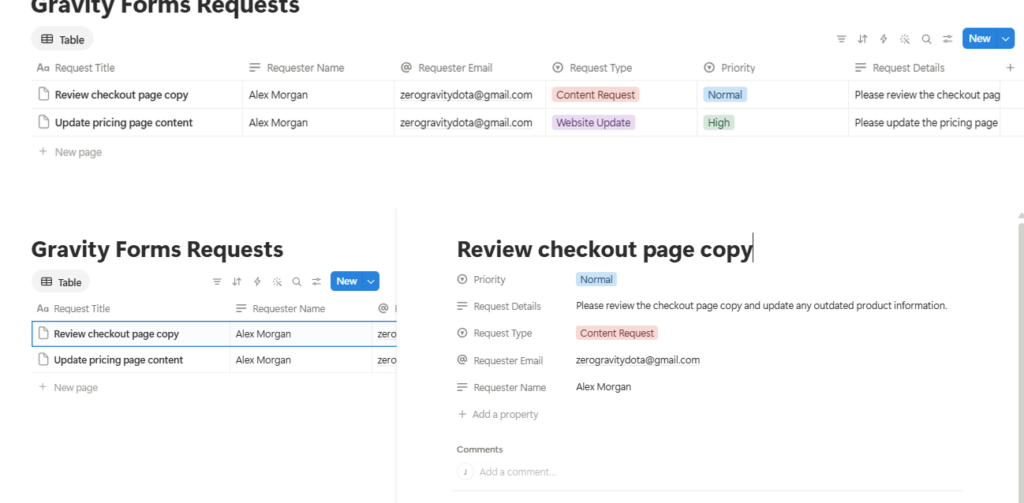
Our final test created a second database page:
Review checkout page copy
The row contained:
- Requester Name: Alex Morgan
- Submitted requester email
- Request Type: Content Request
- Priority: Normal
- Submitted request details
Opening the row also displayed it as an individual Notion page with the same database properties.
This confirmed that changing the Request Type and Priority in Gravity Forms also changed the values sent to Notion.
Step 16: How do you verify the returned Notion data in Gravity Forms?
Return to:
Forms → Entries
Open the same submission.
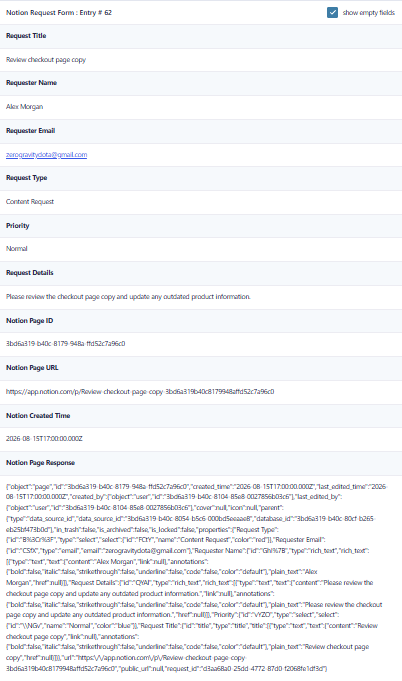
Our final Gravity Forms entry contained:
- Notion Page ID
The unique ID returned for the new page. - Notion Page URL
A direct URL to the created Notion page. - Notion Created Time
Timestamp returned when Notion created the page. - Notion Page Response
Complete JSON Page object returned by the API.
The Page object returned by Notion includes top-level values such as the page id, creation time, properties, and page URL.
Saving the URL is especially useful because someone reviewing the Gravity Forms entry can open the related Notion page directly.
What did our Gravity Forms Notion integration actually prove?
In our final test, a Gravity Forms submission automatically created a new page inside the Gravity Forms Requests Notion database.
The submitted title, requester information, request type, priority, and request details were mapped to matching Notion properties.
Notion then returned the newly created page information. GravityWP API Connector saved the Page ID, Page URL, Created Time, and full API response into the original Gravity Forms entry.
The complete tested workflow was:
Gravity Forms → GravityWP API Connector → Notion API → Notion database page → response saved to Gravity Forms
What should you check if the Gravity Forms Notion integration does not work?
Why is the Notion Page Response empty?
First check:
API Configuration
Make sure the feed actually has:
Notion API
selected.
During our own testing, the request did not populate the response until the saved API configuration was selected in the feed.
Also confirm:
- Request method is correct
- Endpoint is correct
- Notion-Version header exists
- Trigger is On form submission
- Store Full Response is enabled
Why can’t Notion find the database?
Check the connection’s Content access.
The Notion connection must have access to the database that contains your data source.
Notion’s Retrieve Database endpoint can return a 404 when the database does not exist or when the connection cannot access it.
Why can’t you find the Data Source ID?
Retrieve the database with:
GET /v1/databases/YOUR_DATABASE_ID
Then inspect:
data_sources
The Data Source ID is returned there.
Do not confuse the Database ID, Data Source ID, and Notion view ID. They serve different purposes.
Why does Notion reject one of the properties?
Check all three parts:
- Property name
- Property type
- JSON mapping
For example, a Select property should not be mapped using the same JSON structure as a Title property.
The keys you send when creating a page under a data source must match that data source’s property schema.
Why doesn’t a Select field map correctly?
Confirm that the submitted Gravity Forms value matches the intended Notion Select option.
Our setup used identical values in both systems:
Content Request
Website Update
High
Normal
That allowed the form values to map directly to select.name.
What should you do if your Notion token was exposed?
Rotate it immediately and replace the token stored in API Connector.
Notion recommends protecting API tokens because anyone who obtains one may be able to perform requests permitted by that token’s capabilities and content access.
Can you connect Gravity Forms to Notion without Zapier?
Yes.
The workflow in this tutorial uses:
Gravity Forms → GravityWP API Connector → Notion API
There is no Zap between Gravity Forms and Notion.
You also do not need to build a separate webhook workflow for this setup. API Connector handles the authenticated API request, JSON body, form-field mapping, and response mapping.
If you want to compare API workflows with native add-ons and webhooks, see our guide to Gravity Forms integrations.
This does not mean an API-based integration is always better than Zapier, Gravity Connect, or a dedicated Notion add-on. The right option depends on the workflow you need.
Our tutorial focuses specifically on direct API control and saving values from Notion’s response back into the original Gravity Forms entry.
Can you expand this Gravity Forms to Notion workflow?
Yes.
Notion’s Create Page API supports more than the properties used in this example. Pages can also include page content and other supported property types.
You could build a more advanced workflow for:
- Internal requests
- Task management
- Content planning
- Lead intake
- Customer requests
- Editorial workflows
- Project submissions
You could also add more Notion database properties and map additional Gravity Forms fields to them.
However, those extensions should be tested against the exact Notion property type and JSON format you plan to use.
This tutorial documents only the setup we actually tested: Title, Text, Email, and Select properties.
For another example of sending structured Gravity Forms data to a work-management platform, see our Gravity Forms monday.com integration tutorial.
How does the finished Gravity Forms to Notion workflow work?
The finished Gravity Forms Notion integration turns a WordPress form submission into a new Notion database page without requiring Zapier.
Our tested workflow sent form data to matching Notion properties, created the new page, and then saved useful information returned by Notion back into Gravity Forms.
The final data flow is:
Gravity Forms → API Connector → Notion database → returned Notion page data → Gravity Forms entry
To build other direct API workflows, see the GravityWP API Connector documentation or the GravityWP API Connector product page.
Frequently asked questions
Yes. In our tested setup, a Gravity Forms submission triggered GravityWP API Connector, which sent a POST request to Notion’s Create Page endpoint. A new page was created in the selected Notion data source.
No. This tutorial uses GravityWP API Connector and the Notion API directly.
The Database ID identifies the Notion database container. A database can contain one or more data sources. The Data Source ID identifies the source that holds the properties and pages used by the current database APIs.
For this workflow, we retrieve the Database ID first and then obtain the Data Source ID from the database’s data_sources response.
Our setup uses a Notion internal connection with an access token. That token is stored in GravityWP API Connector using Bearer Token authentication.
Internal Notion connections are scoped to a single workspace and use a static API token rather than an OAuth authorization flow.
Yes. In our test, Request Type and Priority Drop Downs mapped to Notion Select properties. The submitted values matched valid Notion Select option names, such as:
Content Request
Normal
and Notion stored the correct option.
Yes. GravityWP API Connector can map properties from an API response into Target Fields.
In our final test, we saved:
Notion Page ID
Notion Page URL
Notion Created Time
We also stored the complete Notion Page response.
Our Premium add-ons for Gravity Forms

Update Multiple Entries
Trigger the update of multiple entries in a target form by submitting an entry in a trigger form.

Advanced Number Field
Functionality for Number Fields, like rounding or only absolute numbers, fixed point notation, range calculation, custom units like % or m2 & show as slider.

List Datepicker
Add a Datepicker with calendar select to a column or multiple columns in a Gravity Forms List Field.

All Entries
All your new Gravity Forms entries in one central place. Stop navigating between multiple forms to find new entries. Get immediate oversight and full control with a powerful, unified dashboard.
Read tutorials about

How to Validate Repeatable Contact Rows in Gravity Forms
Learn how to validate repeatable Gravity Forms List field rows with GravityWP List Text. This tutorial shows how to add email and regex validation, test invalid values, and confirm that valid team roster data is stored correctly.

Gravity Forms Airtable Integration: Create Records From Form Submissions
Learn how to build a Gravity Forms Airtable integration with GravityWP API Connector. Send form submissions to Airtable, create new records automatically, and save the returned Airtable Record ID and response back to Gravity Forms.

Gravity Forms Asana Integration: Create Tasks From Form Submissions
Learn how to connect Gravity Forms to Asana with GravityWP API Connector. This tested workflow creates Asana tasks from form submissions and saves the returned task ID and URL back to Gravity Forms.

Gravity Forms Google Calendar Integration: Create Events From Form Submissions
Connect Gravity Forms to Google Calendar with GravityWP API Connector. Learn how to create calendar events from form submissions, map event details, configure OAuth 2.0, handle time zones, and save the returned Event ID and URL.