You can connect Gravity Forms to Asana and turn a form submission into a new Asana task using GravityWP API Connector.
In the workflow we tested, a user submits a Gravity Form, API Connector sends the form data to the Asana API, and Asana creates a task inside a selected project. The task name, description, requester details, department, and due date come from the Gravity Forms entry.
Asana then returns the new task’s GID and direct URL. API Connector saves both values back into the original Gravity Forms entry.
The workflow is:
Gravity Forms submission → GravityWP API Connector → Asana API → Asana task → Task GID and URL saved back to Gravity Forms
This method does not use Zapier. It connects Gravity Forms to the Asana API directly through API Connector.
What Will You Build in This Tutorial?
We will create an Asana Task Request Form in Gravity Forms.
A submission will create a task inside an Asana project called Task Request Form.
Here is the data flow we tested:
| Gravity Forms field | Asana destination |
|---|---|
| Task Name | Task name |
| Requester Name | Task description |
| Requester Email | Task description |
| Department | Task description |
| Task Description | Task description |
| Due Date | Task due date |
| Asana Task GID | Returned to Gravity Forms |
| Asana Task URL | Returned to Gravity Forms |
| Asana API Response | Stores the full API response |
This gives the workflow two useful directions.
Gravity Forms sends form data to Asana, but it also receives information about the task that Asana created.
That means an administrator can open the original form entry later and find the Asana task ID and direct link without searching through the Asana dashboard.
What Do You Need for This Gravity Forms Asana Integration?
Before you start, you need:
- A WordPress site
- Gravity Forms
- GravityWP API Connector
- An Asana account
- An Asana workspace
- An Asana project
- An Asana Personal Access Token
We used a Personal Access Token, or PAT, for authentication.
Asana describes a PAT as a simple way to authenticate API requests. PATs use the permissions of the Asana user who created the token. Asana also recommends OAuth when an application needs multiple users to sign in and authorize access. For this controlled WordPress-to-Asana workflow, a PAT gave us a straightforward way to test the integration.
Keep the token private. Treat it like a password.
Step 1: Create the Gravity Forms Task Request Form
In WordPress, create a new Gravity Form.
We named ours:
Asana Task Request Form
Add these public fields:
| Field | Gravity Forms field type |
| Task Name | Single Line Text |
| Requester Name | Name |
| Requester Email | |
| Department | Drop Down |
| Task Description | Paragraph Text |
| Due Date | Date |
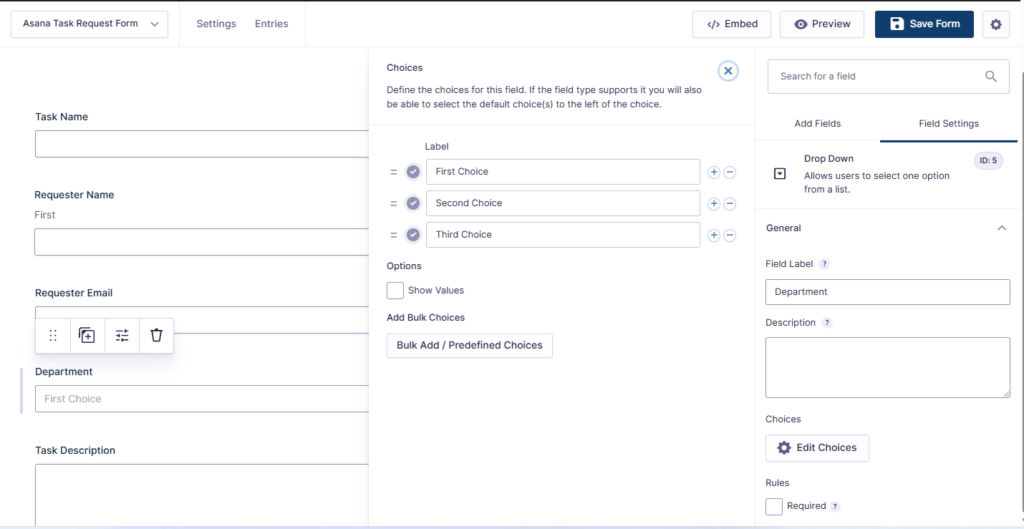
For Department, we used:
- Marketing
- Sales
- Support
- Operations
These fields give Asana enough information to create a useful task instead of only sending a basic title.
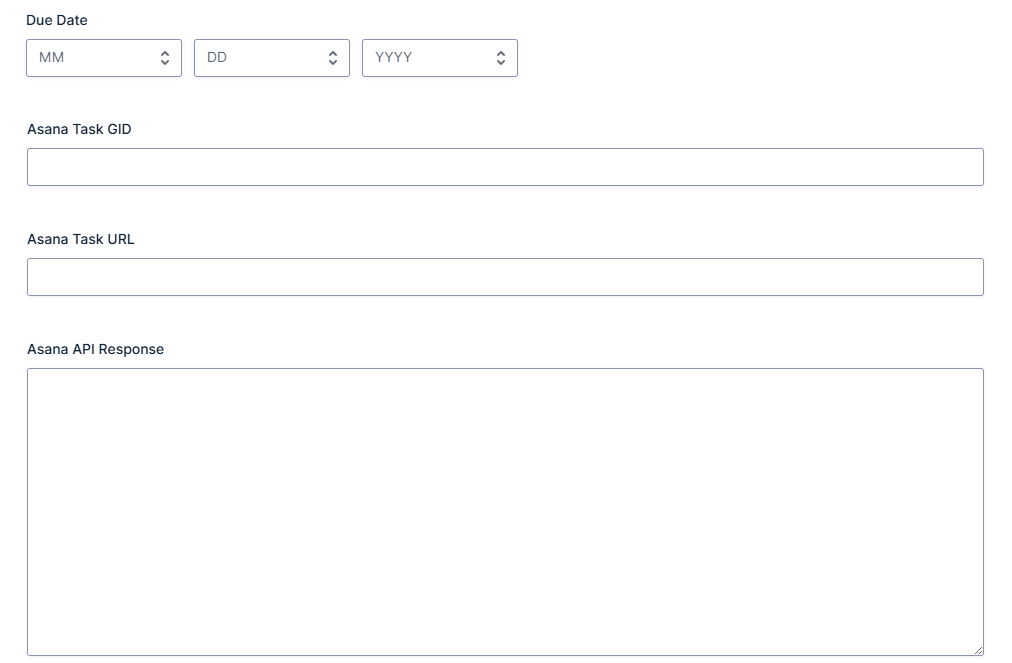
Add fields for the returned Asana data
Next, add three administrative fields:
- Asana Task GID
- Asana Task URL
- Asana API Response
We used Single Line Text fields for the GID and URL, and a Paragraph Text field for the full response.
These fields are for data returned by Asana. They do not need to be shown to the person completing the form.
Set the Due Date format to YYYY-MM-DD
This setting matters.
Open the Due Date field and set:
Date Format → yyyy-mm-dd
Gravity Forms supports YYYY-MM-DD as one of its Date field formats.
We originally tested the workflow with:
2026/09/05
When that value was mapped to Asana’s due_on property, the task was not created.
We then changed the Gravity Forms field to output:
2026-09-05
The next test succeeded and Asana showed the correct due date: Sep 5.
This matches Asana’s API requirement. Date-only values such as due_on use the ISO date format:
YYYY-MM-DD
Use the hyphen format, not YYYY/MM/DD, when mapping a Gravity Forms Date field directly to due_on.
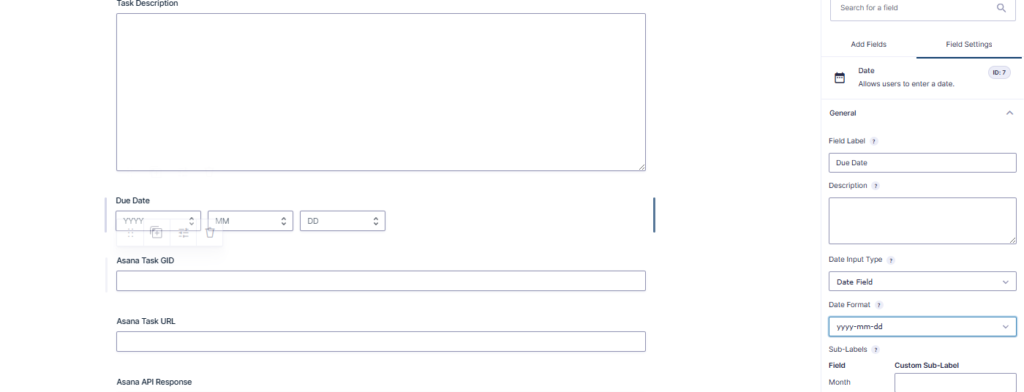
yyyy-mm-dd so it matches Asana’s due_on format.Step 2: Create the Asana Project
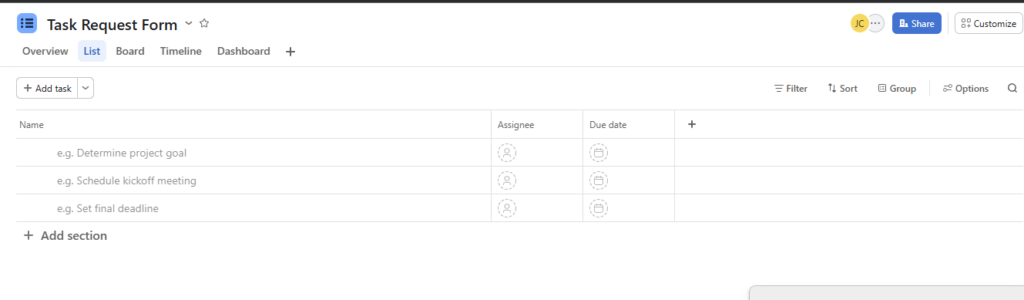
Next, create the Asana project where the form submissions should become tasks.
Our project was:
Task Request Form
You do not need a complex Asana project for this tutorial.
An empty project is useful during testing because you can clearly see when a form submission creates a new task.
There are three Asana terms that are important here:
Workspace: The Asana environment that contains your projects and other data.
Project: A collection of tasks used to organize work.
Task: The individual item that our Gravity Forms submission will create.
The Asana API uses globally unique identifiers, or GIDs, to identify resources such as workspaces, projects, and tasks.
We need the correct Project GID before creating the final workflow.
Step 3: Create an Asana Personal Access Token
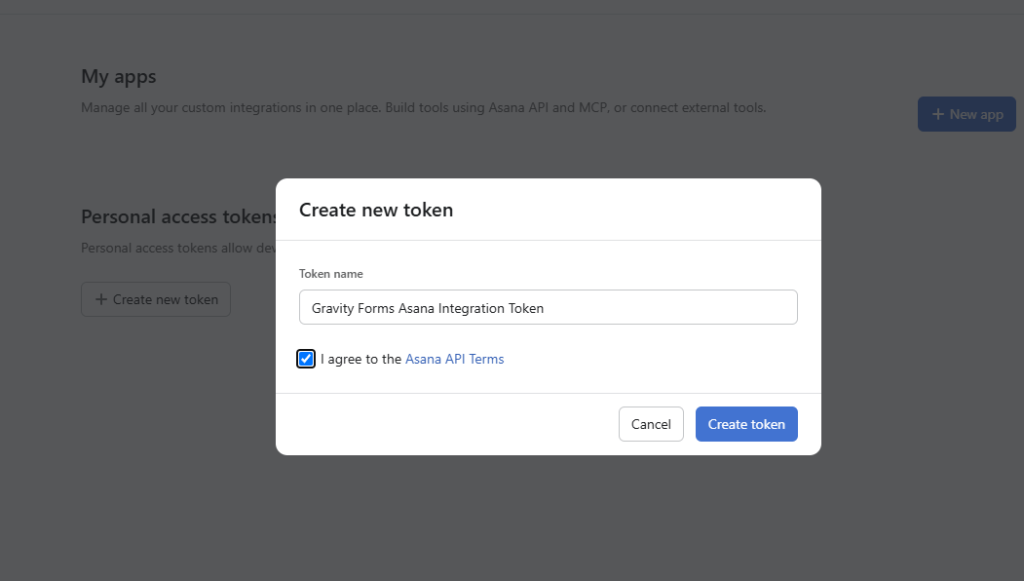
Open Asana and go to the Developer Console.
Create a new Personal Access Token.
For our test, we called it:
Gravity Forms Asana Integration Token
Copy the token when Asana displays it.
Do not place this value inside a public Gravity Forms field or publish it in screenshots.
Asana states that PATs should be stored securely because they provide programmatic API access with the permissions of the user who created them.
Step 4: Connect Asana to GravityWP API Connector
Now create the Asana connection in GravityWP API Connector.
Go to the API Connector settings in WordPress and add a new connection.
Use:
| Setting | Value |
| API Name | Asana API |
| Slug | asana-api |
| Base URL | https://app.asana.com/api/1.0 |
| Authentication Method | Bearer Token |
| Bearer Token | Your Asana Personal Access Token |
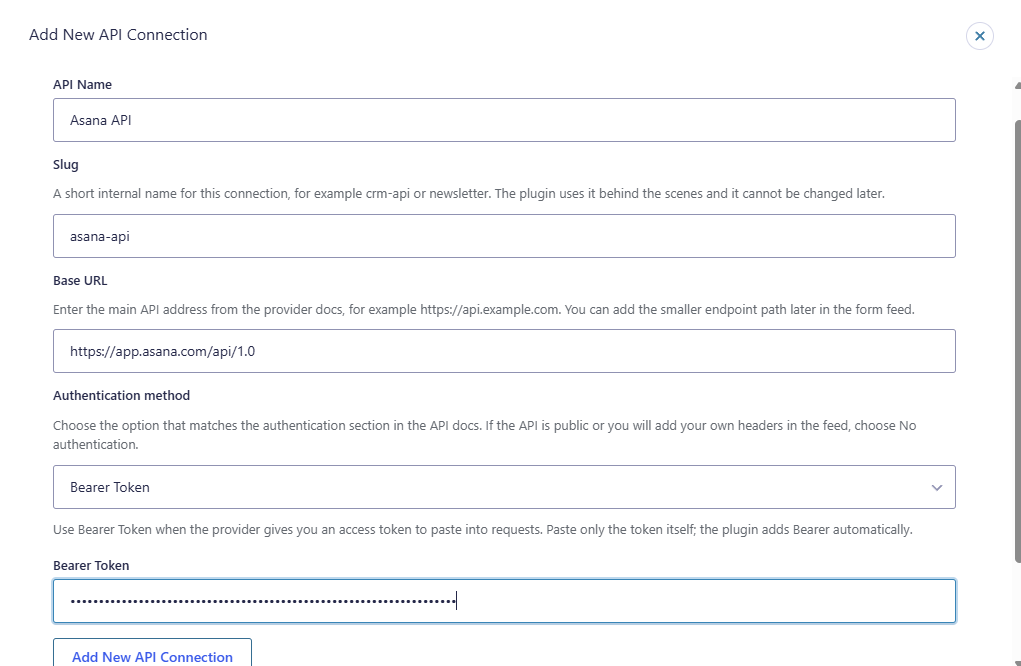
Paste only the token itself.
You do not need to manually add Bearer before it. GravityWP’s Bearer Token authentication handles the Authorization header for the API feeds that use this connection.
After we saved the connection, GravityWP showed it as Authorized.
That confirmed the authentication layer was ready before we started creating Asana tasks.
Step 5: Find Your Asana Workspace GID
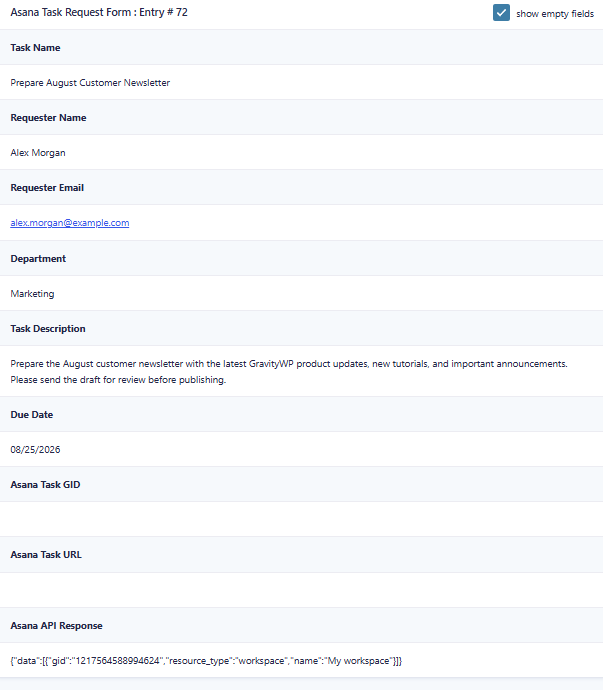
Before building the final POST request, we used a temporary GET feed to discover the Workspace GID.
Open:
Asana Task Request Form → Settings → API Connector
Create a new feed.
Use:
| Setting | Value |
| Feed Name | Get Asana Workspaces |
| API Configuration | Asana API |
| Request Method | GET |
| Endpoint URL | /workspaces |
| Input Type | Regular Field Input |
| Trigger | On form submission |
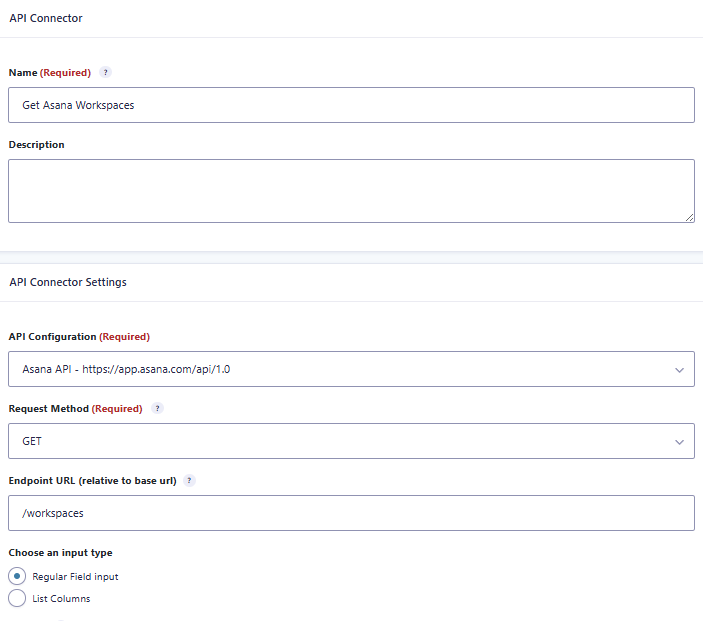
/workspaces feed retrieves the Asana workspaces available to the authorized account.Leave the Headers and request parameters empty.
Enable:
Store full response → Asana API Response
GravityWP’s API Connector feed settings allow the full API response to be stored in a field when the request runs on form submission.
Submit the form once.
The Asana API’s workspace endpoint returns compact records for the workspaces visible to the authorized user.
The response structure looked like this in our test:
{
  "data": [
    {
      "gid": "YOUR_WORKSPACE_GID",
      "resource_type": "workspace",
      "name": "My workspace"
    }
  ]
}
Find:
data → gid
That value is your Workspace GID.
How do you find an Asana Workspace GID?
Use:
GET /workspacesThen read the gid returned for the workspace you want to use.
Do not copy the example GID from another account. Use the value returned by your own Asana workspace.
Once you have it, you can disable the Get Asana Workspaces feed.
Step 6: Find Your Asana Project GID
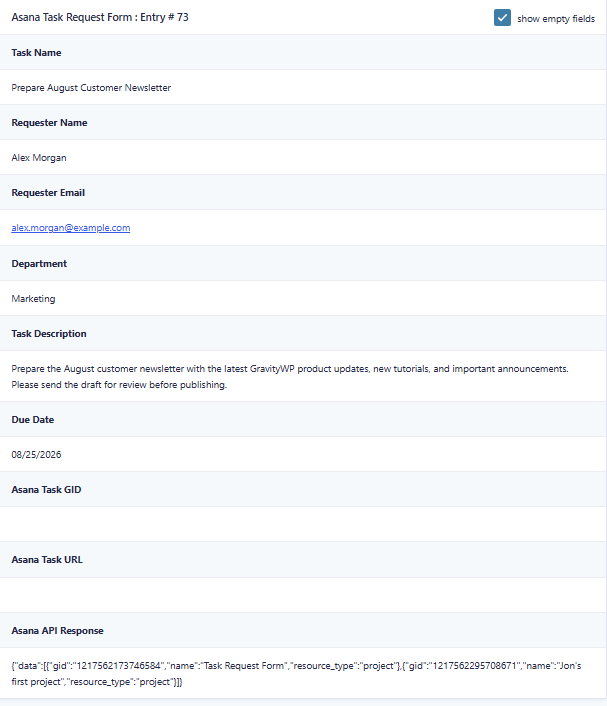
Next, we used the Workspace GID to retrieve its projects.
Create another temporary API Connector feed.
Use:
| Setting | Value |
| Feed Name | Get Asana Projects |
| API Configuration | Asana API |
| Request Method | GET |
| Endpoint | /workspaces/YOUR_WORKSPACE_GID/projects |
| Trigger | On form submission |
| Store Full Response | Asana API Response |
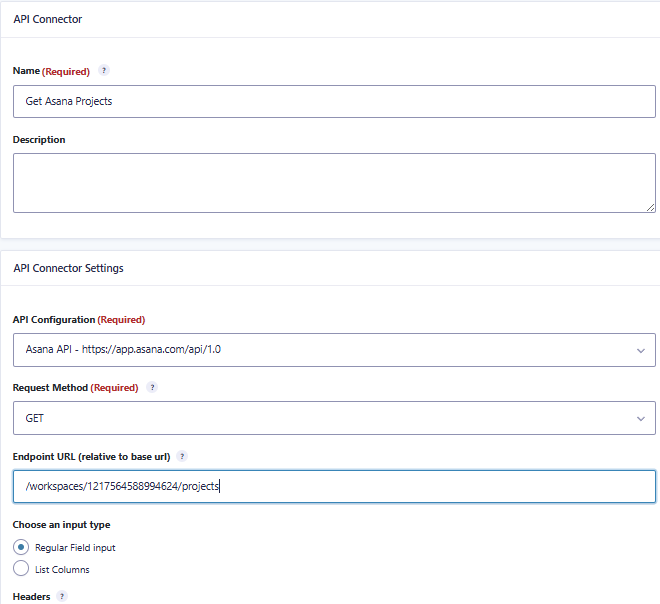
Replace:
YOUR_WORKSPACE_GID
with the value returned in Step 5.
The complete request follows this pattern:
/workspaces/YOUR_WORKSPACE_GID/projectsSubmit the form again.
The response will contain compact records for the projects that Asana returns from that workspace.
Our result included:
Task Request Form
along with its project gid.
How do you find an Asana Project GID?
Use:
GET /workspaces/{workspace_gid}/projectsThen find the project you want and copy its gid.
You will use this Project GID in the final task creation feed.
Once you have it, disable the temporary Get Asana Projects feed.
You do not need these discovery feeds to run on every future form submission.
Step 7: Create the Gravity Forms to Asana Task Feed
Now we can build the permanent workflow.
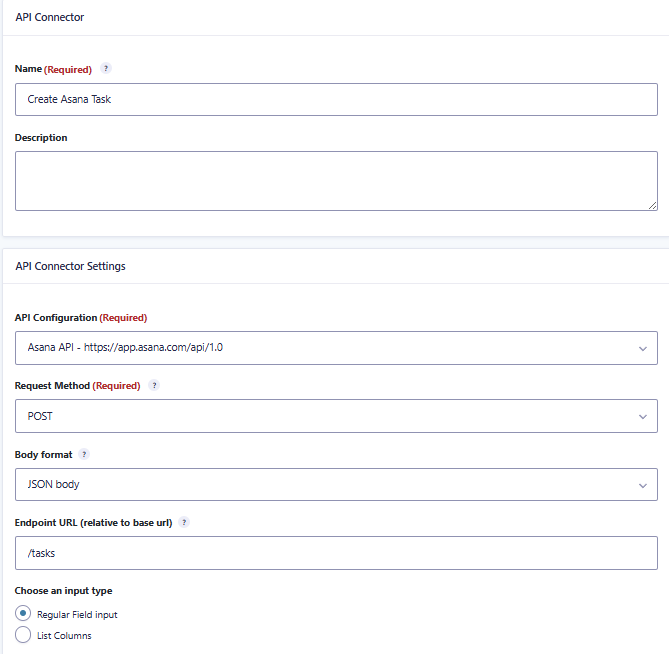
Create a new API Connector feed.
Use:
| Setting | Value |
| Feed Name | Create Asana Task |
| API Configuration | Asana API |
| Request Method | POST |
| Body Format | JSON body |
| Endpoint | /tasks?opt_fields=gid,name,permalink_url |
| Input Type | Regular Field Input |
| Trigger | On form submission |
/tasks endpoint.Asana creates tasks through:
The API expects a data object containing the task properties you want to set.
We add this query parameter:
?opt_fields=gid,name,permalink_urlopt_fields tells Asana to include optional properties in the response. We requested the task GID, name, and direct permalink URL.
Asana also states that every task belongs to a workspace, but you do not have to send the workspace separately when a project is supplied in the request.
GravityWP API Connector’s JSON body support lets POST feeds build nested objects and arrays through mapping paths such as data.name and data.projects[0].
Step 8: Map the Gravity Forms Data to the Asana Task
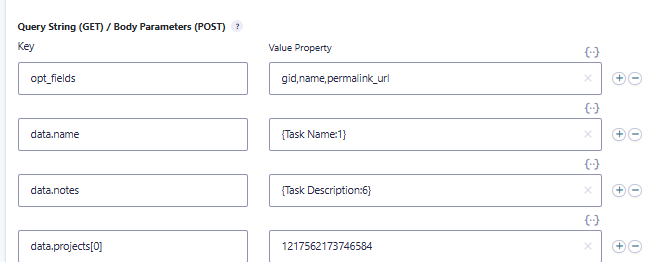
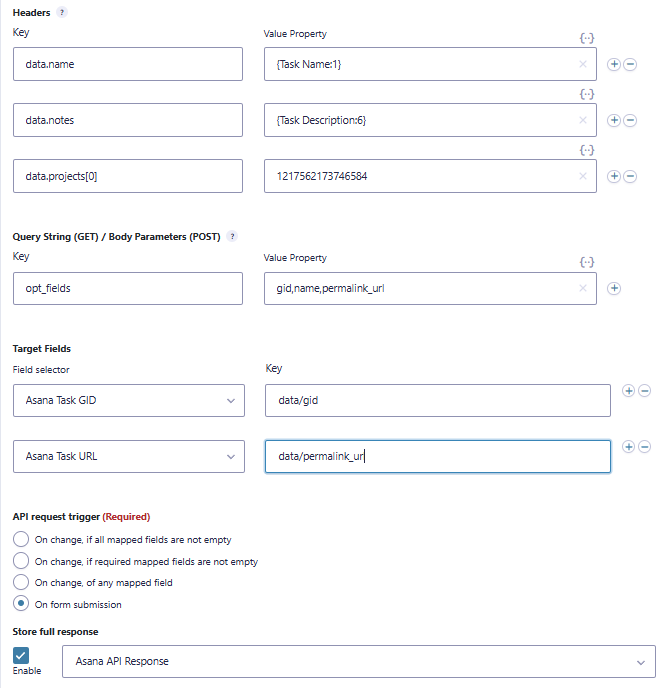
In the Body Parameters section, create these mappings.
Map the task name
Key:
data.nameValue:
{Task Name:1}This becomes the title of the Asana task.
For our successful test, the Gravity Forms value was:
Review September Landing Page
and the Asana task used the same name.
Map the task description
Use:
Key:
data.notesFor the value, combine the Gravity Forms merge tags into one custom value.
Our final structure was:
Requester: {Requester Name (First):3.3} {Requester Name (Last):3.6} | Email: {Requester Email:4} | Department: {Department:5} | Task Description: {Task Description:6}This keeps the requester information and original form data together inside the Asana task description.
For example:
Requester: Alex Morgan | Email: alex.morgan@example.com | Department: Marketing | Task Description: Review the September campaign landing page and send feedback before the page is published.Watch the space between Name merge tags
During testing, we originally used the first-name and last-name merge tags without a literal space:
{Requester Name (First):3.3}{Requester Name (Last):3.6}The result was:
AlexMorganAdd a space between the merge tags:
{Requester Name (First):3.3} {Requester Name (Last):3.6}This prevents the two values from being joined together.
Map the Asana project
Add:
Key:
data.projects[0]Value:
YOUR_PROJECT_GIDReplace YOUR_PROJECT_GID with the project GID you found earlier.
projects is an array in the task request. [0] represents the first project in that array.
This mapping is what placed our new tasks inside the Task Request Form project.
Map the due date
Add:
Key:
data.due_onValue:
{Due Date:7}The Date field should output:
2026-09-05not:
2026/09/05Asana’s due_on value uses YYYY-MM-DD.
What Does the JSON Request Look Like?
With the mappings above, a submission can produce a request with this structure:
{
  "data": {
    "name": "Review September Landing Page",
    "notes": "Requester: Alex Morgan | Email: alex.morgan@example.com | Department: Marketing | Task Description: Review the September campaign landing page and send feedback before the page is published.",
    "projects": [
      "YOUR_PROJECT_GID"
    ],
    "due_on": "2026-09-05"
  }
}
Here is what each part does:
| JSON property | Purpose |
data.name | Sets the Asana task name |
data.notes | Sets the plain-text task description |
data.projects[0] | Adds the task to the selected Asana project |
data.due_on | Sets the task due date |
This is the core of the Gravity Forms Asana integration.
Instead of writing a custom WordPress integration in PHP, the JSON body is built from Gravity Forms field values inside API Connector.
Step 9: Save the Asana Task GID and URL Back to Gravity Forms
Now configure the response mappings.
In Target Fields, add:
| Gravity Forms target field | Response key |
| Asana Task GID | data/gid |
| Asana Task URL | data/permalink_url |
API Connector uses / as the separator when mapping nested properties from an API response.
Also enable:
Store full response → Asana API Response
This gives us three useful records inside Gravity Forms after successful task creation:
- The Asana Task GID
- The Asana Task URL
- The full API response
This is useful for both administration and troubleshooting.
Instead of only knowing that data was sent somewhere, you have a direct link from the Gravity Forms entry to the Asana task that was created.
Step 10: Test the Gravity Forms Asana Integration
Our final test used:
Task Name: Review September Landing Page
Requester: Alex Morgan
Requester Email: alex.morgan@example.com
Department: Marketing
Task Description: Review the September campaign landing page and send feedback before the page is published.
Due Date: 2026-09-05
After submitting the form, GravityWP API Connector sent the request to Asana.
What happened in Asana?
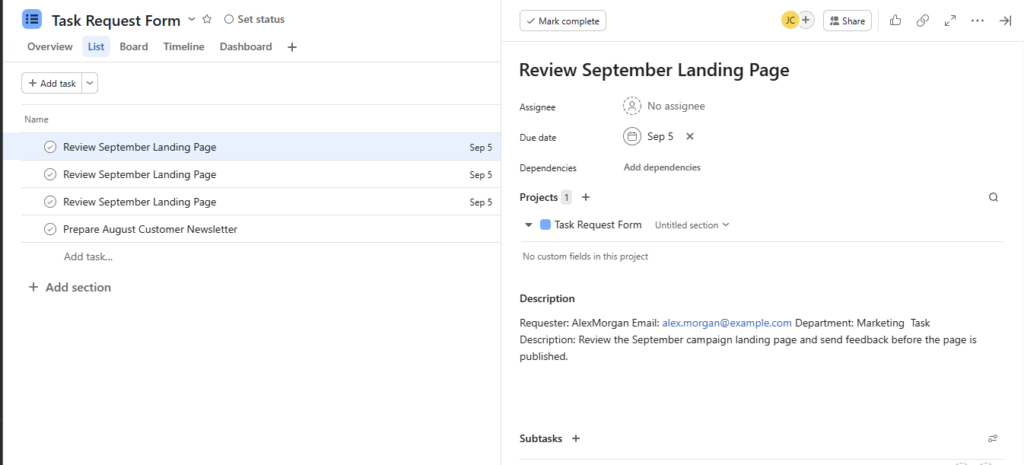
Asana created:
Review September Landing Page
inside the:
Task Request Form
project.
The task showed:
- The correct task name
- Due date: Sep 5
- The correct project
- Requester details in the description
- Requester email
- Department
- Original task description
What happened in Gravity Forms?
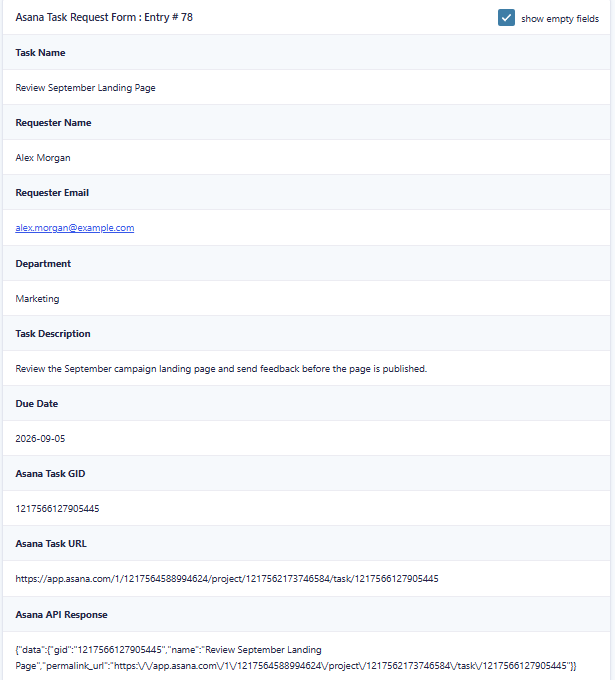
The original Gravity Forms entry contained:
- The submitted task data
- Due Date:
2026-09-05 - A returned Asana Task GID
- A returned Asana Task URL
- The full Asana API response
The stored response followed this structure:
{
  "data": {
    "gid": "RETURNED_TASK_GID",
    "name": "Review September Landing Page",
    "permalink_url": "RETURNED_ASANA_TASK_URL"
  }
}
This confirmed the full workflow:
Form submission → Asana task creation → Asana response → Gravity Forms entry update
What Does the Final Gravity Forms Asana Workflow Look Like?
The completed workflow is:
1. User submits Gravity Forms
The form collects the task request.
↓
2. GravityWP API Connector runs
The feed builds a JSON request using the submitted Gravity Forms data.
↓
3. API Connector sends POST /tasks to Asana
The request contains the task name, notes, project, and due date.
↓
4. Asana creates the task
The new task appears in the selected Asana project.
↓
5. Asana returns task information
The response includes the requested GID and permalink URL.
↓
6. GravityWP updates the Gravity Forms entry
The Task GID, direct Asana URL, and complete response are stored with the original form submission.
This turns Gravity Forms form entries into actionable project management tasks without manually copying the data between WordPress and Asana.
Troubleshooting Gravity Forms and Asana
Our testing exposed a few details that are easy to miss.
Why wasn’t my Asana task created?
Check these first:
- Is the Asana API connection authorized?
- Is the Personal Access Token still valid?
- Is the correct Project GID being used?
- Are your JSON body mappings under Body Parameters rather than Headers?
- Is
data.projects[0]using the correct project? - Is the due date formatted correctly?
- Are the required task values present?
Asana’s create-task endpoint can return a 400 response when a parameter is missing or malformed. Authentication problems may return 401, while valid authentication without enough access can return 403.
If the API request fails, check the stored response and API Connector logs before changing several settings at once.
Why does the Asana due date fail?
This was the main error we found during our test.
Our first date value was:
2026/09/05The task was not created.
We changed the Gravity Forms Date field format to:
yyyy-mm-ddThe form then submitted:
2026-09-05and the Asana task was created successfully with a Sep 5 due date.
Asana documents due_on as a date-only ISO value in YYYY-MM-DD format.

yyyy/mm/dd produced a slash-formatted date that did not work with Asana’s due_on field in our test.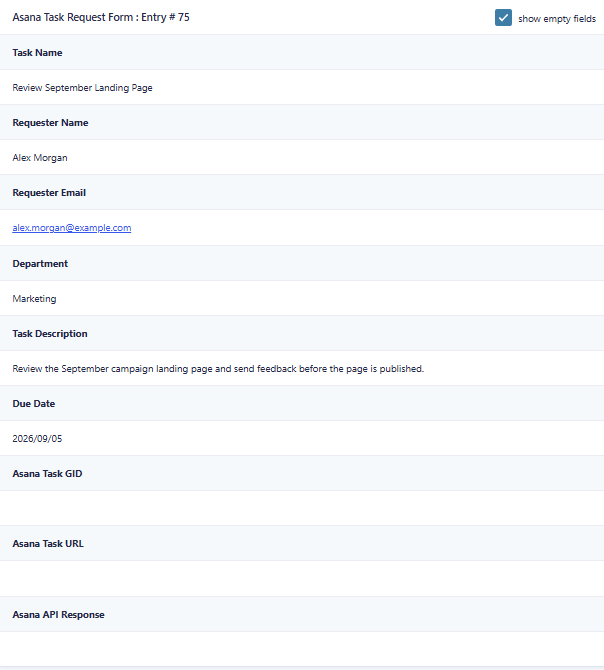
Why are Asana Task GID and Asana Task URL empty?
Those fields depend on a successful Asana response.
If Asana does not create the task, it cannot return the new task’s GID or permalink.
Check:
- The stored API response
- The API Connector log
- Your authentication
- Your request body
- Your Project GID
- Your date format
Do not troubleshoot only the target-field mapping if the task itself was never created.
Why does the requester name show as AlexMorgan?
Separate Gravity Forms Name subfields do not automatically insert extra text between merge tags.
This:
{Requester Name (First):3.3}{Requester Name (Last):3.6}produced:
AlexMorganUse:
{Requester Name (First):3.3} {Requester Name (Last):3.6}The literal space between the two merge tags keeps the name readable.
Why is the task not inside the correct Asana project?
Check:
data.projects[0]The value must be the GID for the project, not the Workspace GID.
These are different identifiers.
If needed, run:
GET /workspaces/{workspace_gid}/projectsagain and confirm the project name and GID.
Should the Get Workspaces and Get Projects feeds stay enabled?
No.
We used those feeds only to discover the IDs required during setup.
Once you know the Workspace GID and Project GID, disable those temporary feeds.
The feed that should remain active is:
Create Asana Task
GravityWP API Connector vs Zapier for Gravity Forms and Asana
Zapier is another way to connect Gravity Forms and Asana.
Gravity Forms has an official Zapier Add-On, and its documentation shows a workflow where a Gravity Forms submission triggers an Asana action. Zapier also offers a template that creates a new Asana task whenever a Gravity Forms submission occurs.
Our workflow uses a different route:
Gravity Forms → GravityWP API Connector → Asana API
A Zapier workflow follows:
Gravity Forms → Zapier → Asana
Neither approach is automatically right for every site.
If your business already runs many workflows in Zapier, using the Gravity Forms Zapier integration may fit your existing setup.
If you use GravityWP API Connector and want to work directly with the Asana REST API, the method in this tutorial gives you control over the request body, API response, and values stored back in the Gravity Forms entry.
Other automation platforms such as Make also support Asana and Gravity Forms workflows.
The important part is choosing the integration method that fits how you already manage your WordPress and project management automation.
When Is This Asana Integration Useful?
This workflow can help whenever a Gravity Forms submission represents work that someone needs to complete.
Examples include:
Marketing requests
A team member submits a campaign, newsletter, or content request. The form submission creates an Asana task for the marketing team.
Website update requests
Staff can submit website changes through WordPress. Each request becomes a task in the web team’s Asana project.
Design requests
Collect the design brief, requester details, and due date in Gravity Forms, then create an actionable Asana task.
Support escalations
A support form can turn requests that need internal action into project management tasks.
Sales follow-up
A form submission can create an Asana task that reminds a team member to follow up.
Internal operations
Teams can use different forms for purchasing requests, process changes, onboarding work, or other internal tasks.
The main benefit is simple: the form collects structured information, while Asana becomes the place where the team manages the resulting work.
Conclusion
You now have a tested Gravity Forms Asana integration that can turn form submissions into Asana tasks.
The workflow uses:
Gravity Forms → GravityWP API Connector → Asana API
When the form is submitted, API Connector sends the task data through Asana’s POST /tasks endpoint.
Our final test created an Asana task with:
- The submitted task name
- Requester details
- Department
- Task description
- Correct project
- Correct due date
Asana then returned the Task GID and direct task URL, and GravityWP saved both values back into the original Gravity Forms entry.
We also found two details worth checking before you deploy the workflow:
- Use
YYYY-MM-DDfor Asana’sdue_onvalue. - Add a literal space when combining separate First Name and Last Name merge tags.
Once those mappings are correct, Gravity Forms can collect the request while Asana handles the actionable task.
If you want to build other API-driven workflows, see the GravityWP API Connector or read our guide to Gravity Forms integrations.
Frequently Asked Questions
Yes. In our test, a Gravity Forms submission created an Asana task through GravityWP API Connector and Asana’s POST /tasks API endpoint.
The task received the submitted task name, description, project, and due date.
Yes.
The workflow in this tutorial does not use Zapier.
It connects Gravity Forms to the Asana REST API through GravityWP API Connector.
Asana uses:POST https://app.asana.com/api/1.0/tasks
The request contains a data object with the task properties you want to set.
Every Asana task belongs to a workspace.
However, Asana does not require the workspace to be supplied separately when the task request includes a project or parent task.
In our setup, we retrieved the Workspace GID so we could find the correct Project GID.
First get the Workspace GID with:GET /workspaces
Then request:GET /workspaces/{workspace_gid}/projects
Find the correct project in the response and use its gid.
Use:YYYY-MM-DD
For example:2026-09-05
In our test, the slash format 2026/09/05 did not create the task. Switching the Gravity Forms Date field to yyyy-mm-dd fixed the request.
Yes.
We requested permalink_url using:?opt_fields=gid,name,permalink_url
Then mapped:data/permalink_url
to an Asana Task URL field in Gravity Forms.
Yes.
Map:data/gid
from the Asana response to a Gravity Forms field.
Our test stored the newly created task GID in the original form entry.
Yes, as long as the data is mapped to a property supported by the Asana API.
In this tutorial, we combined the requester name, email, department, and description into data.notes.
More advanced integrations may use other supported Asana task properties or separate API requests.
Not for the workflow shown here.
We configured the API connection, endpoint, JSON paths, Gravity Forms merge tags, and response mappings through GravityWP API Connector.
You still need to understand which fields the Asana API expects, but you do not need to build the entire WordPress integration in custom PHP.
Our Premium add-ons for Gravity Forms

n8n Connector
Connect Gravity Forms to n8n and automate your workflows with secure, flexible, and powerful webhooks. Go beyond simple notifications and build advanced, two-way automations.

API Connector
Connect Gravity Forms to External API's: Query the API using form field values and automatically fill other form fields with the API response.

DateTime Field
The GravityWP - DateTime Field add-on adds a dedicated Date/Time field to Gravity Forms so users can enter both a date and a time in a single input.

JWT Prefill
Fill forms with data you can trust. Prefill Gravity Forms fields with a secure token instead of links with editable url parameters, so your data is accurate, tamper-proof, and ready to use.
Read tutorials about

How to Validate Repeatable Contact Rows in Gravity Forms
Learn how to validate repeatable Gravity Forms List field rows with GravityWP List Text. This tutorial shows how to add email and regex validation, test invalid values, and confirm that valid team roster data is stored correctly.

Gravity Forms Airtable Integration: Create Records From Form Submissions
Learn how to build a Gravity Forms Airtable integration with GravityWP API Connector. Send form submissions to Airtable, create new records automatically, and save the returned Airtable Record ID and response back to Gravity Forms.

Gravity Forms Asana Integration: Create Tasks From Form Submissions
Learn how to connect Gravity Forms to Asana with GravityWP API Connector. This tested workflow creates Asana tasks from form submissions and saves the returned task ID and URL back to Gravity Forms.

Gravity Forms Google Calendar Integration: Create Events From Form Submissions
Connect Gravity Forms to Google Calendar with GravityWP API Connector. Learn how to create calendar events from form submissions, map event details, configure OAuth 2.0, handle time zones, and save the returned Event ID and URL.