Do you want to change the type of an existing field in an existing Gravity Forms? There are multiple ways to achieve this.
- Change the field type by adding a new field and swapping the field id’s. This is the safest option. See our tutorial for Modify the Field Type in Gravity Forms by swapping Field ID’s.
- Change the field type, while retaining all the settings by using the snippet below. This can lead to unexpected behaviour, because the original field type might have setting properties that are not compatible with the new field type.
To change the field type using our snippet follow this steps:
- Open the form editor with the form which contains the field you want to change the type of.
- Open the browser console by pressing ‘Ctrl + Shift + i’ or right mouse button + ‘inspect’. This works both in FireFox an Chrome.
- Paste the snippet below in your console and hit the enter key.
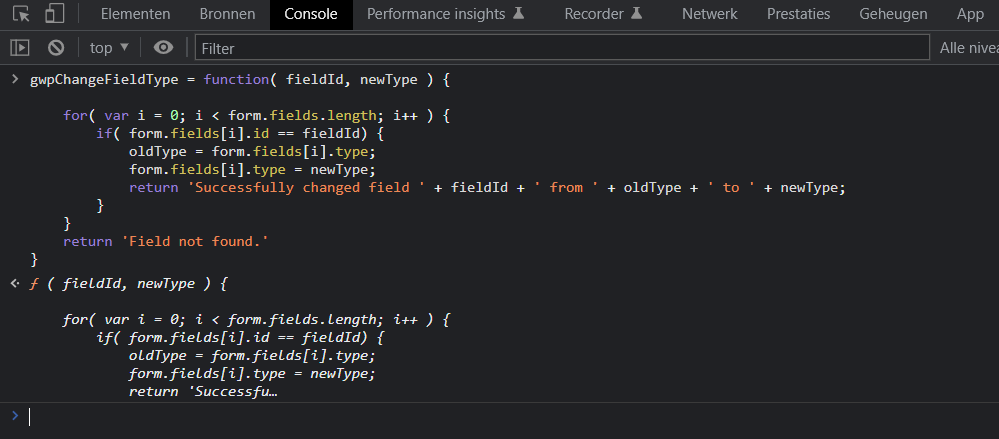
gwpChangeFieldType = function( fieldId, newType ) {
	for( var i = 0; i < form.fields.length; i++ ) {
		if( form.fields[i].id == fieldId) {
			oldType = form.fields[i].type;
			form.fields[i].type = newType;
			return 'Successfully changed field ' + fieldId + ' from ' + oldType + ' to ' + newType;
		}
	}
	return 'Field not found.'
}
It should look like this:
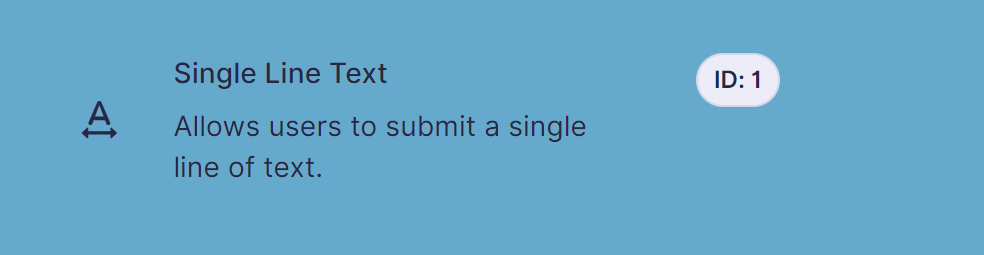
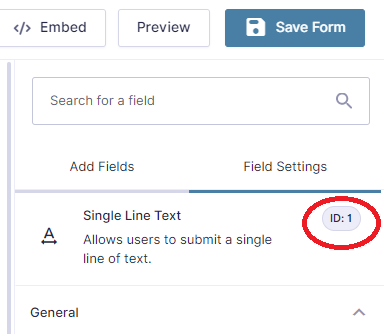
- Identify the id of the field you want to change the type of. This is a numeric value which you can see when you select the field in the form editor:
- Determine what the target field type should be. Common types are: html, hidden, section, text, website, phone, number, date, time, textarea, select, checkbox, radio, name, address, fileupload, email, post_title, post_content, post_excerpt, post_tags, post_category, post_image, post_custom_field, captcha. These are documented in the Gravity Forms documentation under Basic Properties -> type property.
- Type gwpChangeFieldType( fieldID, newType) in your console, where fieldID should be replaced with the numeric field ID and the second parameter should be the new field type string. For example:
gwpChangeFieldType( 1, 'number')Make sure you got it right, then hit enter. On success you will see the following response:

IMPORTANT NOTE:
You should use this snippet with care and only if you know what you are doing. It might impact existing entries and in the worst case result in data loss if the new field type stores values differently.
If you have conditional logic dependencies on this field the conditional logic might not work as expected. This has been reported when trying to convert checkboxes (multiple possible values) to radiobutton (single value).
When in doubt, always try it in test form first.
Our Premium add-ons for Gravity Forms

n8n Connector
Connect Gravity Forms to n8n and automate your workflows with secure, flexible, and powerful webhooks. Go beyond simple notifications and build advanced, two-way automations.

All Entries
All your new Gravity Forms entries in one central place. Stop navigating between multiple forms to find new entries. Get immediate oversight and full control with a powerful, unified dashboard.
List Dropdown
Add a Dropdown Select with choices to a column or multiple columns in a Gravity Forms List Field.

Advanced Number Field
Functionality for Number Fields, like rounding or only absolute numbers, fixed point notation, range calculation, custom units like % or m2 & show as slider.
Read tutorials about

How to Create a Public Submission Business Directory in WordPress (Gravity Forms + GravityView)
Build a moderated business directory where users submit listings through a form, admins approve entries, and approved businesses appear in a searchable GravityView directory.

How to Create an Event Workshop Registration + Waitlist System in WordPress
This guide shows how to set up a workshop registration + waitlist system in WordPress: register attendees until capacity is reached, waitlist the rest, approve entries, and auto-promote people when a seat opens using Gravity Forms, Gravity Flow, and GravityView.

Gravity Flow Form Submission Step Tutorial
The Gravity Flow Form Submission step pauses a workflow until another form is submitted, then continues once the handoff is complete. This guide shows how to connect two forms, prefill fields with mapping, send the correct secure link, and troubleshoot the most common “workflow didn’t move” issues.

Gravity Flow Delete an Entry Step Tutorial
The Gravity Flow Delete Entry step lets you trash or permanently remove Gravity Forms entries as part of a workflow. This guide covers the key settings, scheduling options (delay or date-based), and safe testing tips so you can follow retention and privacy rules with confidence.