A workshop registration waitlist system keeps your event signups clean when seats are limited: it registers people until capacity is reached, then automatically moves the overflow to a waitlist and handles approvals when a spot opens. The moment you add a real capacity limit, things get messy fast.
Who gets in first?
Where do you put the overflow?
How do you stop manually emailing people every time a spot opens?
In this tutorial, you’ll build a workshop registration + waitlist system that handles all of that using:
- Gravity Forms for the registration form and email notifications
- Gravity Flow for capacity decisions, approvals, and automatic entry updates
- GravityView (GravityKit) for a clean dashboard that shows attendees, statuses, workflow steps, and approval links
- GravityWP Advanced Merge Tags (used in this build to calculate the Registered Count automatically)
Workshop registration waitlist system: what you’re building
This workshop registration waitlist system uses one registration form and a workflow to control capacity and approvals.
By the end, your system will work like this:
- A visitor submits a Workshop Registration form.
- If the workshop still has space, they become Registered and get a confirmation email.
- If the workshop is full, they become Waitlist and get a waitlist email.
- An admin can approve or reject waitlisted entries.
- When approved, the entry is automatically promoted to Registered, and the attendee receives a “Spot Opened” email.
- A GravityView dashboard shows all attendees in one place, including: workshop type, registration status, workflow status, current workflow step, approval links, and a view details link.
This matters because it removes the two biggest admin headaches:
- Capacity enforcement without manually counting entries
- Waitlist handling without manual email follow-ups
Step 1: Create the workshop registration waitlist system form (Gravity Forms)
Go to Forms → New Form and create a form named:
Workshop Registration
1.1 Visitor fields for the workshop registration waitlist system
These are the only fields your visitors should fill out. Keep it short so conversions stay high:
- Name (First + Last)
- Email
- Workshop Type (Dropdown)
- Workshop A
- Workshop B
- Workshop C
- Workshop A

Why this matters: your waitlist logic depends on the Workshop Type choice, so make sure the dropdown values are clean and consistent (for example, “Workshop A” everywhere, not “Workshop A” in one place and “Workshop-A” in another).
Step 2: Internal fields for your workshop registration waitlist system
A waitlist system needs internal fields. Without them, you can’t reliably:
- assign Registered vs Waitlist automatically
- track how someone got registered
- filter and manage entries in a dashboard
Add these fields to the same form, but make them Administrative so visitors never see them.
2.1 Workshop registration waitlist system registration status field
Create a field called: Registration Status
Recommended field type: Dropdown (or Single Line Text if you prefer, but Dropdown is cleaner)
Values used in this build:
- Registered
- Waitlist
Set it to Administrative (important)
Open the field settings → Advanced tab → Visibility → choose Administrative
Why: Gravity Flow will set this field automatically. Visitors should not choose their own status.
2.2 Workshop registration waitlist system capacity counter (Registered Count)
Create a field called: Registered Count
Recommended field type: Number (because you’ll compare it in conditions)
Set to Administrative (same as above).
Why this field exists: every time a new entry comes in, the workflow needs a number that answers:
“How many people are already registered for this workshop right now?”
That number is what your workflow compares against your capacity.
2.3 Registration Source (Administrative)
Create a field called: Registration Source
Values used in this build:
- Auto (registered/waitlisted during first pass)
- Promoted (moved from waitlist to registered after approval)
Set to Administrative.
Why this is useful: it gives you instant clarity later when you’re reviewing entries. You can tell whether someone got in immediately or was promoted from the waitlist.
Step 3: Create the notifications you’ll send (Gravity Forms)
This system uses three attendee-facing emails:
- Registered Confirmation
- Waitlist Confirmation
- Spot Opened – You’re In
Go to: Form Settings → Notifications
Create those three notifications with clear subject lines.

Important: avoid double emails
There are two common ways notifications get triggered:
- Gravity Forms sending notifications on “Form is submitted”
- Gravity Flow sending notifications from workflow steps
Either approach can work, but you should test so attendees don’t get duplicates. If you ever see double sends during testing, the fix is simple: only trigger the email from one place (usually the workflow, because timing is cleaner).
Use a test email while building
During setup, use a real email you control (or a mailbox like test@yourdomain.com) so you can confirm messages are being sent correctly before going live.
Step 4: Gravity Flow workflow for the workshop registration waitlist system
This is where the workshop registration waitlist system makes decisions automatically.
Now you’ll attach a workflow so Gravity Flow can:
- calculate the Registered Count
- decide Registered vs Waitlist
- hold waitlisted entries for approval
- promote approved entries automatically
- trigger the right emails at the right time
Go to:
Forms → Workshop Registration → Settings → Workflow → Add New
Step 5: Capacity check for the workshop waitlist system (Registered Count)
This is the step that makes the whole thing possible.
In your build, the workflow uses an Update an Entry step named:
Workshop Capacity + Waitlist

5.1 What this step must do
It should update the field:
- Registered Count = “number of matching entries already Registered for the selected workshop”
In your build, this was done using the merge tag function:
gwp_count_matched_entries
gwp_count_matched_entries, so the workflow can compare current registrations against capacity.5.2 Workshop registration waitlist system count formula (copy/paste)
Because the Value field is single-line, include the full string in the article so readers can copy the Advanced Merge tag gwp_count_matched_entries.
Use this format (from your test):
{Workshop Type:4:gwp_count_matched_entries form_id="93" match_id="4" filter1="5" operator1="is" value1="Registered"}What each part means (so readers can adapt it safely)
- Workshop Type:4
“Workshop Type” is the field label, and 4 is the field ID in the example form. - form_id=”93″
The form being counted. In your test build, the registration form ID is 93. - match_id=”4″
The field used to match entries (Workshop Type field ID in this build). - filter1=”5″ operator1=”is” value1=”Registered”
This filters entries so only those with Registration Status = Registered are counted.
In this build, the Registration Status field ID appears as 5.
How to find your field IDs (quick method)
In Gravity Forms, edit the field and look for the Field ID in the field settings. If your IDs aren’t the same, update the numbers in the merge tag accordingly.
Step 6: Create the Registered vs Waitlist routing steps (per workshop)
Now that the workflow has a Registered Count number, you’ll branch into two paths:
- If there’s space → Set Registered
- If full → Set Waitlist
In your build, each workshop has its own pair of steps. That’s a good pattern because conditions stay easy to read.
6.1 Example: Set Registered – Workshop A
This is an Update an Entry step.
Condition (as shown in your test):
- Workshop Type is Workshop A
- Registered Count less than 1
This effectively means “capacity is 1 seat” in the test setup.
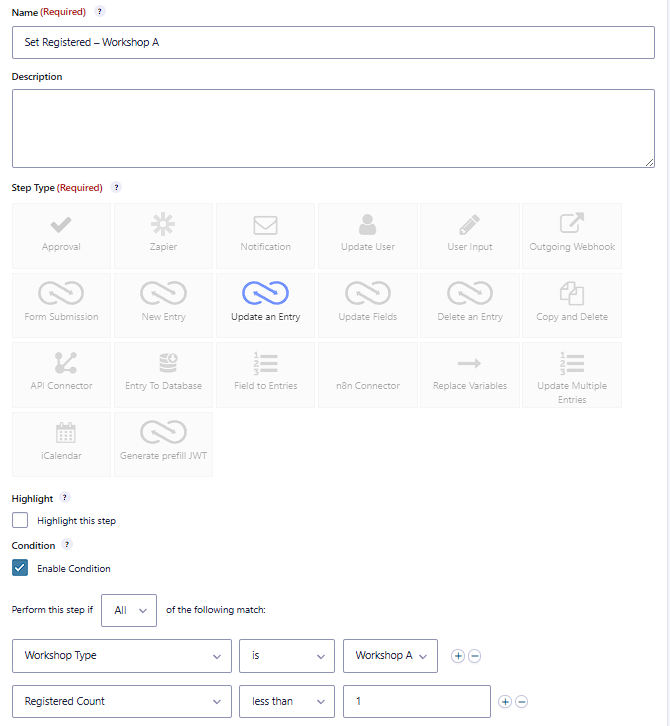
What this step should update
- Registration Status → Registered
- Registration Source → Auto
What should happen after this step
Trigger the Registered Confirmation email (either via a Gravity Flow Notification step, or by triggering the right Gravity Forms notification depending on how you prefer to manage email timing).
6.2 Example: Set Waitlist – Workshop A
This is also an Update an Entry step.
Condition (as shown in your test):
- Workshop Type is Workshop A
- Registered Count greater than 0
Meaning: “someone is already registered, so capacity is full.”
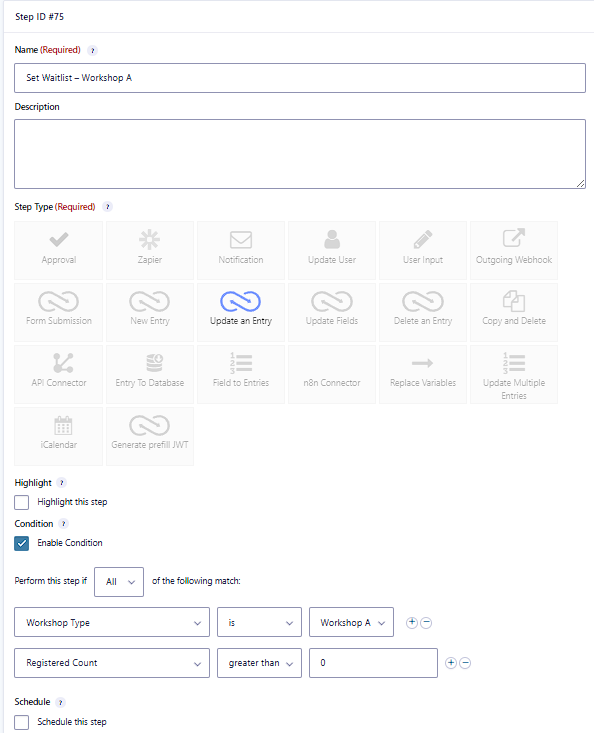
What this step should update
- Registration Status → Waitlist
- Registration Source → Auto
What should happen after this step
Trigger the Waitlist Confirmation email.
6.3 Repeat for Workshop B and Workshop C
Duplicate the same pattern:
- Set Registered – Workshop B
- Set Waitlist – Workshop B
- Set Registered – Workshop C
- Set Waitlist – Workshop C
Only change the Workshop Type condition and the capacity number if needed.
Step 7: Waitlist approval step for workshop registrations
Waitlisted entries should pause until someone makes a decision.
Add an Approval step named:
Waitlist Approval
Set the assignee to the person or role that should approve entries (for example, an Administrator or an Events Manager user).How you’ll know it’s working: waitlisted entries will show Waitlist Approval as the current workflow step.

Step 8: Promote waitlist to registered (spot opened)
Once an entry is approved, the system should:
- switch status from Waitlist to Registered
- mark the source as Promoted
- send the “Spot Opened” email
In your build, this is the Update an Entry step:
Promote to Registered
Condition shown:Registration Status is Waitlist
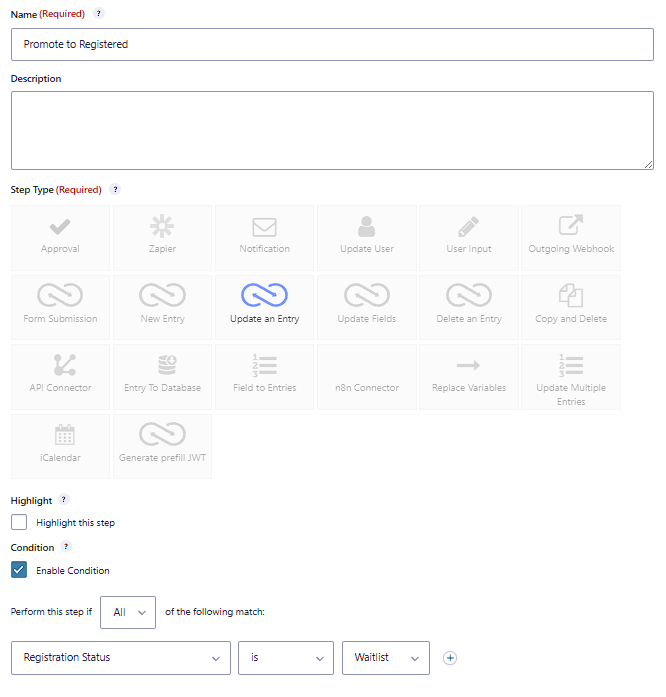
What this step should update
- Registration Status → Registered
- Registration Source → Promoted
Email to send here
- Spot Opened – You’re In
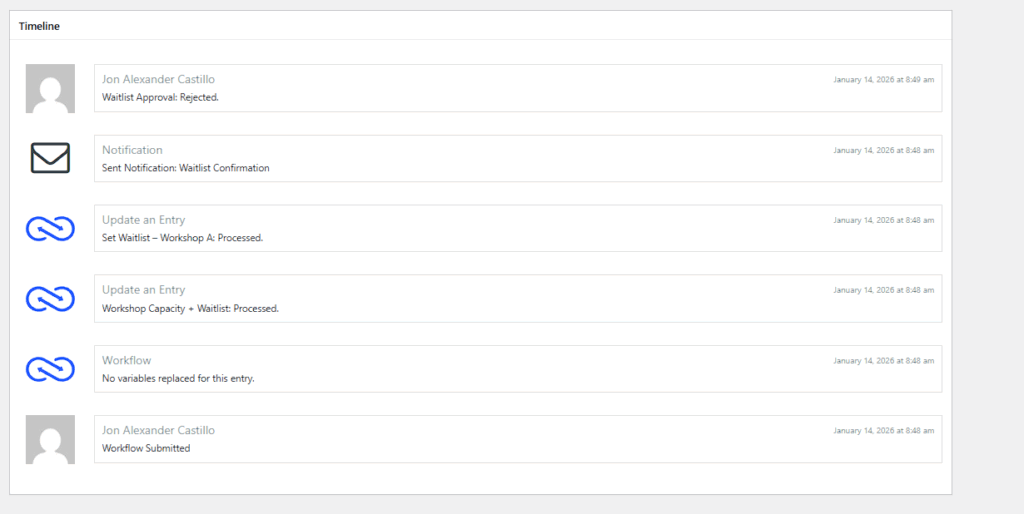
Step 9: Verify the workflow using Entry Details + Timeline
When you’re testing, don’t guess. Confirm everything directly in the entry.
9.1 Entry detail screen (field values + workflow status)
Open a test entry and confirm:
- Workshop Type
- Registration Status
- Registered Count
- Registration Source
- Workflow status

9.2 Workflow timeline for waitlist approvals and emails
The timeline is where you confirm sequence:
- the capacity step ran
- the correct status step ran
- the correct notification sent
- approval happened
- promotion happened (if approved)
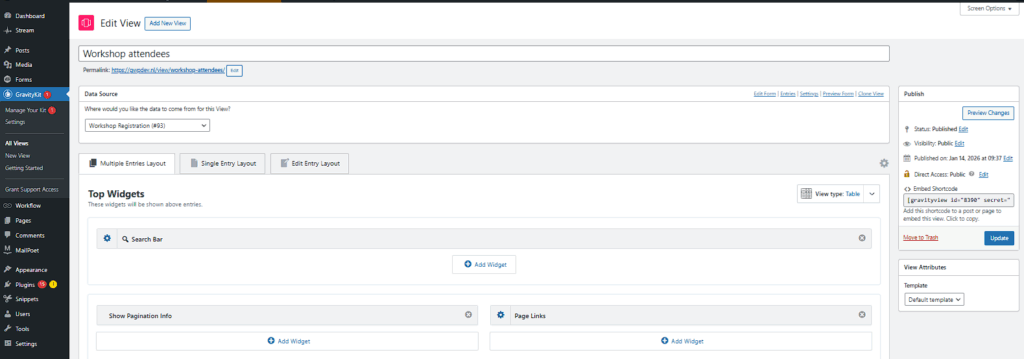
Step 10: Build the GravityView “Workshop attendees” dashboard
The dashboard is the control panel for your workshop registration waitlist system.
This is the operator view that makes the system usable day-to-day.
It should let you:
- see all attendees at a glance
- filter by workshop and status
- approve waitlist entries without digging through admin screens
- open a full entry when needed
10.1 Create a new View
Go to: GravityView → New View
- View name: Workshop attendees
- Data source: Workshop Registration form
- Layout: Table
10.2 Workshop registration waitlist system dashboard columns
Your table includes these columns:
- First
- Last
- Email
- Workshop Type
- Registration Status
- Workflow Status
- Workflow Step
- Workflow Approval Links
- Workflow Detail Link
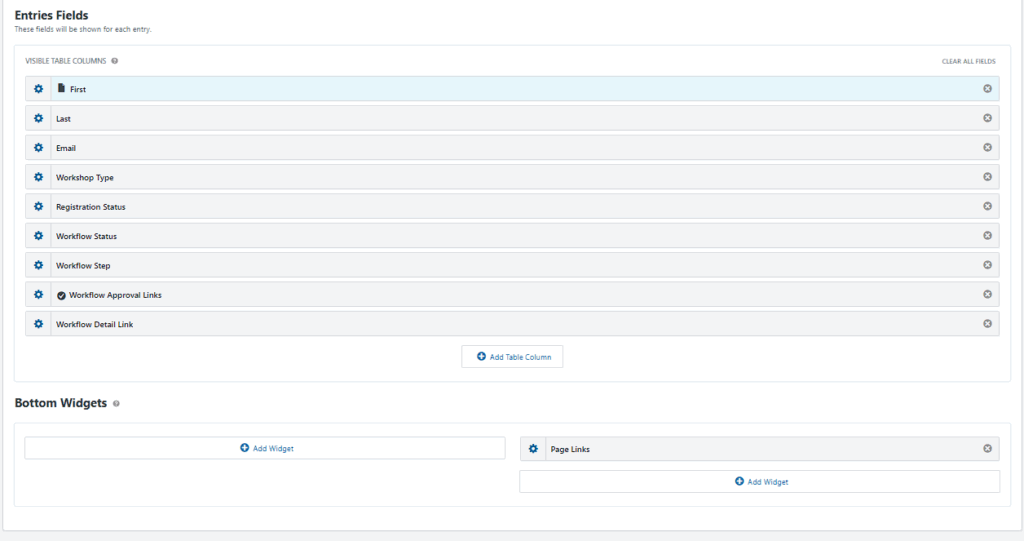
Why these two workflow columns matter:
- Workflow Approval Links lets you approve/reject fast
- Workflow Detail Link takes you straight to the entry detail view
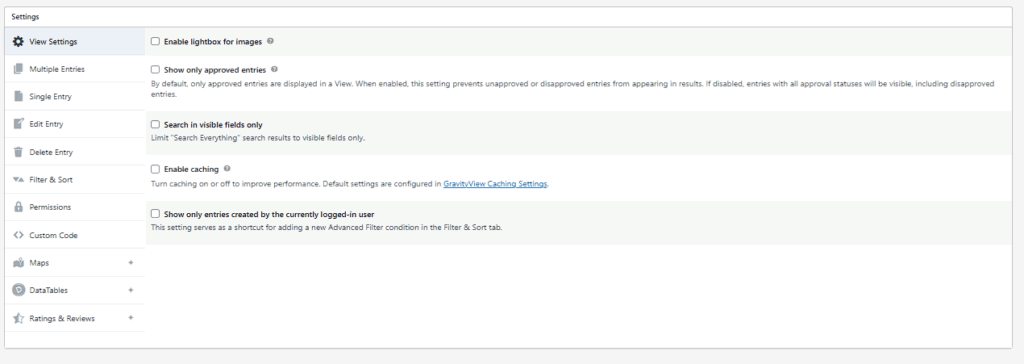
10.3 Check View Settings (important)
If you accidentally enable “Show only approved entries,” you may hide the exact entries you’re trying to manage (like waitlisted/pending ones).
10.4 Confirm the final front-end table
This is what your working dashboard should look like once embedded on a page.

Workshop registration waitlist system testing checklist
Test 1: First registration becomes Registered
Expected:
- Registration Status = Registered
- Registered Confirmation sent
Test 2: Next registration becomes Waitlist
Expected:
- Registration Status = Waitlist
- Workflow Step shows Waitlist Approval
- Waitlist Confirmation sent
Test 3: Approve a waitlist entry
Expected:
- Approval recorded
- Entry promoted to Registered
- Registration Source = Promoted
- Spot Opened email sent
Test 4: Reject a waitlist entry
Expected:
- Workflow status shows Rejected
- Entry remains visible in the dashboard depending on your GravityView settings
Workshop waitlist system: common issues and fixes
“The wrong people are getting waitlisted”
Almost always caused by one of these:
- Registered Count isn’t being calculated correctly
- The capacity number in conditions is wrong (for example, less than 1 vs less than 10)
- The filter is counting waitlist entries too (your filter should count only Registered)
“Waitlist entries don’t appear in the dashboard”
Check GravityView settings and make sure “Show only approved entries” is not hiding pending items.
“Emails didn’t send”
Confirm:
- the correct notification exists
- the workflow step that should send it actually ran
- you’re not relying on two systems that conflict (Gravity Forms vs Gravity Flow)
Final notes
This setup works because it solves the real admin problems in a clean way:
- capacity enforcement without manual counting
- a real waitlist process with approvals
- automatic promotion when a seat opens
- one dashboard for managing everything quickly
Our Premium add-ons for Gravity Forms

List Number Format
With this Gravity Forms Add-on you can change List Field columns into a number field, do calculations within a row or column. Extra merge tags are available with total counts of columns.

All Entries
All your new Gravity Forms entries in one central place. Stop navigating between multiple forms to find new entries. Get immediate oversight and full control with a powerful, unified dashboard.

n8n Connector
Connect Gravity Forms to n8n and automate your workflows with secure, flexible, and powerful webhooks. Go beyond simple notifications and build advanced, two-way automations.

JWT Prefill
Fill forms with data you can trust. Prefill Gravity Forms fields with a secure token instead of links with editable url parameters, so your data is accurate, tamper-proof, and ready to use.
Read tutorials about

How to Create a Public Submission Business Directory in WordPress (Gravity Forms + GravityView)
Build a moderated business directory where users submit listings through a form, admins approve entries, and approved businesses appear in a searchable GravityView directory.

How to Create an Event Workshop Registration + Waitlist System in WordPress
This guide shows how to set up a workshop registration + waitlist system in WordPress: register attendees until capacity is reached, waitlist the rest, approve entries, and auto-promote people when a seat opens using Gravity Forms, Gravity Flow, and GravityView.

Gravity Flow Form Submission Step Tutorial
The Gravity Flow Form Submission step pauses a workflow until another form is submitted, then continues once the handoff is complete. This guide shows how to connect two forms, prefill fields with mapping, send the correct secure link, and troubleshoot the most common “workflow didn’t move” issues.

Gravity Flow Delete an Entry Step Tutorial
The Gravity Flow Delete Entry step lets you trash or permanently remove Gravity Forms entries as part of a workflow. This guide covers the key settings, scheduling options (delay or date-based), and safe testing tips so you can follow retention and privacy rules with confidence.
