How to update the current entry using values from another entry (Form Connector)
The Gravity Flow Update Fields step pulls values from another entry and writes them into the current entry, so your workflow can route using “live” data.
For example:
- You keep an internal form where staff updates who the on-duty manager is today.
- A customer submits an incident form.
- Your workflow should automatically pull the latest on-duty manager into the incident entry so the next steps can route correctly.
That is exactly what the Update Fields step is designed for. It is included in the Gravity Flow Form Connector Extension, and it updates field values of the current entry using values from another entry (or custom values).
If you want the big picture of step types first, read our Gravity Flow workflow steps guide.
What the Gravity Flow Update Fields step actually does
The Gravity Flow Update Fields step works like this:
- You choose a Source Form (the form that contains the entry you want to pull values from).
- You choose how Gravity Flow will find the source entry:
- by conditional logic lookup (filters + one sort option), or
- by reading a source entry ID from a field in the current entry.
- by conditional logic lookup (filters + one sort option), or
- You configure Field Mapping so the current entry’s fields are updated from the source entry’s values (or from custom values).
- The workflow continues to the next step you define.
Two important rules from the docs:
- If your lookup returns multiple matches, only the first entry returned is used.
- If the lookup returns no results, the step makes no updates to the current entry.
When to use the Update Fields step (real scenarios)
Gravity Flow lists a few strong use cases for Update Fields. Three that matter most for tutorials:
Time-sensitive assignment
One form is used to store who the current on-duty support manager is. A second form lets customers open an incident, and Update Fields retrieves the current on-duty manager so later steps can be assigned directly.
Customer engagement and long workflows
If you have a long process in one form and a second form used for customer updates or status checks, Update Fields can pull data from the primary workflow entry to keep everything aligned.
Minimizing manual data entry
If you maintain several forms that track work activities, Update Fields reduces how much custom code or “extra questions” you need just to look up the latest related data.
We’ll build the first scenario because it’s simple, practical, and proves the step clearly.
Tutorial build: Update Fields lookup (On-Duty Manager)
We’ll create two forms:
Form A: On-Duty Manager (Source Form)
This is where staff sets who is currently on duty.
Form B: Priority Incident (Current Entry / Workflow Form)
This is what the customer submits. The workflow will pull the current on-duty manager into the incident entry.
This is the exact pattern Gravity Flow describes in its “time-sensitive future step assignment” use case.
Step 1: Create the Source Form (On-Duty Manager)
Create a Gravity Form named On-Duty Manager with these fields:
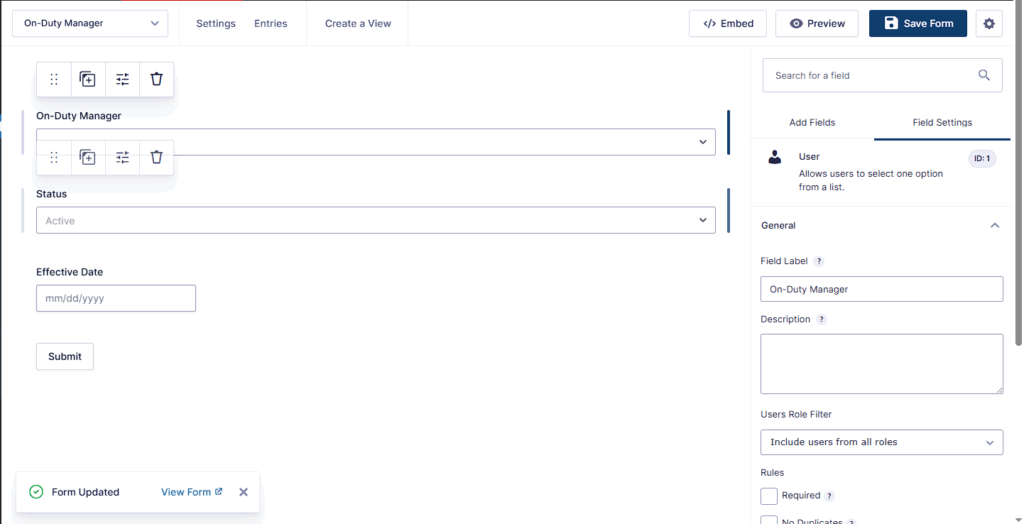
- On-Duty Manager (User field)
- Status (Drop Down)
Suggested choices: Active, Inactive - Effective Date (Date field) (optional but recommended)
Why include Status and Date?
Because your lookup is much safer when you can filter to “Active” and (optionally) sort by date or entry ID.
Step 2: Create the Workflow Form (Priority Incident)
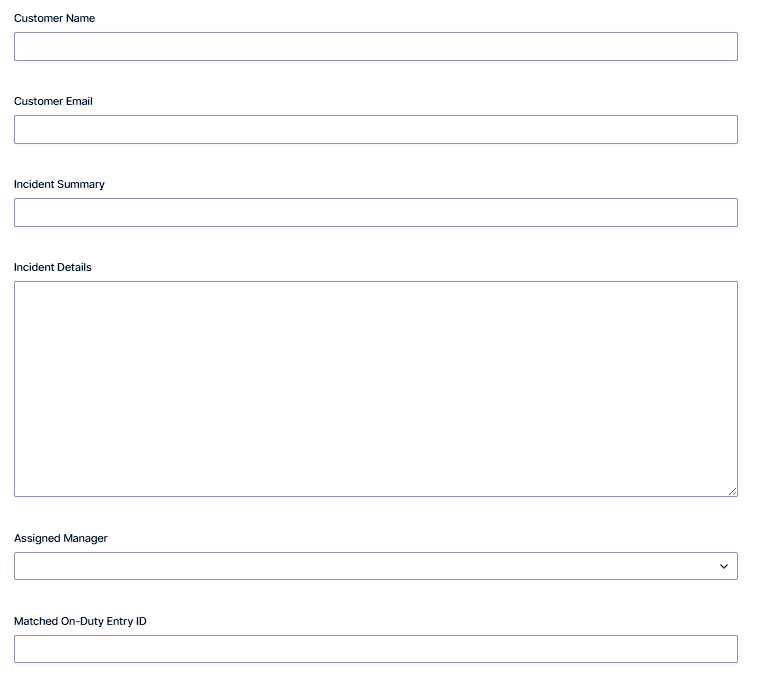
Create a Gravity Form named Priority Incident with fields like:
- Customer Name
- Customer Email
- Incident Summary
- Incident Details (Paragraph)
Now add two internal/admin fields:
- Assigned Manager (User field)
This is the field we’ll update using Update Fields. - Matched On-Duty Entry ID (Hidden or Single Line Text) (optional)
Not required, but useful if you want a visible audit trail later.
Step 3: Add a workflow to the Priority Incident form
Go to:
Forms → Priority Incident → Settings → Workflow → Add New
You can keep the workflow minimal for testing:
- Step 1: Update Fields (this tutorial)
- Step 2 (optional): Notification, User Input, or Approval (not required for proof)
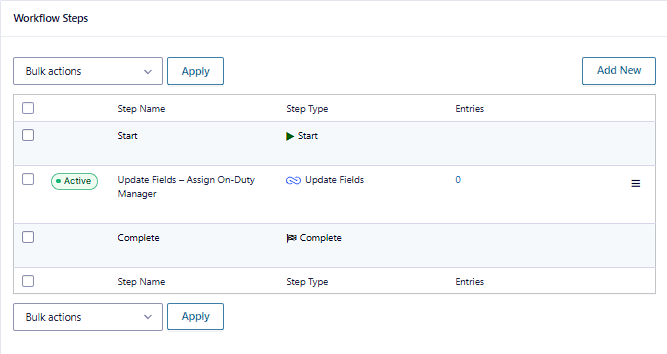
Add an Update Fields step to the Priority Incident workflow.
Step 4: Configure the Update Fields step
In this section, we’ll configure the Gravity Flow Update Fields step using entry lookup and mapping.
Edit the Update Fields step and work through the settings in order.
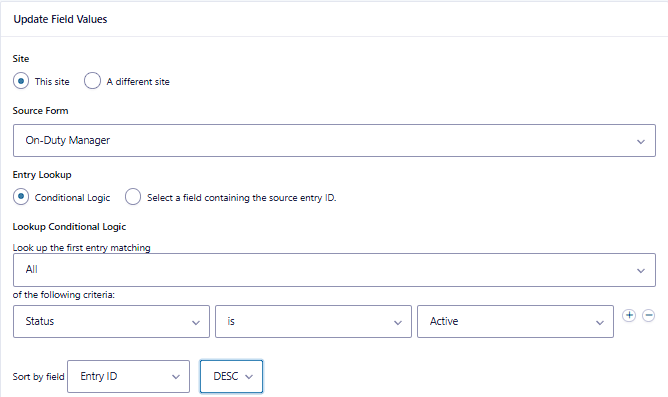
4.1 Site (this site vs a different site)
The docs let you choose:
- This site, or
- A different site
If you choose “a different site,” you’ll be prompted for API keys for version 1 of the Gravity Forms API on that site.
For this tutorial, select This site (it’s easier to test).
If you later want cross-site lookups, see the optional section near the end.
4.2 Source Form
Set Source Form to: On-Duty Manager
This tells Gravity Flow where it should look for the entry you want to pull values from.
4.3 Entry Lookup (how Gravity Flow finds the source entry)
This setting defines how the source entry will be looked up.
You have two valid approaches. I recommend starting with conditional logic because it’s easier to understand.
Option A: Conditional Logic lookup (recommended)
Enable Conditional Logic and define criteria for which source entry should be used.
Here’s what the docs allow:
- You can specify multiple filter criteria
- You can specify a single sort option
- Only the first entry returned will be used
- If no results are returned, no updates happen
A clean lookup setup for our scenario
Filters:
- Status is Active
Sort:
- Sort by Entry ID descending (or by date descending if the UI offers it in your setup)
This is simple and usually enough: the “most recent Active” entry becomes the source of truth.
Option B: Use a field containing the source entry ID (most precise)
Instead of searching, you can select a field in the current entry that contains the source entry ID.
This is best when:
- You already know the exact source entry ID, or
- Your workflow created it earlier and stored it
Important warning from the docs:
If the entry ID does not exist within the chosen Source Form, the step will not make any updates.
For our “on-duty” scenario, you usually do not have an ID to reference, so conditional logic is the better fit.
4.4 Include a Date Field in your lookup (only if you need it)
If you include a date field value in your search criteria, Gravity Flow says you should use the custom value format YYYY-MM-DD, because that is how date field values are stored in the database.
They also give a working example format:
If field #4 is the date field you’re evaluating, use:
{:4:year}-{:4:month}-{:4:day}
This matters if you want rules like:
- Effective Date equals today
- Effective Date is after a certain date
If you don’t need date filtering, skip this entirely and keep the lookup simple.
Step 5: Field mapping in Update Fields
Now we define what fields in the current entry should be updated.
Gravity Flow describes Field Mapping like this:
- It defines which fields in the current entry will be updated based on the values from the source entry.
- If you select Add Custom Value in the Value column, you can provide a hard-coded value or use a merge tag.
For our scenario, map this:
In the Priority Incident entry (current entry), update:
- Assigned Manager ← On-Duty Manager (from the source entry)
This is the whole point of the step.
Optional extra mappings:
- Set “Matched On-Duty Entry ID” to a custom value or copied value (only if your mapping options make that available in your UI)

Step 6: Next Step (what happens after Update Fields)
The step includes a Next Step setting so you define what step the workflow proceeds to after Update Fields completes.
For testing, you can set Next Step to:
- a basic Notification step, or
- simply the next step in your workflow (even if it’s a placeholder step)
The key is: Update Fields runs, updates the current entry, and then the workflow continues.
Step 7: Test the Update Fields step
This test is designed to be quick and “no guessing.”
7.1 Create a source entry first
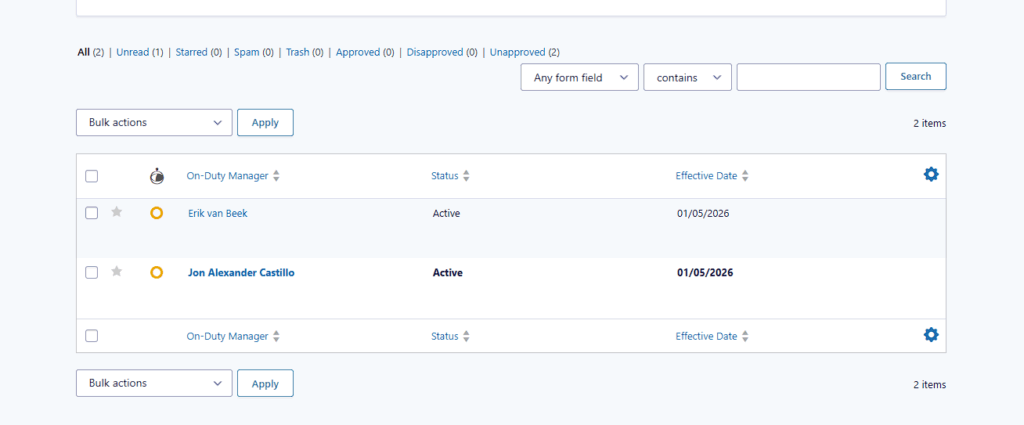
Go to On-Duty Manager → Entries and submit one entry:
- On-Duty Manager: pick a user
- Status: Active
- Effective Date: today (optional)
7.2 Submit a Priority Incident
Submit your Priority Incident form as a test entry.
7.3 Confirm the current entry was updated
Open the incident entry in the WordPress admin and confirm:Assigned Manager is now populated with the on-duty manager from the source form entry.
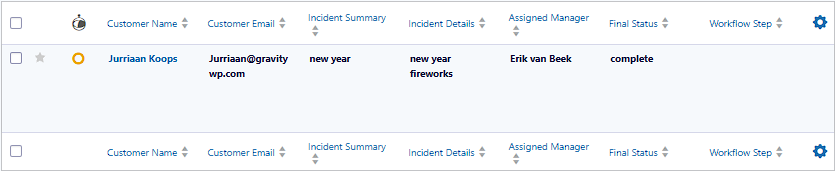
If Assigned Manager is filled correctly, the step is working.
If it’s blank, go to troubleshooting below and check lookup results first.
Troubleshooting the Update Fields step
Problem 1: Nothing updates
If the Gravity Flow Update Fields step can’t find a match, it won’t update anything.
This usually means the lookup returned no results.
Remember: If no results are returned, the step will not make any updates.
Fix checklist:
- Confirm the Source Form is correct.
- Confirm your filter criteria matches a real entry (Status must be Active).
- Confirm your sort option makes sense.
- Confirm there is at least one entry that should match.
Problem 2: The wrong entry is being used
The docs say only the first entry returned will be used.
Fix checklist:
- Use the sort option so the “latest” entry becomes the first result.
- Tighten your filters (for example, Status is Active AND Effective Date is today).
Problem 3: Date-based criteria doesn’t match
If you include a date field in lookup criteria, Gravity Flow says the custom value must be in YYYY-MM-DD format, because that’s how date values are stored in the database. Fix checklist:
- Use the exact format they specify.
- Use their example structure when building your custom date value.
Problem 4: Using “source entry ID” method doesn’t work
If you choose the “field containing source entry ID” method and the ID is not valid for the Source Form, no updates happen.
Fix checklist:
- Confirm the ID exists in the Source Form entries.
- Confirm the Source Form setting is correct.
- Confirm your entry ID field is being populated correctly.
Optional: Using Update Fields across sites (advanced)
Update Fields can use a different site and will prompt for API keys for version 1 of the Gravity Forms API on that site.
If you test this later, two docs matter most:
- Gravity Forms explains how to enable the REST API and that settings only become active after clicking Update.
- Gravity Forms REST API v1 is the original “Web API” functionality (now referred to as REST API v1).
This is powerful, but keep it as a separate testing phase. Most workflows should start on “this site” until the logic is proven.
Our Premium add-ons for Gravity Forms

Update Multiple Entries
Trigger the update of multiple entries in a target form by submitting an entry in a trigger form.
List Text
Add features like textarea, placeholder and custom validation to a column or multiple columns in a Gravity Forms List Field.
List Dropdown
Add a Dropdown Select with choices to a column or multiple columns in a Gravity Forms List Field.

JWT Prefill
Fill forms with data you can trust. Prefill Gravity Forms fields with a secure token instead of links with editable url parameters, so your data is accurate, tamper-proof, and ready to use.
Read tutorials about

How to Create a Public Submission Business Directory in WordPress (Gravity Forms + GravityView)
Build a moderated business directory where users submit listings through a form, admins approve entries, and approved businesses appear in a searchable GravityView directory.

How to Create an Event Workshop Registration + Waitlist System in WordPress
This guide shows how to set up a workshop registration + waitlist system in WordPress: register attendees until capacity is reached, waitlist the rest, approve entries, and auto-promote people when a seat opens using Gravity Forms, Gravity Flow, and GravityView.

Gravity Flow Form Submission Step Tutorial
The Gravity Flow Form Submission step pauses a workflow until another form is submitted, then continues once the handoff is complete. This guide shows how to connect two forms, prefill fields with mapping, send the correct secure link, and troubleshoot the most common “workflow didn’t move” issues.

Gravity Flow Delete an Entry Step Tutorial
The Gravity Flow Delete Entry step lets you trash or permanently remove Gravity Forms entries as part of a workflow. This guide covers the key settings, scheduling options (delay or date-based), and safe testing tips so you can follow retention and privacy rules with confidence.