This guide shows how to connect Gravity Forms to n8n with the GravityWP n8n Connector so you can display a one-line AI reply immediately after someone submits a form no custom coding required. The connector sends the entry to an n8n webhook secured with JWT, your AI agent generates a short message that includes the submitter’s name, and the response is mapped back into the entry so it appears in the Gravity Forms confirmation.
You’ll set this up using Immediate Update so the reply shows right away. The same pattern also works with Trigger Only for fire-and-forget automations and Delayed Update for longer workflows.
You can follow the same flow on n8n Cloud or a self-hosted n8n instance. The steps are identical: make a JWT connection in WordPress, create a matching JWT credential in n8n, build a tiny form, configure one connector feed, and wire Webhook → AI Agent → Respond.
Step 1: Set up the Gravity Forms n8n Connector in WordPress
Open Forms → Settings → n8n Connector → Add New Connection. Give it a clear name (e.g., “n8n demo”). For Webhook URL, paste your n8n base URL (cloud or self-hosted). Set Algorithm to HS256 and keep the generated Secret Token. Save.
Why HS256? It’s the HMAC-SHA256 option for JWT. It’s fast, widely supported, and secure when the secret is long and random. You’ll paste this same secret into n8n so both ends sign and verify the token the same way.

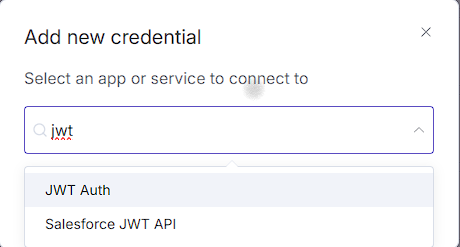
Step 2: Create the JWT credential in n8n (for your Gravity Forms n8n integration)
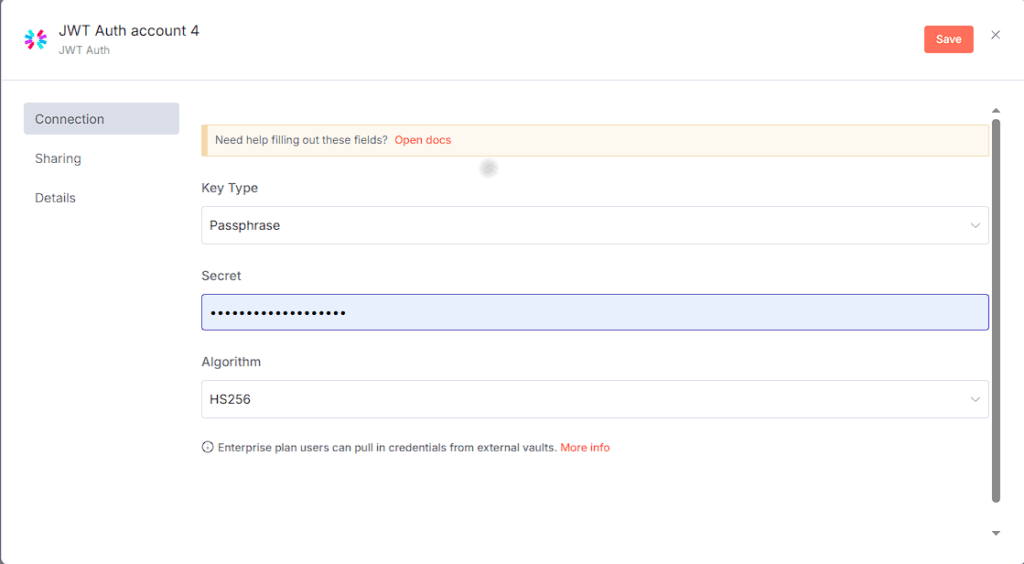
In n8n, open Personal → Credentials → Create Credential, choose JWT Auth, and set Key Type to Passphrase. “Passphrase” is correct for HMAC algorithms like HS256 because both sides share the same secret string. Paste the Secret from WordPress, pick HS256 as the algorithm, and save.
If you ever move to an asymmetric algorithm such as RS256 or ES256, you’d switch to a private key credential rather than a passphrase, but that adds key-pair management most Gravity Forms workflows don’t need.
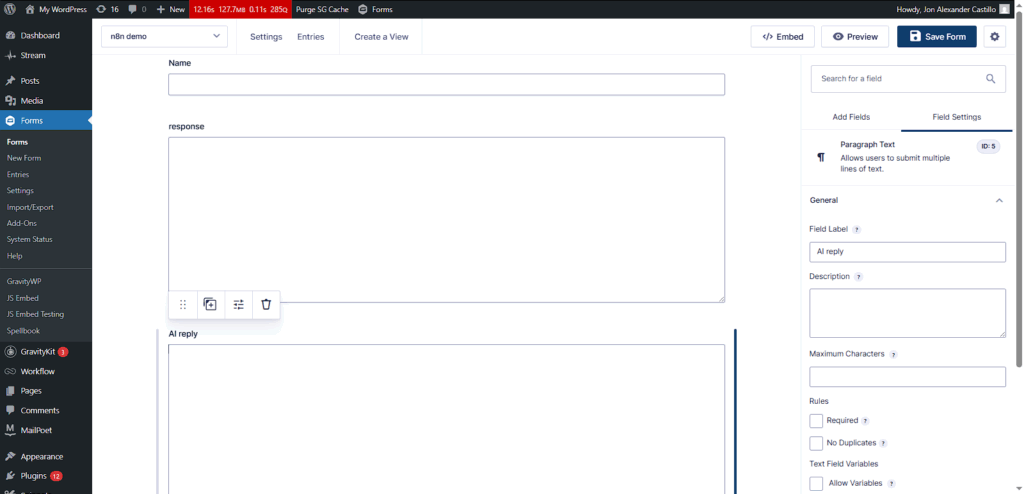
Step 3: Build a small form in Gravity Forms for the n8n Connector
Create a form called “n8n demo.” Start with a Single Line Text field labeled Name so your workflow can address the person. Next, include a Paragraph Text field labeled Response to store the raw JSON from n8n while you test. Finally, finish with a Paragraph Text field labeled AI reply this is where the connector will write the one-line message that appears in the confirmation.
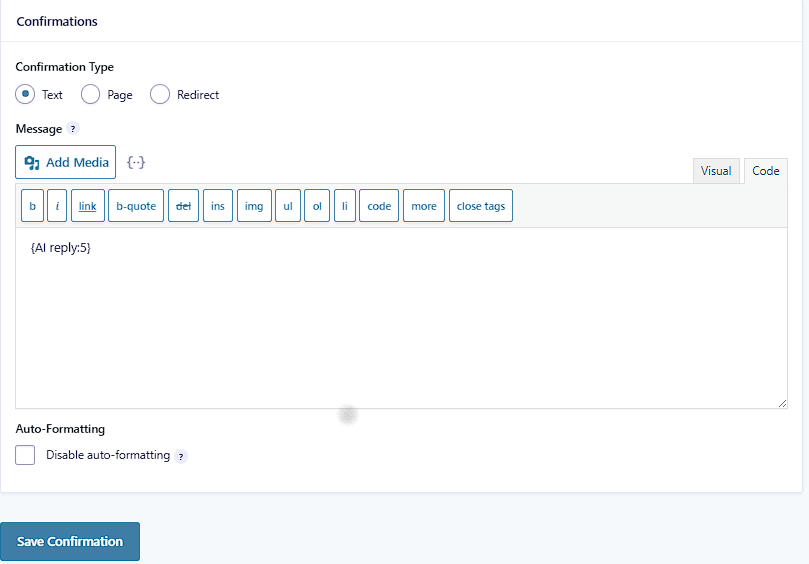
Use a Text confirmation and insert the merge tag for AI reply (for example, {AI reply:5}). Hidden fields aren’t targetable by the current response-mapping UI, so use a visible text field for the reply (you can hide it later with CSS if needed).
Step 4: Configure the Gravity Forms n8n Connector feed
Open Forms → [Your Form] → Settings → n8n Connector → Add New Feed. Select the connection you created earlier. While you’re building, set the n8n Webhook Connection Mode to Test; you’ll switch to Production later. For Response Mode, choose Immediate Update so the plugin waits briefly for n8n and updates the entry before the confirmation shows.
In the request mapping, send a predictable JSON structure. Use name as the key and map it to your Name field via the merge tag picker (e.g., name = {Name:1}). You’re defining the schema n8n will receive, so “name” is simply a clear choice. In the workflow, you’ll access it as $json.body.name.
In response mapping, capture the key you’ll return from n8n. Use ai_reply and select the AI reply field as the target. If you enabled the Response paragraph field, set “Store full response” to that field so you can see the raw JSON during testing. Save the feed.
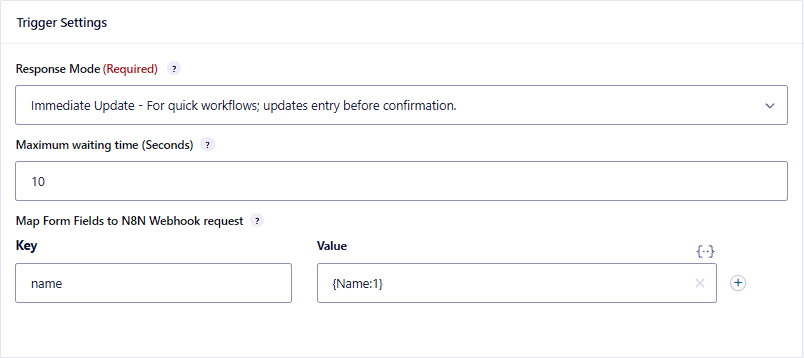
name → {Name:1}.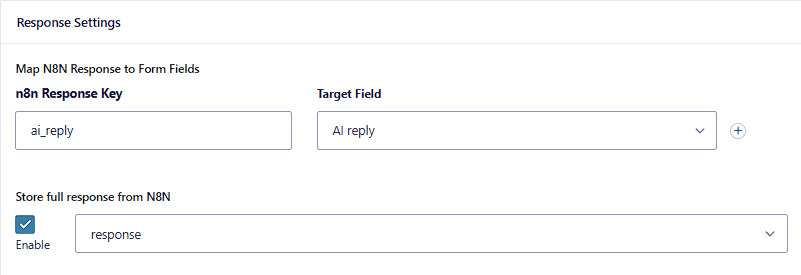
Step 5: Paste the Webhook node and wire the n8n workflow
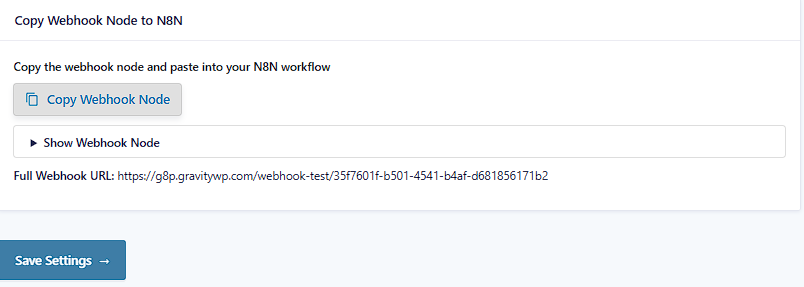
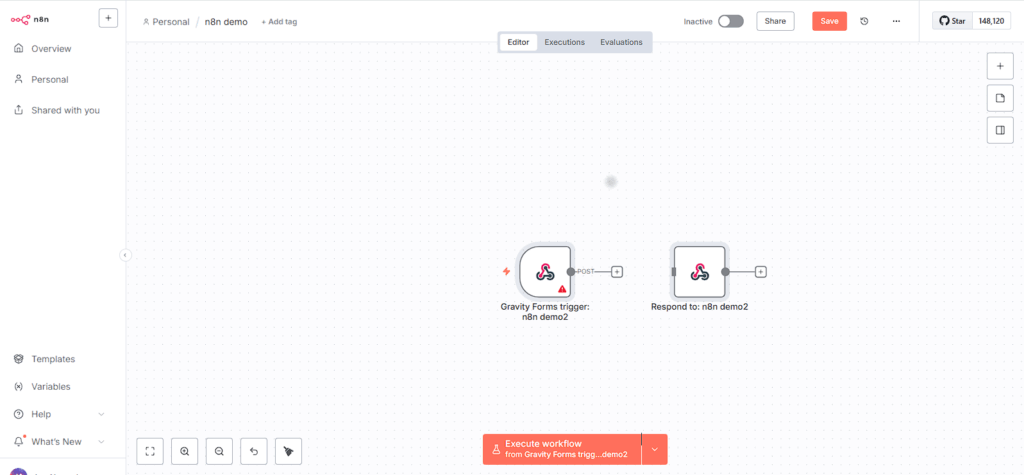
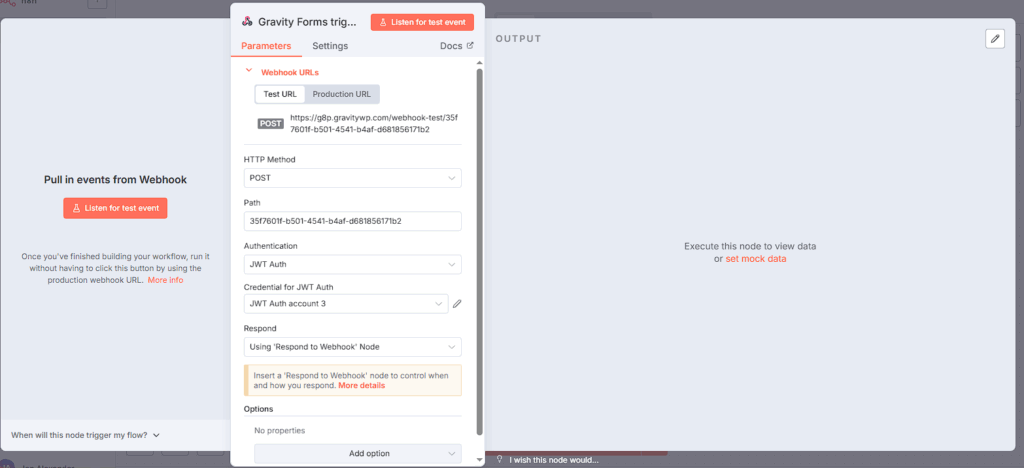
Back in the feed, click Copy Webhook Node, then open n8n and paste it onto a new workflow canvas. You’ll see a Webhook node (already configured with the correct path and JWT auth) and a Respond node. Select the Webhook node and use the Test URL while you’re developing; click Listen for test event so it waits for the next request.
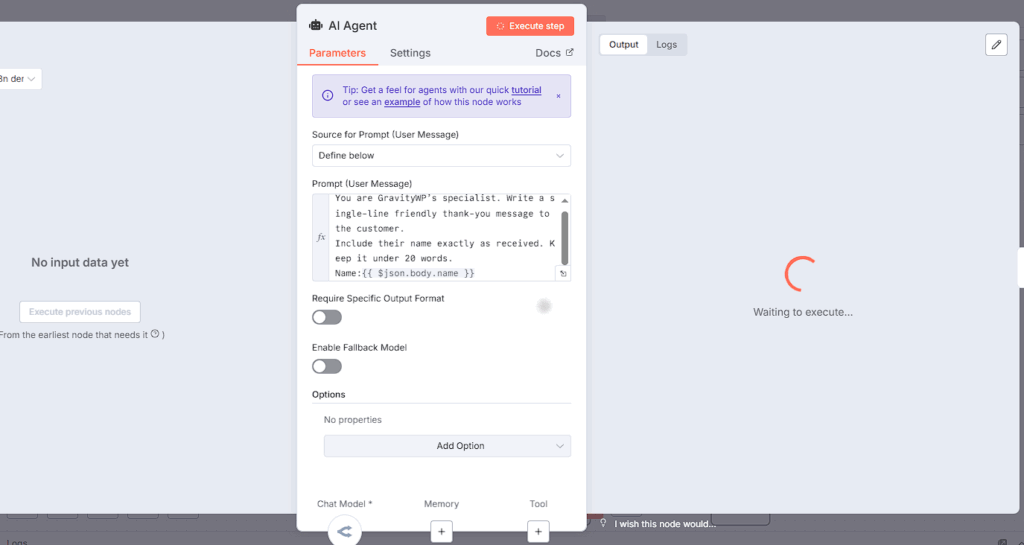
Add an AI Agent node and write a tight prompt to minimize latency:
You are GravityWP’s specialist. Write a single-line friendly thank-you message to the customer. Include their name exactly as received. Keep it under 20 words.
Name: {{ $json.body.name }}
Connect the AI Agent to Respond to Webhook. Set the response type to JSON and define the body as:
{"ai_reply": {{ $json.output.toJsonString() }}}
If your AI node returns a different property name, adjust the expression accordingly, but keep the final key as ai_reply to match your response mapping.
$json.body.name.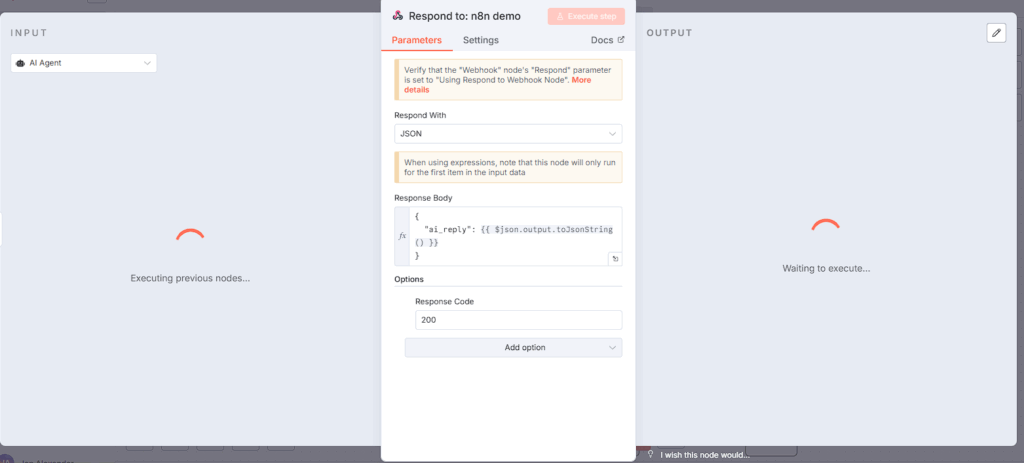
ai_reply key.Step 6: Test the round-trip in your Gravity Forms n8n integration
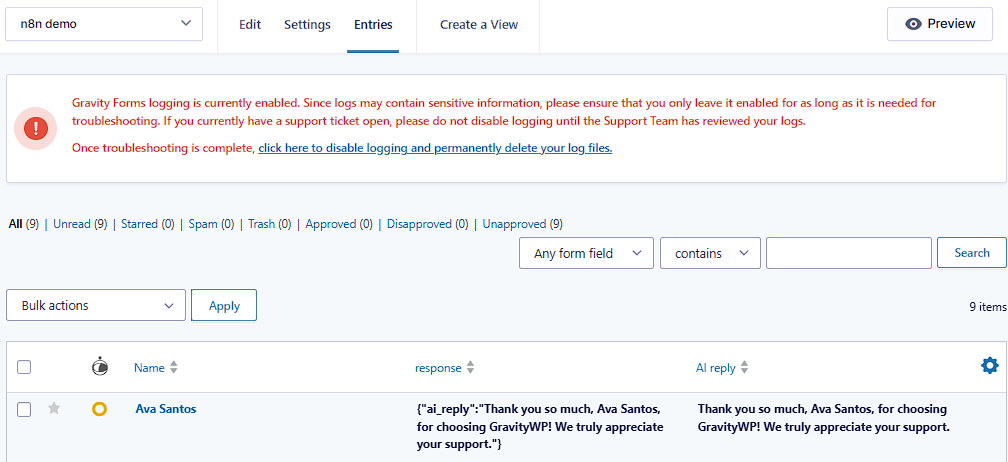
Click Listen for test event on the Webhook node. Open the form preview in WordPress, enter a real name, and submit. The Webhook receives the payload, the AI Agent produces a one-liner, and the Respond node returns a JSON object with ai_reply. Because you chose Immediate Update, the connector writes that value into the entry and your confirmation displays it -”Thank you so much, Ava Santos, for choosing GravityWP! We truly appreciate your support.” or a similar line.
If you enabled the Response field, open the entry and confirm you see a JSON string like {“ai_reply”:”…message…”}. That makes debugging painless.

FAQ
Trigger Only sends data to n8n and immediately shows the form confirmation best when you don’t need anything back (e.g., log to Google Sheets, notify Slack).
Immediate Update waits briefly for n8n to respond so you can enrich the entry or display results on the confirmation page perfect for the one-line AI reply or a generated code.
Delayed Update returns the confirmation right away but updates the entry later when your long-running n8n workflow finishes (e.g., approvals or multi-step processing).
The Test URL only receives requests while the Webhook node is in Listen for test event mode ideal for setup and inspection.
The Production URL receives requests when the workflow is active use this in live environments.
In your feed, choose Test while building and Production when you go live; make sure the feed’s mode matches the Webhook node’s mode.
All three are HMAC algorithms that use the same shared secret.
– HS256 (SHA-256) is the recommended default: widely supported, secure with a long random secret, and performant.
– HS384 / HS512 increase digest size and CPU cost; pick them only if your security policy explicitly requires it.
Passphrase tells n8n to sign/verify JWTs with a shared secret string the same value you saved in the WordPress connection. It’s the correct key type for HMAC algorithms (HS256/384/512). If you ever switch to an asymmetric algorithm (e.g., RS256), you’d use a private key credential instead.
name? In your feed you define a simple JSON body, for example:{ "name": "{Name:1}" }
The n8n Webhook node exposes this as {{$json.body.name}}. Your AI Agent reads that value to personalize the reply. The Respond node returns JSON like:{ "ai_reply": "Hi Ava, thanks for your submission." }
The connector maps ai_reply into your AI reply field and you display it in the Gravity Forms confirmation. You can add more keys (e.g., entry_id, form_title) and reference them the same way.
Work through these checks in order:
1. Response Mode is Immediate Update and the response mapping is ai_reply → AI reply field.
2. Webhook mode matches: Test + “Listen for test event” (or Production + active workflow).
3. The JWT secret in n8n matches the secret in WordPress.
4. Your Respond node returns the exact key ai_reply. If not, either change the key in n8n or map the returned key in the feed.
If latency is the issue, tighten the prompt, lower tokens/temperature, or temporarily replace the AI Agent with this Function node to confirm the round-trip:const name = $json.body?.name?.trim() || 'there'; return [{ ai_reply: `Hi ${name}, this is GravityWP’s specialist — thanks for your submission.` }];
Both. The Gravity Forms n8n Connector supports quick round-trips via Immediate Update and longer, multi-step automations via Delayed Update. Start simple, then expand your n8n workflow as your use case grows.
Our Premium add-ons for Gravity Forms

JWT Prefill
Fill forms with data you can trust. Prefill Gravity Forms fields with a secure token instead of links with editable url parameters, so your data is accurate, tamper-proof, and ready to use.
Field to Entries
Create entries based on Checkboxes & Multi Select choices & List Field rows.

Update Multiple Entries
Trigger the update of multiple entries in a target form by submitting an entry in a trigger form.
Advanced Merge Tags
This Gravity Forms Add-On adds extra Merge Tag modifiers (and a lot of power). From the most common used functions like capitalize and length to changing date formats.
Read tutorials about

How to Create a Public Submission Business Directory in WordPress (Gravity Forms + GravityView)
Build a moderated business directory where users submit listings through a form, admins approve entries, and approved businesses appear in a searchable GravityView directory.

How to Create an Event Workshop Registration + Waitlist System in WordPress
This guide shows how to set up a workshop registration + waitlist system in WordPress: register attendees until capacity is reached, waitlist the rest, approve entries, and auto-promote people when a seat opens using Gravity Forms, Gravity Flow, and GravityView.

Gravity Flow Form Submission Step Tutorial
The Gravity Flow Form Submission step pauses a workflow until another form is submitted, then continues once the handoff is complete. This guide shows how to connect two forms, prefill fields with mapping, send the correct secure link, and troubleshoot the most common “workflow didn’t move” issues.

Gravity Flow Delete an Entry Step Tutorial
The Gravity Flow Delete Entry step lets you trash or permanently remove Gravity Forms entries as part of a workflow. This guide covers the key settings, scheduling options (delay or date-based), and safe testing tips so you can follow retention and privacy rules with confidence.