Do you want to limit the availability of a Checkbox or Radio Button choice based on a maximum number the choice can be selected? For example if you have a maximum number of workshop places or products available? With the Limit Choices Add-on from Gravity Perks you can easily configure that.
How to set maximum limit per choice
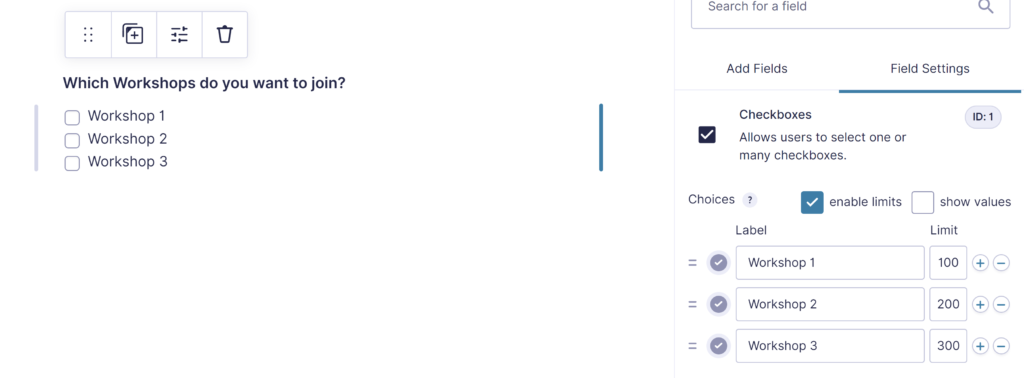
Once you’ve installed and activated the Perk, you’ll have an extra configuration option available with Checkbox, Radio Button, Dropdowns and Multi Select Fields in Gravity Forms. Click ‘enable limits’ to activate it. See the example used in the demo, where we’ve set a limit of 100 to Workshop 1, a limit of 200 to Workshop 2 and a limit of 300 to Workshop 3:
How to display the spots that are left
GravityWiz provided a handy snippet you can easily add to your functions.php file in your WordPress (child)theme to show the number of spots left.
If you want to to change spots in something else, you can easily change the $message variable in the snippet:
$message = sprintf( _n( '(%s product available)', '(%s products available)', $count, 'gp-limit-choices' ), number_format_i18n( $how_many_left ) );Above example will show ‘100 products available’ in stead of ‘100 spots left’. The %s automatically changes in the actual amount remaining, don’t change that.
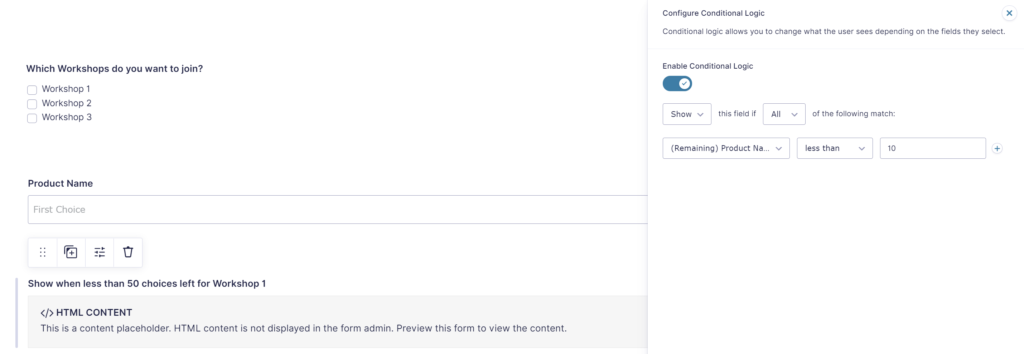
Conditional Logic for remaining choices
How many choices are left for a specific choice can also be used to configure Conditional Logic, for example for showing a certain HTML Block if there are less then a certain amount of spots left.
How to reset the limits every day
If you want to renew the Limit Choices on a daily basis, you can use this snippet from Gravity Wiz. Don’t forget to change the form_id and the field_ids array to match the Gravity Form and Field you want to renew daily.
Our Premium add-ons for Gravity Forms

All Entries
All your new Gravity Forms entries in one central place. Stop navigating between multiple forms to find new entries. Get immediate oversight and full control with a powerful, unified dashboard.

n8n Connector
Connect Gravity Forms to n8n and automate your workflows with secure, flexible, and powerful webhooks. Go beyond simple notifications and build advanced, two-way automations.

API Connector
Connect Gravity Forms to External API's: Query the API using form field values and automatically fill other form fields with the API response.

Advanced Number Field
Functionality for Number Fields, like rounding or only absolute numbers, fixed point notation, range calculation, custom units like % or m2 & show as slider.
Read tutorials about

How to Create a Public Submission Business Directory in WordPress (Gravity Forms + GravityView)
Build a moderated business directory where users submit listings through a form, admins approve entries, and approved businesses appear in a searchable GravityView directory.

How to Create an Event Workshop Registration + Waitlist System in WordPress
This guide shows how to set up a workshop registration + waitlist system in WordPress: register attendees until capacity is reached, waitlist the rest, approve entries, and auto-promote people when a seat opens using Gravity Forms, Gravity Flow, and GravityView.

Gravity Flow Form Submission Step Tutorial
The Gravity Flow Form Submission step pauses a workflow until another form is submitted, then continues once the handoff is complete. This guide shows how to connect two forms, prefill fields with mapping, send the correct secure link, and troubleshoot the most common “workflow didn’t move” issues.

Gravity Flow Delete an Entry Step Tutorial
The Gravity Flow Delete Entry step lets you trash or permanently remove Gravity Forms entries as part of a workflow. This guide covers the key settings, scheduling options (delay or date-based), and safe testing tips so you can follow retention and privacy rules with confidence.

