Looking to self-host n8n with Docker on a VPS? This is the “full control” way to run n8n in production. You rent a VPS, install Docker, and run n8n yourself with Docker Compose. This is the setup most guides and the official docs refer to when they talk about production-ready self-hosting. You’re responsible for the server, but you also get the most flexibility and often the lowest long-term cost.
At GravityWP, a lot of Gravity Forms users ask how to self-host n8n in a way that’s reliable, affordable, and works smoothly with our n8n Connector add-on. This guide focuses on the Docker + VPS pattern we see most often in real projects and community best practices.
In this guide you’ll:
- Understand the architecture (VPS + Docker + n8n + Postgres + reverse proxy)
- Follow a practical Ubuntu + Docker Compose setup
- See how to configure Postgres, encryption, and WEBHOOK_URL correctly
- Learn how to secure n8n with HTTPS and keep it updated
The examples assume Ubuntu 22.04 or 24.04 on a VPS, but the same pattern applies to any modern Linux distribution.
1. What “What this Docker + VPS setup looks like” actually means
This is do-it-yourself self-hosting:
- You choose a VPS provider (for example Hetzner, DigitalOcean, Linode, Contabo, Hostinger, etc.).
- You install Docker and the Docker Compose plugin on that server.
- You create a project folder with:
- a .env file for environment variables (database, encryption, URL)
- a docker-compose.yml describing n8n and Postgres containers
- a .env file for environment variables (database, encryption, URL)
- You start the stack with docker compose up -d.
- You put it behind a reverse proxy (such as Nginx or Caddy) and enable HTTPS.
Compared to one-click platforms, nothing is hidden. You see every piece of the configuration and can move it to another VPS, change providers, or extend it with Redis workers when you’re ready to use queue mode.
2. Prerequisites and VPS sizing to self-host n8n with Docker
Most guides recommend a small VPS with:
- 1–2 vCPUs
- 2–4 GB RAM
- SSD storage
That’s enough to run n8n, Postgres, and a reverse proxy for many small-to-medium workloads.
You’ll need:
- A domain name (for example automations.yourdomain.com)
- SSH access to your VPS
- A non-root user with sudo privileges
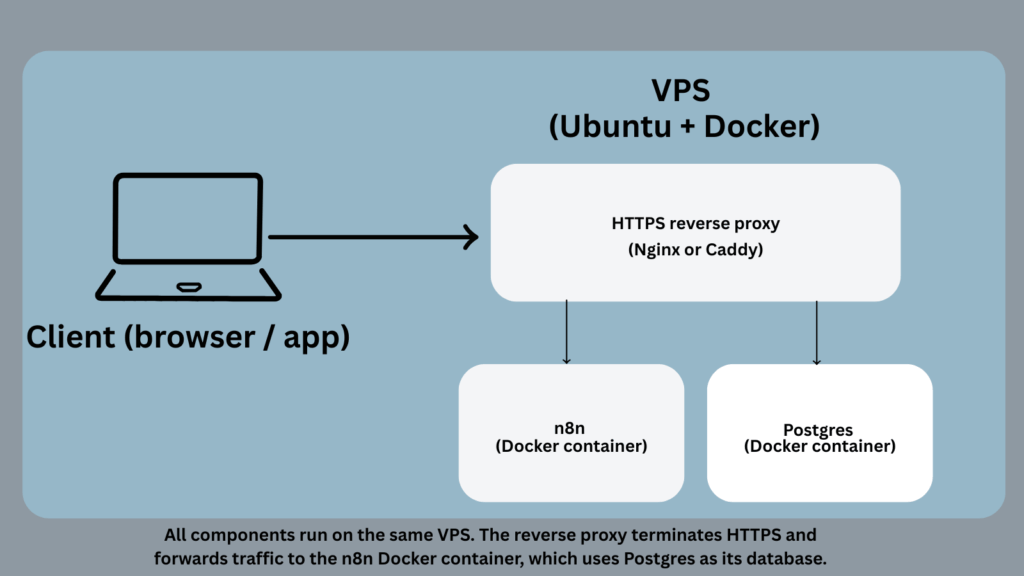
3. High-level architecture of your self-hosted n8n Docker stack
Before typing commands, it helps to know what you’re building.
On your VPS you’ll have:
- n8n container: the app and editor, listening internally on port 5678.
- Postgres container: persistent database for workflows, executions, and credentials.
- Docker volumes: to store /home/node/.n8n (config, encryption key) and Postgres data.
- Reverse proxy (Nginx or Caddy): terminates HTTPS on port 443 and forwards traffic to the n8n container.
The key idea:
n8n itself never needs to know about raw http://server-ip:5678 in production. It should generate webhook URLs that use your public HTTPS domain, which you configure via WEBHOOK_URL.
4. Step 1 – Prepare your VPS to self-host n8n with Docker
Before you self-host n8n with Docker in production, you should make sure your Docker and Docker Compose installation is up to date and stable on the VPS.
SSH into your VPS as your non-root user and update packages:
sudo apt update && sudo apt upgrade -y
Install Docker using the official convenience script (recommended by many recent n8n + Ubuntu guides because it gets you a current Docker version with minimal steps).
curl -fsSL https://get.docker.com | sudo sh
Add your user to the docker group so you don’t need sudo for every Docker command:
sudo usermod -aG docker "$USER"
newgrp docker
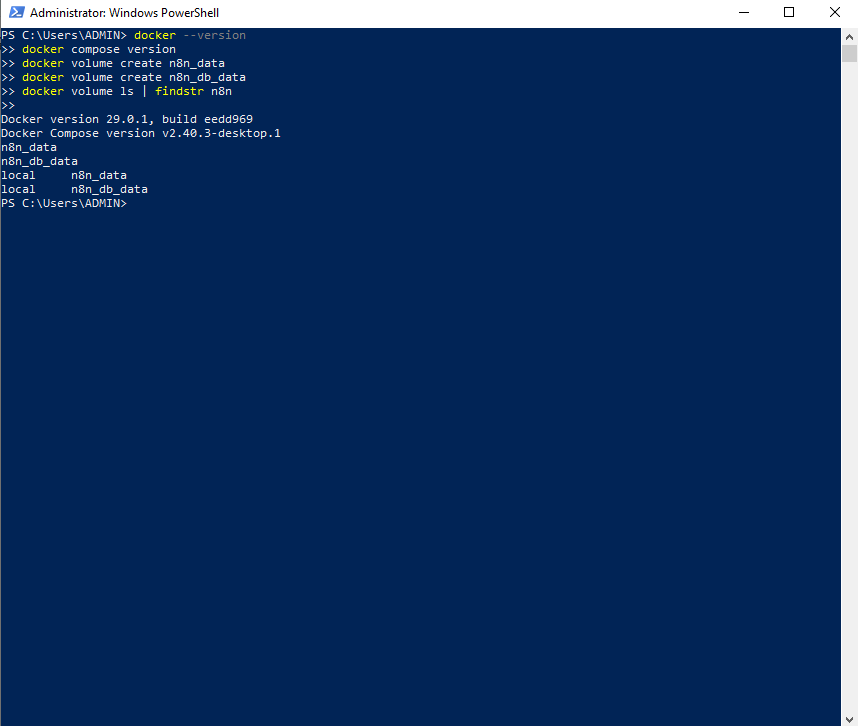
Check that Docker and the Compose plugin work:
docker --version
docker compose version
5. Step 2 – Create the n8n project directory and .env file
Choose a directory for your n8n stack, for example:
mkdir -p ~/n8n-vps
cd ~/n8n-vps
5.1. Why use a .env file?
n8n and official configuration docs strongly recommend using environment variables to control the database, encryption, timezones, and URLs. Storing them in a .env file next to your docker-compose.yml keeps secrets out of the main file and matches best practices in many production guides.
Create a .env file:
nano .env
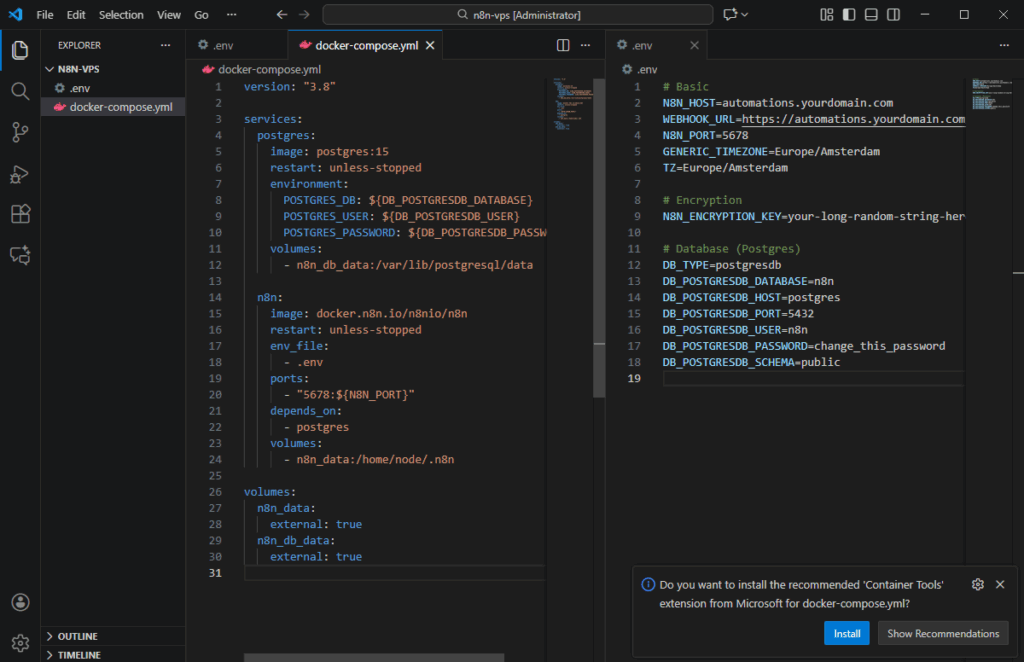
Add something like this (adjust values for your setup):
# Basic
N8N_HOST=automations.yourdomain.com
WEBHOOK_URL=https://automations.yourdomain.com/
N8N_PORT=5678
GENERIC_TIMEZONE=Europe/Amsterdam
TZ=Europe/Amsterdam
# Encryption
N8N_ENCRYPTION_KEY=your-long-random-string-here
# Database (Postgres)
DB_TYPE=postgresdb
DB_POSTGRESDB_DATABASE=n8n
DB_POSTGRESDB_HOST=postgres
DB_POSTGRESDB_PORT=5432
DB_POSTGRESDB_USER=n8n
DB_POSTGRESDB_PASSWORD=change_this_password
DB_POSTGRESDB_SCHEMA=public
A few important details, all reflected in n8n’s environment variable documentation:
- DB_TYPE=postgresdb switches n8n from the default SQLite to PostgreSQL.
- DB_POSTGRESDB_* variables describe the connection to the Postgres container you’ll define in Docker Compose.
- N8N_ENCRYPTION_KEY must be a stable, strong secret. n8n uses it to encrypt credentials in the database. Changing it later means old credentials can’t be decrypted.
- WEBHOOK_URL should match the final public HTTPS URL of your instance so webhook nodes generate correct URLs.
Generate N8N_ENCRYPTION_KEY with a password manager or a simple command such as:
openssl rand -hex 32
Paste the resulting string into the .env file.
6. Step 3 – Create Docker volumes for persistence
You want persistent storage for:
- n8n’s internal config directory
- Postgres data
Create named volumes:
docker volume create n8n_data
docker volume create n8n_db_data
Using volumes instead of bare directories is exactly how many official and community Docker-based setups persist n8n and Postgres data.
7. Step 4 – Write the docker-compose.yml for n8n + Postgres
Now create the compose file:
nano docker-compose.yml
Paste a minimal but production-oriented example, using the official n8n image and a standard Postgres container:
version: "3.8"
services:
  postgres:
    image: postgres:15
    restart: unless-stopped
    environment:
      POSTGRES_DB: ${DB_POSTGRESDB_DATABASE}
      POSTGRES_USER: ${DB_POSTGRESDB_USER}
      POSTGRES_PASSWORD: ${DB_POSTGRESDB_PASSWORD}
    volumes:
      - n8n_db_data:/var/lib/postgresql/data
  n8n:
    image: docker.n8n.io/n8nio/n8n
    restart: unless-stopped
    env_file:
      - .env
    ports:
      - "5678:${N8N_PORT}"
    depends_on:
      - postgres
    volumes:
      - n8n_data:/home/node/.n8n
volumes:
  n8n_data:
    external: true
  n8n_db_data:
    external: true
Why this matches official guidance:
- It uses the official n8n Docker image (docker.n8n.io/n8nio/n8n is the registry they recommend for production).
- It passes config via environment variables aligned with n8n’s documented database settings (DB_TYPE=postgresdb, DB_POSTGRESDB_*).
- It persists /home/node/.n8n on n8n_data, which is recommended in the Docker docs to keep credentials and configuration safe across upgrades.
8. Step 5 – Start the self-hosted n8n Docker stack and test it
From inside ~/n8n-vps, launch the stack:
docker compose up -d
Check that both containers are running:
You should see n8n and postgres with a “running” status.
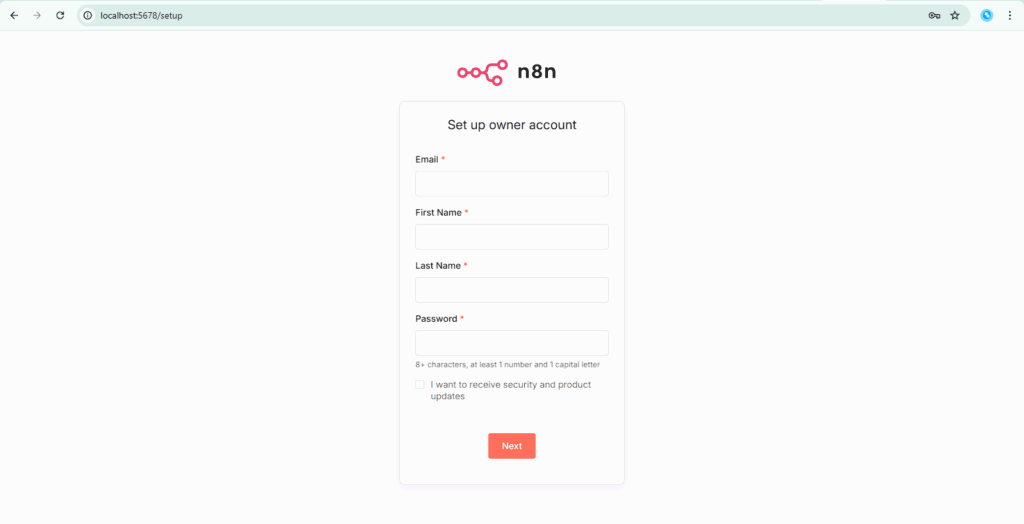
Now open:
http://YOUR_SERVER_IP:5678
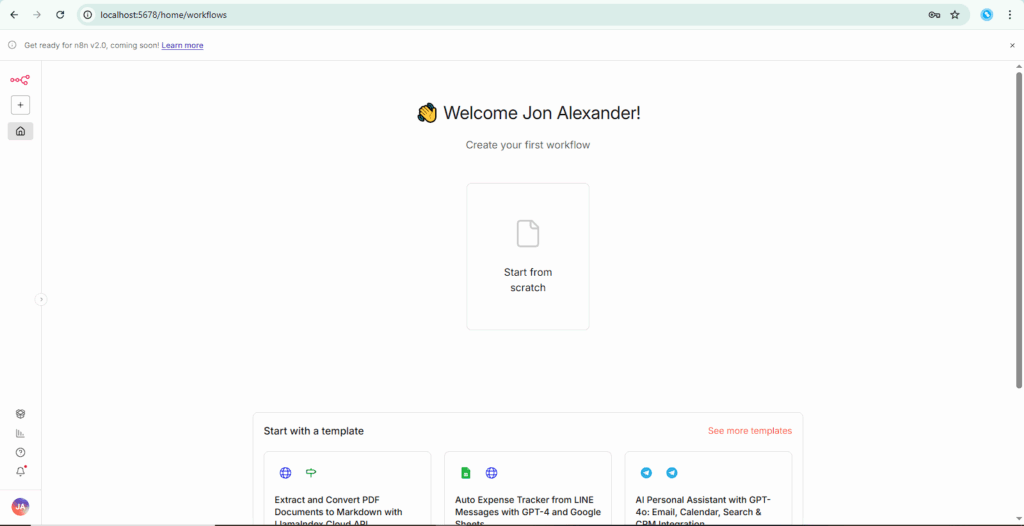
in your browser (temporarily, before HTTPS is set up). You should see the n8n owner setup screen. Create the initial owner account with a strong password. After you finish the form, you’ll land on the n8n editor home screen, which confirms your Docker + Postgres stack is running correctly.
9. Step 6 – Add a reverse proxy and HTTPS
Serving n8n directly over plain HTTP from port 5678 is not suitable for production. Official and community guides all recommend putting n8n behind an HTTPS-terminating reverse proxy such as Nginx or Caddy.
There are several valid patterns; here’s a common one with Nginx + Let’s Encrypt:
Install Nginx:
- sudo apt install nginx -y
- Point your DNS automations.yourdomain.com to your VPS IP.
- Use a tool like Certbot to obtain a certificate and configure HTTPS for that domain.
- Configure Nginx to proxy HTTPS traffic to http://127.0.0.1:5678.
DigitalOcean and Hostinger both have up-to-date tutorials that walk through Nginx + Let’s Encrypt + Dockerised n8n step by step.
Once HTTPS works, make sure:
- Your browser shows the lock icon
- The domain matches what you put in WEBHOOK_URL in .env
10. Step 7 – Verify webhooks and environment variables
To confirm that your VPS + Docker setup is ready for real workflows:
- Create a new workflow in n8n.
- Add a Webhook node.
- Switch it to Production URL.
- Copy the Production URL it should start with your HTTPS domain, not localhost.
- Send a test POST request with a tool like Postman or from another app.
If you see an execution in n8n’s Executions list and get a valid response, your WEBHOOK_URL and reverse proxy are configured correctly.
11. Updating, backups, and security basics
Once the stack is running, you’ll need to maintain it. Recent production guides and official docs all stress the same themes: updates, backups, and careful environment config.
11.1. Updating n8n safely
To update to the latest n8n version via Docker:
cd ~/n8n-vps
docker compose pull
docker compose up -d
Because your config and Postgres data live in volumes, the update should keep workflows and credentials intact — as long as N8N_ENCRYPTION_KEY hasn’t changed.
11.2. Backups
Best practice is to regularly back up:
- The Postgres volume (or pg_dump to an off-server location)
- The /home/node/.n8n volume, which contains settings and sometimes SQLite if you ever fall back to it
You can automate this with cron jobs or external backup services.
11.3. Security checklist
From a mix of official docs and security-focused articles on self-hosting n8n:
- Keep Ubuntu packages patched (sudo apt update && sudo apt upgrade).
- Restrict SSH access (keys instead of passwords, non-default port, firewall).
- Only expose ports 80/443 publicly; keep Docker containers on internal networks.
- Use strong passwords and, where possible, identity provider SSO for n8n.
- Monitor disk usage, CPU, and memory — low VPS resources can kill containers unexpectedly.
12. Optional: Queue mode later, same VPS
Once you outgrow regular mode (single n8n process), n8n’s queue mode lets you add Redis and worker containers so heavy workflow executions run outside the main editor process.
The Docker + VPS pattern stays the same:
- Add a Redis container.
- Keep Postgres as your main database.
- Run:
- one n8n main container (UI + triggers)
- one or more n8n worker containers
- one n8n main container (UI + triggers)
Queue mode uses additional environment variables (EXECUTIONS_MODE=queue and Redis settings) covered in n8n’s official queue-mode docs and in modern VPS tutorials.
You don’t need queue mode to start, but designing your Option 2b setup with Postgres + Docker Compose from day one makes that upgrade much easier.
13. Where this setup fits in your hosting strategy
In your broader “How to set up an n8n instance” guide, you can link to this article as the Docker + VPS production setup or “full step-by-step Docker + VPS guide”
- It’s the DIY, full-control solution:
- More work than n8n Cloud or one-click VPS providers
- Lower recurring costs and maximum flexibility once you’re comfortable managing a server
For GravityWP users, this setup is ideal when you want to:
- Point the GravityWP n8n Connector at a stable HTTPS domain you control
- Keep data in a specific region or infrastructure provider
- Grow from a single VPS to more advanced setups (queue mode, dedicated DB, separate monitoring) without changing your basic architecture
In short, if you want to self-host n8n with Docker and keep full control over cost, performance, and data location, this Docker + VPS setup is the way to go. It takes more effort than n8n Cloud or one-click hosting, but it scales with you as your automations and infrastructure grow.
Our Premium add-ons for Gravity Forms

All Entries
All your new Gravity Forms entries in one central place. Stop navigating between multiple forms to find new entries. Get immediate oversight and full control with a powerful, unified dashboard.

API Connector
Connect Gravity Forms to External API's: Query the API using form field values and automatically fill other form fields with the API response.

Update Multiple Entries
Trigger the update of multiple entries in a target form by submitting an entry in a trigger form.

Advanced Merge Tags
This Gravity Forms Add-On adds extra Merge Tag modifiers (and a lot of power). From the most common used functions like capitalize and length to changing date formats.
Read tutorials about

How to Create a Public Submission Business Directory in WordPress (Gravity Forms + GravityView)
Build a moderated business directory where users submit listings through a form, admins approve entries, and approved businesses appear in a searchable GravityView directory.

How to Create an Event Workshop Registration + Waitlist System in WordPress
This guide shows how to set up a workshop registration + waitlist system in WordPress: register attendees until capacity is reached, waitlist the rest, approve entries, and auto-promote people when a seat opens using Gravity Forms, Gravity Flow, and GravityView.

Gravity Flow Form Submission Step Tutorial
The Gravity Flow Form Submission step pauses a workflow until another form is submitted, then continues once the handoff is complete. This guide shows how to connect two forms, prefill fields with mapping, send the correct secure link, and troubleshoot the most common “workflow didn’t move” issues.

Gravity Flow Delete an Entry Step Tutorial
The Gravity Flow Delete Entry step lets you trash or permanently remove Gravity Forms entries as part of a workflow. This guide covers the key settings, scheduling options (delay or date-based), and safe testing tips so you can follow retention and privacy rules with confidence.

