A public submission business directory lets visitors submit listings through a form, while you review and approve them before anything goes public. This is one of the most practical ways to build a user-submitted business directory in WordPress because you get the best of both worlds:
- Visitors can submit listings without needing a WordPress account
- You keep control, so your directory doesn’t turn into spam
- Approved listings appear automatically in a searchable directory
This setup gives you a public submission business directory that stays clean, searchable, and fully moderated.
In this tutorial, we’ll build a Gravity Forms business directory powered by GravityView, including:
- a public submission form
- admin approvals
- a searchable directory page
- a single listing profile page
GravityView is built specifically to display, search, and filter Gravity Forms entries on the front end.
Public submission business directory overview (what you’re building)
What you need to build a public submission business directory
- WordPress admin access
- Gravity Forms installed
- GravityView installed
Quick glossary for beginners
Entry: One form submission (one business listing).
View (GravityView): The front-end directory page created from form entries.
Multiple Entries: The directory listing page (shows many results).
Single Entry: The profile page for one listing.
Entry Approval: A status that decides whether a listing is visible to the public.
Step 1: Public submission form for your business directory (Gravity Forms)
Go to Forms → New Form
Name it: Business Directory Submission
You’re creating the “source of truth” for your directory. Every listing that appears publicly later will come from this form.
1A) Add these fields (the exact structure we tested)
Public listing fields
- Business Name (Single Line Text, Required)
- Category (Drop Down, Required)
- City (Single Line Text, Required)
- Business Email (Email, Required, Visible later)
- Phone (Phone, Optional)
- Website (Website, Optional)
- Short Description (Paragraph Text, Required)
- Logo (File Upload, Optional)
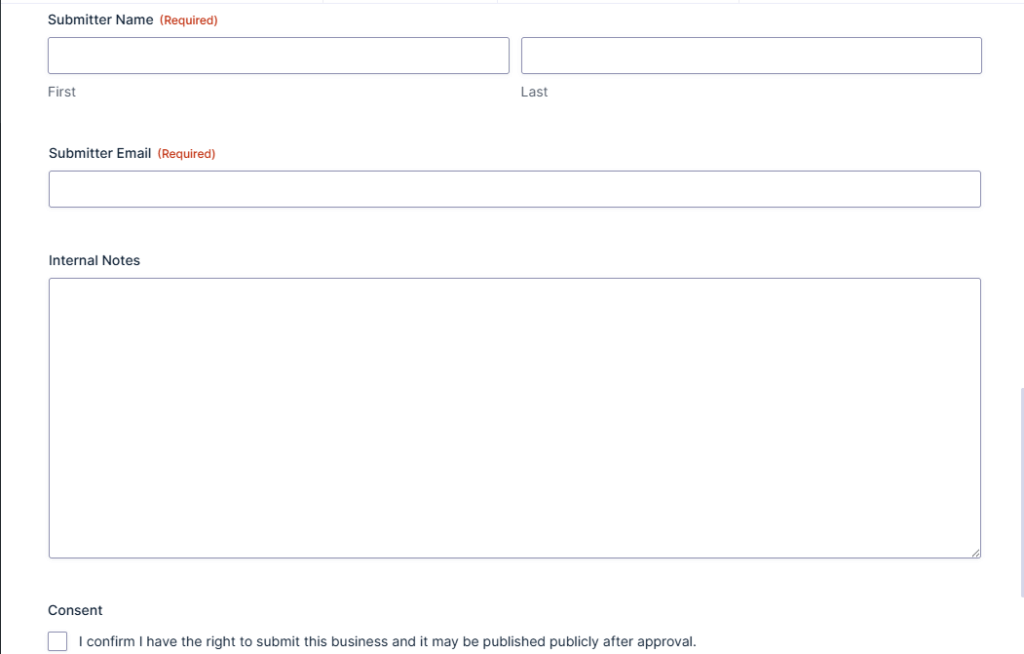
Submitter and admin-only fields
- Submitter Name (Name, Required)
- Submitter Email (Email, Required)
- Internal Notes (Paragraph Text, Optional, Admin-only)
- Consent (Checkbox, Required)


What to do and what not to do in Step 1
Do
- Make the “must-have” business fields required (Name, Category, City, Email, Short Description).
- Keep the form short enough to finish.
- Add consent if listings will be public.
Don’t
- Collect sensitive info you don’t plan to display.
- Publish internal notes or submitter email publicly.
Why Step 1 matters (in plain English)
This form is the foundation of your directory. If the form is messy or missing key fields, your directory will look incomplete later. Getting the form right first makes everything else easier, because GravityView can only display what the form captures.
Step 2: Public submission business directory confirmation message
Go to Settings → Confirmations
Use a clear message like:
Thanks! Your business listing is pending review. Once approved, it will appear in the directory.
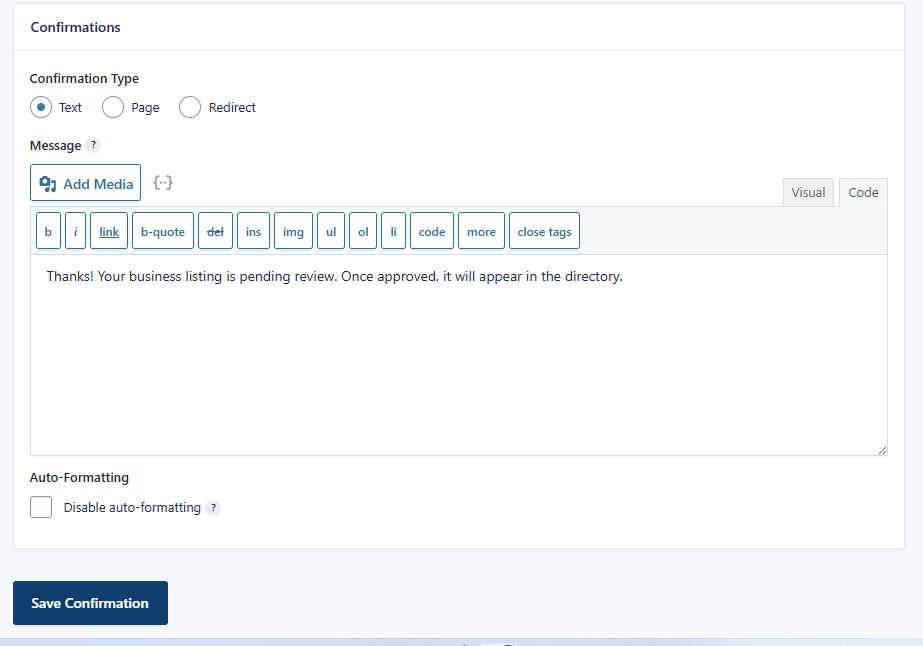
Why Step 2 matters for your Public Submission Business Directory
When people submit a listing, they need clarity right away. A good confirmation message prevents support headaches and helps users understand that the listing won’t appear instantly because it still needs approval.
Step 3: Public submission business directory notifications (admin + submitter)
Go to Settings → Notifications and create two notifications:
3A) Admin notification (new submission)
Purpose: you get alerted so you can review and approve quickly.
- Send to: admin email
- Subject: New Business Submission: {Business Name}
- Message: include Business Name, Category, City, Business Email, Phone, Website
3B) Public Submission Business Directory Submitter notification (we received it)
Purpose: confirmation and trust.
- Send to: Submitter Email field
- Subject: We received your business listing
- Message: thank them, explain the review step, mention it goes live after approval
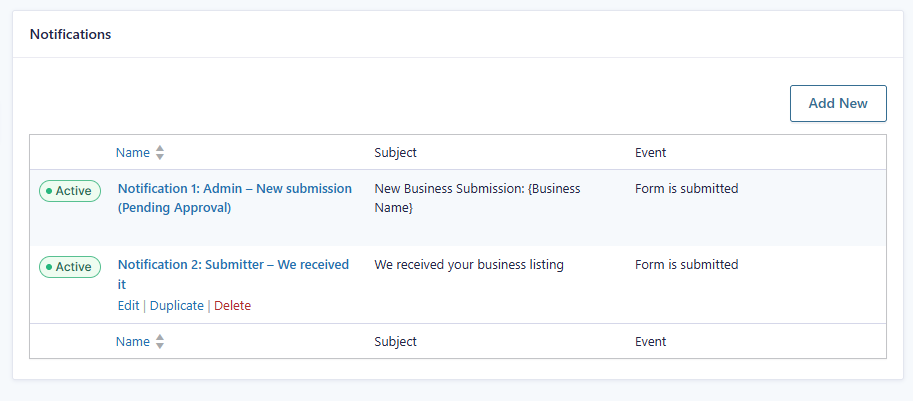
Why Step 3 matters for Public Submission Business Directory
Public submission directories work best when they’re responsive. Notifications keep the process moving so submissions don’t sit in “pending” forever, and submitters don’t feel ignored.
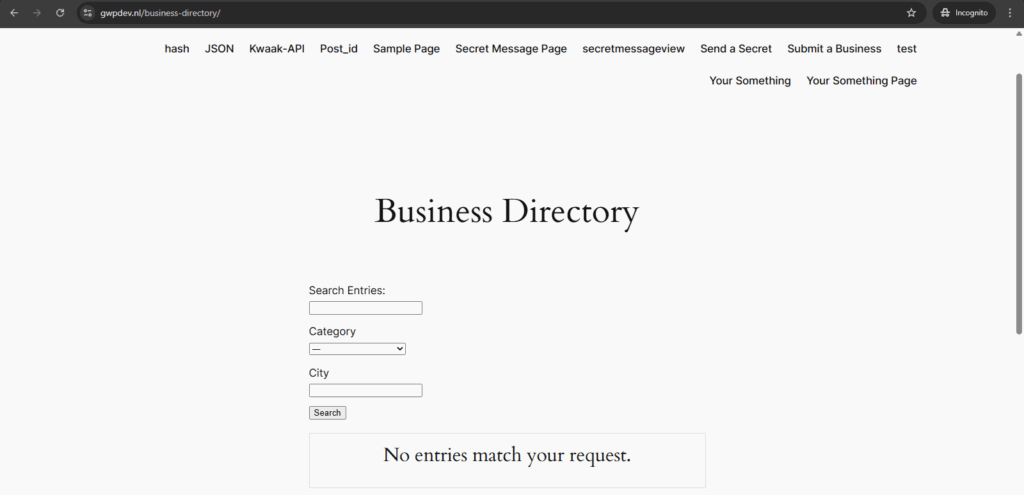
Step 4: Create a GravityView business directory (your public directory page)
Now you’ll turn form entries into a front-end directory page.
Go to GravityView → New View
- Select the form: Business Directory Submission
- Choose View type: List
GravityView’s “Views” are the feature that lets you display Gravity Forms entries on the front end as directories, profiles, and searchable listings.
Why Step 4 matters in Public Submission Business Directory
At this point, your form is collecting data, but visitors can’t browse it yet. The View is what creates the actual public directory experience. No View means no directory.
If you need help embedding forms on pages, see: Gravity Forms shortcode guide
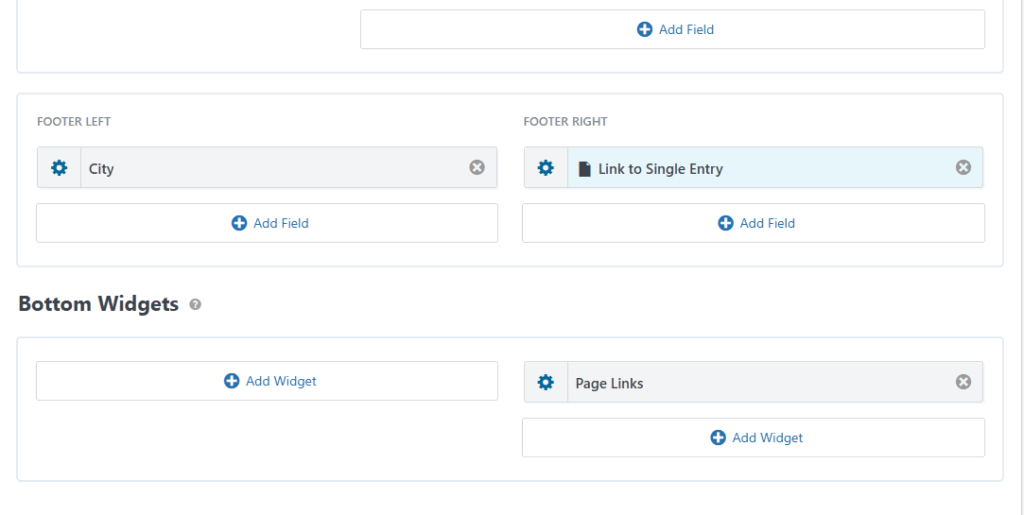
Step 5: GravityView directory layout (Multiple Entries listing page)
This is the main directory page that shows multiple listings.
Recommended layout (matching what we built and tested):
Listing Title
- Business Name
Subheading
- Category
- City
Image
- Logo
Other Fields
- Short Description
- Business Email (visible)
- Phone
- Website
Footer Right
- Link to Single Entry (“View details”)
Why Step 5 matters
This is what users judge in five seconds. A good listing card layout makes the directory easy to scan. If it’s too crowded, people won’t browse. If it’s too thin, listings won’t feel useful.
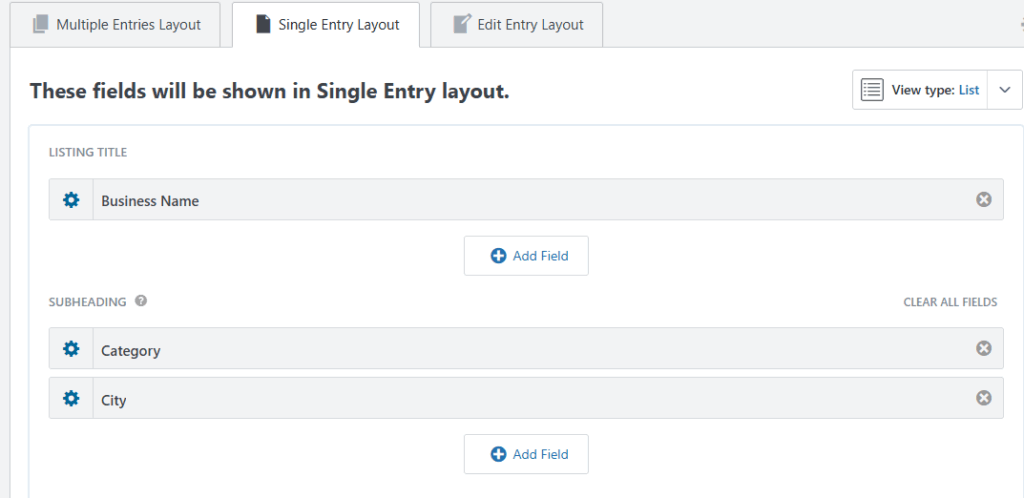
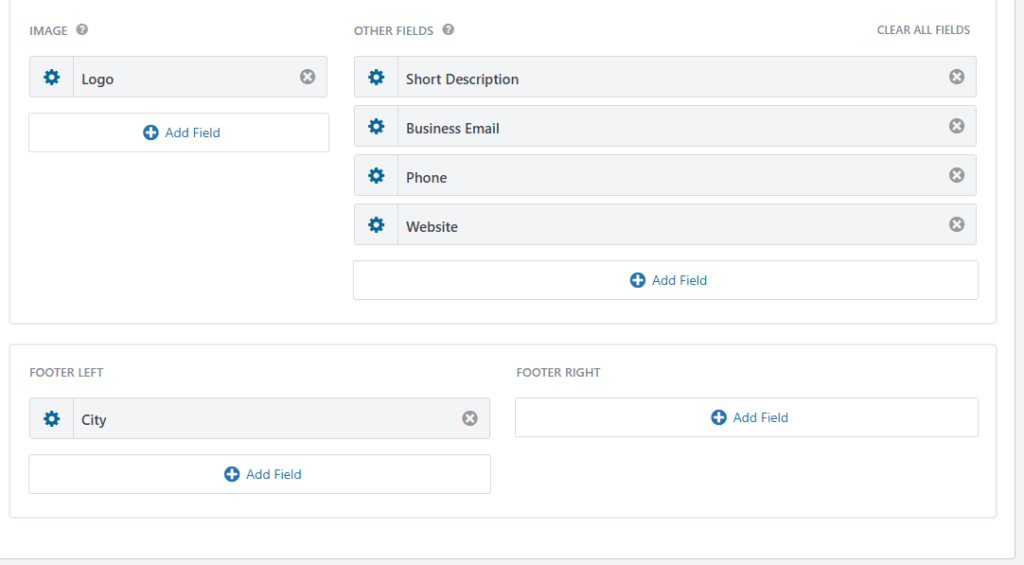
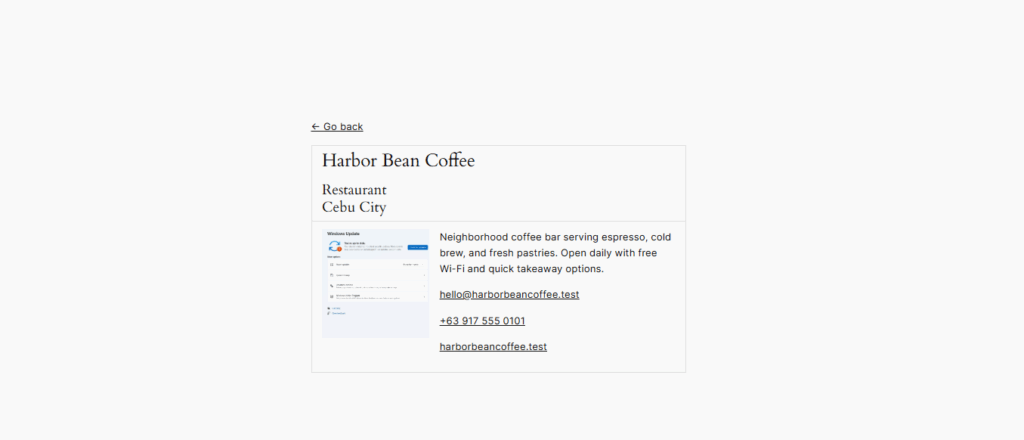
Step 6: GravityView directory profile page (Single Entry layout)
This is the “full details” page for one business.
Add these fields:
- Business Name
- Category
- City
- Logo
- Short Description
- Business Email (visible)
- Phone
- Website
Why Step 6 matters
A directory listing card is for scanning. The single entry page is for decision-making. This is where someone decides to contact the business, visit the website, or save the listing.
Step 7: Public submission business directory moderation settings
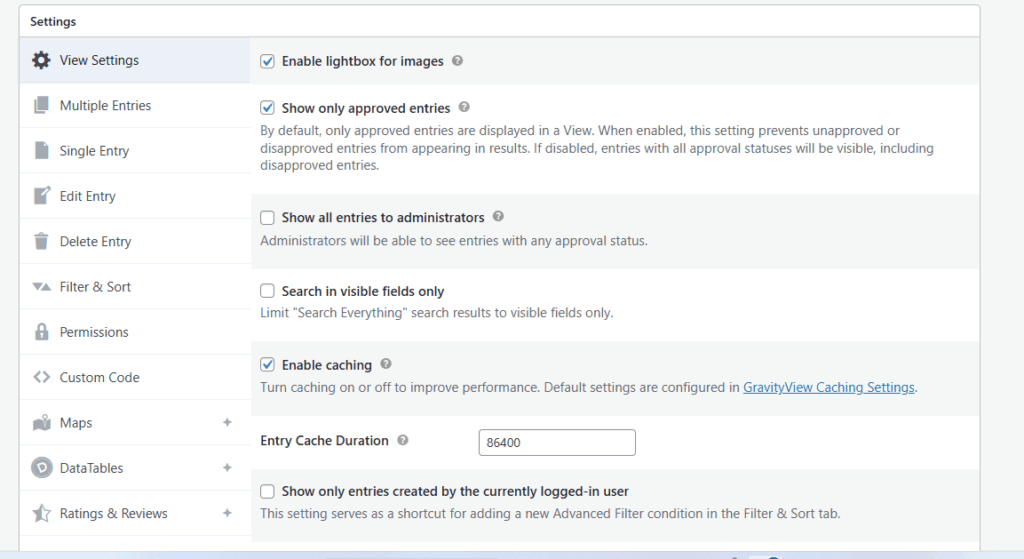
Go to your View settings: View Settings
Enable: Show only approved entries
This setting prevents pending or disapproved entries from appearing publicly.
Why Step 7 matters
This single checkbox is what turns a normal directory into a moderated public submission directory. Without it, every submission could show publicly right away, which is usually how spam gets in.
Step 8: Test your public submission business directory (end-to-end)
This testing section is longer on purpose. It’s the part most people rush, and it’s where small setup mistakes show up.
8A) Submit 2 to 3 test listings in Public Submission Business Directory (incognito window)
Open an incognito/private window and submit a few listings.
Why incognito?
Because it shows you what normal visitors see. No admin cookies, no logged-in permissions, no “it works for me” false positives.
What to submit (simple test plan)
- One listing with a logo
- One listing without a logo
- One listing with a longer description
This helps you verify your directory looks good even when users leave optional fields blank.
8B) Visit the directory page (still incognito)
Expected result: nothing appears yet, because nothing is approved.
If you still see entries here:
That usually means “Show only approved entries” is not enabled, or you’re still logged in somewhere.
8C) Approve entries as admin (this is the moderation step)
Go to: Forms → Business Directory Submission → Entries
You’ll see the Entry Approval column. Entries start as pending and can be approved with the icon. GravityKit’s docs explain the approval behavior and visibility impact.
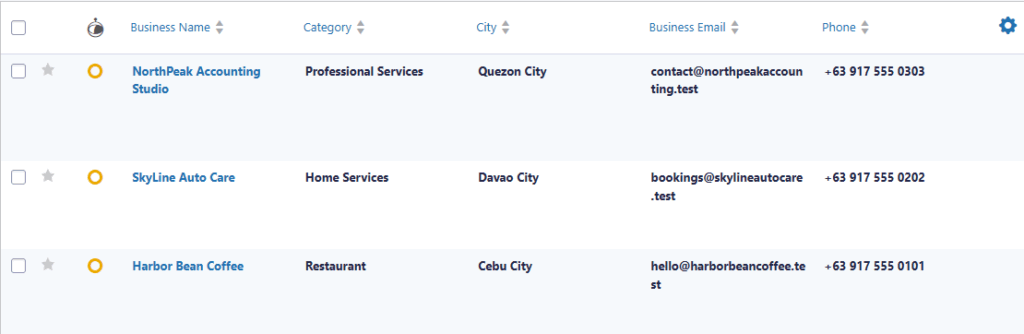
Practical tip:
Approve only one entry first so you can clearly confirm the directory is behaving correctly.
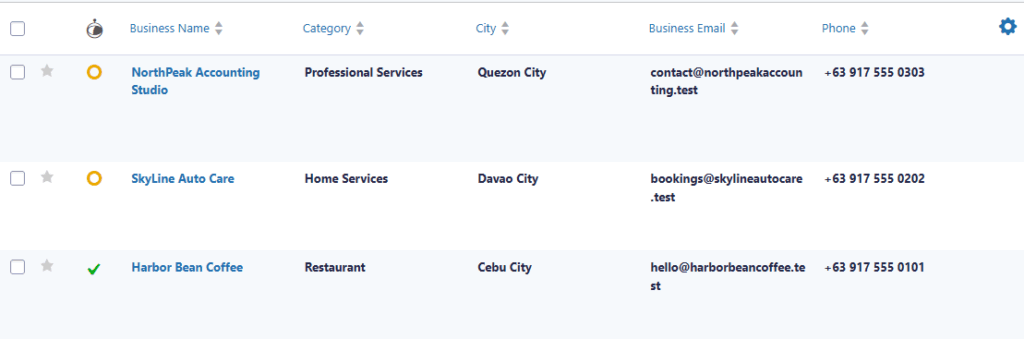
8D) Refresh the directory page (incognito)
Expected result: the approved entry now appears publicly.
Then approve the rest and refresh again:

If approval does not show right away:
Check if caching is enabled in the View settings. Caching can delay visible changes until the cache expires or is cleared.
8E) Test search and filters (so it feels like a real directory)
Your directory includes a Search Bar widget. GravityView supports a “Search Everything” field and additional field filters you can add.
What to test
- Search by keyword: type Harbor and search
- Filter by Category (Restaurant)
- Filter by City (Cebu City)

Why this test matters:
A directory without search becomes frustrating as it grows. This confirms your directory will still be usable when you have 100 listings, not just 3.
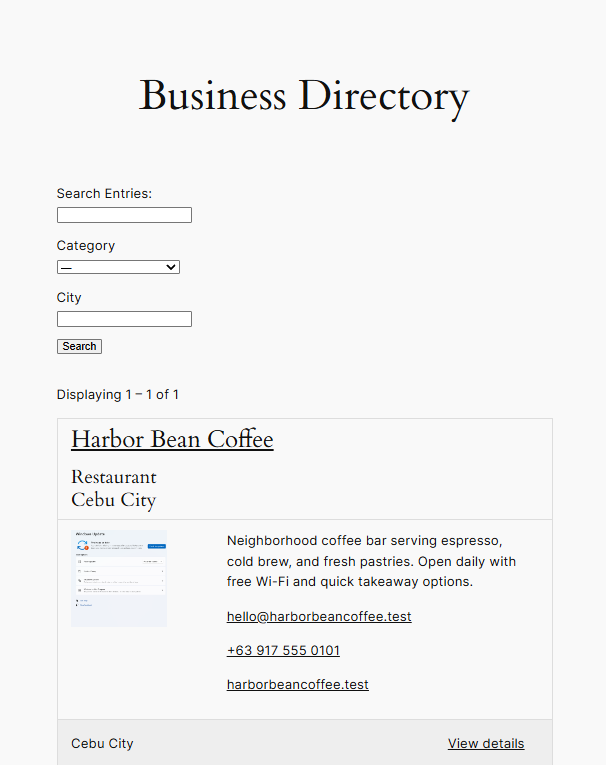
8F) Test the single listing page (profile page)
Click View details or click the business name.
Expected: it opens the single entry page and displays full details.
Why this test matters:
It confirms your directory isn’t a dead end. Visitors can browse listings, then click through to a complete profile page with contact details.
Step 8 wrap-up (why testing matters so much)
Testing isn’t just checking “it works.” It’s confirming that:
- unapproved submissions stay private
- approved entries appear publicly
- the directory is searchable
- the profile page is accessible
- optional fields (like logo) don’t break the layout
Once those are true, your public submission directory is ready for real users.
Before you launch: a quick final checklist (so your directory stays clean)
At this point, your public submission business directory is working. Before you share the directory publicly, do one last pass on the “real-world” details that usually get missed.
1) Confirm your moderation is actually enforced
Make sure your GravityView directory is still set to show only approved listings.
- Go to GravityView → Edit your View → View Settings
- Confirm Show only approved entries is enabled
Why this matters: this is the difference between a moderated directory and a directory that publishes everything instantly. If this is off, spam and junk listings can show publicly right away.
2) Double-check what you’re showing publicly
In our build, we made Business Email visible in the listing card and the single entry page. That’s fine for testing, but for a real directory, decide if you want that.
Ask yourself:
- Do I want emails visible publicly?
- Or should I show only Website and Phone?
- Or do I want people to contact businesses another way?
Why this matters: public emails can attract spam once your site starts getting traffic. If your directory is meant to be public-facing, you want it to be useful without creating problems later.
3) Check how the directory looks when fields are empty
Even if your form has required fields, users will often skip optional fields like Logo or Phone.
Do a quick sanity check:
- a listing with a logo
- a listing without a logo
- a listing with a short description
- a listing with a longer description
Why this matters: a directory that looks good only when every field is filled out will look messy in production. Testing “incomplete” listings helps you catch layout issues early.
4) Confirm search is doing what people expect
Your directory already has search and filters. Use them like a visitor would.
Try:
- searching by business name (example: Harbor)
- filtering by Category
- filtering by City
Why this matters: search is what makes a directory feel usable. Without it, a directory becomes harder to navigate the moment you have more than a handful of listings.
Common issues and quick fixes (so you don’t get stuck)
“My listings are showing even when they are not approved.”
Most likely cause: the View is not restricted to approved entries.
Fix:
- Go to GravityView → Edit View → View Settings
- Enable Show only approved entries
“I approved an entry, but it still doesn’t show on the directory.”
Most likely cause: caching is delaying what you see.
Fix:
- refresh the page
- temporarily disable caching in the View settings while testing, or clear cache if needed
“My logo looks too big or awkward.”
Most likely cause: image width settings need adjustment.
Fix:
- click the gear icon beside the Logo field in the View layout
- adjust the image width until it fits your card layout cleanly
“Search doesn’t return results.”
Most likely cause: you’re searching fields that aren’t included, or you didn’t add the search widget correctly.
Fix:
- confirm the Search Bar widget is added to the View
- test simple keywords first (like part of a business name)
Final recap: what you built and what to do next
You now have a public submission business directory that collects submissions privately and publishes only approved listings.
That setup gives you the best balance between openness and control:
- people can submit listings without an account
- you review entries before anything goes live
- the directory stays clean, searchable, and useful as it grows
If you want to take it further, the next logical upgrades are improving styling, adding stronger spam protection, and refining what contact information you display publicly.
Want approvals to be fully workflow-based later? See: Gravity Flow workflow steps guide
Our Premium add-ons for Gravity Forms
List Dropdown
Add a Dropdown Select with choices to a column or multiple columns in a Gravity Forms List Field.

List Datepicker
Add a Datepicker with calendar select to a column or multiple columns in a Gravity Forms List Field.

API Connector
Connect Gravity Forms to External API's: Query the API using form field values and automatically fill other form fields with the API response.

Advanced Number Field
Functionality for Number Fields, like rounding or only absolute numbers, fixed point notation, range calculation, custom units like % or m2 & show as slider.
Read tutorials about

How to Create a Public Submission Business Directory in WordPress (Gravity Forms + GravityView)
Build a moderated business directory where users submit listings through a form, admins approve entries, and approved businesses appear in a searchable GravityView directory.

How to Create an Event Workshop Registration + Waitlist System in WordPress
This guide shows how to set up a workshop registration + waitlist system in WordPress: register attendees until capacity is reached, waitlist the rest, approve entries, and auto-promote people when a seat opens using Gravity Forms, Gravity Flow, and GravityView.

Gravity Flow Form Submission Step Tutorial
The Gravity Flow Form Submission step pauses a workflow until another form is submitted, then continues once the handoff is complete. This guide shows how to connect two forms, prefill fields with mapping, send the correct secure link, and troubleshoot the most common “workflow didn’t move” issues.

Gravity Flow Delete an Entry Step Tutorial
The Gravity Flow Delete Entry step lets you trash or permanently remove Gravity Forms entries as part of a workflow. This guide covers the key settings, scheduling options (delay or date-based), and safe testing tips so you can follow retention and privacy rules with confidence.
