In your overall n8n hosting strategy, one-click hosting is where things get interesting: you still get a self-hosted n8n instance, but a platform handles most of the DevOps for you. At GravityWP we build an n8n Connector add-on for Gravity Forms, so a lot of our users are specifically looking for a hosting option that feels “self-hosted” and reliable, without having to become full-time server admins.
Instead of renting a raw VPS, installing Docker, writing your own docker-compose.yml, and maintaining everything by hand, you can:
- Sign up at a platform like Railway, Elestio, xCloud, or Coolify
- Pick n8n from their catalog or template list
- Click Deploy
- Get a production-ready n8n URL a few minutes later
Under the hood, these platforms still run the official n8n Docker image with a proper database (usually Postgres) and often a basic queue-mode setup for webhooks and background work.
This article goes deep on:
- What “one-click n8n hosting” actually does
- When to choose it over n8n Cloud or a raw VPS
- A step-by-step example on Railway
- How Elestio and Coolify compare
- The must-know environment variables, security, and troubleshooting tips
1. What One-Click n8n Hosting Actually Does
From n8n’s point of view, there’s no “special one-click version” of the app. It’s still the same open-source n8n server running in a container, configured with environment variables as documented in the official hosting docs.
The one-click part comes from the hosting platform:
- Provisions infrastructure (compute, storage, network) for you
- Wires n8n to a database (commonly Postgres) with the right DB_TYPE and connection string
- Sets sane defaults for WEBHOOK_URL, PORT, and reverse proxy headers
- Gives you a dashboard to restart, scale, and monitor your instance without SSH
Examples:
- Railway has a dedicated n8n template that runs the official Docker image with Railway-managed Postgres and queue-mode workers.
- Elestio offers a “fully managed n8n” service where they handle installation, encryption, security, backups, updates and monitoring; you just click Create Service for n8n.
- Coolify treats n8n as a one-click service in its catalog on top of your own VPS, giving you an internal PaaS-style experience instead of manual Docker.
From the user perspective, one-click hosting means:
- You still own (or pick) the underlying server/cloud account
- You skip the hardest part: writing and maintaining the deployment scripts
- You trade some flexibility for a much gentler learning curve
2. When to Choose One-Click n8n Hosting vs n8n Cloud or a VPS
To keep it simple:
- n8n Cloud – if you want zero infrastructure and don’t mind subscription pricing.
- Raw VPS + Docker – if you want maximum control and lowest cost and are comfortable with Linux & Docker.
- One-click platforms – if you want self-hosted control but prefer:
- A web dashboard instead of SSH
- Built-in HTTPS and database provisioning
- “Click and deploy” templates for n8n
- A web dashboard instead of SSH
Common use cases for one-click hosting:
- Agencies or freelancers who want client-specific n8n instances without building infra from scratch each time
- Small teams that need production-grade webhooks and a proper Postgres DB, but don’t have a dedicated DevOps engineer
- GravityWP-style users who just want a stable URL where their GravityWP n8n Connector can send form data
3. Typical Stack Architecture on Railway, Elestio & Coolify
Every platform names things differently, but if you strip away the UI, the structure is similar.
A typical one-click n8n stack includes:
- n8n container
- Database, usually Postgres
- Optionally Redis + workers + webhook processors for queue mode (no long-running work in the main process)
- A reverse proxy that terminates HTTPS and forwards traffic to the n8n container (Railway, xCloud, Coolify, etc. hide this layer)
Configuration is done via environment variables, as documented by n8n:
DB_TYPE=postgresdband relatedDB_POSTGRESDB_*variables tell n8n to use Postgres.WEBHOOK_URLtells n8n what public URL to use when generating webhook links (so it doesn’t point to localhost).N8N_ENCRYPTION_KEYencrypts credentials in the database; this must stay stable.
- In queue mode, you see
EXECUTIONS_MODE=queueand flags that disable heavy work in the main editor process.
Railway’s template docs and community posts show exactly this pattern: an n8n service, a Postgres service, optional Redis, and environment variables pre-wired for queue mode and webhooks.
These patterns are the same whether you’re using one-click n8n hosting on Railway, Elestio, Coolify, or xCloud.
4. Railway Example: One-Click n8n Hosting in the Browser
In this section, we’ll walk through a one-click n8n hosting example using Railway’s official template.
Railway is a good concrete example because they maintain a dedicated n8n template that uses the official Docker image and managed Postgres.
You don’t touch Docker or SSH at all. Everything is done in the browser.
Note: You’ll still pay Railway for infrastructure usage. Some guides mention free credit or trial tiers, but always check Railway’s current pricing.
4.1. Prerequisites for One-Click n8n Hosting on Railway
Before you deploy, you should have:
- A Railway account
- Optionally a custom domain (for example, automations.yourdomain.com) you can point at Railway later
- A strong password manager ready you’ll generate an encryption key for n8n
4.2 Start from the Official One-Click n8n Template on Railway
Railway’s n8n template page describes what it will spin up for you: the official n8n Docker image, a managed Postgres database, and environment variables like PORT, DB_TYPE=postgresdb, and WEBHOOK_URL.
You can reach it either by:
- Clicking a Deploy n8n button in a blog/tutorial
- Or opening the template directly from Railway’s site
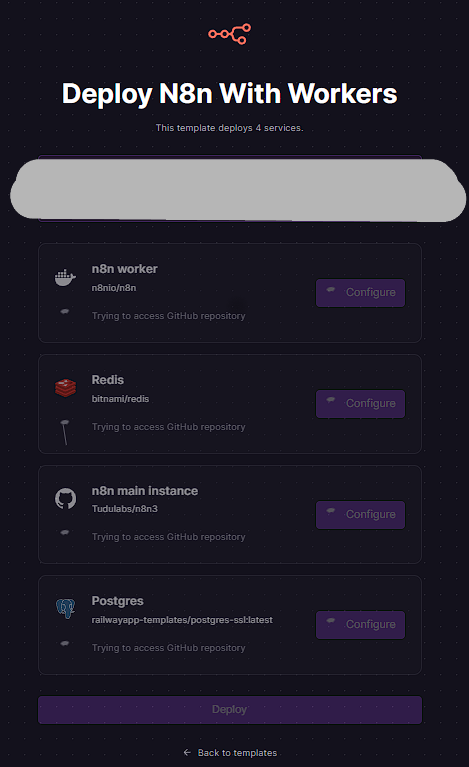
Once there, you see a Deploy Template button and a summary showing that this template deploys multiple services (n8n and Postgres, and in some templates also Redis/workers).
Click Deploy to create a new project based on this template.
4.3. Let Railway provision the services
After you click Deploy, Railway:
- Creates a new project
- Adds the n8n service (running the official image)
- Adds a Postgres database service and sets
DB_TYPE=postgresdbplus connection variables for you - In some templates, also adds Redis, workers, and a webhook processor so queue mode works out of the box
You’ll see a small status indicator as each service builds and boots. When the status flips to Running, the stack is ready.
4.4. Review and customize environment variables
Next, open the n8n service inside the project and inspect its Variables / Environment tab.
Typical variables you’ll see include:
PORT=5678(internal port the container listens on)DB_TYPE=postgresdb- Postgres credentials (host, database, user, password, URL) already linked to the Postgres service
WEBHOOK_URLthis determines what URL n8n writes into webhook nodes and should match the public domain of your instance
EXECUTIONS_MODE=queueand flags that configure worker/webhook services, depending on the template
Important:
- Generate a secure random string and set it as
N8N_ENCRYPTION_KEYbefore you start using the instance. Changing this later will break existing credentials because they can no longer be decrypted.
- Make sure
WEBHOOK_URLuses the final public URL you’ll use (Railway domain or your own custom domain). Otherwise, webhook URLs might point at localhost or an internal domain and fail when called from the outside.
4.5. Configure the public URL and domain
Railway gives each service a default public URL (for example, something like https://n8n-production-up-somehash.railway.app). You can use this as-is or set up a custom domain, depending on your plan.
The important thing is consistency:
- The domain configured in Railway (or your DNS)
- The
WEBHOOK_URLin your n8n environment variables - Any external integrations (for example GravityWP n8n Connector feed URLs)
All should point to the same HTTPS URL.
4.6. Open the n8n editor and finish initial setup
Once the service is running and the environment variables look good:
- Visit the public URL in your browser.
- You should see n8n’s onboarding / owner setup screen.
- Create the initial owner account with a strong password.
- After this, you land in the familiar n8n workflow editor.
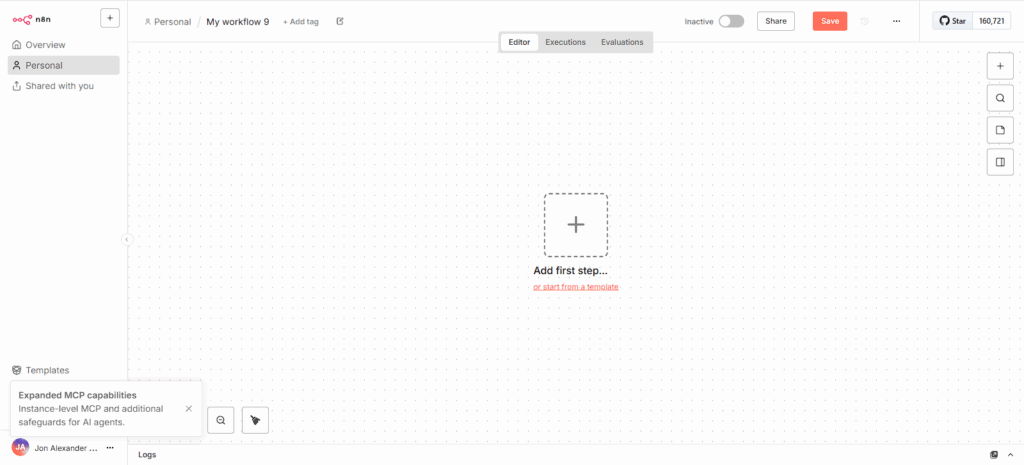
4.7. Create a test workflow with a Webhook
To verify that everything works end-to-end (especially important if you plan to connect Gravity Forms or GravityWP):
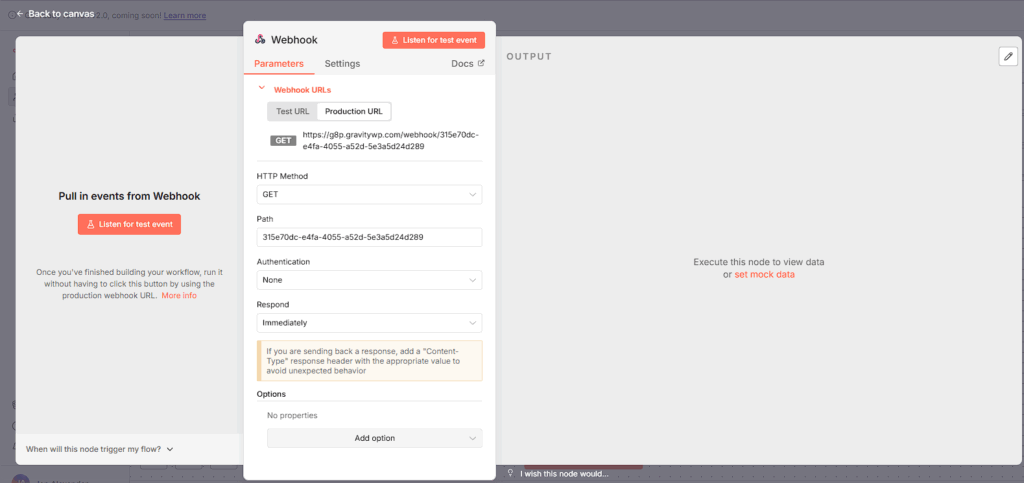
- Create a New workflow in n8n.
- Add a Webhook node and set it to Production URL.
- Save the workflow and activate it.
- Copy the Production URL it should match your configured domain and
WEBHOOK_URL.
- Send a test request using your browser, a tool like Postman, or from a WordPress site.
If the execution shows up in n8n’s Executions list and the response comes back correctly, your one-click hosting stack is working.
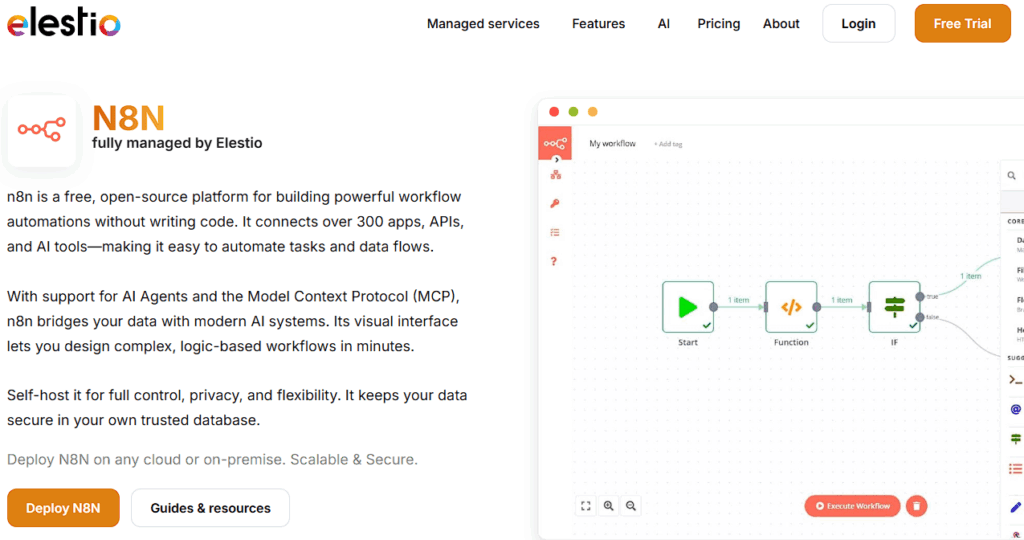
5. Managed n8n on Elestio
Elestio is positioned as “fully managed open-source” hosting and is a popular option for one-click n8n hosting if you don’t want to manage the server yourself.
Elestio is positioned as “fully managed open-source” hosting. For n8n, that means:
- You choose n8n from their open-source catalog
- You pick a cloud provider/region and instance size
- Elestio provisions a dedicated instance, installs n8n, and takes care of encryption, security, backups, monitoring, and updates for you
Their installation guide explains the flow:
- Create a service for n8n in the Elestio dashboard
- Choose your provider, region, and plan
- Review the estimated monthly price
- Click Create Service; Elestio installs n8n on the instance
- Open your n8n URL and start using it
Under the hood, Elestio still uses the official n8n Docker image (n8nio/n8n) and a managed database, wired together via their automation.
You get less hands-on control than with a raw VPS, but you don’t have to worry about OS-level packages, Docker upgrades, or backup scripts Elestio keeps all that running.
6. Coolify and xCloud as Self-Hosted PaaS Options
one-click n8n on your own VPS
Coolify is a self-hosted PaaS: you install Coolify on a VPS you control, then deploy apps like n8n through its web UI.
Once Coolify is installed:
- Log into the Coolify dashboard.
- Create a Project.
- Add a new Service and choose n8n from the catalog.
- Point a domain… and let Coolify handle SSL.
From a user perspective, the n8n part is still one-click. The extra work is in installing Coolify itself (which feels closer to VPS-style hosting), but the n8n deployment experience is very much one-click.
xCloud: “One Click Apps” for n8n
xCloud offers managed n8n hosting where n8n is one of the One Click Apps. Their docs describe a simple process:
- Log into your xCloud account and create a New Site.
- Choose a server and go to the One Click Apps section.
- Select n8n from the list to start deployment.
- xCloud sets up the n8n application, SSL, backups, updates, and lets you pick plans with different RAM/CPU allocations.
Again, this fits the same one-click pattern: you get self-hosted n8n with point-and-click deployment and a UI for operational tasks.
7. Best Practices for Long-Running n8n Instances
Regardless of which platform you pick, good one-click n8n hosting is about reliability over time, not just clicking Deploy once.
There are a few best practices that come straight from n8n’s self-hosting guidance and common community issues.
- Use Postgres, not SQLite, for production.
Most one-click templates already do this by settingDB_TYPE=postgresdband wiring in a managed database. Double-check this before you go live. - Set and keep a stable N8N_ENCRYPTION_KEY.
Generate a long random key once and store it in your password manager. Changing it later means old credentials can’t be decrypted. - Make sure WEBHOOK_URL matches your public HTTPS URL.
If webhooks are redirecting to localhost or an internal domain, it’s usually becauseWEBHOOK_URLwasn’t updated in env vars. - Understand queue mode if your template uses workers.
Templates that include worker and webhook-processor services rely onEXECUTIONS_MODE=queueand related env vars. If workers are idle, check that the encryption key and queue settings match across services. - Turn on backups and monitoring.
Managed platforms like Elestio and xCloud emphasize automatic backups and monitoring; for more DIY-friendly platforms like Railway or Coolify, make sure you enable project-level backups or snapshots as recommended.
Keep an eye on resource limits.
Even if the instance is easy to deploy, it can still run out of RAM or disk if you grow. Providers and n8n docs both recommend monitoring resource usage and scaling up when workflows grow in complexity.
8. Troubleshooting Common Platform Issues
From provider docs and community threads, the same three issues appear again and again:
Webhooks redirect to localhost
- Cause:
WEBHOOK_URLleft as default (oftenhttp://localhost:5678). - Fix: Set
WEBHOOK_URLto your public HTTPS domain and redeploy/restart.
Credentials stop working after a redeploy
- Cause:
N8N_ENCRYPTION_KEYchanged between deployments. - Fix: Use a persistent key stored in your password manager; don’t let the platform regenerate a new one each time.
Worker services don’t process jobs in queue mode
- Cause:
EXECUTIONS_MODEor queue-related env vars inconsistent across services, or mismatched encryption keys. - Fix: Ensure all n8n services in the project share the same encryption key and queue configuration.
If your one-click platform provides logs per service (Railway, Coolify, xCloud, Elestio all do), keep those open while testing new workflows.
9. How One-Click n8n Hosting Fits in Your Overall Strategy
In your main “How to set up an n8n instance” article, you can position one-click n8n hosting as:
Self-hosted n8n with one-click deployment on platforms like Railway, Elestio, xCloud, or Coolify.
It naturally sits between:
- n8n Cloud – fully hosted by the n8n team
- Raw VPS with Docker – full DIY
One-click hosting is perfect for readers who:
- Want a URL they control
- Need production-grade webhooks and a proper database
- Don’t want to become full-time server admins just to run their automations
Our Premium add-ons for Gravity Forms

JWT Prefill
Fill forms with data you can trust. Prefill Gravity Forms fields with a secure token instead of links with editable url parameters, so your data is accurate, tamper-proof, and ready to use.

List Number Format
With this Gravity Forms Add-on you can change List Field columns into a number field, do calculations within a row or column. Extra merge tags are available with total counts of columns.
Field to Entries
Create entries based on Checkboxes & Multi Select choices & List Field rows.
List Datepicker
Add a Datepicker with calendar select to a column or multiple columns in a Gravity Forms List Field.
Read tutorials about

How to Create a Public Submission Business Directory in WordPress (Gravity Forms + GravityView)
Build a moderated business directory where users submit listings through a form, admins approve entries, and approved businesses appear in a searchable GravityView directory.

How to Create an Event Workshop Registration + Waitlist System in WordPress
This guide shows how to set up a workshop registration + waitlist system in WordPress: register attendees until capacity is reached, waitlist the rest, approve entries, and auto-promote people when a seat opens using Gravity Forms, Gravity Flow, and GravityView.

Gravity Flow Form Submission Step Tutorial
The Gravity Flow Form Submission step pauses a workflow until another form is submitted, then continues once the handoff is complete. This guide shows how to connect two forms, prefill fields with mapping, send the correct secure link, and troubleshoot the most common “workflow didn’t move” issues.

Gravity Flow Delete an Entry Step Tutorial
The Gravity Flow Delete Entry step lets you trash or permanently remove Gravity Forms entries as part of a workflow. This guide covers the key settings, scheduling options (delay or date-based), and safe testing tips so you can follow retention and privacy rules with confidence.

