The Gravity Flow Update Entry step lets you update an existing Gravity Forms entry instead of creating a new one, using a stored Entry ID and field mapping.
Sometimes, you do not want to create a new entry. You want to update an entry that already exists.
Typical examples:
- A “Task Tracker” form is completed by staff, and you want to push the final status back into the original request entry.
- A customer submits a second form to add missing details, and you want that submission to update the original entry instead of creating a duplicate.
- You have a multi-form workflow and need the “parent” and “child” entries to stay in sync.
That is what the Update an Entry step in Gravity Flow’s Form Connector extension is built for. It can update entries in other forms, and it can also complete an Approval step or User Input step for a different entry when you need advanced automation.
If you want the big picture of step types first, read our Gravity Flow workflow steps guide.
What the Gravity Flow Update Entry step does
The Gravity Flow Update Entry step lets you select a target form, point to an Entry ID, and update specific fields using mappings.
The Update an Entry step:
- Lets you pick a target form (the form whose entry you want to update).
- Requires an Entry ID field that contains the ID of the target entry.
- Uses Field Mappings to decide which fields in the target entry should be updated, and where the new values should come from.
Gravity Flow’s docs even give a practical hint for the Entry ID field: it can be admin-only and automatically pre-filled (for example, from a URL parameter).
What we will build in this tutorial (simple, realistic)
We will build a clean “parent-child” setup using two forms:
Form A: Request Form (the parent)
This is the original entry you want to update later.
Form B: Task Tracker (the child)
This is the internal workflow form. When staff completes the task, we update the original Request Form entry with the latest status.
This is a real-world pattern because the Request Form stays as the “source of truth” for the customer, while the Task Tracker is where internal work happens.
Prerequisites checklist
You will need:
- Gravity Forms installed.
- Gravity Flow installed.
- Gravity Flow Form Connector extension installed and activated (this is what adds the Update an Entry step type).
- Two forms (or a willingness to create two test forms).
Step 1: Create your forms for the Update an Entry step
A. Request Form (Form A)
Create a Gravity Form named Request Form with these fields (keep it basic):
- Name
- Email
- Request Type (Dropdown)
- Amount (Number)
- Notes (Paragraph)
Add one admin-only field so you can see the update later:
- Task Status (Single Line Text or Dropdown)
This is where we will write back the status from the Task Tracker.
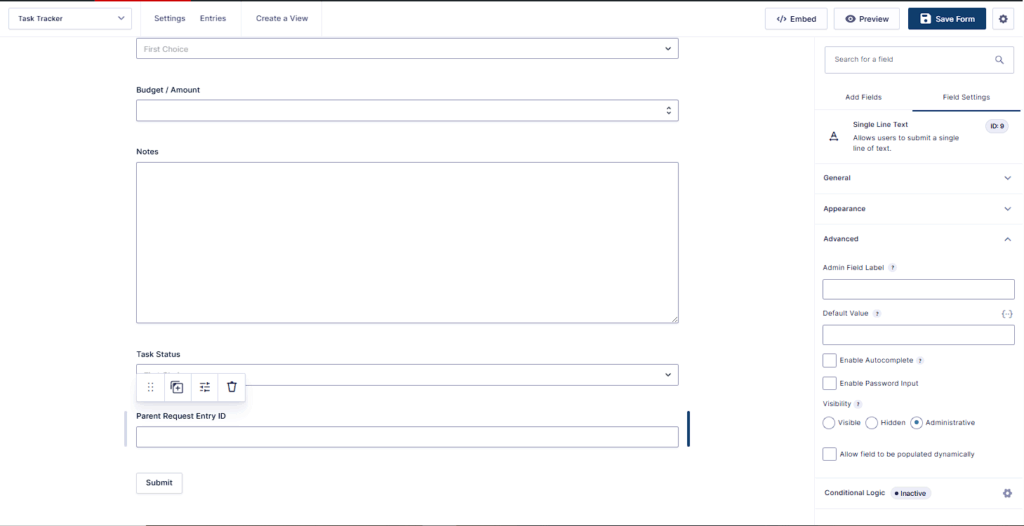
B. Task Tracker (Form B)
Create a Gravity Form named Task Tracker with these fields:
- Task Notes (Paragraph)
- Task Status (Dropdown) with values like: New, In Progress, Done
- Parent Request Entry ID (Hidden or Single Line Text)
That last field is critical. The Update an Entry step needs a field that contains the ID of the target entry.
Important tip: keep “Parent Request Entry ID” hidden or admin-only. Users should not type entry IDs manually unless you are intentionally building that kind of admin tool.
Step 2: Populate the Entry ID for Update an Entry
Gravity Flow’s Update an Entry docs suggest a smart approach: use a hidden field and set it automatically using Gravity Forms dynamic population so the user does not have to enter the entry ID.
There are two common ways to do this. Pick one.
Option A (best for parent-child workflows): populate the Parent Request Entry ID during Create an Entry
If you already use a Create an Entry (New Entry) step to create Task Tracker entries from the Request Form, you can map the parent entry ID into the Task Tracker entry at creation time.
This is clean because it is automatic and consistent.
How it works conceptually:
- Request Form entry has its own {entry_id}.
- When you create the Task Tracker entry, you store that parent entry ID in “Parent Request Entry ID”.
Then later, Update an Entry can use that stored value to find the correct Request Form entry to update.
Option B (best for admin edit links): populate from a URL parameter (dynamic population)
If you want staff to open a special link like:
/task-tracker/?parent_entry_id=123
You can configure the “Parent Request Entry ID” field to allow dynamic population and fill it from the query string. Gravity Forms supports dynamic population and documents how to enable it on a field.
For this tutorial, I’ll assume Option A (parent-child workflow), because it is the most “hands-off” once set up.
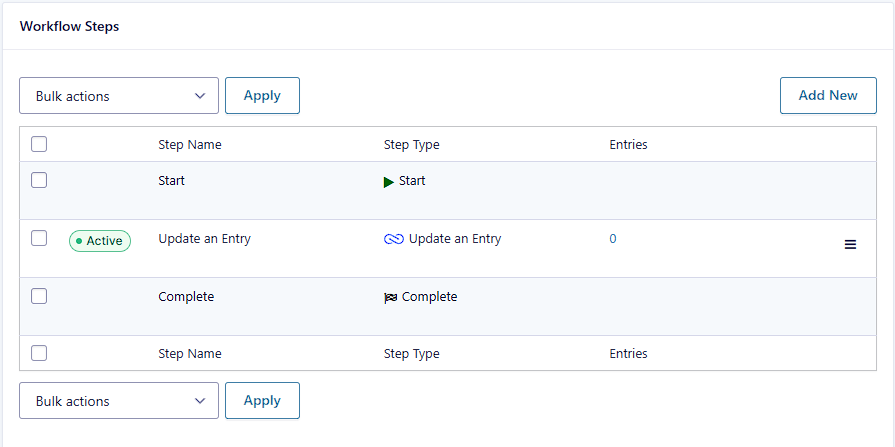
Step 3: Add a workflow to the Task Tracker form (Form B)
We want the update to happen after staff sets the status in Task Tracker.
Go to:
Forms → Task Tracker → Settings → Workflow
Add a workflow (or open your existing one).
At minimum, you need:
- A User Input step (optional but common) where staff enters Task Notes and sets Task Status.
- An Update an Entry step that pushes Task Status back into the Request Form entry.
Step 4: Add the Gravity Flow Update Entry step
In this step, you’ll configure the Gravity Flow Update Entry step to update the parent Request Form entry.
Inside the Task Tracker workflow:
- Click Add Step
- Choose Update an Entry
- Name it something obvious, like:
Update Parent Request
Gravity Flow’s documentation for this step is straightforward:
- Configure standard step settings
- Select the target form
- Select the field in the current form used as the source for the target Entry ID
- Configure field mappings to define which target fields should be updated and which current fields provide the values
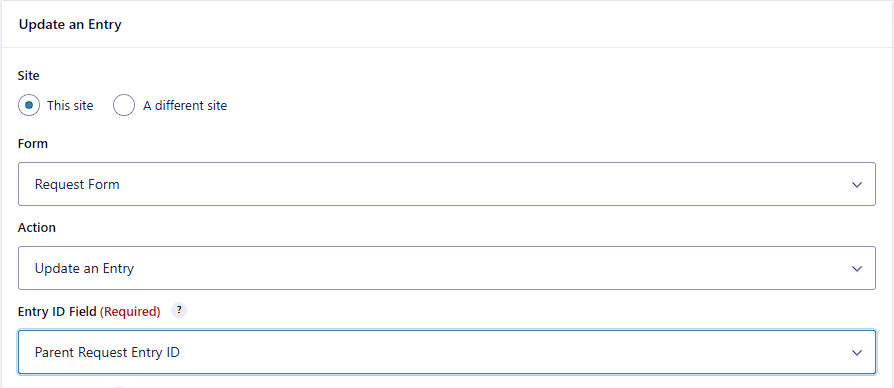
A. Select the target form
Set the Target Form to: Request Form.
B. Set the Entry ID field
Set the Entry ID field to: Parent Request Entry ID.
This field must contain the ID of the entry that will be updated.
Step 5: Field mapping for the Update Entry step
Now we tell Gravity Flow what to update in the Request Form entry.
In the Field Mappings table:
- Choose the target field (from Request Form)
- Choose the source field (from Task Tracker)
Example mapping (recommended)
Update this field in Request Form:
- Task Status (in Request Form) ← Task Status (in Task Tracker)
You can map more fields if you want. Keep it minimal for your first test.
Using Custom Value (when you want fixed text or merge tags)
The docs note you can select Custom Value to specify a static value, a merge tag, or a combination of both.
Example uses:
- Set a “Last Updated By” text field to a fixed label plus a merge tag.
- Set a “Workflow Stage” field to “Task Completed” when this step runs.
For your first test, stick to one simple field mapping so you can confirm the update works.

Step 6: Test the workflow end to end (proof that it updated the parent entry)
Here is the clean test flow:
- Create one entry in Request Form (Form A).
- Create one entry in Task Tracker (Form B) that includes the correct Parent Request Entry ID.
If you are using the parent-child automation (Option A), you will already have Task Tracker entries created from the Request Form and the “Parent Request Entry ID” should already be set automatically.
If you are doing a manual test for now, you can temporarily enter the parent entry ID yourself (just for testing).
Then run the update:
- In the Task Tracker entry, set Task Status to “Done”.
- Let the workflow reach the Update an Entry step.
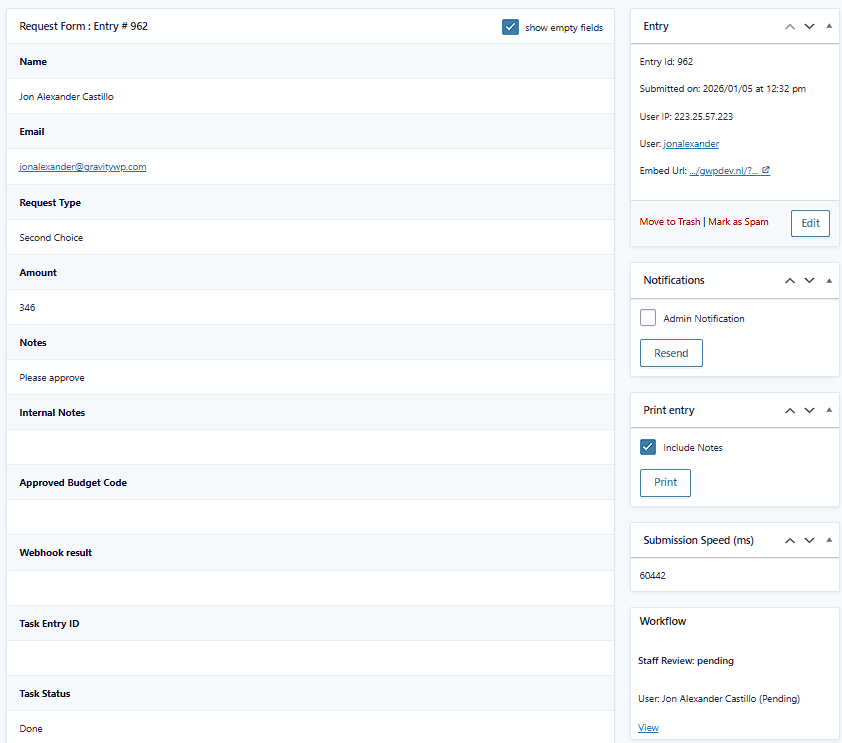
Confirm it worked:
- Open the original Request Form entry (Form A) and check the “Task Status” field.
It should now reflect the value from Task Tracker.
The “Entry ID (Self)” option (useful for same-entry updates)
Gravity Flow notes an important detail:
If the target form is also the source form, then “Entry ID (Self)” becomes available as an Entry ID option. This makes it easy to update field values in the same entry.
That means you can use Update an Entry even when you are not “connecting forms.” You can use it as a controlled way to update the current entry after a workflow step runs (for example, writing a status field, stamping a value, or pushing data between fields).
This is not the main use case for Form Connector, but it is worth knowing because it prevents confusion when you see the option in the UI.
Optional: Update an entry on a different server (two WordPress sites)
Gravity Flow supports updating an entry on a different server:
- Select “a different server” in the server setting.
- Enter the Gravity Forms Web API details.
- After credentials are saved, the process works the same as local.
What is “Web API” in Gravity Forms terms?
Gravity Forms documentation refers to the original “Web API” as REST API v1, and notes that it requires “pretty permalinks” and is activated on the API settings tab.
If you plan to test remote updates, follow Gravity Forms’ REST API v1 (Web API) guide first.
Advanced capability 1: Approve an existing entry (in another workflow)
The Update an Entry documentation includes a separate section: Approve an existing Entry.
This is not just updating fields. It is letting Form Connector process a workflow step for a different entry.
Key rules from the docs:
- The current step for the target entry must be an Approval step.
- You still need an Entry ID field that points to the target entry.
- You also need a field that contains the approval status, with values like approved and rejected.
- For forms on the same server, the current user must be an assignee or the step has no effect.
- For remote forms, you pick an assignee to impersonate.
If you are building a “customer approval form” that approves an internal entry, this is the feature you want.
For most people, this is a second tutorial on its own, so treat it as “bonus functionality,” not required for basic updates.
Advanced capability 2: Complete a User Input step (in another workflow)
The docs also describe completing a User Input step in another entry:
- The target entry’s current step must be a User Input step.
- The current user must be an assignee, or it will have no effect.
- It updates mapped fields and sets the User Input step status to complete.
Again, this is extremely useful for complex “handoff” workflows, but you can ignore it until your basic update scenario is working.
Troubleshooting the Update an Entry step
1) The wrong entry gets updated
This almost always means the Entry ID field contains the wrong number.
Remember: the Entry ID field must contain the ID of the entry that will be updated.
Fix: confirm the “Parent Request Entry ID” value matches a real entry ID in the target form.
2) Nothing updates
Common causes:
- Wrong target form selected.
- The step never ran (workflow did not reach it).
- The current user is not an assignee in the “approve” or “complete user input” modes (those modes require assignee rules).
3) Users have to type Entry IDs manually
Gravity Flow explicitly suggests using a hidden field and Gravity Forms dynamic population so the user does not have to enter the target entry ID every time.
If you are using query string population, also keep in mind that dynamic population relies on PHP execution and can be affected by caching in some setups.
4) “Entry ID (Self)” is missing
That option only appears when the target form is also the source form.
Once your Gravity Flow Update Entry step is working, you can keep parent and child entries in sync without duplicate submissions.
Our Premium add-ons for Gravity Forms
List Text
Add features like textarea, placeholder and custom validation to a column or multiple columns in a Gravity Forms List Field.

Entry to Database
Integrates Gravity Forms with internal or external databases, offering flexible mapping of form fields to database columns and real-time synchronization between entries and database rows.

JWT Prefill
Fill forms with data you can trust. Prefill Gravity Forms fields with a secure token instead of links with editable url parameters, so your data is accurate, tamper-proof, and ready to use.

Advanced Merge Tags
This Gravity Forms Add-On adds extra Merge Tag modifiers (and a lot of power). From the most common used functions like capitalize and length to changing date formats.
Read tutorials about

How to Create a Public Submission Business Directory in WordPress (Gravity Forms + GravityView)
Build a moderated business directory where users submit listings through a form, admins approve entries, and approved businesses appear in a searchable GravityView directory.

How to Create an Event Workshop Registration + Waitlist System in WordPress
This guide shows how to set up a workshop registration + waitlist system in WordPress: register attendees until capacity is reached, waitlist the rest, approve entries, and auto-promote people when a seat opens using Gravity Forms, Gravity Flow, and GravityView.

Gravity Flow Form Submission Step Tutorial
The Gravity Flow Form Submission step pauses a workflow until another form is submitted, then continues once the handoff is complete. This guide shows how to connect two forms, prefill fields with mapping, send the correct secure link, and troubleshoot the most common “workflow didn’t move” issues.

Gravity Flow Delete an Entry Step Tutorial
The Gravity Flow Delete Entry step lets you trash or permanently remove Gravity Forms entries as part of a workflow. This guide covers the key settings, scheduling options (delay or date-based), and safe testing tips so you can follow retention and privacy rules with confidence.