The Gravity Flow Form Submission step pauses a workflow until another form is submitted, then continues once that handoff is completed through a secure link.
Gravity Forms is great at collecting the first submission. But real workflows often need a second “handoff form” later, like a payment form, a follow-up questionnaire, or an internal sign-off form that should be completed only after an earlier step. That is exactly what the Form Submission step is built for: it pauses a workflow until a different form is submitted, then continues the workflow after that submission happens.
If you want the bigger picture first, read our guide to Gravity Flow workflow steps before diving into this specific step.
What you’ll build in this tutorial
A simple, realistic two-form workflow:
- Form A (Source Form): “Project Request” (customer submits requirements)
- Form B (Target Form): “Deposit Payment” (customer pays a deposit later)
- Workflow: After Form A is submitted (and optionally approved), Gravity Flow sends the customer a secure link to Form B. When Form B is submitted, the workflow continues.
This exact pattern is also why Gravity Flow’s docs use payment as a common example for the Form Submission step.
Prerequisites (do this before you start)
- Gravity Forms installed and working.
- Gravity Flow installed and activated.
- Form Connector Extension installed and activated. The Form Submission step is part of this extension (v1.1+).
- You can create/edit two forms and add a workflow to Form A.
Step 1: Create your two forms (source and target)
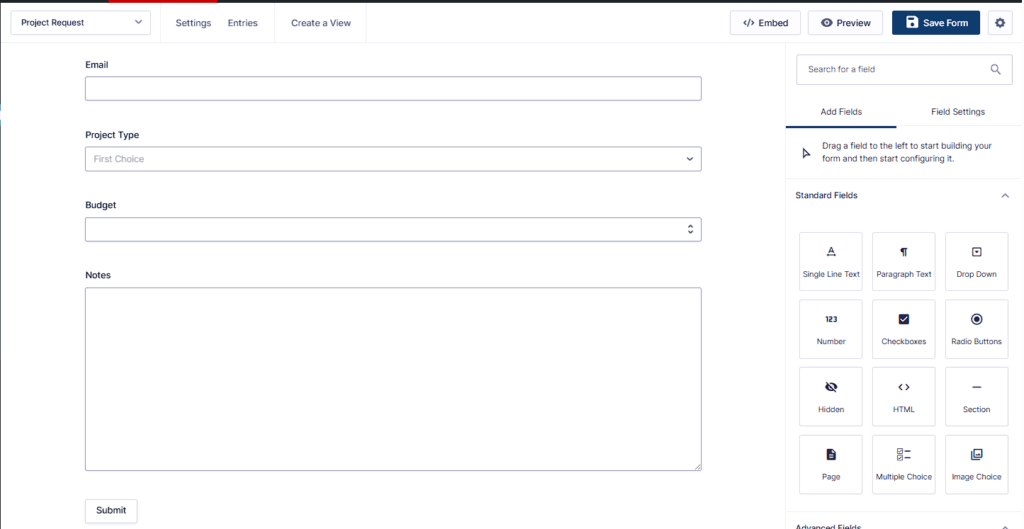
1A) Build the Source Form (Form A: “Project Request”)
Keep it simple. Example fields:
- Name
- Project Type (Dropdown)
- Budget (Number)
- Notes (Paragraph)
This form’s entry becomes the “source entry” that will feed default values into Form B via field mappings.
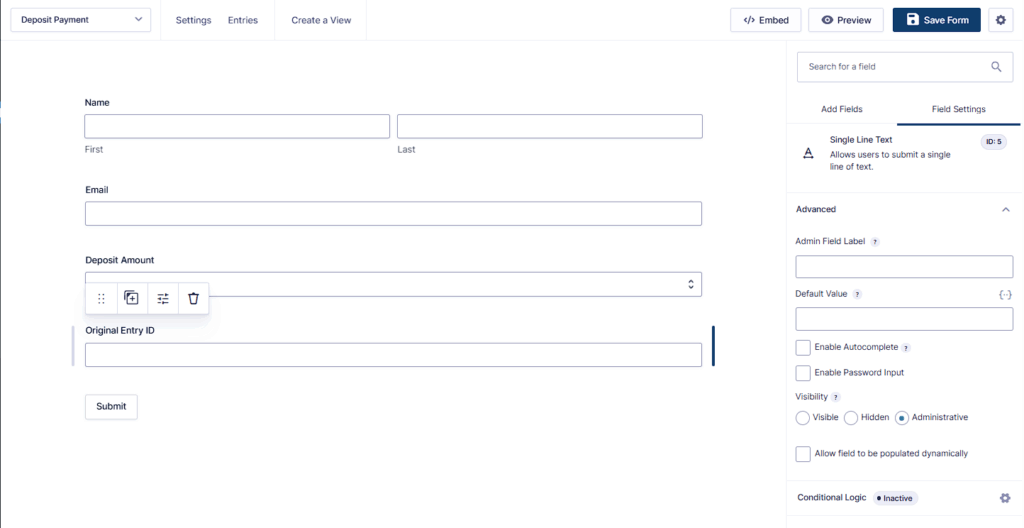
1B) Build the Target Form (Form B: “Deposit Payment”)
Example fields:
- Name (prefilled from Form A)
- Email (prefilled from Form A)
- Deposit amount (prefilled or calculated)
- Payment fields (whatever your payment add-on requires)
Important design tip: If you want to connect Form B’s submission back to Form A later (for reporting or updates), add a Hidden field in Form B like:
- “Original Entry ID” (Hidden)
You’ll map Form A’s entry ID into this hidden field using the Form Submission step’s field mappings. That makes it much easier to update the original entry later if you choose to.
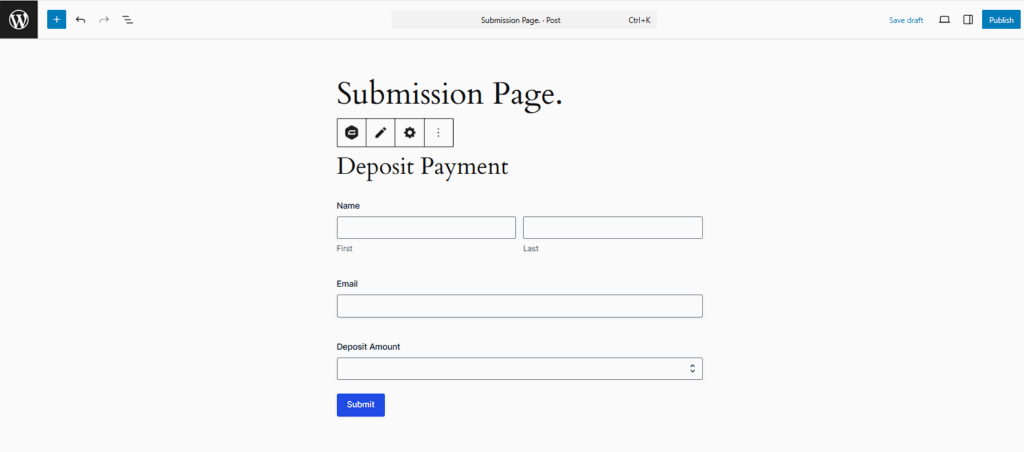
Step 2: Embed the target form on a Submission Page
The Form Submission step needs to know which page the target form is embedded on, because that page is used to generate the secure submission links.
Option A (simplest): Normal WordPress page
- Create a WordPress page called something like Deposit Payment.
- Embed Form B on that page using the Gravity Forms block/shortcode.
Option B: Gravity Flow Submit Page or Submit Block
Gravity Flow also has a Submit Block / Submit Page concept, but there’s one extra requirement:
If you use either:
- Workflow Submit Page (in the admin dashboard), or
- The Submit Page via the Submit Block, then your form must be selected under Workflow > Settings > Published Workflow Forms.
Step 3: Add the workflow to the Source Form (Form A)
Go to: Forms → Project Request (Form A) → Settings → Workflow → Add New
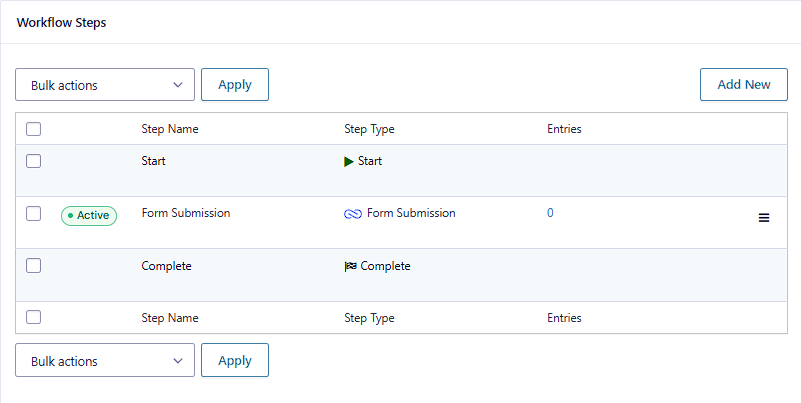
Create your workflow steps in the order you want.
A simple structure could be:
- (Optional) User Input or Approval
- Form Submission (this tutorial)
- Next step (Notification, Webhook, etc.)
Any number of Form Submission steps can exist in the same workflow if you need multiple follow-up forms.
Step 4: Configure the Gravity Flow Form Submission step
In your workflow, add a new step and select Form Submission as the Step Type.
4A) Standard settings (don’t skip these)
Step Type
Select Form Submission. Gravity Flow notes you can also set conditional logic and schedule if needed.
Assign To
Assign the step to one or more assignees, or use conditional routing.
Typical choices for Form Submission:
- Assign to the submitter (common when Form B is a customer-facing payment form)
- Assign to a staff role (common when Form B is an internal follow-up form)
If you assign steps to an email field, Gravity Flow supports that, but it is less secure than assigning to WordPress users and you should use HTTPS and avoid highly sensitive data.
Instructions
Add short instructions. These appear above the field values while the step is waiting.
Example: “Please complete the deposit payment form using the secure link below. Once submitted, your request will move forward.”
Display Fields
Pick the fields from Form A you want visible while the step is pending. This keeps the step clean and reduces confusion.
A good default is:
- Project Type
- Budget
- Notes
Emails
This is critical. Gravity Flow specifically recommends emailing the assignee with the {workflow_form_submission_link} merge tag.
We’ll set up the exact email in Step 6.
Expiration
Optional. Set an expiration if this follow-up form must be completed within a deadline.
4B) Step-specific settings (these are the “Form Connector” parts)
1) Form (Target Form)
Select your Form B (“Deposit Payment”). The step will wait for a submission from the form you select here.
2) Submission Page
Select the page where Form B is embedded. That page is used to generate the secure link.
If you used a Submit Block / Workflow Submit Page approach, confirm Published Workflow Forms is configured (covered earlier).
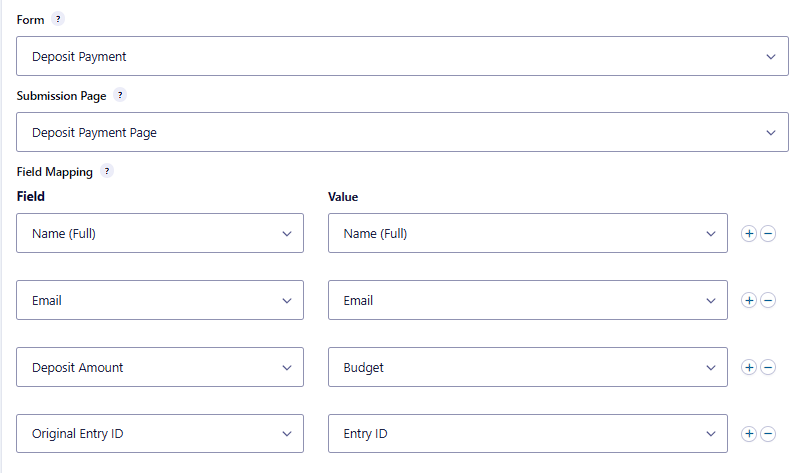
3) Field Mappings
This setting defines the default values for the target form. You can map:
- simple fields (Single Line Text, Email),
- complex fields (Name, Address),
- or custom values (including Gravity Forms field merge tags).
Recommended mapping for our example Map:
- Form A Name → Form B Name
- Form A Email → Form B Email
- Form A Budget → Form B Deposit Amount (or use a custom value if you want a fixed deposit)
- Form A Entry ID → Form B “Original Entry ID” (Hidden)
Step 5: Form Submission step security (why links matter)
This is the part that trips people up, so read this carefully.
The assignee must use the secure link
Gravity Flow is very explicit:
- The assignee can open the target form from the workflow entry detail page, or
- from the assignee email using {workflow_form_submission_link}.
If they submit the target form without using one of those links, the submission will be ignored by the step. The reason is that the link includes a security hash so field mappings cannot be altered.
Secure default field values and the security token
Field mappings populate default values in the target form when opened from the secure link. Gravity Flow also adds a special security token to the URL to prevent tampering with the source entry ID. If the ID is changed in the URL, the default values will not display.
This is why your proof screenshots matter. When you test, you want to show:
- the secure link opened correctly, and
- the mapped fields prefilled correctly.
Step 6: Email the Form Submission link to the assignee
Inside the Form Submission step, configure an email to the assignee.
Gravity Flow’s docs call out that the assignee email should include the merge tag: {workflow_form_submission_link}
Example email template (copy and paste)
Subject: Please complete your deposit payment Message: Hi,
To move your request forward, please complete the deposit payment form using this secure link:
{workflow_form_submission_link}
Thank you.
Optional: change the link text
You can customize the clickable text like this: {workflow_form_submission_link: text=”Open the payment form”}
Step 7: Test it end-to-end (and capture proof)
This is the cleanest test path for a tutorial.
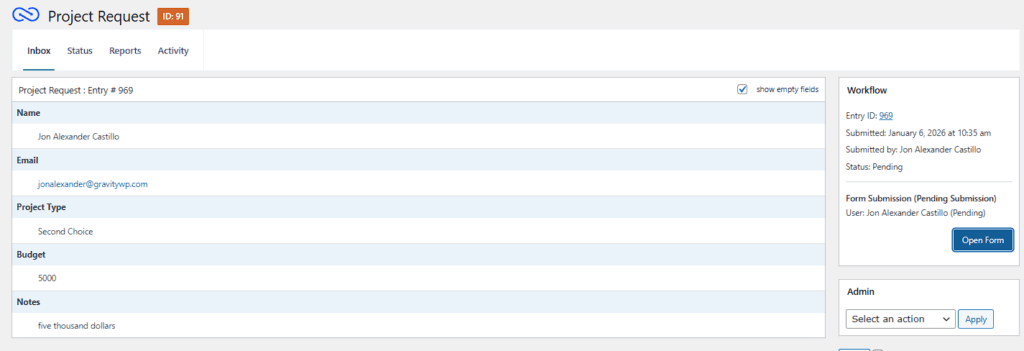
7A) Submit Form A (Source Form)
- Submit a new entry through Form A.
- Confirm the workflow reaches the Form Submission step.
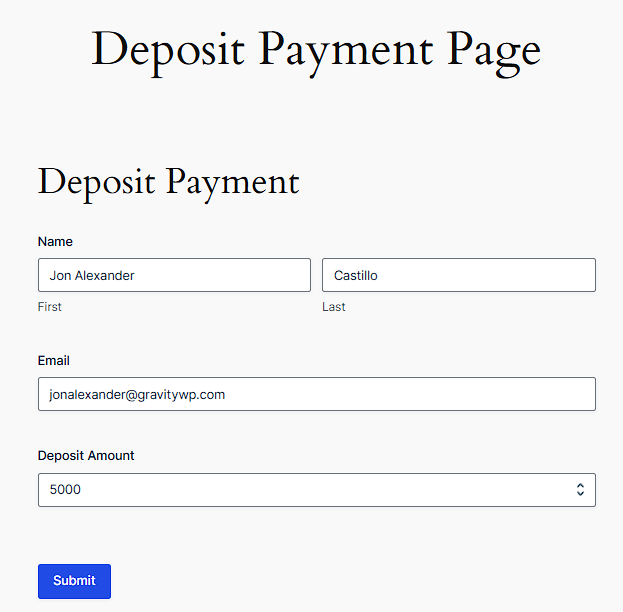
7B) Open the target form using the secure link
Use one of these:
- The link from the workflow entry detail page, or
- The link generated by {workflow_form_submission_link} in the assignee email
Now confirm:
- mapped fields are prefilled (Name, Email, Deposit Amount)
- your hidden “Original Entry ID” is populated (you can verify after submission by viewing the entry)
7C) Submit Form B (Target Form)
Submit the target form normally.
When the target form is submitted correctly through the secure link, the Form Submission step completes and the workflow can continue.
Step 8: Optional but powerful configurations
Option 1: Use Conditions to skip the step when it isn’t needed
The Condition setting lets you control whether a step runs or is skipped when the workflow reaches it, based on entry values. If the step is bypassed, it will not appear in the timeline.
Example:
- Only require a deposit payment if Budget is greater than 50,000.
This helps you keep one workflow for multiple scenarios without duplicating steps.
Option 2: Schedule the step (delay when it triggers)
The Schedule setting can delay when a step is triggered, using minutes/hours/days/weeks, a specific date, or a date field in the form.
Two important realities to know:
- Delay settings are not exact. Up to 15 minutes could pass before a scheduled step triggers.
- Gravity Flow relies on WP-Cron and processes queued steps on a cycle (every 15 minutes), so low traffic can delay execution.
For Form Submission, scheduling is usually used when you want the “please submit the next form” step to start later, not immediately after Form A is submitted.
Step 9: Multiple assignees (when you need more than one person to submit)
The Form Submission step can have more than one assignee and supports conditional routing. It can also be set to wait until:
- all assignees have submitted, or
- just one assignee has submitted
That is controlled by the assignee policy setting.
This is useful for scenarios like:
- Two departments must each submit their own follow-up form before the workflow can continue.
- A manager and finance both must confirm something using the same target form.
(When you test this, be sure you understand which policy you chose, because it changes when the workflow moves forward.)
Step 10: If your target form has payments, the step can wait for payment completion
By default, the step continues as soon as the target form is submitted. But if the target form has a payment feed configured, the Form Submission step will wait until the payment has been processed. If payment is unsuccessful, the step remains pending so the assignee can submit again.
Gravity Flow states that payment add-ons built on the Gravity Forms Payment Add-On Framework are supported, and it lists these examples:
- Authorize.net
- Stripe
- PayPal Payments Standard
- PayPal Payments Pro
This is why the Form Submission step is such a clean way to handle deposits and staged payments inside one workflow.
Step 11: Updating the original entry (advanced, but very practical)
If you want Form B’s submitted values to update Form A’s original entry, Gravity Flow recommends pairing Form Submission with an Update Entry step on the target form. The key requirement is that your field mappings include the original entry ID so the Update Entry step can identify which entry to update.
Gravity Flow also notes this can be a great alternative to a User Input step for forms with heavy conditional logic or custom code that causes issues.
You already added “Original Entry ID” as a hidden field in Form B earlier, so you’re set up correctly for this pattern.

Troubleshooting the Form Submission step
Problem 1: “I submitted Form B but the workflow didn’t move”
Most common cause: the target form was submitted without the security token link, so the submission was ignored.
Gravity Flow is clear that the Form Submission step only listens for submissions coming from pages whose URLs contain the security token, and it will ignore submissions without it.
Fix: Always open Form B using:
- the workflow entry detail page link, or
- {workflow_form_submission_link} in the assignee email
Problem 2: Default values are not prefilling
If the source entry ID is changed in the URL, the default values will not display.
Fix: Do not edit the URL. Use the secure link exactly as generated.
Problem 3: “The link to this form is no longer valid” (common with email assignees)
Gravity Flow documents this warning specifically when the step is assigned to an email assignee, and it points to aggressive caching as the likely cause. The fix is to exclude the submission page from caching (you may need your host to help).
Problem 4: You tried to map a File Upload field
The Form Submission step cannot map file upload fields.
Practical workaround: Put the File Upload field directly in the target form and collect it during that submission instead of trying to map it.
Problem 5: You expected cross-site listening
Gravity Flow states the Form Submission step only listens for submissions of forms on the same site. If you need to listen for submissions on different sites, they advise contacting support and voting for the feature.
Closing
The Form Submission step is one of the cleanest ways to build multi-stage processes in Gravity Flow: you can split a process across forms, prefill fields safely, and keep the workflow moving only when the next form is truly completed. It is also built with security in mind, which is why testing must always use the secure submission links.
Our Premium add-ons for Gravity Forms

n8n Connector
Connect Gravity Forms to n8n and automate your workflows with secure, flexible, and powerful webhooks. Go beyond simple notifications and build advanced, two-way automations.

Advanced Merge Tags
This Gravity Forms Add-On adds extra Merge Tag modifiers (and a lot of power). From the most common used functions like capitalize and length to changing date formats.

Entry to Database
Integrates Gravity Forms with internal or external databases, offering flexible mapping of form fields to database columns and real-time synchronization between entries and database rows.

Field to Entries
Create entries based on Checkboxes & Multi Select choices & List Field rows.
Read tutorials about

How to Create a Public Submission Business Directory in WordPress (Gravity Forms + GravityView)
Build a moderated business directory where users submit listings through a form, admins approve entries, and approved businesses appear in a searchable GravityView directory.

How to Create an Event Workshop Registration + Waitlist System in WordPress
This guide shows how to set up a workshop registration + waitlist system in WordPress: register attendees until capacity is reached, waitlist the rest, approve entries, and auto-promote people when a seat opens using Gravity Forms, Gravity Flow, and GravityView.

Gravity Flow Form Submission Step Tutorial
The Gravity Flow Form Submission step pauses a workflow until another form is submitted, then continues once the handoff is complete. This guide shows how to connect two forms, prefill fields with mapping, send the correct secure link, and troubleshoot the most common “workflow didn’t move” issues.

Gravity Flow Delete an Entry Step Tutorial
The Gravity Flow Delete Entry step lets you trash or permanently remove Gravity Forms entries as part of a workflow. This guide covers the key settings, scheduling options (delay or date-based), and safe testing tips so you can follow retention and privacy rules with confidence.
