The Gravity Flow Delete Entry step lets you trash or permanently delete Gravity Forms entries, immediately or on a schedule, so your workflow can follow retention rules.
Sometimes a form entry should not live forever.
Maybe it contains sensitive personal data, and your policy says it must be removed once the process is finished. Or maybe you create “temporary” helper entries in another form, and once the workflow is complete, those entries are just noise.That is exactly what the Delete an Entry step is for. It is included in the Gravity Flow Form Connector Extension and can be used to trash an entry or delete it permanently at any point in a workflow. It can delete entries on the current site or on a different site.
If you want the full list of step types first, read our Gravity Flow workflow steps guide.
What the Gravity Flow Delete Entry step does
In practice, the Gravity Flow Delete Entry step can target the current entry (self) or a different entry ID, and it can run immediately or later using Schedule.
The Delete an Entry step gives you three core powers:
- Choose where to delete
- This site, or a different site
- Choose how to delete
- Permanently delete the entry, or move the entry to the trash
- Choose which entry gets deleted
- Delete the current entry (Entry ID (Self)), or
- Delete a different entry by selecting a field that contains the target Entry ID
And because it’s a Gravity Flow step, you can also schedule it (delay, date, or date field) using the built-in Schedule setting.
When you should use Delete an Entry (real use cases)
step supports conditional execution using the standard step Condition setting.Gravity Flow specifically highlights privacy and retention needs: deleting entries helps when organizations must ensure personal data is stored no longer than necessary.
Here are practical ways teams use it:
1) Data retention after workflow completion
Example: “We keep request entries for 30 days after the process is completed, then delete them.”
2) Delete helper entries created by Form Connector
Example: A workflow creates an entry in a “Task Tracker” form. After the task is done and copied back to the parent request, the task entry can be trashed or deleted.
3) Enforce privacy rules only when a condition is met
Example: If an approval is rejected, delete the entry after 7 days. If it is approved, keep it.
That last one is important: the Delete an Entry
Trash vs Delete in the Delete an Entry step
The step gives you two Delete Actions:
- Move the entry to the trash
- Permanently delete the entry
Why this matters:
- “Trash” is a safer first choice because it acts like a buffer.
- “Permanently delete” is final.
Also keep in mind a Gravity Forms behavior worth planning around: when an entry is deleted, associated file uploads are also removed (unless you implement custom handling).
So if your form has file uploads, test your retention plan carefully.
Tutorial build (simple and realistic)
We’ll build a clean example you can test fast:
Scenario:
A “Request Form” runs through an internal workflow. Once the workflow finishes, we delete the entry 5 weeks later, either by trashing or permanently deleting it.
This mirrors Gravity Flow’s own example of deleting the current entry permanently 5 weeks after the step is triggered.
Prerequisites checklist
You need:
- Gravity Forms installed
- Gravity Flow installed
Gravity Flow Form Connector Extension installed and activated (this is what adds the Delete an Entry step type)
Step 1: Create a test form (Request Form)
Create a Gravity Form called Request Form with fields like:
- Name
- Email
- Request Type (Dropdown)
- Notes (Paragraph)
If you want to test file deletion behavior, add a File Upload field too, but only do that on a staging site.
Step 2: Add a workflow to the form
Go to:
Forms → Request Form → Settings → Workflow → Add New
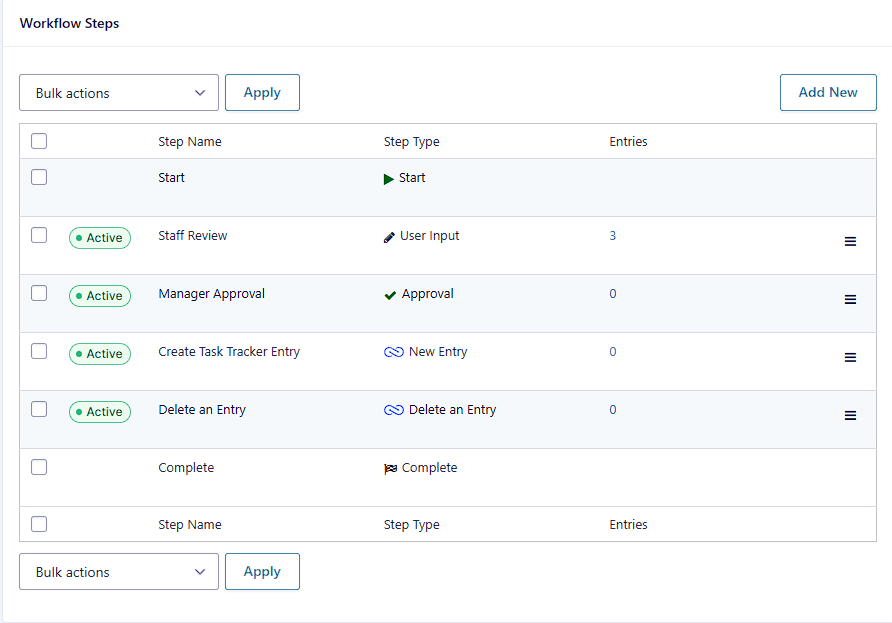
Add a basic workflow that can actually reach “complete.” For example:
- User Input (staff updates internal notes)
- Approval (manager approves)
- Delete an Entry (scheduled)
You can swap these steps around depending on your real process, but for testing, keep it simple.
Step 3: Add the Delete an Entry step
Click Add Step and choose Delete an Entry.
You’ll see common step settings (Name, Description, Highlight, Condition, Schedule) and then the Delete an Entry specific settings.
Step 4: Configure Delete an Entry settings (the exact options that matter)
4.1 Site: this site vs a different site
In the Delete an Entry step settings, choose:
- This site (for your first test)
The step also supports deleting entries on a different site.
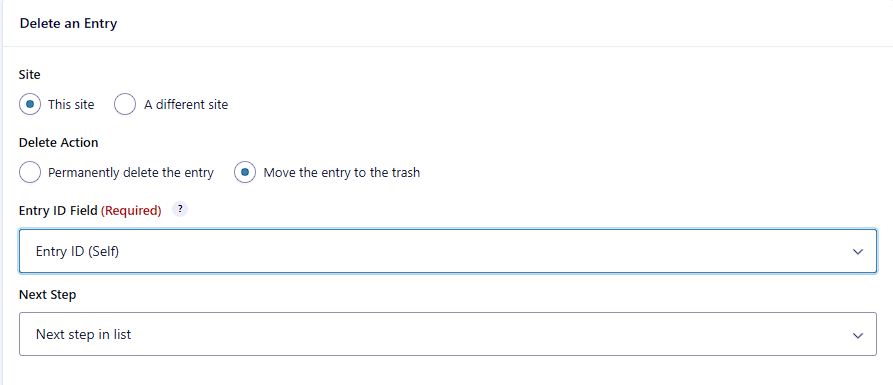
4.2 Delete Action: trash vs permanent delete
Choose one:
- Move the entry to the trash (safer for testing)
- Permanently delete the entry (final)
For your first run, I strongly recommend “trash.” Once you confirm the workflow timing and behavior, you can switch to permanent deletion if that’s what your policy requires.
4.3 Entry ID Field: delete “self” or delete a different entry
This setting controls what entry will be deleted.
- If you want to delete the current entry, choose Entry ID (Self) (this is shown as an available option).
- If you want to delete a different entry, select a field that contains the ID of the entry you want to delete. Gravity Flow calls this out directly in the docs.
For this tutorial, choose:
Entry ID (Self)
Step 5: Schedule the deletion (delay, date, or date field)
This is the part most people care about: “delete it later, not right now.”
5.1 Turn on Schedule
Enable Schedule this step.
Gravity Flow supports scheduling steps:
- after a delay (minutes, hours, days, weeks),
- on a specific date,
- or on, before, or after the date in a date field.
5.2 Choose a delay (example: 5 weeks)
If your retention policy is “delete after 5 weeks,” set:
- Schedule: Delay
- Start this step: 5
- Unit: Week(s)
This matches the example shown in the Gravity Flow Delete an Entry documentation screenshot.

Important timing note (so your testing makes sense)
Gravity Flow notes two timing realities you should expect:
- Delay scheduling is not exact. Up to 15 minutes could pass before the step triggers.
- Gravity Flow uses WP-Cron and processes queued steps on a 15-minute cycle, and low site traffic can delay scheduled tasks.
So when you test, don’t expect deletion to occur at the exact minute.Important timing note (so your testing makes sense)
Gravity Flow notes two timing realities you should expect:
- Delay scheduling is not exact. Up to 15 minutes could pass before the step triggers.
- Gravity Flow uses WP-Cron and processes queued steps on a 15-minute cycle, and low site traffic can delay scheduled tasks.
So when you test, don’t expect deletion to occur at the exact minute.
Step 6: Understand when deletion actually happens (this surprises people)
Gravity Flow’s Delete an Entry doc includes a key rule:
The entry will be deleted only when the workflow is complete. Allow at least 15 minutes for the entry to be deleted.
What that means in practice:
- Your workflow needs to reach completion.
- Then the Delete an Entry step can run (based on schedule).
- Then you may still need to wait a bit for the scheduled process to execute.
If your workflow is stuck in a User Input step waiting on someone, deletion will not happen because the workflow is not complete yet.
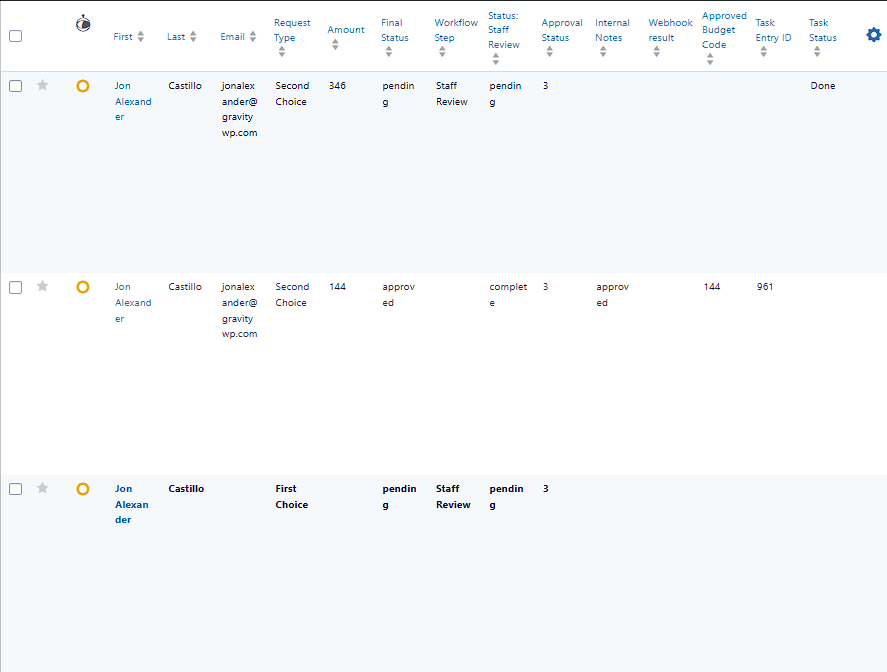
Step 7: Test it (and capture proof screenshots)
7.1 Submit a test entry
Submit your Request Form once.
7.2 Push the workflow to completion
Complete the actions needed to finish the workflow (approve, submit user input, etc.).
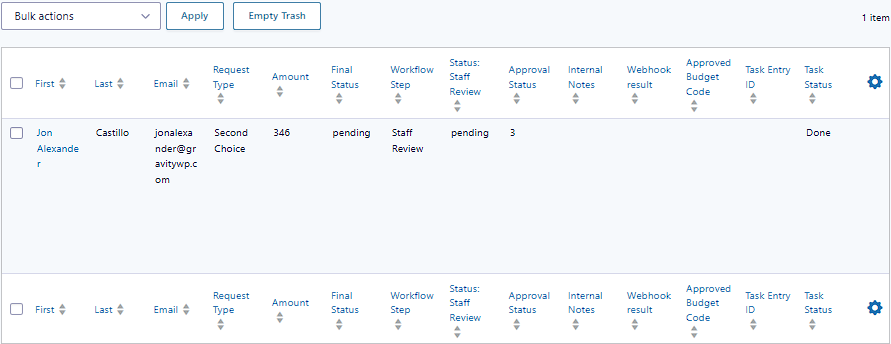
7.3 Confirm deletion behavior
Depending on your Delete Action:
- If you chose Trash, the entry should be moved to trash after the scheduled time.
If you chose Permanent delete, the entry should be removed.
For timing tests, you can temporarily set the delay to something short (like minutes) so you don’t wait weeks while validating the setup. The scheduling system supports minutes/hours/days/weeks.
Deleting a different entry (common Form Connector pattern)
Once you’re comfortable deleting “self,” the next step is deleting another entry.
This is common when you have a parent-child workflow:
- Parent form: Request Form
- Child form: Task Tracker
After you update the parent entry with the final status, you might want to delete the child entry to reduce stored data.
How this works:
- Add a field in the current form that stores the target entry ID (often a hidden field).
- In Delete an Entry step, set Entry ID Field to that field.
- The step will delete the entry whose ID is stored there.
Using Delete an Entry responsibly (best-practice notes)
Prefer “Trash” until you are confident
Because permanent deletion is final, trash is safer while you test and while you confirm your retention policy.
Be careful with file uploads
If your entries include uploads, remember Gravity Forms’ behavior: deleting an entry removes associated file uploads too.
If you need to retain files while deleting entries, Gravity Forms documents a filter-based approach, but that’s outside this step’s UI.
Consider Gravity Forms built-in retention if you only need time-based deletion
If your only goal is “delete entries after X days,” Gravity Forms includes Personal Data retention policies that can automatically move entries to trash or delete them permanently.
Where Gravity Flow still wins:
- You can tie deletion to workflow logic (only after approvals, only after completion).
- You can schedule based on workflow timing and step placement.
- You can delete other entries, not just the current one.
Our Premium add-ons for Gravity Forms

Field to Entries
Create entries based on Checkboxes & Multi Select choices & List Field rows.

JWT Prefill
Fill forms with data you can trust. Prefill Gravity Forms fields with a secure token instead of links with editable url parameters, so your data is accurate, tamper-proof, and ready to use.

All Entries
All your new Gravity Forms entries in one central place. Stop navigating between multiple forms to find new entries. Get immediate oversight and full control with a powerful, unified dashboard.

List Number Format
With this Gravity Forms Add-on you can change List Field columns into a number field, do calculations within a row or column. Extra merge tags are available with total counts of columns.
Read tutorials about

How to Create a Public Submission Business Directory in WordPress (Gravity Forms + GravityView)
Build a moderated business directory where users submit listings through a form, admins approve entries, and approved businesses appear in a searchable GravityView directory.

How to Create an Event Workshop Registration + Waitlist System in WordPress
This guide shows how to set up a workshop registration + waitlist system in WordPress: register attendees until capacity is reached, waitlist the rest, approve entries, and auto-promote people when a seat opens using Gravity Forms, Gravity Flow, and GravityView.

Gravity Flow Form Submission Step Tutorial
The Gravity Flow Form Submission step pauses a workflow until another form is submitted, then continues once the handoff is complete. This guide shows how to connect two forms, prefill fields with mapping, send the correct secure link, and troubleshoot the most common “workflow didn’t move” issues.

Gravity Flow Delete an Entry Step Tutorial
The Gravity Flow Delete Entry step lets you trash or permanently remove Gravity Forms entries as part of a workflow. This guide covers the key settings, scheduling options (delay or date-based), and safe testing tips so you can follow retention and privacy rules with confidence.
