How to create a new Gravity Forms entry in another form using the Form Connector “New Entry” step
Gravity Forms is excellent at collecting submissions. But a lot of real workflows need more than one form.A common example: a customer submits a request, and your team needs an internal “task” entry created automatically in a separate form. That’s exactly what the Form Connector “New Entry” step is for. It creates a brand-new entry in a different form, using field mapping from the current entry.
If you’re still getting familiar with step types, start with our Gravity Flow workflow steps guide.
What the Gravity Flow Create Entry step actually does
The Gravity Flow Create Entry step is part of the Form Connector extension and creates a new entry in a different form.
At a high level, the setup is:
- Add a New Entry step to a workflow.
- Select the target form.
- Use Field Mapping to map target fields to source fields.
- When the step runs, Gravity Flow uses those mapped values to create the new entry in the target form.
What we’re building in this tutorial (simple, real-world setup)
We’ll create two forms:
Form A (source form): “Request Form”
This is what the user submits.
Form B (target form): “Task Tracker”
This receives a new entry automatically, created by the workflow.
Goal: Every time Form A gets a submission, Gravity Flow creates a new entry in Form B with the mapped details.
Before you start: prerequisites checklist
You’ll need:
- Gravity Forms installed and working.
- Gravity Flow installed and activated.
- Gravity Flow Form Connector extension installed and activated (so the New Entry step type is available).
- Permission to edit forms and create workflows in WordPress.
Step 1: Create the target form (Form B: “Task Tracker”)
Start with the target form because the New Entry step needs a target to map into.
Recommended fields for “Task Tracker”
Create a new Gravity Form called Task Tracker with fields like:
- Task Title (Single Line Text)
- Requester Name (Single Line Text)
- Requester Email (Email)
- Request Type (Drop Down)
- Budget / Amount (Number)
- Notes (Paragraph Text)
- Status (Drop Down)
Optional, but useful for internal tracking.
Why this matters:
Field mapping works best when your target form has clear, “single-purpose” fields. It makes mapping clean and avoids confusion later.
Step 2: Create the source form (Form A: “Request Form”)
Now create your source form, where the workflow starts.
Recommended fields for “Request Form”
Create a Gravity Form called Request Form with:
- Name
- Email
- Request Type (Drop Down)
- Amount (Number)
- Notes (Paragraph Text)
Add one important internal field: “Task Entry ID”
Add a field to store the Entry ID that gets created in the Task Tracker form.
This matters because the Form Connector docs note that “Store the ID of the new entry” only shows these field types: Text, Paragraph, and Hidden.
So add one of the following to your Request Form:
- Single Line Text (this counts as “Text”), or
- Hidden field, or
- Paragraph Text
My recommendation: use a Single Line Text field labeled Task Entry ID and set its Visibility to Administrative so users never see it, but you can still view it in the entry later.
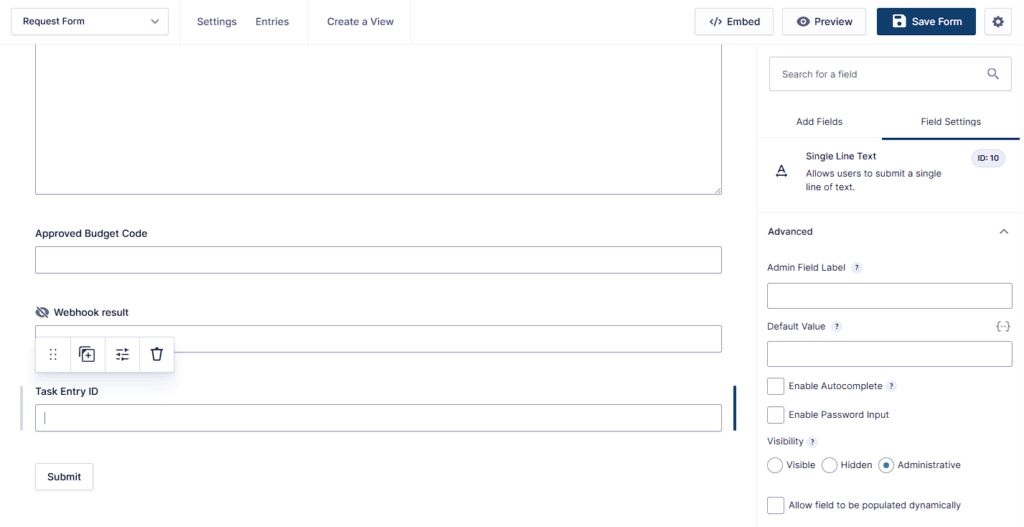
Gravity Forms supports a Visibility setting where Administrative means it’s not shown on the front-end, but it still captures data for entries.
Gravity Flow also notes that fields set to Administrative can still be used in workflow pages.
Step 3: Create a workflow on the Request Form
Go to:
Forms → Request Form → Settings → Workflow
Then create a new workflow and add a step.
You’re going to add a New Entry step (Form Connector).
Step 4: Add the Gravity Flow Create Entry step and select the target form
In this step, you’ll add the Gravity Flow Create Entry step and select your target form.
Inside your workflow:
- Click Add Step
- Choose the step type New Entry
- Give it a clear name like:
Create Task Tracker Entry - Select your Target Form: Task Tracker
Gravity Flow’s doc description is simple but important here: you add the New Entry step, configure standard step settings, and select your target form.
Step 5: Configure Field Mapping (the part that makes it work)
This is where most mistakes happen, so slow down and map carefully.
Gravity Flow describes the mapping behavior like this:
- Target fields are listed on the left.
- You map each target field to a source field on the right.
- When the step runs, the values in the mapped fields are used to create the new entry in the target form.
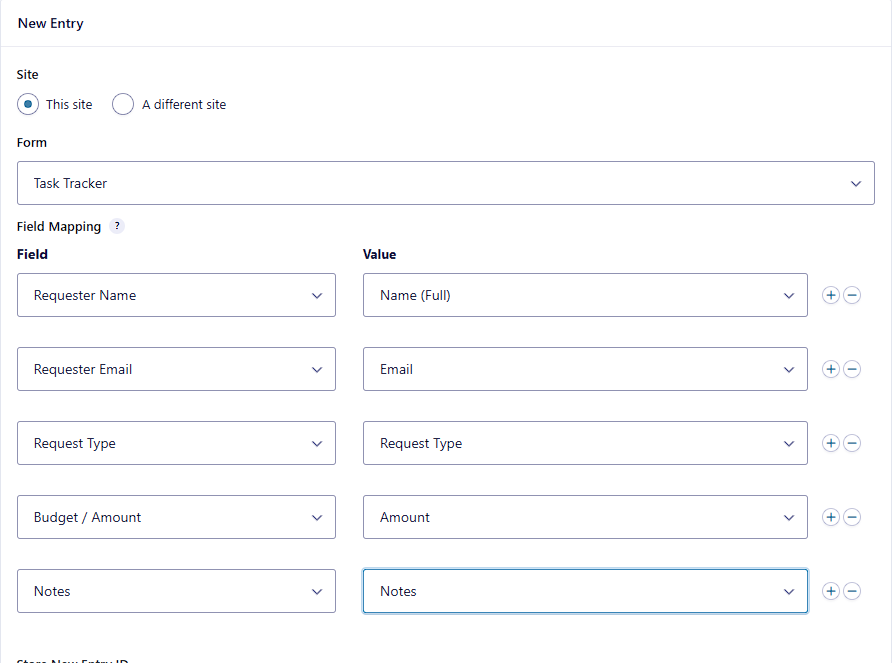
A clean mapping example (Request Form → Task Tracker)
Map these target fields (Task Tracker) to source fields (Request Form):
- Requester Name ← Name
- Requester Email ← Email
- Request Type ← Request Type
- Budget / Amount ← Amount
- Notes ← Notes
If your Task Tracker has fields that don’t exist in the Request Form (like Status), just leave them unmapped for now. You can set defaults later inside the Task Tracker form if needed.
Step 6: Store the new entry’s ID back into the source entry
This is the “nice-to-have” that makes debugging and reporting easier.In the New Entry step settings, find Store the ID of the new entry and select your Task Entry ID field from the Request Form.
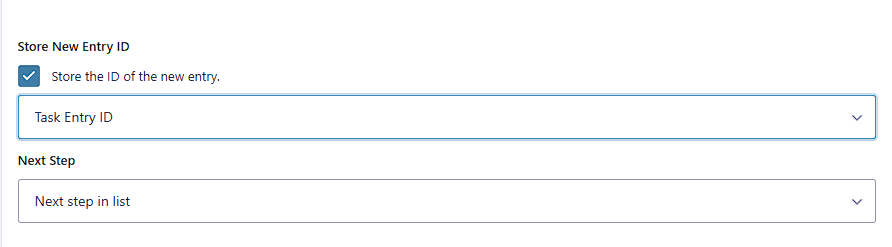
Remember the limitation from the docs: this dropdown only shows Text, Paragraph, and Hidden field types.
That’s why we added the Task Entry ID field earlier.What you’ll get after testing:
When Form A submits, Form B is created, and Form A’s entry gets updated with the newly created Form B Entry ID.
Step 7: Test it end-to-end (proof time)
Now we test in the simplest, most reliable way.
- Open the Request Form on the front-end.
- Submit a test entry with obvious sample data.
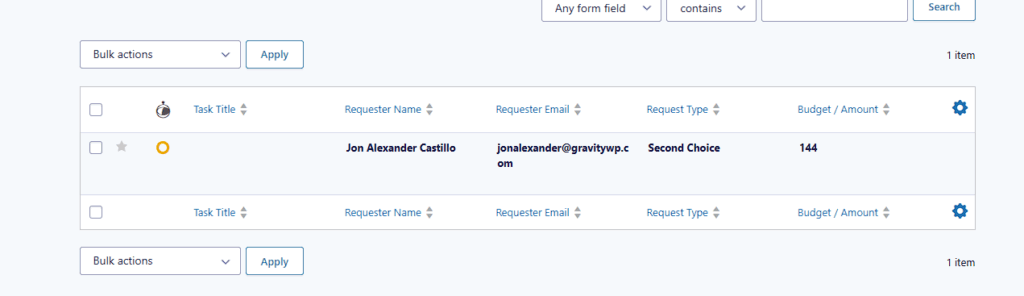
- Go to Forms → Task Tracker → Entries
- Confirm a brand-new entry exists with your mapped values.
Then go back to the source entry:
- Go to Forms → Request Form → Entries
- Open the same submission
- Confirm Task Entry ID contains an entry number
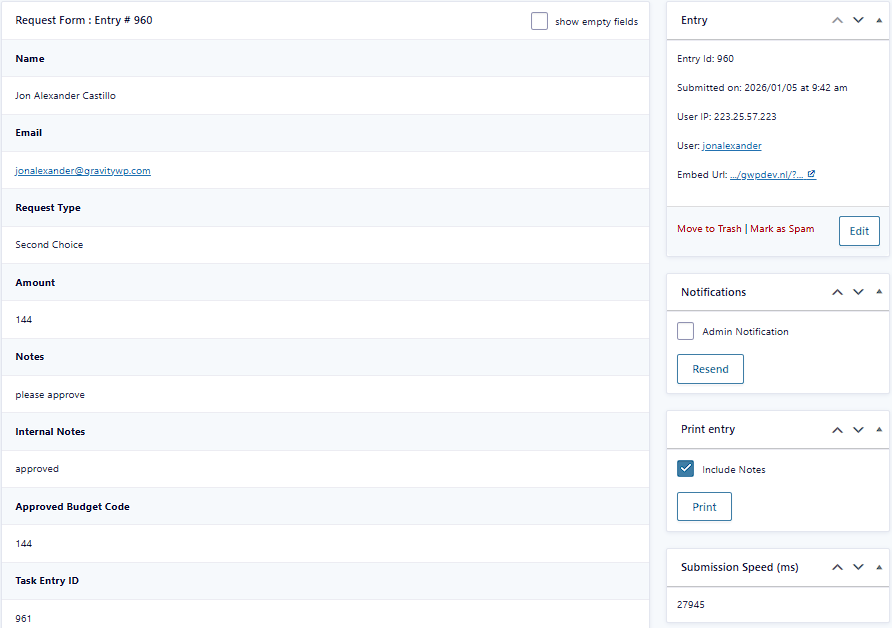
If both are true, your Create an Entry setup is working.
Optional: Make internal-only fields usable by staff during workflow steps
If you plan to add staff review later (User Input steps), this small detail helps a lot.
Gravity Forms has Visibility settings including Administrative, which keeps fields out of the front-end.
Gravity Flow also notes that Administrative fields can still be available to workflow pages and can be used in workflow steps by selecting them as display/editable fields.
Practical use:
You can add admin-only fields like “Internal Notes” or “Assigned Department” and let staff update them later in a User Input step, without exposing them to the original submitter.
Optional: Setting default values the safe way
Sometimes you want the Task Tracker entry to start with a default Status like “New”.
Because the Create An Entry doc focuses on mapping source fields to target fields, a safe and reliable approach is:
- Set defaults inside the Task Tracker form itself.
Gravity Forms supports Default Value, and the docs note that merge tags can be used there via the merge tag marker.
You can also keep the field Administrative if it’s internal-only.
Create an entry on a different site (advanced, but supported)
Gravity Flow supports creating an entry for a form on a different server.
The Create An Entry doc says:
- In the server setting, choose “a different server”
- Enter the Gravity Forms Web API details
- After saving credentials, the remote process works the same as local.
What to do on the target site (where the entry will be created)
You’ll need the Gravity Forms API enabled and an API key created.
Gravity Forms documents the REST API setup here:
- Enable the REST API at Forms → Settings → REST API and click Update.
- Add a key under API version 2 authentication (Add Key, copy Consumer Key/Secret, then click Update at the bottom to activate it).
Important:
This section is only needed if you’re truly creating entries across two different WordPress installs. For most workflows, “same server” is simpler and more than enough.
Troubleshooting (the real reasons it “doesn’t work”)
1) The New Entry step doesn’t show up
Most likely the Form Connector extension isn’t active. The New Entry step is part of the Form Connector extension.
2) The entry submits, but no Task Tracker entry is created
Check these, in order:
- Is the New Entry step in the workflow, and is the workflow enabled?
- Did you select the correct Target Form?
- Did you map at least one target field to a source field?
- Are you looking in the correct target form Entries screen?
3) “Store the ID of the new entry” won’t let you pick your field
That field is probably the wrong type. The docs are explicit: only Text, Paragraph, and Hidden field types appear in that selector.
4) Cross-site entry creation fails
Most common causes:
- REST API is not enabled on the target site.
- Keys were created but not activated because Update was not clicked.
- Wrong credentials were pasted into the Form Connector “different server” settings.
A practical upgrade you can do next (optional)
Once Create an Entry is working, a very common next step is:
- Add an Approval step before Create an Entry.
That way, you only create internal tasks when someone approves the request.
You already have a great overview article that explains Approval and the other key step types. So after you publish this tutorial, you can link back to it in two spots:
- Near the top (recommended): the “Gravity Flow workflow steps guide” link suggestion I gave earlier.
- Near the end of this tutorial: add one short line like:
Want to route requests before creating tasks? Read our Gravity Flow workflow steps guide.
Closing
The Gravity Flow Create Entry step is one of the fastest ways to turn one submission into a multi-form workflow. You choose a target form, map your fields, and Gravity Flow creates the new entry using the mapped values. If you want, paste your current form field list for Request Form and Task Tracker, and I’ll give you an exact 1:1 mapping plan (including which field to use for “Store the ID of the new entry”) with the fewest possible changes.
Our Premium add-ons for Gravity Forms

Advanced Number Field
Functionality for Number Fields, like rounding or only absolute numbers, fixed point notation, range calculation, custom units like % or m2 & show as slider.

JWT Prefill
Fill forms with data you can trust. Prefill Gravity Forms fields with a secure token instead of links with editable url parameters, so your data is accurate, tamper-proof, and ready to use.

Field to Entries
Create entries based on Checkboxes & Multi Select choices & List Field rows.

API Connector
Connect Gravity Forms to External API's: Query the API using form field values and automatically fill other form fields with the API response.
Read tutorials about

How to Create a Public Submission Business Directory in WordPress (Gravity Forms + GravityView)
Build a moderated business directory where users submit listings through a form, admins approve entries, and approved businesses appear in a searchable GravityView directory.

How to Create an Event Workshop Registration + Waitlist System in WordPress
This guide shows how to set up a workshop registration + waitlist system in WordPress: register attendees until capacity is reached, waitlist the rest, approve entries, and auto-promote people when a seat opens using Gravity Forms, Gravity Flow, and GravityView.

Gravity Flow Form Submission Step Tutorial
The Gravity Flow Form Submission step pauses a workflow until another form is submitted, then continues once the handoff is complete. This guide shows how to connect two forms, prefill fields with mapping, send the correct secure link, and troubleshoot the most common “workflow didn’t move” issues.

Gravity Flow Delete an Entry Step Tutorial
The Gravity Flow Delete Entry step lets you trash or permanently remove Gravity Forms entries as part of a workflow. This guide covers the key settings, scheduling options (delay or date-based), and safe testing tips so you can follow retention and privacy rules with confidence.