This Gravity Forms HubSpot integration uses OAuth 2.0, so it’s more secure and easier to maintain than a pasted token. A Gravity Forms HubSpot integration becomes much more useful when the form can pull existing contact details from HubSpot instead of making people type everything again.
This tutorial shows how to connect Gravity Forms to HubSpot using GravityWP API Connector and OAuth 2.0, then run a GET request that looks up a contact by email and returns:
- First name
- Last name
- Phone number
The tested result is simple and reliable: submit an email, and Gravity Forms stores the matching HubSpot fields (plus optional Raw JSON for proof and debugging).
What you’re building (Gravity Forms HubSpot integration overview)
Goal: A contact lookup form.
Flow:
- A user enters an email address.
- GravityWP API Connector sends a GET request to HubSpot’s CRM API.
- HubSpot returns the contact record (if it exists).
- Gravity Forms stores the returned values in your fields.
- You confirm the result using:
- a Confirmation message (human-readable)
- a Confirmation message (human-readable)
the Entry details (Raw JSON proof)
This is a practical Gravity Forms HubSpot integration pattern for contact lookups by email.
What you need for this Gravity Forms HubSpot integration
- A WordPress site with Gravity Forms
- GravityWP API Connector installed and activated
- A HubSpot account where you can create/configure an app (OAuth)
- At least one test contact in HubSpot with:
- email
- firstname
- lastname
- phone
- email
Once these are ready, the Gravity Forms HubSpot integration takes only a few configuration steps inside API Connector.
Key terms for a Gravity Forms HubSpot integration (OAuth, redirect URL, scopes)
OAuth 2.0
OAuth is a secure login-style flow. Instead of pasting a permanent token into WordPress, you “authorize” HubSpot and HubSpot issues access for your connection.
HubSpot’s OAuth flow starts at an authorization URL and then returns to your site’s redirect URL (callback).
Redirect URL (Callback URL)
This is the URL HubSpot sends the user back to after they approve access.
With GravityWP API Connector, the callback endpoint format is:
- https://yourdomain.com = your site domain
- /wp-json/ = WordPress REST API base path
- /gwpapiconnector/v1/ = API Connector endpoint namespace
- /oauth/callback = the OAuth return endpoint used by the add-on
Important: HubSpot requires an exact match between:
- the redirect URL in your app settings, and
- the redirect_uri being used in the authorization request
If it doesn’t match, HubSpot blocks the connection.
Scope: crm.objects.contacts.read
A “scope” is a permission. This permission is the “read contacts” level access needed to retrieve contact details from HubSpot.
Endpoint
An endpoint is the API path you call. In this tutorial, the endpoint is HubSpot’s Contacts CRM v3 endpoint. HubSpot supports identifying a record by email using idProperty=email.
idProperty=email
HubSpot’s object endpoints usually expect an internal record ID.
idProperty=email tells HubSpot: “Treat the identifier I’m sending as an email instead of an internal ID.”
properties=…
HubSpot contact records return lots of fields. properties lets you request only what you need (faster and cleaner). HubSpot documents properties as the query parameter used to choose which properties are returned.
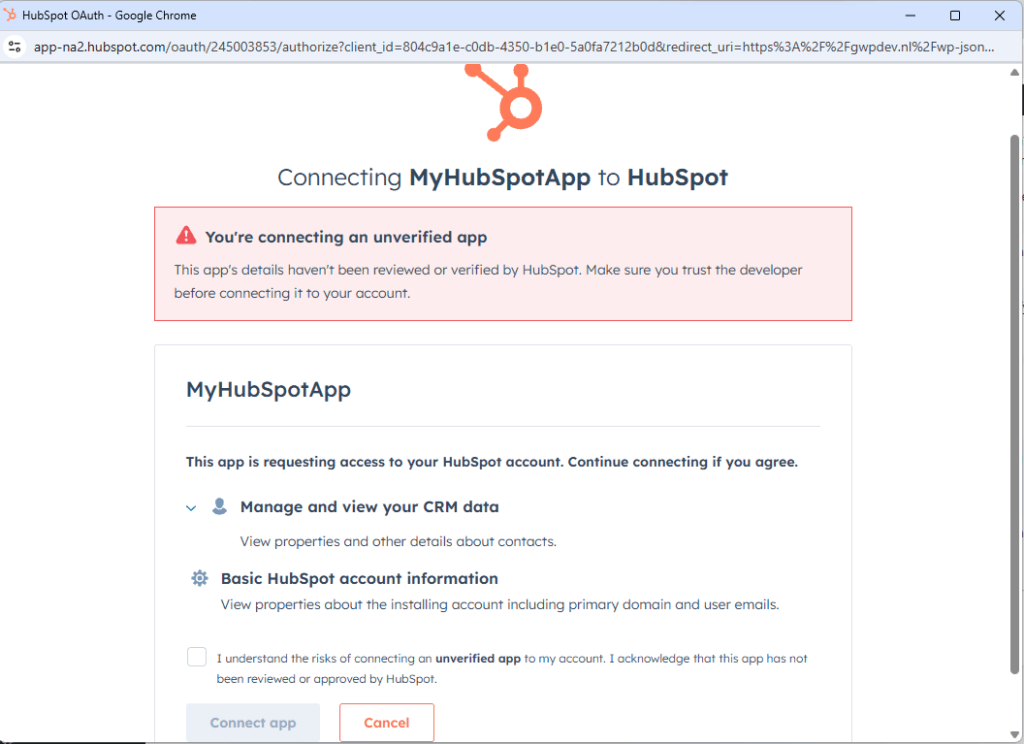
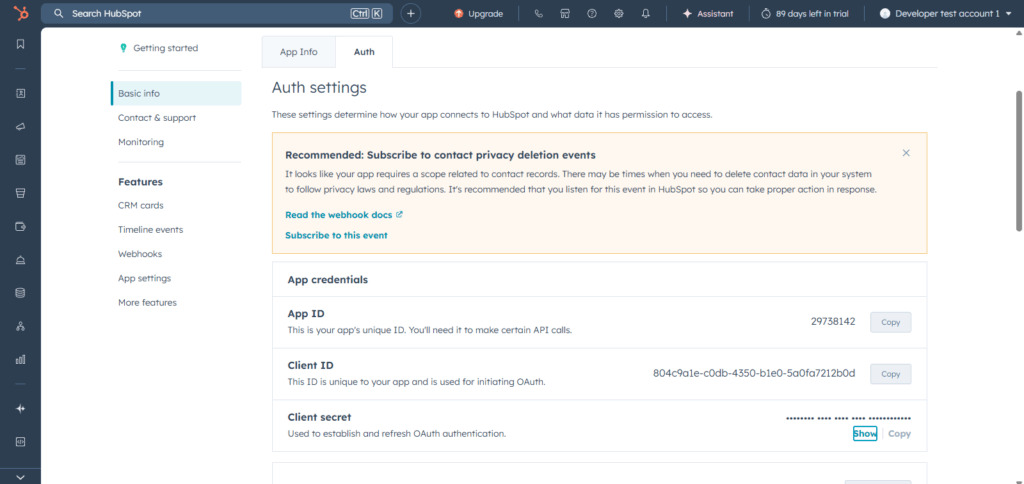
Step 1: Create a HubSpot app for this Gravity Forms HubSpot integration (OAuth)
In HubSpot’s developer app settings, the OAuth setup generates an install/authorize flow. HubSpot’s OAuth quickstart shows the authorization URL pattern and how redirect_uri and scopes are part of that request.
During testing, HubSpot also displays a warning if the app is unverified. That is normal for dev/testing apps.
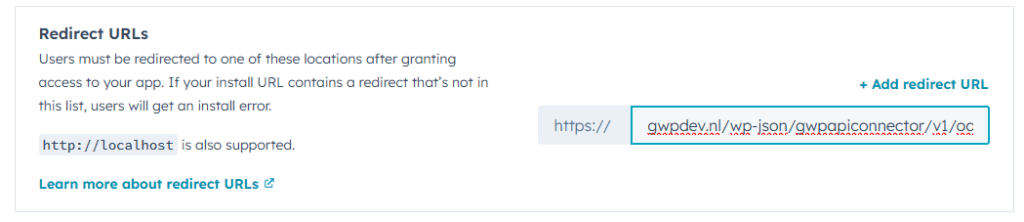
Step 2: Find your GravityWP API Connector redirect URL (Gravity Forms HubSpot integration callback)
Do not guess this URL. Copy it from your setup.
Best practice: Start creating your HubSpot OAuth API configuration inside GravityWP API Connector. The add-on provides the exact callback/redirect URL format your HubSpot app must allow.
If the UI shows only a partial value in HubSpot, expand the field or copy the full value.
Callback format to expect:
https://yourdomain.com/wp-json/gwpapiconnector/v1/oauth/callbackStep 3: Add the redirect URL in HubSpot (Gravity Forms HubSpot integration OAuth)
In HubSpot, go to your app’s OAuth settings and add the redirect URL.
This must match exactly:
- same domain
- same protocol (http vs https)
- same path
- no missing characters
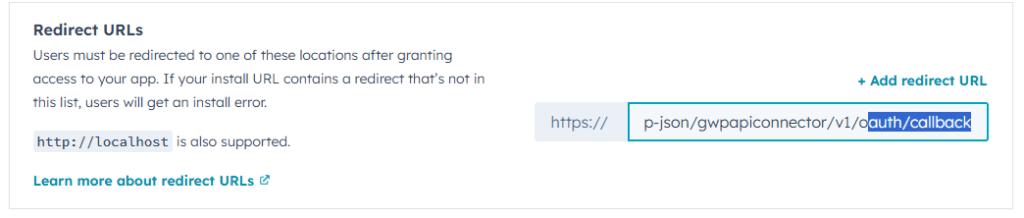
HubSpot’s OAuth flow uses redirect_uri as a required parameter, and redirect mismatch errors happen when the registered URL does not match the request.
Step 4: Add HubSpot scopes for this Gravity Forms HubSpot integration (crm.objects.contacts.read)
For this tutorial, the goal is read-only contact lookup. The key scope is:
- crm.objects.contacts.read
That scope lets the app read contact data for GET lookups.
Step 5: Authorize HubSpot in GravityWP API Connector (Gravity Forms HubSpot integration)
Once the HubSpot app is configured:
- Create the HubSpot OAuth API connection in GravityWP API Connector.
- Click Authorize (or Re-authorize).
- Log in to HubSpot if prompted.
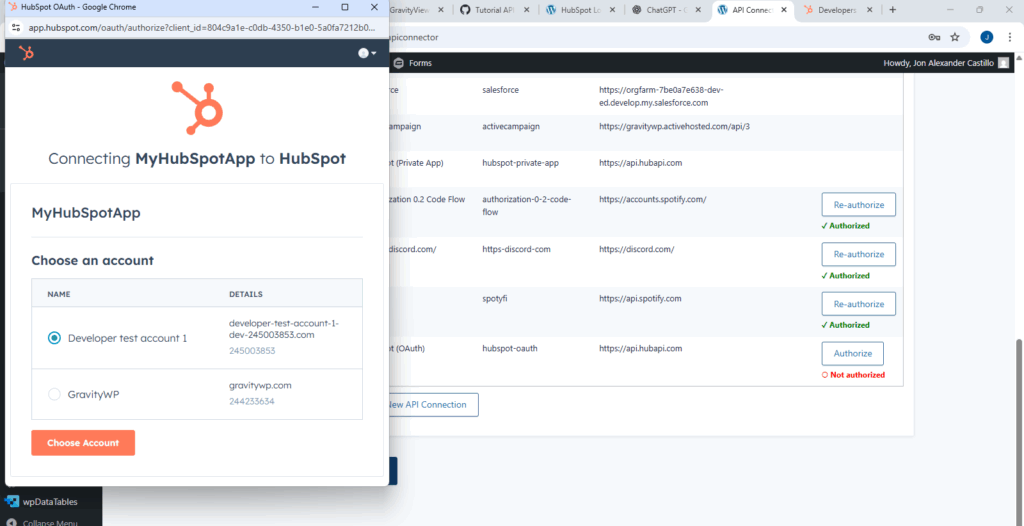
- Approve access.
HubSpot’s OAuth flow uses an authorization step followed by a token exchange step. The token endpoint is /oauth/v1/token.
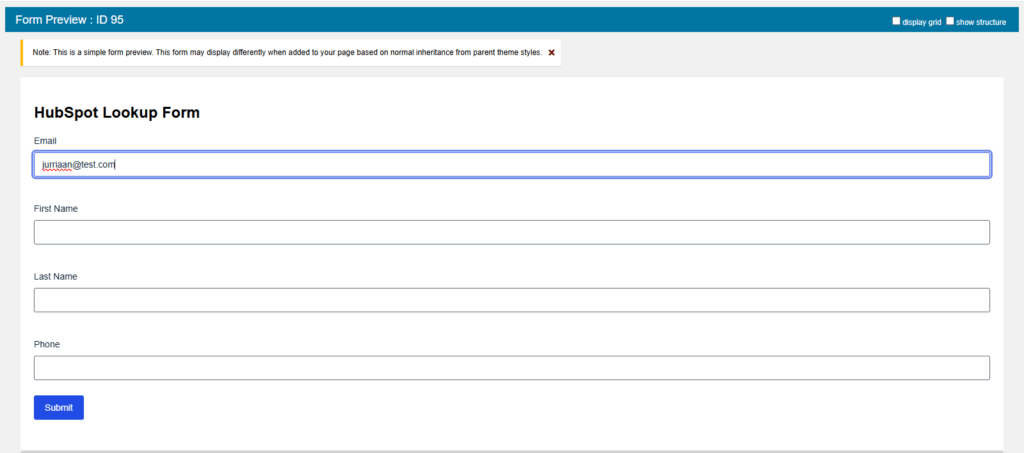
Step 6: Build the form fields for your Gravity Forms HubSpot integration (and confirm field IDs)
Create a form (example: “HubSpot Lookup Form”) with these fields:
- Email (Single Line Text)
- First Name (Single Line Text)
- Last Name (Single Line Text)
- Phone (Single Line Text)
Optional but strongly recommended while testing:
- “Raw JSON” (Paragraph Text or Hidden field) to store the full API response
How to confirm field IDs (important)
Field IDs are not the same on every form.
To check:
- Edit your form in Gravity Forms.
- Click a field (example: Email).
- Look for the field ID in the editor (or use the merge tag picker to insert it).
Why this matters:
- The endpoint uses {Email:ID}.
- If Email is not field 1 on your form, {Email:1} will be wrong.
Example merge tag format:
{First Name:3} means “First Name field, ID 3”
{Email:1} means “Email field, ID 1”
Step 7: Create the GET feed for this Gravity Forms HubSpot integration (lookup by email)
Go to:
Forms → your form → Settings → API Connector → Add New Feed
Set:
Request Method
- GET
Base URL
Use your HubSpot OAuth connection (base URL is HubSpot’s API domain).
Endpoint URL (relative to base URL)
Use this format:
/crm/v3/objects/contacts/{Email:1}
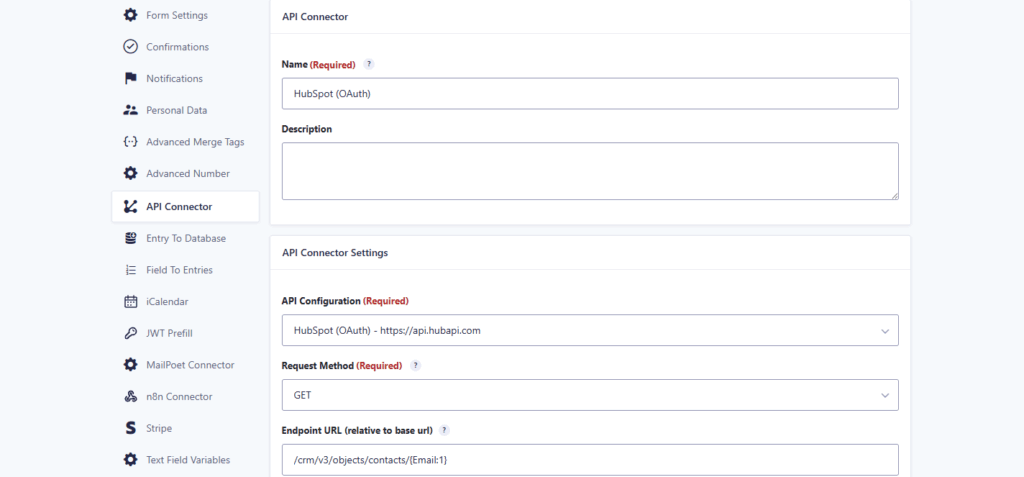
This is HubSpot’s contacts endpoint. HubSpot supports retrieving a contact where the identifier can be email when combined with idProperty=email.
Step 8: Add query string parameters and map the response
Query String (GET)
Add:
1) idProperty
Key:
- idProperty
Value:
- email
What it means:
- HubSpot normally expects a record ID in the URL.
- idProperty=email tells HubSpot to treat the identifier as an email address instead.
2) properties
Key:
- properties
Value:
- email,firstname,lastname,phone,hs_object_id
What it means:
- HubSpot contacts have many fields.
properties asks HubSpot to return only the fields needed for this lookup. HubSpot documents properties as the parameter that controls which properties are returned.
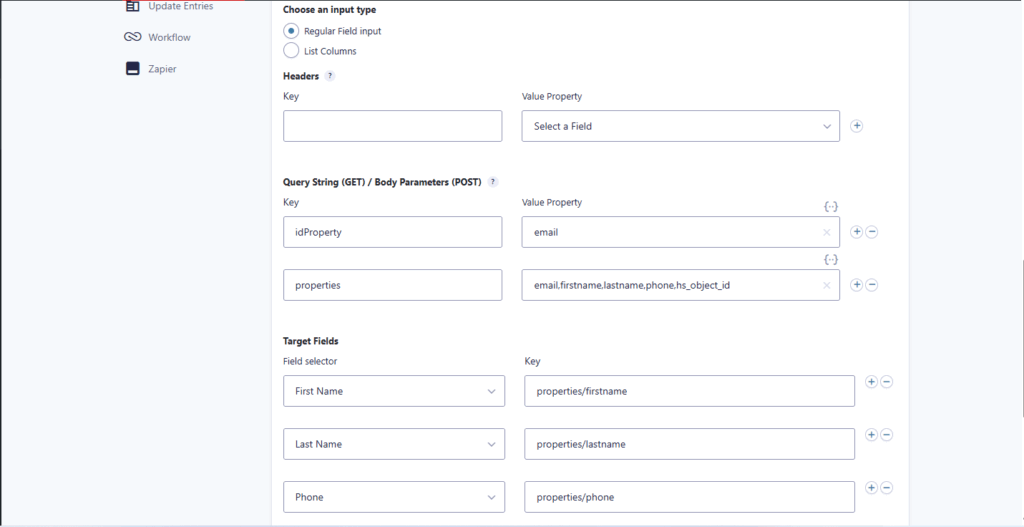
Target Fields (HubSpot response → Gravity Forms fields)
Map these JSON paths:
- First Name → properties/firstname
- Last Name → properties/lastname
- Phone → properties/phone
Why the properties/… path works:
HubSpot’s response groups contact values inside a properties object, so firstname, lastname, and phone are read from that object.
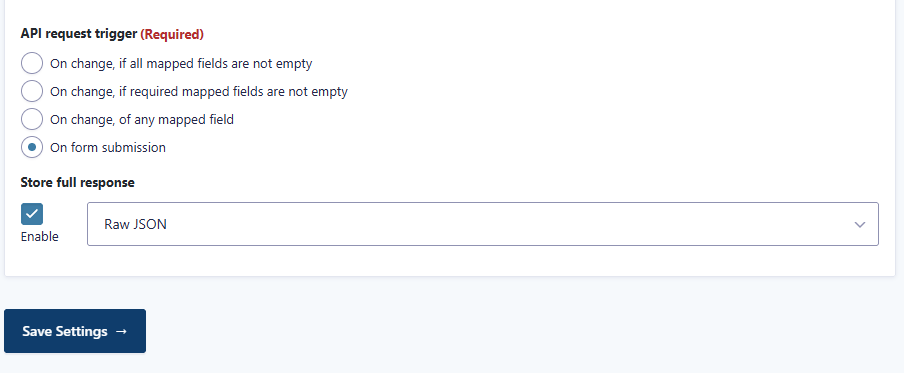
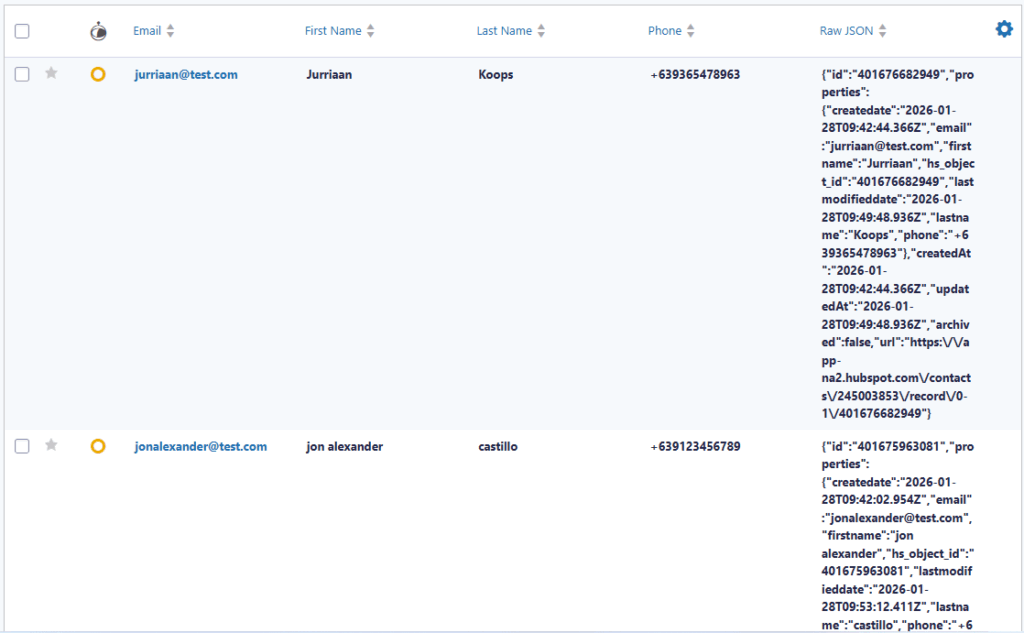
Step 9: Trigger the request and store Raw JSON (for proof and debugging)
API request trigger
In testing, the working setup used:
- On form submission
This means the lookup happens when the form is submitted.
If real-time prefill is needed later, switch the trigger to one of the “On change” options. (Those options exist in the feed UI.)
Store full response (Raw JSON)
Enable:
- Store full response
- Select a field to store it (example: “Raw JSON”)
Why store Raw JSON:
- It proves what HubSpot returned.
It makes troubleshooting easy when a mapping path is wrong.
Step 10: Add a confirmation message to confirm the lookup worked
A confirmation message makes the result obvious, even for non-technical users.
Example confirmation:
{Email:1}
Found contact: {First Name:3} {Last Name:4} – {Phone:5}

Reminder: those IDs must match your form. Use your own field IDs.
At this point, the Gravity Forms HubSpot integration is configured, and testing is about verifying the response and your mappings.
Step 11: Test the integration end-to-end
1) Confirm HubSpot has your test contacts
You need at least one contact that matches the email you will submit.
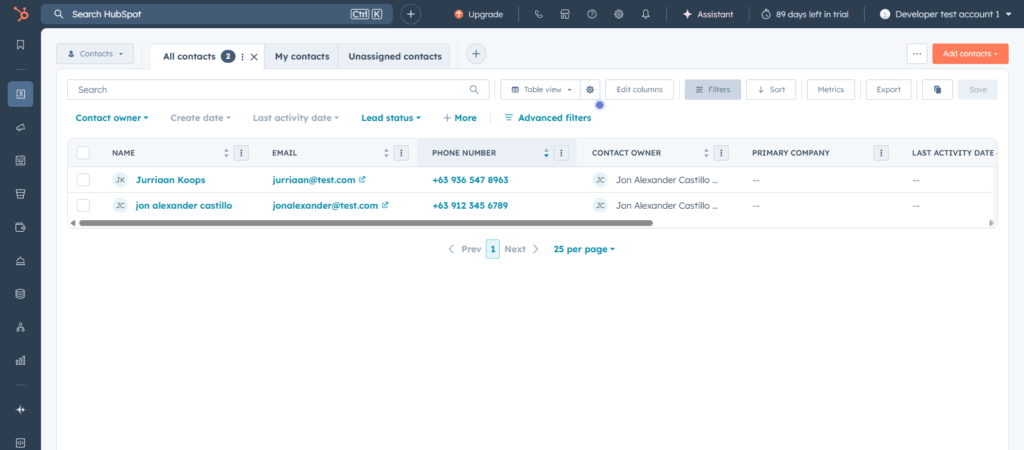
2) Submit the form with a known email
3) Confirm the result on the confirmation screen

4) Verify the Entry and Raw JSON
Troubleshooting (common issues)
“Authorization failed… redirect URL doesn’t match”
Fix:
- Compare your HubSpot app Redirect URL with your API Connector callback URL.
- Make sure it is an exact match (including https vs http). HubSpot’s OAuth flow requires redirect_uri accuracy.
Fields not populating
Check:
- Email exists in HubSpot.
- Field IDs are correct in {Email:ID}.
- Target mappings use the correct path: properties/firstname, properties/lastname, properties/phone.
Raw JSON is empty
Check:
- “Store full response” is enabled.
- The selected storage field exists on the form and is not misconfigured.
Wrong values showing up
Usually this is one of these:
- wrong field IDs
- typo in the properties list
- wrong JSON path mapping
What this Gravity Forms HubSpot integration achieves
With this Gravity Forms HubSpot integration in place, you can reuse the same pattern to auto-fill additional HubSpot properties.
This setup gives a clean, beginner-friendly HubSpot lookup flow:
- OAuth 2.0 authentication (no pasted tokens)
- GET contact lookup by email using idProperty=email
- Controlled data output using properties=…
- Clear field mapping using properties/firstname style paths
- Proof and debugging using Confirmation + Entries + Raw JSON
Gravity Forms HubSpot integration – FAQ
Create a HubSpot app, set the correct Redirect URL (callback), add contact read scope, then authorize HubSpot inside GravityWP API Connector. OAuth uses an authorization step and token exchange step.
It follows this format:
https://yourdomain.com/wp-json/gwpapiconnector/v1/oauth/callback
Your domain is different, but the callback path format stays the same.
HubSpot blocks OAuth if the redirect URL in the app doesn’t exactly match the redirect_uri used during authorization. Fixing this is usually about protocol (http vs https) or a missing path segment.
It tells HubSpot to treat the identifier in the URL as an email address instead of the default internal record ID.
It limits which fields HubSpot returns in the response. This keeps the payload smaller and makes mapping easier.
HubSpot groups returned contact values under a properties object. That is why firstname, lastname, and phone are read from properties/….
The API Connector feed UI includes “On change” trigger options. Switching to those options can run the lookup earlier. The tested setup used “On form submission” for stable verification.
Enable “Store full response” and save the payload into a Raw JSON field. Then confirm it in Entries.
Our Premium add-ons for Gravity Forms

Advanced Number Field
Functionality for Number Fields, like rounding or only absolute numbers, fixed point notation, range calculation, custom units like % or m2 & show as slider.

n8n Connector
Connect Gravity Forms to n8n and automate your workflows with secure, flexible, and powerful webhooks. Go beyond simple notifications and build advanced, two-way automations.
List Text
Add features like textarea, placeholder and custom validation to a column or multiple columns in a Gravity Forms List Field.

Entry to Database
Integrates Gravity Forms with internal or external databases, offering flexible mapping of form fields to database columns and real-time synchronization between entries and database rows.
Read tutorials about

How to Create a Public Submission Business Directory in WordPress (Gravity Forms + GravityView)
Build a moderated business directory where users submit listings through a form, admins approve entries, and approved businesses appear in a searchable GravityView directory.

How to Create an Event Workshop Registration + Waitlist System in WordPress
This guide shows how to set up a workshop registration + waitlist system in WordPress: register attendees until capacity is reached, waitlist the rest, approve entries, and auto-promote people when a seat opens using Gravity Forms, Gravity Flow, and GravityView.

Gravity Flow Form Submission Step Tutorial
The Gravity Flow Form Submission step pauses a workflow until another form is submitted, then continues once the handoff is complete. This guide shows how to connect two forms, prefill fields with mapping, send the correct secure link, and troubleshoot the most common “workflow didn’t move” issues.

Gravity Flow Delete an Entry Step Tutorial
The Gravity Flow Delete Entry step lets you trash or permanently remove Gravity Forms entries as part of a workflow. This guide covers the key settings, scheduling options (delay or date-based), and safe testing tips so you can follow retention and privacy rules with confidence.