Gravity Flow workflow steps turn a Gravity Forms submission into a real process, where entries move through reviews, approvals, notifications, and integrations.
A request gets reviewed by staff, then approved by a manager, then forwarded to a team, then pushed into another system, and sometimes it loops back for changes. That is exactly the gap Gravity Flow fills: it lets you define a workflow that entries follow after submission, using steps and step types built for real business processes.
In this guide, we’ll break down the Gravity Flow step types you asked to cover, explain what each one does, and call out the configuration options that matter in real-world workflows. Step types fall into two big groups: steps that require user interaction (someone must act), and steps that run automatically (the site processes them immediately)
Gravity Flow workflow basics: steps, assignees, and where tasks appear
A workflow is a set of steps attached to a form
Gravity Flow “builds on” Gravity Forms by letting you define what should happen after an entry is created. A workflow is made of steps, and each step has a step type (Approval, User Input, Notification, and so on).
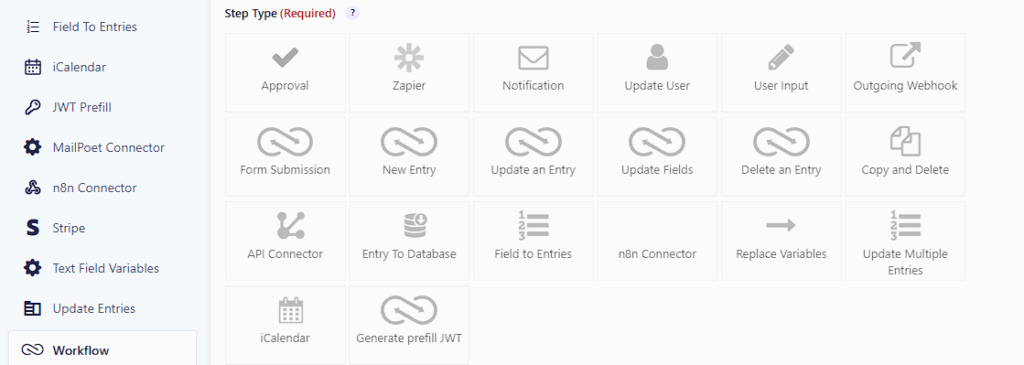
Step types depend on what’s installed
The Step Type dropdown changes based on which plugins and extensions are active. This matters because Gravity Flow extensions (like Form Connector) add their own step types. Also, once you save a step, you cannot change its type later.
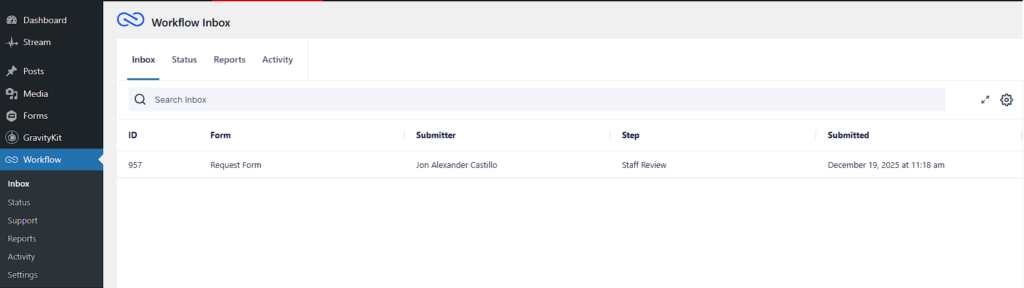
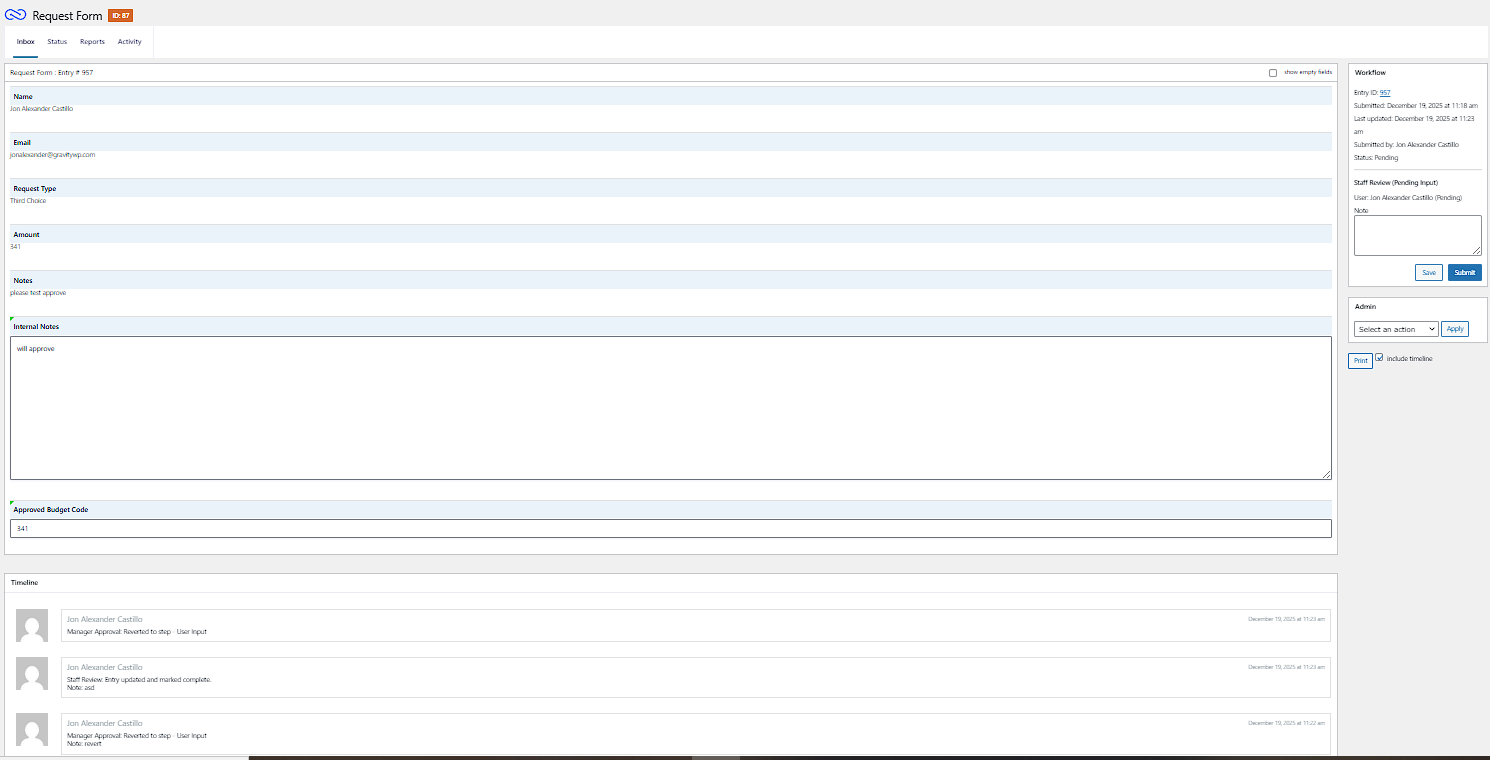
Where tasks show up: Inbox and entry detail
Assignees see their assigned steps in the Gravity Flow Inbox. They can click an entry row to open the entry detail screen, where the step actions appear (Approve/Reject/Revert, Save/Submit, and similar).
If you want the workflow UI on the front end, Gravity Flow supports blocks and the gravityflow shortcode
Gravity Flow workflow step types at a glance
Below is a quick map of the Gravity Flow workflow steps covered in this guide.
User interaction steps (wait for user input)
- User Input: Assignees can update selected fields, then complete the step.
- Approval: Assignees approve or reject (and optionally revert) to drive a decision point.
Non-interactive steps (run automatically)
- Notification: Sends workflow emails using Gravity Forms notifications or workflow-specific notifications.
- Outgoing Webhook: Sends entry data to an external endpoint, and can map response data back into the entry.
Update User: Updates a WordPress user profile, roles, and user meta (with strong permission considerations).
Form Connector extension step types
Form Connector adds step types that let workflows interact across multiple forms on the same site, or across remote sites running the extension.
Once you understand these Gravity Flow workflow steps, building repeatable processes in WordPress becomes much easier.
Gravity flow workflow step: User Input (user interaction)
What it’s for
User Input is the “staff update” step type. It’s designed to capture input after the original submission, while controlling:
- who can act (assignees),
- what they can see (display fields),
- and what they can edit (editable fields).
This is the step type you used in your test workflow to let staff edit internal-only fields after the submitter sent the form.
The settings that matter most:
Assign To (who gets the task)
You can assign the step to specific users, roles, or other supported assignee methods depending on your workflow design.
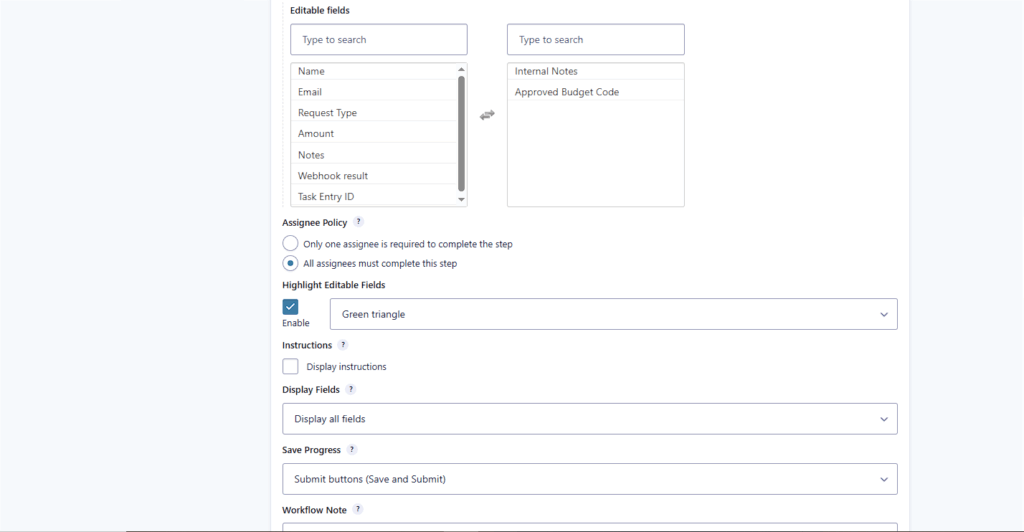
Editable Fields (what they are allowed to change)
This is where Gravity Flow shines in internal processes: the assignee can be allowed to update only selected fields, including fields that were not visible to the original submitter (like administrative fields).
Display Fields (what they can see, but not edit)
Use Display Fields to reduce noise. The best workflows show only what the assignee needs for that step, which also speeds up task completion and reduces mistakes.
Save Progress (the setting you got stuck on)
The User Input step has a Save Progress setting that controls whether the assignee must complete the step in one go or can save and return later. The docs describe this as setting the default status (complete vs in progress).
This matches what you saw in practice:
- Save keeps the step in progress.
- Submit completes the step and moves the entry forward.
Workflow Note (clean audit trail)
Workflow notes are added to the timeline (not stored as a field value). You can make notes optional or required depending on whether the assignee submits complete or in progress.
Emails, reminders, due dates, and expiration
User Input supports assignee notifications and can be paired with reminders, due dates, and expiration so steps do not become bottlenecks.
Gravity flow workflow step: Approval (user interaction)
What it’s for
Approval is a decision step. It asks assignees to approve or reject an entry, creating a clear “fork in the road” in the workflow.
The settings that matter most:
Assign to approvers
Like User Input, Approval steps are assigned to users or roles, and the entry appears in the assignee’s inbox until action is taken.
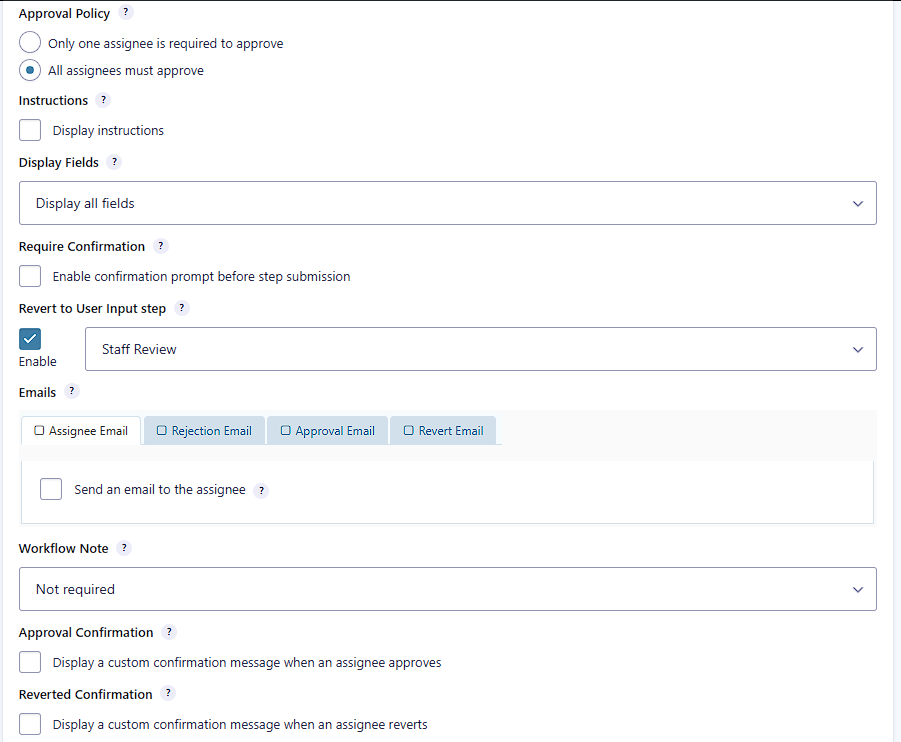
Emails tied to approval outcomes
The Approval configuration guide describes the common pattern: assignee email when the step starts, and different emails for approval vs rejection.
Next step logic (what happens after approve or reject)
By default, rejection can stop the workflow and approval can continue to the next step in the list, but the key is that Approval is intended to route entries based on the outcome.
Revert (loop the entry back)
Approval steps can support revert behavior (this is what you tested successfully). Revert is useful when a manager needs changes before approving, because it sends the entry back to a previous step (often a User Input step).
Notification step type (non-interactive)
What it’s for
Notification steps send workflow emails. You can either:
- trigger existing Gravity Forms notifications, or
- define a workflow-specific notification in the step settings.
This is especially useful when you want emails to be sent at workflow milestones, not only at form submission.
Two ways to configure Notification steps
1) Trigger existing Gravity Forms notifications
Every Gravity Forms notification you created under Settings → Notifications can be selected and triggered when the workflow reaches the Notification step.
2) Build a workflow notification inside the step
Workflow notifications can send to WordPress users or roles (not just email addresses or email fields), and they support conditional routing for recipients.
Event-based workflow notifications (related, but separate)
Gravity Flow also adds workflow events (Approved/Rejected, User Input, Complete, Cancelled) that can be used in the Notifications settings area. This is useful when you want notifications to fire on workflow events rather than only when a Notification step is processed.
Outgoing Webhook step type (non-interactive)
What it’s for
Outgoing Webhook sends an HTTP request to another system. It can send entry data outward and can also receive response data and map it back into the entry. Gravity Flow frames this as “no coding required” as long as you have the endpoint details and any required credentials from the vendor’s API documentation.
The settings that matter most:
Webhook URL and Request Method
You define the endpoint URL and pick the HTTP method (GET, POST, PUT, PATCH, DELETE).
Authentication
Gravity Flow supports authentication options including none, basic, and connected app / OAuth1.
When you need OAuth2 or more complex auth
Outgoing Webhook is great when the endpoint accepts simple authentication and straightforward requests. But some APIs require more advanced authentication like OAuth2, token refresh flows, or custom header logic that goes beyond what you can comfortably manage inside a single webhook step.
In those cases, you can pair Gravity Flow with GravityWP API Connector as the integration layer. Instead of having Gravity Flow talk directly to the third-party API, the workflow can send entry data to an API Connector endpoint, and API Connector handles the advanced auth (including OAuth2) and any request/response shaping. This approach keeps your workflow logic clean while still letting you integrate with stricter APIs.
Response Mapping (save API output back into the entry)
The step supports mapping values from response headers or response body back into fields, so later steps can use those results.
Next steps based on response codes
You can route the workflow depending on whether the response is success (200–299), client error (400–499), server error (500–599), or other.
Update User step type (non-interactive, high impact)
What it’s for
Update User changes WordPress user profile data, roles, and user meta. Because it can affect access levels and personally identifiable information, Gravity Flow recommends using an Approval step before Update User so only authorized updates happen.
The settings that matter most:
Permissions and capability requirement
Adding or updating an Update User step requires the WordPress edit_users capability. In multisite installs, the user is only updated if they belong to the current site.
Choosing which user to update
The docs list multiple ways to pick the user whose profile gets updated, including the form submitter (Created By) and the current logged-in user when the step runs.
What can be updated
The step supports updating:
- profile data,
- roles,
- and user meta
Form Connector workflow steps for multi-form automation
What the extension adds
Form Connector lets Gravity Flow workflows interact across multiple forms on the same site or on remote sites running Gravity Flow. It’s designed for processes that span multiple stages or teams without manual data transfer.
Create An Entry (Form Connector)
Creates a brand-new entry in a target form using field mapping from the current entry. When the step runs, the mapped values are used to create the new entry.
Best use cases:
- After an approval, create a task in a separate “Task Tracker” form.
- Split a long process into smaller forms owned by different teams.
Update An Entry (Form Connector)
Updates an existing entry in another form, and can also complete Approval or User Input steps for that target entry. It relies on an Entry ID field to locate the target entry.
Key detail:
- If the target form is the same as the source form, “Entry ID (Self)” can be used, which makes “update this entry later in the workflow” much easier.
A powerful pattern: find a customer record, then update it automatically
Update an Entry becomes especially useful when you combine it with Update Fields.
Here’s a practical example many businesses need: updating a Customer record form based on a new submission.
- Use Update Fields to find the matching Customer entry
In your workflow, configure Update Fields to search your “Customers” form for an entry where the email address matches the current submission’s email (using conditional logic lookup). Update Fields can pull values from the first matched entry and map them into the current entry, including the matched customer’s Entry ID. - Store the matched customer Entry ID in the current entry
Save that ID into a hidden/admin field like “Matched Customer Entry ID.” Now your current entry has a reliable pointer to the Customer record. - Use Update an Entry to update the Customer record
Configure Update an Entry with:
- Target form: Customers
- Entry ID field: “Matched Customer Entry ID”
- Field mappings: map new values from the current entry into the Customer entry (for example, updated phone number, company name, preferences, or latest request details).
- Target form: Customers
This turns Gravity Flow into a lightweight “mini-CRM sync” system: the workflow can look up a record, keep the link between entries, and then update the right record automatically without anyone copying data between forms.
Update Fields (Form Connector)
Updates fields of the current entry using values from another entry or custom values. It supports:
- selecting a source site (this site or different site),
- finding a source entry via conditional logic (filters + sort, first result used),
- or selecting a field that contains the source entry ID,
then mapping values into the current entry.
It also supports “Add Custom Value” using a hard-coded value or a merge tag.
Delete An Entry (Form Connector)
Deletes or trashes an entry at any point in a workflow, on the current site or a different site. It can also be scheduled for later execution (for example, deleting entries weeks after a step is triggered).
This is often used for data retention and privacy policies where personal data must not be stored longer than necessary.
Form Submission (Form Connector)
Form Submission is a step that waits for a different form to be submitted before the workflow can continue. The Form Connector docs describe it as a feature of the extension that adds a “wait for submission” step type.
This is useful when:
- a second form is completed by a different team,
- the workflow should pause until that second form arrives,
- or you want a “two-form handshake” style process.
Common step settings that apply across step types
Even though each step type has its own unique settings, Gravity Flow also has common step settings that shape how steps behave in real workflows. Two that come up constantly in production workflows are:
- Condition and branching: Use conditions to skip steps or route to later steps.
- Schedule, due dates, and expiration: Steps can start later, have deadlines, and expire so workflows do not stall.
If you only remember one thing: step types define what happens, and common step settings define when and under what rules it happens.
Troubleshooting note (based on what you ran into)
If someone submits the form and “nothing appears,” the Inbox will only show entries that currently have workflow steps assigned to the logged-in user. That means you typically need:
- a user-interaction step assigned to that user or their role, and
- the entry to actually be sitting on that step.
Closing
Gravity Flow step types are the real power lever: Approval and User Input give you controlled human decision-making, and Notification, Outgoing Webhook, and Update User automate what usually becomes admin busywork. If you add Form Connector, you can stretch workflows across multiple forms (and even sites) without copying data around.
If you want, paste your current draft intro and headings (even rough), and I’ll align this into your exact GravityWP formatting style (header hierarchy, internal links, and screenshot placement density) without adding fluff.
Our Premium add-ons for Gravity Forms

Update Multiple Entries
Trigger the update of multiple entries in a target form by submitting an entry in a trigger form.
List Text
Add features like textarea, placeholder and custom validation to a column or multiple columns in a Gravity Forms List Field.

n8n Connector
Connect Gravity Forms to n8n and automate your workflows with secure, flexible, and powerful webhooks. Go beyond simple notifications and build advanced, two-way automations.

Entry to Database
Integrates Gravity Forms with internal or external databases, offering flexible mapping of form fields to database columns and real-time synchronization between entries and database rows.
Read tutorials about

How to Create a Public Submission Business Directory in WordPress (Gravity Forms + GravityView)
Build a moderated business directory where users submit listings through a form, admins approve entries, and approved businesses appear in a searchable GravityView directory.

How to Create an Event Workshop Registration + Waitlist System in WordPress
This guide shows how to set up a workshop registration + waitlist system in WordPress: register attendees until capacity is reached, waitlist the rest, approve entries, and auto-promote people when a seat opens using Gravity Forms, Gravity Flow, and GravityView.

Gravity Flow Form Submission Step Tutorial
The Gravity Flow Form Submission step pauses a workflow until another form is submitted, then continues once the handoff is complete. This guide shows how to connect two forms, prefill fields with mapping, send the correct secure link, and troubleshoot the most common “workflow didn’t move” issues.

Gravity Flow Delete an Entry Step Tutorial
The Gravity Flow Delete Entry step lets you trash or permanently remove Gravity Forms entries as part of a workflow. This guide covers the key settings, scheduling options (delay or date-based), and safe testing tips so you can follow retention and privacy rules with confidence.
